There are a huge number of varieties of ceiling plinths that are used in finishing work. Some types can be attached over wallpaper, paint, putty, plaster and other types of coatings in order to hide unevenness and defects in joints. Other varieties are glued exclusively before finishing the walls.
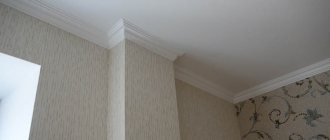
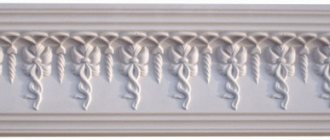
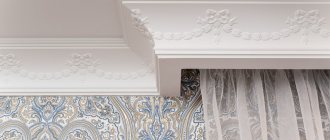
The ceiling plinth serves as a decorative and aesthetically attractive element. The most popular variety is plastic edging, which, with skillful actions, can be disguised as polyurethane or plaster. Therefore, it is better to familiarize yourself with how to glue foam ceiling plinths in advance. It is especially worth learning about the rules for working with corners in a room.
Foam skirting boards are made from extruded polystyrene foam, which is lightweight and low in cost. Thanks to the structure of the material, you can easily create skirting boards that vary in appearance. How to properly glue foam ceiling plinths and not make a mistake in choosing the appropriate adhesive will be described in this article.
Step-by-step instruction
It is best to glue the ceiling plinth using one of two existing technologies:
- The first technology involves the use of glue. It is also considered the simplest and most standard. Many craftsmen choose Moment Installation glue for foam ceiling skirting boards, as it even allows them to mask and remove minor irregularities and defects.
Advice! If there are large differences, it is better to use putty to level the areas.
- The second option involves using putty in the work. But, since only experienced craftsmen and professionals can glue ceiling plinths onto putty, beginners should not choose it for work. The baseboard is attached to the uncured consumable material before the walls are finished with wallpaper. In the future, you need to select the size of the wallpaper sheets, taking into account the height not to the ceiling, but to the cornice.
To decide what is best to glue the ceiling plinth to, you should familiarize yourself with all the existing types of adhesive mixtures.
Features and advantages of foam plastic ceiling plinth
The basis of the product is extruded polystyrene foam. The material allows you to create lightweight products with different textures.
The main advantages of lamellas:
- Aesthetic appeal. Moldings look beautiful and bring a certain chic to the interior.
- Budgeting. The price of the parts is affordable for any buyer.
- Ease of installation. Light weight and ease of fastening allow you to do all the finishing work yourself.
Despite the fact that foam plastic is inferior to other materials in strength, moldings have a number of undeniable advantages:
- Versatility. Polystyrene foam mounts well on any base and will hide wall unevenness.
- Long service life. In rooms with normal temperatures, a foam fillet will last for decades.
- Immune to moisture. Foam plastic tolerates changes in humidity well, which cannot be said about many other materials.
Extruded polystyrene foam, from which the slats are made, is not a breeding ground for biological life forms, so the moldings can be installed in bathrooms, kitchens and other utility rooms. In addition, the material is undemanding in care; the main thing is not to use abrasives, but a damp cloth will do just fine.
Important! Foam plastic is fragile, so the decorative element should not be subjected to mechanical stress.
Polymer mixtures
The polymer mixture is the adhesive that is intended for gluing foam skirting boards to the ceiling. The most popular brands remain: “Eco-naset”, “Moment”. The adhesives in this group have excellent astringent properties and provide reliable fastening. Their strength is enough to withstand both foam baseboards and wooden types.
All mixtures belonging to this category can be divided into two more subgroups:
- Those that instantly glue baguettes to the base.
- Gradually hardening.
The first group includes Moment glue, which takes a few seconds to set. In this short period of time, you need to install the ceiling plinth level and secure it motionless for a few seconds. But the Moment product contains toxic ethyl cyanoacrylate, which can be destructive to the skin or cause allergies. Therefore, craftsmen must provide themselves with reliable protection. During work, carry out operations wearing gloves and safety glasses.
Products that allow you to stick polystyrene foam or polystyrene foam to a wall or ceiling under the brands “Titan” and “Eco-naset” are less dangerous to humans and dry slowly. Therefore, the plinth must not only be glued in the correct position, but also held motionless for several minutes. Because of this, work slows down significantly and tires the person much more.
If we compare the pricing policy of two categories of adhesive compositions, then “Moment” will have a price that is an order of magnitude higher than “Titan” and “Eco-naset”.
Polyvinyl acetate glue, which includes PVA and similar products, does not contain harmful substances or components that cause a characteristic odor. It also takes a certain period of time to harden. Therefore, after gluing the ceiling plinths to the wall, you need to keep them in a stationary position for 2-3 minutes.
Polyvinyl acetate adhesive has a high consumption, as it is applied in significant quantities to the surface of the material for optimal bonding of surfaces.
Experts and professionals have still not come to a consensus on how to choose the appropriate composition for gluing ceiling skirting boards to the surface. In each specific case, you need to choose the appropriate substance. If you know about the features and characteristics of each type of glue, then the work of gluing panels to the ceiling will go smoothly and without problems.
Note! To glue foam skirting boards to a wall or ceiling, it is not important to look for any specific glue. A significant proportion of existing species release harmful toxins into the air, especially polymeric species. Therefore, it is necessary to ensure optimal air circulation in the room or premises so that toxins do not provoke headaches, weakness or deterioration in well-being.
Instructions for gluing foam baseboards
In reality, gluing skirting boards is not such a complicated process. Even a beginner can do this. The main thing is to ensure that the fixed elements are installed evenly and firmly. Foam baguettes are easy to bend, cut and are easy to paint. All this makes their installation as simple as possible.
Preparation before installing the ceiling plinth is carried out in the following sequence:
- First, the walls and ceiling are puttied and primed.
- Appropriate markings are made on the walls strictly horizontally.
- Now the plastic baseboard is being prepared. To do this, measure the length of the walls, and, based on these dimensions, cut the strips. Cuts are made from the required sides at an angle of 45°.
- At the final stage, the correctness of the angles is checked.
The success of all subsequent work will depend on how well the preparatory stage is completed.
It is recommended to buy one extra plinth, especially if this is your first time doing such work. You will need it if you damage any of the pieces of molding.
Once all the baseboards and glue are prepared, you can begin installing them. Glue is applied to the foam planks on the inside and pressed in accordance with the previously made markings throughout the room. There is nothing complicated about this, the main thing here is to cut the corners correctly in the right places. After all, in order to avoid an overlay and create a beautiful 90-degree joint, the skirting boards being joined must be cut exactly at an angle of 45 degrees. In this case, the joined planks will be cut in different directions.
To make a beautiful cut, you need to use a miter box. It is a special tool that makes it possible to cut the workpieces inserted into it at different angles. Therefore, we simply put our foam plinth inside the miter box and cut it according to the desired template.
Adhesive gluing technology
Main stages:
- The ceiling plinth is attached from any convenient corner of the room in two directions at once.
2. To join the edges of the plinth in the corners, you need to cut them at an angle of 45 degrees.
3. The glue is applied in a dotted manner to the back side of the baguette, but not in a continuous line, so that it does not go beyond the boundaries after being pressed to the base and does not stain the already pasted wallpaper or other finishing.
4. The decor of the baseboard needs to be glued to the wall, and then they need to be torn off with sharp but light movements, the more carefully, the better. This will help remove excess adhesive that leaves messy and attractive marks on your wall or ceiling trim.
5. While the first plinth is drying, you need to carry out similar actions with the second. Then return to the first one again, fix it to the ceiling while the glue is still in a viscous state.
6. After the first baguette is finally secured, the same is done with the second and so on.
Note! The plinth for the foam plastic ceiling must be glued with special care; you should not press it with force, especially against uneven walls. Otherwise, it may bend, and excess glue from the inside will begin to appear along the edges on the walls and ceiling.
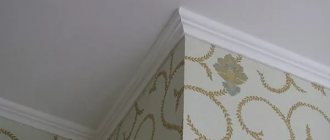
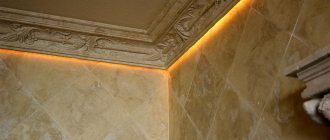
Is it possible to glue skirting boards to a suspended ceiling?
Installation of a ceiling molding is the final stage of work on installing a stretch ceiling in a room. It will close the visible technological gap between the canvas and the wall. However, gluing the plinth to the tension fabric material is strictly prohibited.
When the glue hardens, it changes its volume and this can lead to the formation of wrinkles on the surface of the canvas, or even to its mechanical damage. When decorating suspended ceilings, the fillet should be attached only to the wall surface and located at a distance of 2-4 mm from the ceiling plane. How to do this - see here.
Liquid Nails
Liquid nails are a good type of glue and a good alternative to real metal fasteners. They appeared on the construction market not so long ago, but very quickly gained popularity. This material is valued for its versatility, the ability to work with various finishing and other materials. Therefore, liquid nails are also used to fasten ceiling plinths. The baguettes glued to them receive high-quality, reliable and long-term bonding to the base.
There are 2 types of liquid nails:
- Neopropylene, which are made from organic solvents, have a sharp, characteristic aroma. This composition is harmful to humans, as it has toxic fumes after hardening. Therefore, you need to work with such compounds only in a room where excellent ventilation is provided. Compared to the second acrylic-based variety, these substances are not so important to the environmental conditions in the room. That is, they do not respond to low temperatures or significant humidity.
- Acrylic substances do not have an unpleasant aroma, are water-based, and therefore do not harm human health. The structure of these compounds will be destroyed if repair work is carried out in a room with a low air temperature. Acrylic liquid nails should not be chosen if you need to work with heavy materials. They are not able to withstand a lot of weight. Therefore, we glue the foam plinth onto them calmly and without fear. This is not propylene material, which is much heavier.
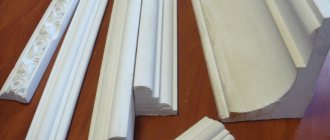
Types of skirting boards and choice of glue
You need to select a product depending on the material from which the baseboard is made. Some adhesives can destroy the structure of the product and are not suitable for the job. You can find different types of borders in stores, the main ones are described below along with recommendations for choosing glue.
Polystyrene and foam
These skirting boards are the most inexpensive and practical, widespread, sold in every hardware and hardware store. They can be painted - the appearance will be no less attractive than plaster ones. We sell regular skirting boards, two-level cornices, fillets (plinths with a groove). Even if you have no experience in repairs, foam and polystyrene borders can be glued to the wall; the process is simple.
Many people are interested in what is glued first - the wallpaper or the baseboard first? Foam elements can be glued directly to the wallpaper; the reverse procedure is less convenient. Due to their low weight, the skirting boards will stick to any glue, but their fragility must be taken into account. You need to cut carefully, then coat it with two strips of glue. Using acrylic putty will be effective. The gaps between the planks and the ceiling can be sealed with a gypsum finishing mixture to which a little PVA glue has been added. The joints are sealed with white sealant.
Polyurethane and plastic
Polyurethane is a flexible material that is resistant to wear and temperature changes. Typically, polyurethane skirting boards are purchased for those areas where there are a large number of corners, bends, and recesses of different sizes and shapes. They are especially relevant for rooms with columns, they go well with a suspended ceiling, and are successfully glued to a suspended ceiling.
When choosing glue, you need to take into account that such skirting boards can shrink during use. The joints are made as tight as possible; any gaps, even small ones, are filled with silicone sealant. They use reliable glue - “liquid nails”, “Moment”, “Titan”. Be sure to coat the ends of the baseboards with glue; it is advisable to buy a special product for the latter.
Plastic plinths usually come complete with corners - external, internal, connecting strips. It must be glued with “liquid nails” or other glue with high adhesion to the surface.
Plaster and wood
Wooden skirting boards are used less frequently than others; they require professional skills and very reliable glue. Basically, they are purchased for apartments and houses with a classic interior; they are not recommended for high humidity. Lighter models are glued with “liquid nails”, and heavy baseboards are additionally drilled with self-tapping screws.
Gypsum cornice is very durable and has an excellent safety margin. They even sell molds for self-molding parts, which come with a dry mass. For reliable gluing, use a mixture of alabaster with PVA or other polyvinyl acetate glue. More massive structures are also coated with “liquid nails”.
Pasting on putty
Note! Putty is a universal composition that is used as the main material for attaching ceiling plinths. Gluing foam plastic onto putty is very easy and convenient; there is no need to select special environmental temperature conditions.
Thanks to the putty, you don’t need to spend a lot of time fixing the cornice for several minutes for the adhesive to completely harden. Putty is used for leveling walls and ceilings, covering cracks and cracks, as well as openings between the baseboard and the ceiling. Putty is also indispensable when carrying out other types of repair work. For example, it allows you to perfectly level the surface for further application of white paint or a wall for wallpapering, and much more. Thanks to putty, you can significantly save on the purchase and consumption of other building materials.
It is convenient to apply the putty evenly with a construction spatula. After the layer is applied to the size of the plinth, this material is fixed to the wall with light pressure. If the substance goes beyond its limits, then the excess is removed with the same spatula and all the cracks between the walls and the baguette are immediately covered.
Note! Putty is the material that can be used to glue the baseboard before finishing the walls with tiles or wallpaper.
Each of the three listed materials has both pros and cons, but all of them have been tested for suitability, are of high quality and proven.
Putty for gluing
Putty is often used by professional builders. However, this material is also quite suitable for DIY work. Conveniently, there is no need to comply with temperature conditions. The glued plinth will remain in place for quite a long time.
Putty can perform several tasks at once:
- The material is convenient to use for leveling the working surface, that is, the one on which the plinth is glued.
- The putty will perfectly close the cracks.
How to install a foam fillet when using this material? An even, not very thick layer of putty is applied to the wall surface with a spatula. A plinth is placed on top and lightly pressed down. You can use the excess to seal the cracks.
Problems during operation
There are situations when it is simply impossible to glue the ceiling plinth, and the reasons seem inexplicable.
In fact, the following options are possible:
- The working base was not prepared for pasting, that is, it was not cleaned of moisture or dust or dirt. If the baseboard does not stick to bare walls, you must first apply a layer of primer to them.
- The glue may not set only if a long-drying substance was chosen for the work. For it to set, you need to apply it to the baseboard, leave it to harden for a while, and then just stick the material on. Or attach the plinth to the ceiling and hold it motionless for 2-3 minutes.
- The wrong type of glue was selected. For example, you should not try to glue a foam baseboard onto PVA, which is designed to work with paper. For repair work, you need to choose specialized types of glue.
- Exposure to drafts can also negatively affect the final result. If you glue a plinth to the ceiling in a room where there is too much ventilation, the material may dry out and not have time to set properly. If this is not immediately noticeable, then the next day all the decorative trim will lie on the floor.
Each craftsman can decide which glue to use to glue foam ceiling plinths on his own. At the same time, he does not need to take into account the peculiarities of the material, since it is compatible with almost any type of glue. But the adhesive can be selected based on various parameters: drying speed, packaging cost, consumption and others.
How to properly glue foam ceiling plinths (2 videos)
Gluing the foam plastic ceiling plinth (23 photos)
How to make baseboard glue at home?
Some craftsmen have much more confidence in the adhesive mixture they prepare themselves than in the purchased one. In addition, this helps not only to save on the purchase of material, but also to create a truly high-quality composition that will definitely not let you down.
Glue for moldings is quite easy to make with your own hands. Before proceeding to the manufacture of an adhesive composition suitable for gluing the overlay, prepare all the necessary equipment. We advise you to keep them on hand so as not to waste time looking for them.
So, we will need:
- finishing putty;
- ordinary PVA glue;
- pure water;
- deep reservoir;
- object for mixing the adhesive mass.
Work algorithm
Let's move on to mixing the glue. Step-by-step instructions will allow you to quickly and efficiently cope with the task:
- Pour finishing putty into the tank.
- Pour glue into the same container. We recommend using about four equal parts of putty for one part of the adhesive mass. Mix the ingredients thoroughly and pour water into the reservoir.
- Prepare the solution by mixing it until its structure begins to resemble sour cream.
- We infuse the homemade glue for the panels for about ten minutes, after which we diligently stir the mass in the container again.
When mixing the mixture, it is important to ensure that no foreign matter gets into it. Also, try to avoid creating lumps. Such factors will extremely negatively affect the quality of the connection of materials. For this reason, the structure of the composition should be as clean and uniform as possible.
Once these tasks are completed, you can proceed to gluing the foam baguette. Do the work within the next two hours after preparing the adhesive mixture. Indeed, over time, the adhesive properties of the material deteriorate significantly, after which it becomes completely unsuitable for use.
How many skirting boards are needed?
To buy the right amount of material at once, you should measure the perimeter of the room. To make it easier to understand this issue, it is worth studying an example: the room has a size of 2 * 6, the area will be 12 square meters, and the perimeter will be 11. Usually the size of plastic skirting boards is 2 meters, which means you will need to purchase 6 pieces.
The choice of baguette width is made based on the ceiling height; in high rooms, wider options can be used.
To buy the right amount of material at once, you should measure the perimeter of the room.
Tools and materials for work
To properly glue skirting boards, you need to have more than just glue. Here is a list of what you will need for work:
- paint brush;
- water tank;
- plastic molding;
- hacksaw for metal;
- scissors or stationery knife;
- ladder;
- tape measure, marker, level;
- miter box for cutting at an angle of 45 degrees.
Most common mistakes
Glue putty for ceiling plinths is considered quite difficult to handle. It is especially difficult for beginners who have no experience working with this material. Often the baseboard simply cannot be glued, and sometimes it begins to peel off after just a few days.
We suggest you familiarize yourself with some factors that you need to pay special attention to:
- Don't forget to clean your work surface. There should be no dust or moisture on it. It is recommended to work with gloves so as not to stain the pad itself. If you are working with bare walls, then a primer should be your salvation from contamination.
- Consider the individual characteristics of the adhesive. While some of them can set within a few seconds, formulations with a low degree of adhesion will take longer. We advise you to always press the baseboard against the wall for about two or three minutes.
- If the components of the adhesive mixture contain a solvent, then it cannot be used for a polystyrene foam product. Therefore, read the label before purchasing the product.
- Eliminate drafts. Do not ventilate the room too actively. Because of this, the composition can dry out much faster. Then you will not have time to adjust the level of the glued moldings, and all the work will be ruined.