The final stage of renovation is the most important in aesthetic terms, because its task is to emphasize the chosen style and express the good taste of the owner of the house. Wallpaper, paint, furniture, fittings and, of course, ceiling moldings - they need to be chosen wisely. The latter will be discussed in the article. How to choose a ceiling plinth
to make the interior look beautiful and harmonious?
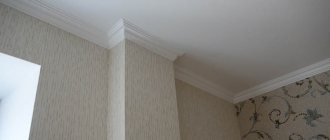
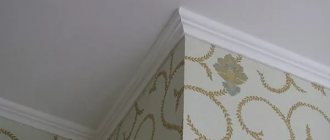
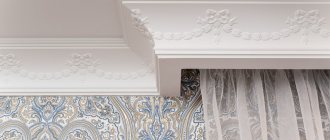
It is no secret that walls often have defects in the form of unevenness, roughness and distortions. The borders between the ceiling and the wall help to disguise these imperfections, giving the environment an ideal appearance. They hide the gaps between the wallpaper and also play a decorative role, emphasizing the chosen interior style and giving it a complete look.
What do designers call it?
If you decide to buy a ceiling plinth, then be prepared to see it also under other names. For example, fillets are a word that is often used among professionals in this industry. It came to us from the German language and translated means “groove”, “notch”. You can also find the name “ceiling cornice”. But if, speaking of cornices, we imagine a window, then here it is nothing more than an element separating the wall from the ceiling.
Moldings are another variation of the name. Essentially, these are the same decorative strips, only with a wider scope of application. They can be used not only at the “wall-ceiling” junction, but also, for example, to create a fancy pattern above your head.
They are also called borders, but in this case they most often talk about a contrasting strip that performs the function of separating two textures that are dissimilar or differ in color. Whereas the fillet can blend in shade with the base and stand out only by its relief.
Finally, there are also names such as baguette or frieze. With the exception of some nuances, this is essentially the same subject. True, there are a huge variety of them: in color, shape and type of manufacture. At the last point, it is worth dwelling in detail and telling you what materials these decorative elements are made from.
Purpose of ceiling plinths
The ceilings and walls in the apartments are not perfectly smooth, especially at the joints. Problem areas are covered with baguettes and the curvature is not so noticeable, and the design of the room turns out beautiful and complete. Communications are hidden in some skirting boards, so the wires don’t spoil the view.
Galleys change the impression of a room. Decorative elements can visually lift or expand a room, complement the style and sometimes become an accent in the design.
Styrofoam
This option is the most economical and will allow you to complete the repairs with the lowest financial costs. Foam bumpers are easy to process, lightweight, and come in a wide range of sizes and styles. True, they also have disadvantages: fragility, low mechanical strength, low fire safety. So if you want to do the job efficiently and soundly, it’s hardly worth buying polystyrene foam.
Polyurethane
The next candidate on the list is a polyurethane frieze. Rubber is used in its production, which gives the finished product flexibility and the ability to take any shape. If you have a complex architecture, a lot of curves and rounded lines, then polyurethane stucco molding is perfect.
Additional advantages of this raw material include moisture resistance, hygroscopicity and immunity to temperature changes. Polyurethane fillets can be used even in bathrooms and other rooms with high humidity - this will not affect their service life in any way. True, they are more expensive in price than their analogues made of polystyrene foam and polystyrene.
Instructions for working with ceiling plinths
First of all, you need to purchase the material. To do this, you need to calculate how much it will be needed. To do this, you need to measure the perimeter of the room. Be careful with corners, protrusions and curves.
The resulting amount is divided by the length of the baseboard. Typically, skirting boards have a length of one and a half to two meters. It is advisable to purchase an additional bar just in case.
Wood
Despite the fact that today there are many products made from polymer raw materials, wood plinths are still very popular. Lovers of natural wood are not deterred even by the relatively high price. After all, this is a truly high-class product, natural and environmentally friendly. This is especially true for expensive elite varieties of wood - oak, beech, mahogany. But pine and veneer also have many fans. All thanks to strength, durability and aesthetics. Wooden moldings are resistant to mechanical stress, easy to clean and last a long time. True, like any natural raw material, wood is subject to temporary changes and is afraid of mold, mildew and insects - therefore, before installation, it is necessary to treat it with an antiseptic and varnish it.
Gypsum
Among other materials from which cornices are made, gypsum stands out especially. It has unique properties and can turn an ordinary room into a real designer masterpiece. Since ancient times, rich houses have been decorated with stucco decorations made of plaster to emphasize the high social status of their owners. Nowadays, it also serves as a decoration, giving the atmosphere a touch of aristocracy and an atmosphere of timeless classics.
Gypsum fillets have excellent performance properties. They are easy to install and flexible to process, allowing you to create an individual design that will not be found anywhere else. Additional advantages are environmental friendliness, durability, excellent repairability, immunity to high humidity and temperature changes. The ability to easily withstand changes in humidity is a truly unique property of gypsum. In a humid room, it absorbs excess moisture and then releases it into the air, without reducing its performance properties.
Gypsum skirting boards are easily connected to each other, and the joints are masked almost imperceptibly, using ordinary putty. In case of chipping or damage, this can be easily fixed using, again, a putty mixture. You can buy a gypsum plinth ready-made, or you can make it to order, according to individual sizes. The latter option allows you to get an exclusive result that is ideal for your design project and furnishing style. By the way, you can place an order for gypsum products in our workshop - we will produce them according to your wishes, and the result will exceed all expectations.
You can install gypsum cornices yourself, without the help of specialists. To do this, you do not need special tools and devices - the products are attached to an adhesive solution and only if necessary (for example, if they are heavy) are secured with self-tapping screws. But if you want to get a truly neat and beautiful interior, we recommend using the services of professionals. Atlant Lepnina offers a free surveyor and prompt installation of ready-made gypsum cornices.
Types of fillets
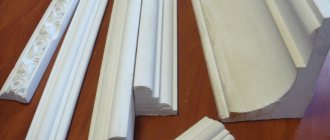
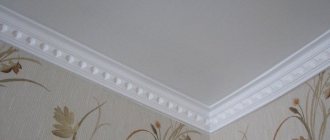
Ceiling plinth can, among other things, have different widths and any design. Choosing a baguette that perfectly matches the ceiling design is absolutely not difficult. Look how beautiful these designs look:
Foam skirting boards
Foam decorative baguette is most often used for finishing ceilings. This is explained primarily by its low cost and beautiful appearance. The foam ceiling plinth weighs very little, and therefore it is extremely easy to install. Its main disadvantage is fragility. A small disadvantage is that due to the granularity of the foam, the joints between the individual planks are not as neat as when using baguettes made from other materials. Therefore, the seams need to be puttied. The advantages of foam fillets also include the fact that they do not absorb moisture at all and do not rot.
Foam ceiling plinth can have absolutely any design
Expanded polystyrene fillets
Ceiling plinth made of polystyrene has all the advantages of foam plastic. But since it is made of a denser material, the joints are neater. Yes, and installing polystyrene fillets is somewhat easier. However, of course, such a baguette costs more.
Ceiling plinth. Expanded polystyrene is denser than polystyrene foam
The polystyrene foam fillet does not absorb moisture. This decor is mounted using regular foam glue.
Polyurethane molding
The price for polyurethane baseboards is even higher. Such fillets are characterized by a high degree of flexibility. A strip of this material can be rolled into a knot without it breaking. It is advisable to use flexible ceiling plinth for uneven ceilings of old apartments. In addition, such a bendable baguette is ideal for decorating rounded surfaces.
Polyurethane ceiling plinth can be used to decorate rounded surfaces
The disadvantages of this material include the very high cost and complexity of installation. Typically, polyurethane foam molding is installed by professionals using special tools.
PVC fillets
PVC ceiling plinth is used in the interior of rooms somewhat less frequently. It is used if the ceilings or walls are decorated with plastic panels, MDF panels or lining. Sometimes a plastic molding serves as an element intended for attaching harpoons of the tension fabric. This option often imitates a variety of materials - wood, cork, metal, natural stucco, etc. Such a baguette costs no more than polystyrene foam.
PVC skirting board can be a good decoration for a room
Installing a plastic ceiling plinth is quite difficult. When installing it, you usually use not glue, but screws and dowels. In addition, it is most often mounted on the sheathing. However, it is easier to connect strips of such molding than foam or polystyrene. This is especially true for the option with a latch (like the latch for floor skirting boards). Some types of plastic fillets require quite expensive work to level the base surface. In old apartments, it is therefore better to use a soft baguette made of other materials.
Plaster molding
Gypsum ceiling plinth in the interior can mask any defects in the surface of the walls and ceiling. Repairing individual parts of the plinth, if necessary, is absolutely simple. Plaster molding can be incredibly beautiful. Using it, it’s easy to turn even a small apartment into a real fairy-tale palace. Such skirting boards are absolutely fireproof and are not particularly afraid of moisture.
Using gypsum molding you can turn any room into a fairy-tale palace
The disadvantages of this type of molding include, first of all, the significant weight and complexity of installation. Such spectacular designs are somewhat more expensive than foam, PVC and polypropylene.
Wooden options
When decorating rooms decorated in an aristocratic classical style, a wooden ceiling plinth is usually used. It looks unusually rich and presentable. It is often used when decorating rooms in an antique style. Such baguettes are used not only in the main rooms, but also, say, for decorating ceilings in attics trimmed with clapboard. The disadvantages of wood fillets include the fact that this material quickly absorbs moisture. Therefore, it is not possible to install a wooden baguette in all rooms.
Wooden plinth is usually used in richly furnished interiors
To make this type of plinth, a variety of types of wood can be used - pine, birch, walnut, mahogany, oak, etc.
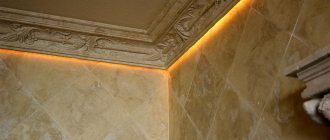
Skirting board with backlight
Especially for those who know no limits to perfection, illuminated sides were invented. In addition to their aesthetic appearance, they also have functionality - they bring a pleasant variety to the standard room lighting scheme.
The design of these varieties is designed so that they have recesses for mounting cables and wires. From the outside, therefore, nothing will be visible except beautiful lighting. LED strips, neon tubes or halogen lamps are used as light sources here.
Illumination on the cornice will amazingly transform your home, adding romance and mystery to it. You can learn more about this from the article on our website: https://www.atlantlepnina.ru/articles/chto-takoe-gipsovyy-svetovoy-karniz/
Ceiling lighting with LED strip under the plinth: photo and installation instructions
If you decide to decorate a room using backlit baseboards, you need to take into account some features. So, for example, you can give preference to the fillet option, which is shaped like a metal profile. This will allow you to place inside not only an LED strip, but also any other lighting sources, for example, neon tubes.
Installation options for LED lighting with polyurethane plinth
At the same time, when measuring the amount of material needed, as well as making a purchase, it is necessary to take into account not only the perimeter of the room, but also the fact that a certain percentage will go to waste during the cutting of corners. Therefore, it is necessary to purchase skirting boards with a small margin.
The main difference between a backlit cornice and a regular one is that the mounting is not done close to the joints of the ceiling and wall, but at some distance. As a rule, the gap is up to 20 cm and is selected depending on the height of the room, as well as the width of the lighting element used.
It is the lightness of polyurethane ceiling cornices that allows them to be securely attached only to the wall, leaving sufficient space for installing lighting and without worrying about the reliability of their fixation.
As for installing the LED strip, it must be placed in the gap between the ceiling and the baseboard, using its reverse side, which is initially sticky. All pieces of tape must be connected to the power supply using a special connector or regular soldering.
LED ceiling lighting installation diagram
Another important detail is the fact that wiring must be connected to the backlight. It is advisable to replace old switches with newer models that have at least three buttons and will allow you to autonomously control all light sources in the room.
Select by width
In addition to raw materials and type, an important selection criterion is the width of the ceiling cornice. In construction stores and markets you can see a variety of products, from thin and almost invisible to wide and massive. What width should I choose for the ceiling plinth, and what does this indicator affect?
- If you want to visually smooth out the corners and make the room more rounded and peaceful, feel free to buy the largest cornice. Remember that visual roundness gives an atmosphere of calm, while sharp corners are a source of internal aggression.
- Volumetric baguettes, in addition to the above-mentioned advantage, perfectly mask all joints, irregularities and other surface defects in the form of cracks, crevices and chips. After all, most often these nuances appear in the corners.
- For suspended and tensile structures, products of large width are also often chosen - for the same reason, in order to hide the joint between the tension fabric and the wall.
- But if your home cannot boast of large sizes, it is better to avoid moldings that are too voluminous. Due to the dimensions of such decorative design, the room will visually seem even smaller.
- The same applies to low rooms - this design will add heaviness to the atmosphere and “eat up” even more height.
Ceiling polyurethane plinth: how to install correctly
The profitability of using polyurethane ceiling plinth is beyond doubt, especially since this material has a lot of technical advantages over others, for example, the ability to withstand serious temperature changes: from -60 to 80°C. This is what determines the extremely long service life of the material.
To attach this type of plinth, the easiest way is to use polymer glue, applying it to the edges of the profile. At the same time, the main requirement that is presented in this case to the adhesive mixture is a high level of adhesion. This simplifies the task, since the ability to harden quickly allows you to fix the elements quickly and eliminates the need to hold the plinth for a long time, because standing with your hands raised even for several minutes is quite difficult.
At the same time, the use of such quick-drying compounds complicates the work, as it requires precision and speed in work, leaving you no room for error and incorrect placement of the cornice. An ideal adhesive mixture for fastening would be Moment glue or liquid nails.
The plinth is mounted using Moment glue or liquid nails
How to correctly cut a corner on a ceiling plinth
In order to cut the corners of a flexible plinth evenly and beautifully, use a special device called a miter box. It contains several holes that allow you to accurately measure angles of 45, 60, 67.5 or 90 degrees. If you want to make a direct connection, then you need to use a 90 degree stencil. But for cutting internal and external corners, an angle of 45 degrees is most often used.
Let's take a closer look at the step-by-step instructions for cutting the corners of a flexible plinth:
- first of all, the element that you want to cut must be inserted into the miter box on the left side and pressed against the side. In this case, the part that will be located near the ceiling should be located in the lower part of the miter box;
- a hacksaw is inserted into the stencil at 45 degrees on the right side;
- If we are talking about cutting an adjacent profile, then the plinth must be inserted from the right, and cutting should be done in the direction from right to left. This way it turns out that the top side for the bottom corner will be longer than the bottom.
In cases where you need to adjust an internal corner, insert the plinth into the miter box from the left side, and trim the edge from right to left at an angle of 45 degrees. Then the bottom side will be longer than the top.
Correct position of the fillet in a special miter box
Helpful advice! In order to avoid mistakes and unnecessary consumption of material, before starting work, it is recommended to watch a video on how to cut corners on ceiling plinths. This simple video instruction will clearly demonstrate to you all stages of the work.
Often we have to face the problem of lack of the necessary tool, namely a miter box. In this case, you can go the other way and do everything manually: on a flat surface (most often just on a table), two parallel lines are drawn. A square is marked in them. Diagonals are drawn from the corners of this square, which form angles of 45 degrees.
To make cutting easier and more accurate, you can use improvised objects, for example, place a box or wooden block on a diagonal line.
Another difficult case that you often have to deal with is an uneven corner that does not have the required 90 degrees. In this case, using stencils is pointless, since the elements you receive will still not lie flat under the ceiling. In such a situation, you need to take into account the characteristics of each corner separately and make markings on the ceiling.
Scheme for trimming plinths to decorate corners
The flexible plinth for the ceiling is applied directly to the place where it will be attached, resting it against the adjacent wall. You need to draw lines on the ceiling and wall that will mark where the cornice contacts the surfaces. The same is repeated for the adjacent wall of the room. The upper point of intersection of these lines will be the cut point, and the lower point of intersection of the lines will be the lower corner of the profile.
To make the outer corner of the ceiling plinth, as in other cases, you need to use the parallel lines method or a miter box. But the direction of the cut will be different.
Helpful advice! If you don’t want to figure out on your own how to properly make a corner on the ceiling plinth, you can buy corners for the ceiling plinth, which are sold in the store. They are quite cheap, but the installation process can be significantly simplified.
How to cut skirting boards for the ceiling: basic operating principles
Another question worthy of attention is how to cut skirting boards into the corners of the ceiling. Although polyurethane is easy to cut, it also requires some caution when working with it. For this purpose, it is best to use a hacksaw or a construction knife, with which you can easily trim irregularities and protruding pieces.
Installation of polyurethane plinth with suspended ceiling
To ensure that the cutting angle is as accurate as possible, try to place the profile in the miter box as evenly as possible so that the width of the plinth on the bottom and on the side is the same as possible.
If you have to trim manually, without using a miter box, then try to distribute the plinth so that it is located evenly on both the vertical and horizontal planes. In this case, you will get the highest quality joint, without cracks or gaps.
As you can see, there is nothing complicated in cutting profiles yourself, and it is quite possible to do everything yourself, without resorting to anyone’s help. Moreover, you can always use a video on how to make a corner on a ceiling plinth as visual material.
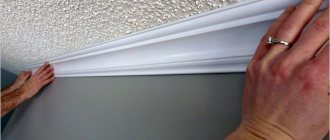
How to glue a plinth to the ceiling: detailed instructions for work
It would seem that there is no need to understand how to glue skirting boards to the ceiling, because by purchasing a ready-made adhesive composition, you almost completely save yourself from the hassle associated with this. In reality, there are quite a lot of subtleties that need to be taken into account during the work process in order to carry out the fastening correctly.
DIY ceiling plinth gluing
Of course, gluing the profile onto a perfectly flat and smooth surface is not difficult. But what if the walls are not level, or how to glue ceiling plinths to wallpaper? Let's look at all this in step-by-step instructions.
First of all, it is necessary to prepare the surface for attaching the fillet. To do this, you need to carry out a thorough cleaning, eliminating all roughness, glue residues, etc. For this purpose, you can use a spatula, fine sandpaper or a mesh designed for grouting putty.
Helpful advice! If the joint between the wall and the ceiling was previously puttied, before proceeding with the installation of the ceiling plinth, the surface must be treated with a primer and wait until it dries completely.
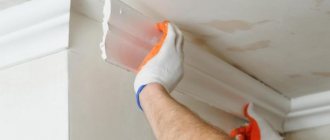
Fastening should always start in the corners. How to glue the plinth to the ceiling and cut the necessary corners was discussed earlier. All other elements are simply adjusted to the required size.
Flexible polyurethane skirting board
It is not so important what kind of glue you use to glue the ceiling plinth. Both “Moment” and liquid nails will do. The main thing is not to apply too much of it, so that the protruding excess does not stain the outer surface of the cornice, since due to the rapid setting of the composition, it will be quite difficult to remove it, and the use of household chemicals in this case is unacceptable. It is usually recommended to apply the composition pointwise and only to the middle of the product, and seal the technological gap that remains as a result using a special sealant that will harmonize in color.
Having figured out how to glue the ceiling plinth in the corners, all that remains is to fill the space between them. The same technology is used for this. All you need to do is measure the required size and trim the elements accordingly. A small amount of glue is applied to the middle of the back surface, after which the part is applied to the wall and held in this position for several seconds.
Related article:
Skirting for a stretch ceiling: basic rules for selection and installation
Review and comparison of materials, what to look for, recommendations for self-installation, important points.
Understanding how to properly glue ceiling plinths is not difficult. You just need to look at the photo or video instructions once, and also read the available materials that explain some of the intricacies of working with this material. There are many different videos on the Internet on how to glue the ceiling plinth in the corner, as well as around the entire perimeter of the room.
What to glue first: wallpaper or ceiling plinth
Another frequently discussed question, which, despite its apparent simplicity, still does not have a clear answer, is what should be pasted first, wallpaper or the ceiling plinth. In order to independently figure out which option is more convenient and correct, let’s consider the arguments that are given in favor of one method or another.
Installation dimensions of corner ceiling plinth
The main difficulty that arises if you first glued the ceiling plinth is to adjust the top edge of the wallpaper evenly so as not to leave a gap between them. But at the same time, you will not be afraid of staining the wallpaper, and it will be much easier for you to putty the joints and paint.
If you are gluing the ceiling plinth on top of the wallpaper, then first of all you need to let the wallpaper glue dry, and this takes at least a day. After this, you need to cover the wallpaper with masking tape, and then, being extremely careful, glue and paint the ceiling plinth.
In fact, both of these options are quite acceptable and everyone chooses the one that seems easier to him. So just evaluate what is more acceptable to you and you can get to work.
Choose by color
If you want to create a harmonious environment with decorative friezes, color plays a very important role. Remember a few rules:
- Nothing visually “raises” a low ceiling like moldings in light shades (ideally matching the tone of the surface).
- Wide walls of the same color scheme and texture as the walls, on the contrary, will visually lower the height and make the room seem smaller. If this is what you were looking for, feel free to use them.
- Some interior styles involve a real “riot of colors.” But if your plans did not include excessive variegation, use one or two main shades in the decoration.
- Remember that the white color of the ceiling cornice, like black, is in perfect harmony with all other shades. True, the latter is used much less frequently, due to its ability to visually reduce the size and reduce the level of light in the room.
- Are you looking for an effective interior solution? Try bright friezes in contrast to the main color. And so that the atmosphere does not look ridiculous, this color must be repeated somewhere else - in furniture, accessories or other elements.
Ceiling plinth in a modern interior
Fillets can match or contrast with the rest of the finish, be the main accent or an almost invisible detail. A beautiful baguette, selected taking into account the decor, transforms the room. There are many varieties possible - in color, width, material and texture.
Choose by invoice
In addition to color and shape, decorative moldings also differ in texture features or the method of applying a textured pattern. This property affects not only how they will look in the setting, but also the possibility of subsequent decoration - for example, painting or varnishing.
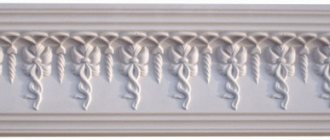
The simplest and most popular borders are those with a smooth laminated texture. It is already perfectly smooth and does not need any additional processing. Options with an extruded surface have a clearly defined pattern, made by cutting out recesses of different sizes and shapes. Finally, there are models with injection texture - they have convex threads, as a result of which they visually recreate examples of classical architecture.
Choose by shape
Choosing a shape is another important decision. It’s easy to get lost in modern diversity, because stucco can be so different: simple and unpretentious, or with relief patterns reminiscent of medieval palaces.
In any case, baguettes must be selected in accordance with the main interior style. Professional designers have a simple rule: the more complex and elaborate the decor, the simpler and more neutral the plaster decor should be, and vice versa.
The molding, simple in texture and design, is suitable for a room of almost any size and design. It will harmoniously combine with the walls and ceiling, without drawing attention to itself and serving as a natural continuation of them.
Of course, there are situations when complex architectural forms will also look great - for example, in a classic style, in an antique atmosphere, with elements of natural finishing. However, be prepared for the fact that such fillets are quite difficult to adjust at joints and corners, so you should buy them with a reserve.
Be that as it may, the main criterion for choosing decor is that you should like it!
Types of texture
Ceiling plinth (curb, fillet, cornice) is classified according to the following texture parameters.
- Smooth. The outer surface does not have patterned ornaments or other relief. This is a discreet and stylish option that fits universally into almost any interior style.
- Extruded. It has a longitudinal relief made by rolling.
- Injection. The relief pattern is applied convexly and has a grainy structure. Outwardly it resembles stucco. This plinth is a striking element of the interior and, in fact, is an independent decor.
When choosing the texture of the ceiling plinth, it is important to understand that this criterion is not decisive! The same shape of the transverse profile, not to mention large patterns, will look completely different on cornices of different widths!
Choosing a gluing method
Speaking about the types of fillets, one cannot fail to mention the method of their installation. They can be mounted on glue or putty, secured with special staples or self-tapping screws. It all depends on the surface, as well as the raw materials from which the fillets themselves are made.
- Polymer adhesive solution is one of the most common methods. Suitable for almost all types of friezes, with the exception of foam or polystyrene. Guarantees quick setting and strong adhesion.
- Liquid nails glue is also reliable in use, provides long-lasting results and is easy to use. The composition is safe for most types of baguettes. It comes on acrylic and neopropylene base. The first version of the composition is recommended for use in rooms not exposed to humidity, and when using the second, it is recommended to ventilate the room properly, since it has a pungent odor.
- Acrylic-based putty is a fairly common installation option among professionals. However, this composition does not require special skills and is excellent for installing moldings with your own hands. You just need to apply it to the product and apply it to the desired area - setting occurs almost instantly. The putty is environmentally friendly and safe, suitable for any materials, and an additional advantage is that it simultaneously serves as a filler for all cracks and joints.
- Some craftsmen use a self-made adhesive solution for installation. To do this, take gypsum-based putty and PVA glue in a ratio of 4:1. This mixture is then diluted with water to the desired consistency. The resulting solution can also be used to glue any baguettes.
If you want to get the perfect result, entrust this procedure to professionals. Atlant Lepnina craftsmen will carry out installation work quickly, accurately and inexpensively.
Do not forget that the installation of gypsum products must be carried out before the wallpaper is hung and the ceiling is painted. The most suitable base for them is smooth, plastered and primed.
No. 3. Ceiling plinth made of polystyrene foam and polystyrene foam
There is always confusion with polystyrene foam and expanded polystyrene. The difference between these materials is the same as between a person and a man. Foam plastic is a whole class of materials that includes foamed polymers, incl. and polystyrene foam of various manufacturing methods. Expanded polystyrene can be produced by foaming or extrusion. People usually call the first material polystyrene foam , the second - polystyrene foam, although this is completely incorrect.
The production technology of different types of polystyrene foam is as follows:
- Foamed polystyrene foam is obtained by treating granules of the material with pentane, exposing them to water vapor in special devices (foamers), softening and increasing their volume. Then another steam treatment occurs, during which the granules expand and sinter together. As the volume increases, the micropores also increase. The bond between the granules is not very strong, so they gradually begin to break down;
- extruded polystyrene foam made by heating and melting granules into a homogeneous mass, to which foaming agents are added. Then the mass is pressed through the extruder slot and takes the form of sheets. The finished material has a strong structure consisting of closed cells, and the absence of micropores makes it more durable.
Foamed polystyrene foam (often called simply polystyrene foam) is one of the most affordable materials for the production of skirting boards. Its big advantage is its ease of processing , and you can cut it with an ordinary sharp knife. In addition, the ceiling plinth made of expanded polystyrene foam is lightweight and easy to install - it can simply be glued to the surface.
Among the disadvantages are flammability and low mechanical strength. The latter is not a significant drawback, since few people touch ceiling skirting boards. However, during installation you should be careful not to leave dents from your fingers or cuts. It is advisable to putty and paint the foam baseboard to increase durability.
Skirting boards made of extruded polystyrene will last much longer, and among its advantages:
- strength , which is several times greater than its foam counterpart;
- better fire-resistant qualities in comparison with expanded polystyrene foam;
- low water absorption.
Extruded polystyrene foam is slightly heavier than foam, but this does not particularly affect installation. Does not require painting, but can be painted to give the required shade. It costs a little more than its analogue, but belongs to the category of budget options.
Today, some manufacturers offer plinths made of duropolymer - the same extruded polystyrene foam, but undergone additional processing under high pressure, which increases strength and makes the material impact-resistant. Manufacturers also offer injection polystyrene foam , which is a more advanced version of conventional extruded foam.
Scope of application
Before making your final choice, think not only about the base, texture and color, but also about the area of application. Here are some design recommendations in this regard.
- PVC borders are well suited for rooms with suspended ceilings and look great framed by plastic panels. Please note that such products often have grooves to facilitate installation.
- Foam models are well suited if plasterboard finishing is used. They are also combined with plastered or putty textures. To install these structures, putty is also used instead of glue.
- If the design is dominated by plastic or plaster, polystyrene foam moldings will be a good solution. How to attach them - with glue or putty - depends on the type of base and your own preferences.
- Polyurethane fillets are virtually universal and are suitable for a wide range of finishes. Their advantage is flexibility and plasticity. Therefore, as a rule, this is the only possible method among complex architecture, with many curved surfaces.
- Plaster sides look perfect in classic designs. Moreover, they often decorate not the entire surface, but only its individual sections: door and window frames, corners, niches. Such products are fixed with a putty solution.
- Wooden friezes look most harmonious in combination with other wooden elements in the setting - furniture, wall panels, etc.
Types of ceiling plinths by material of manufacture
This parameter is key regarding price. The construction market offers six varieties, which can be divided into two groups.
Lightweight curtain rods that can be installed with glue or sealant
- Styrofoam. Lowest price and widest selection of designs. You can use foam plastic to depict anything, even copies of famous sculptural bas-reliefs. It is very easy to cut with a regular knife; no special tool is needed. In addition, it weighs almost nothing - this is a definite plus for transportation and installation. But there are also three significant disadvantages - fragility, deformation when heated and rapid yellowing, especially in the kitchen and bathroom.
- Polyurethane. In appearance, it is more similar to plaster than others. This is the best option for those who are going to decorate their house with stucco and other magnificent patterns, but want to save money.
- Expanded polystyrene. Manufactured by extrusion. It is a cross between the two previous types, but is closer in quality to polyurethane. It is made from the same components, the only difference is the production method. The big advantage of expanded polystyrene is its elasticity, which makes it easy to finish winding sections of walls with such ceiling plinths. Expanded polystyrene is fire hazardous; this fact should be taken into account when choosing a place of use.
It is important to know! Polystyrene foam and polystyrene foam do not tolerate contact with solvents; these substances corrode their surface. Therefore, if it is necessary to paint them, you can use only water-based compositions.
Heavier ceiling skirting boards
- Plastic. Very durable material - decades without loss of appearance. There are countless options for plastic cornices on sale, including imitation of solid wood or natural stone. Mounted on special PVC anchors. Regardless of the pattern, it has a smooth, easy-to-clean surface.
- Natural wood. Such ceiling plinths have the highest cost, are used very rarely and are mainly made to order. An undoubted advantage is environmental friendliness and environmentally friendly disposal.
- Gypsum. Durable and environmentally friendly. Despite the lower price compared to wood, this particular material is associated with an example of aristocratic style and is used in luxurious interiors stylized as rich antiques.
Color, pattern, width: design tips
Finally, here are a few simple tips that you should follow to create a complete picture in an interior decorated with decorative borders.
- In elaborate, richly decorated interiors, friezes should be as neutral as possible so as not to distract attention from the surrounding splendor.
- Wide elements with voluminous stucco molding are perfect for such historical interior styles as Empire, Renaissance, Baroque, Rococo.
- The best choice for a study or library decorated in a strict English style is wooden moldings under the ceiling. Moreover, ideally, they should be of medium width and smooth texture, or with a simple pattern.
- Wide borders are simply necessary for spacious and high rooms - others will simply “get lost” here.
- Also, large-width friezes are indispensable if you need to mask repair defects: for example, fasteners, gaps between the ceiling and the wall, flaws in the installation of floor slabs, etc.
- Often apartments in panel houses have walls with differences in height, especially in corners and niches. Instead of covering these areas with wallpaper, try adding attractive moldings - and this feature will turn from a disadvantage into a real highlight.
- Suspended ceilings with built-in lighting are complemented with wide fillets made of materials that are not subject to combustion.
- An interesting “open sky” effect can be achieved in a small room (for example, in a nursery). To do this, paint both the ceiling and walls the same light blue tone or wallpaper, and then add a smooth, narrow border to match the entire perimeter.
By contacting the Atlant Stucco workshop, you will receive a full range of services, from the development of a design project to the production and installation of ready-made gypsum stucco moldings. We work throughout Moscow and St. Petersburg, and also deliver our products to all regions of Russia. We will be happy to make your dreams of an ideal environment come true!
How to choose the optimal plinth width
Standard fillets are available in lengths ranging from 1.5 to 2 m and widths from 2 to 20 cm. The choice of parameters depends on the purpose of the cornice and the style of the interior.
If you need to hide defects at the connections between ceilings and walls or fasteners, you should choose fairly wide skirting boards. Volumetric moldings made of fire-resistant materials help to disguise the boundaries of suspended plasterboard ceilings equipped with spotlights. It is also appropriate to install such products in work offices and rooms with historical interior styles.
In cases where the living room is richly decorated with decorative elements or bright finishes, you need to do the edging with more modest baguettes. Skirting boards for the ceiling in the bedroom, hallway, and kitchen are also mostly small, since usually in apartments such rooms have a small area. Also, installation of thin products is a necessity in low rooms.