Materials for making ceiling plinths
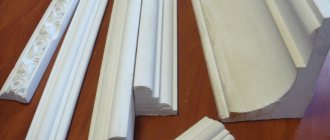
Ceiling plinths are also called baguettes, moldings, fillets and are made from the following materials:
- Trees;
- Polyurethane;
- Plaster;
- Expanded polystyrene.
Wooden models
Wooden baguettes are rarely purchased due to their impracticality . They only look good with the same wall and room design. The price for such a product varies widely. Disadvantages: complex installation and processing process, difficulties in masking the gaps that arise as a result of joints. The tree begins to rot, mold and insects appear. To avoid these troubles, it is necessary to treat the wood with varnish and antiseptic.
Types of wooden baguette
Plaster models
Plaster, like wood, is rarely chosen due to its heavy weight. In addition, they are difficult to dock and glue.
Plaster baguette
Models made of polystyrene foam
Foam products are easy to use, inexpensive and light in weight.
Cons: they have low strength, break easily and leave dents on them. Not all types of glue and paint are suitable for installation. The material is fire hazardous.
Expanded polystyrene baguette
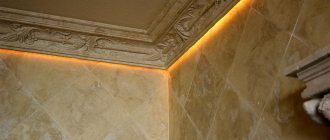
Polyurethane models
Basically, buyers opt for this type of baguette, although compared to foam ones, their cost is higher.
They are flexible, strong and durable. There is variety in color choice, although white is generally the preferred color.
Pros: the product does not burn and its strength is higher compared to the previous type.
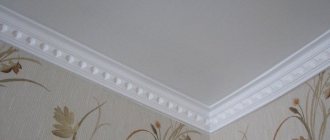
Polyurethane baguette
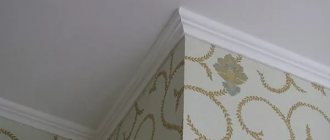
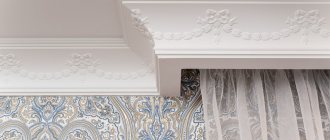
For rooms designed in a minimalist style, it is preferable to choose products with straight lines. To highlight the pomp of the room, choose products with patterns and complex relief. The same baguettes are chosen for rooms decorated in a classic style, especially if the room has antique furniture or design. Note that fillets with patterns are more difficult to join in the corners.
Choosing skirting boards and glue
Ceiling skirting boards can be made of gypsum, wood, foam, or polyurethane. The last two types are lightweight, affordable, and therefore are in greatest demand. But, for example, a foam plinth is not suitable for gluing in corners, since it can quickly burst when bent. Also, the material is not at all suitable for installation in damp rooms; it simply does not tolerate moisture and dampness. But polyurethane is not afraid of moisture, the material bends well and will not break when bent even over large radii.
Usually the length of one plinth is 2 m, so you need to correctly calculate the perimeter of the room in order to purchase the required amount of material and glue for gluing the room. It is also worth paying attention to the width of the fillet. In a room with low ceilings, it is reasonable to glue narrow fillets, but according to the texture of the walls and ceiling themselves.
Glue for gluing fillets is usually acrylic or polymer. The first one has virtually no odor, so it is suitable for use in children's rooms. Polymer glue is odorous, but moisture-resistant; for wet rooms it is the best option. Of course, it is better to buy a well-known, well-proven glue. Finishing putty with the addition of PVC glue is also suitable for gluing skirting boards.
Applying glue to a plastic skirting board
Trimming corners
You can do this in two ways:
- using a template or miter box for sawing;
- use factory cast parts.
How to make a cut with a miter box
Miter box for cutting baguette
Most rooms, as a rule, have a room angle of 90 degrees. Therefore, it is necessary to trim the plank at 90 or 45 degrees. To do this correctly, you will need a tool - a miter box. It has several slots, each with its own angle of inclination.
Fillet cut into the inner corner:
- To do this, you need to take a baguette and place it in a miter box. The hacksaw is inserted into the grooves and a cut is made on the workpiece. The left groove should be closer;
- The second baguette is cut according to the same pattern. Only the right groove is closer, the left one is further.
The fillet is pressed tightly against the far wall of the miter box and held with the inactive hand. The handle of the hacksaw or saw should be as close as possible to the hand that holds the workpiece. The saw should not be pressed too hard.
Fillet cut at external corners
- It is preferable to make markings first. To do this, attach the bar to the ceiling and mark the dimensions;
- We press the workpiece against the wall, hold it with one hand, and mark it with a drywall knife;
- Select a 45 degree position for the hacksaw;
- Cut the fillet;
- Place the second baguette on the other side of the miter box and cut it in the same way.
If the walls are not perfectly smooth, it is better to use other methods without using a special device.
How to make a cornice cut by hand using a template
Draw a straight line on a piece of paper. Use a pencil to mark a dot on the workpiece. Mark the 90 and 45 degree angles using a protractor. Draw straight lines through the marks so that they are clearly visible when working with the saw.
The baguette is pressed against one of the parallels at the desired angle and cut with a hacksaw
There is another simple option to trim the cornice “by eye”. You should take part of the product and attach it to the desired corner. During application, carefully observe and mark the location with a pencil.
Trimming the baseboard using the pencil notching method
How to glue a model in a corner. General recommendations
- If there is a relief, it is necessary to ensure that at the joints there is a harmonious transition from one model to another;
- Start gluing the product from the corner;
- The gap at the connections should not exceed 1.5 mm. If the gap between the moldings is larger, a sealant will help eliminate this problem. If the gap is large, you can close it with a strip of material and then secure it with glue.
Part of successful work is determined by knowledge of the characteristics of angles - internal and external. The corner joint combines two parts: left and right.
Let's figure out how to properly connect the ceiling plinth in different corners of the room.
Joining the internal corner
The peculiarity of these corners is that the bottom edge is longer than the top. That is, when the cornices are attached to the ceiling, the lower edge is pressed against the walls, and the upper edge goes inward. Therefore, the upper perimeter will be smaller than the lower one and when cutting, the ceiling part of the fillet will be shortened.
The side of the cornice that stood on the side of the miter box is glued to the wall. The side that was at the bottom of the instrument is glued to the ceiling.
Before gluing, the corners of the room are measured with a protractor.
The workpiece is cut at 45 degrees when the angle is right.
The cornice is glued to the left side of the corner if it was cut on the right. If you cut it on the left side, you need to glue it on the right.
Both corners are cut with a miter box, the pieces are placed in the corner for fitting. If everything is fine, you can glue it.
Joining at external corners
The procedure for joining such corners is simple. However, they do not occur often.
- To trim the model, first mark the cut location with a pencil;
- Place the bar in the miter box. On the left side of the long part, an angle of 45 degrees is cut;
- The part of the product that is located near the side wall of the instrument is glued to the wall.
How to prepare walls for gluing skirting boards?
- New fillets require adaptation to the environment, so after purchase they need to be kept indoors for up to a day.
- The ceiling also needs to be prepared, cleared of debris, and leveled.
- It is better to glue the plinths before gluing the wallpaper, so when they are replaced there will be no need to replace the fillets, and there will also be no gaps between the walls and plinths that spoil the appearance of the room.
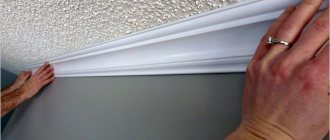
- It would be correct if you start gluing the walls not from the corners, but from straight sections. Gluing fillets in the corners requires taking into account some nuances.
Gluing ceiling cornices
First you need to wash and remove dirt and dust from the ceiling and walls. To level the surface, putty is used. If the walls have small errors, use models with soft edges so that the differences are invisible.
Work begins with measurements of footage and number of products. The usual length of the model is 2 meters.
Cornices are glued using the following methods:
- On acrylic;
- Special putty;
- For wallpaper and sealant.
Sealants for gluing cornices
The most suitable is silicone sealant. Its advantages are that the baguette will hold up perfectly and is suitable even for those who have crooked walls. It can also be used to cover cracks that arise due to the curvature of the walls.
It is recommended to level the walls with putty before gluing wallpaper and baguettes. As for the sealant, craftsmen choose acrylic. They can be used to mask cracks and corners. The advantage of acrylic sealant is its cost. Its price is 100-150 rubles.
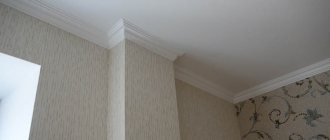
Features of installation of fillets
The ceiling molding is selected based on the tasks it solves in the interior, i.e. whether it is only a decorative element or masks uneven corners, wall and ceiling joints. It is recommended to install the molding on a previously prepared surface before finishing. After its installation, the ceiling is painted and wallpaper is glued. The correct sequence of installation of baguettes is described in this article.
If it so happens that you decide to glue the fillets on top of the wall covering (to mask unevenness and defects in the finishing of the joints), you should choose light friezes made of polyurethane or polystyrene, work as carefully as possible and keep in mind that during the next repair the cornices will have to be dismantled along with the wallpaper.
Direct docking
After gluing the corners, the straight planks are joined to the corner ones and secured. The moldings are attached to each other and you need to ensure that their joints are level. To ensure perfect joints, sections of the plinth are pre-sanded.
- Apply the model to the installation site;
- Remove excess glue using a spatula;
- Wipe carefully with a damp cloth until the composition is completely dry;
- The next day, use a spatula to apply plaster putty at the joint. This procedure should be repeated two more times after the composition has dried.
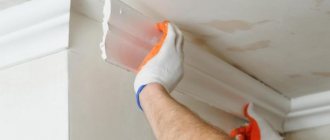
Painting and masking joints
It is possible that after gluing the ceiling cornices there will be small gaps between the sections. This can all be fixed with white sealant.
Use light putty as a sealant; you need to walk it over the area of the product. After it has dried, it is recommended to remove the residue with a sanding sponge.
How to properly stick baguettes over wallpaper
The advantage of this option is that there is no need to adjust the wallpaper to the line of the baguette, since this element masks all errors in the upper edge of the wallpaper.
The question of how to stick a baguette on the ceiling is solved in a certain sequence:
- Using a miter box or other device, cut the edges of the plinth at the desired angle.
- A thin layer of adhesive is applied to the surfaces that will be adjacent to the plane.
- Apply the product to the wall and hold it for a certain period of time. Most often, the manufacturer gives recommendations on how to glue baguettes using one or another composition.
- Excess glue is removed using a rag or spatula.
- The junction of the baguettes is covered with white sealant.
- Apply a layer of finishing paint to the surface of the glued baguette.
The question of how to glue baguettes onto wallpaper can be considered resolved.