12216 0 0
Vadim December 26, 2017
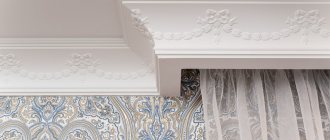
Questions like: is it possible to glue ceiling plinth to wallpaper, or what is glued first and what then, are asked regularly on forums and other similar resources. So, there is no definite answer here. It all depends on the type of wallpaper, the material from which the baseboard is made and the condition of the walls. And then we will look at the most common situations, plus I will tell you how to install it all yourself.
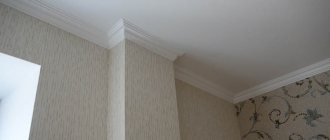
It is quite possible to arrange a ceiling joint yourself.
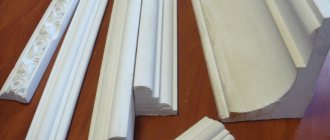
Types of ceiling plinths
To figure out what comes first - wallpaper or ceiling plinth, you must first consider all the available types of plinths. There is no particular difference between ceiling and floor skirting boards. The only difference lies in the operating conditions - floor skirting boards are regularly exposed to physical stress, so their strength must be quite high. This requirement is not imposed on products mounted on the ceiling, so the range of materials for the manufacture of ceiling plinths is wider.
The following types of skirting boards can be installed on the ceiling:
- Paper
(another name is frieze, border). This category of products refers to skirting boards only nominally - the purpose is the same. The elements in question are extremely primitive, but they cope with their decorative task. It is advisable to glue such a ceiling plinth onto wallpaper - other methods are simply pointless. - Plastic (PVC)
. It is advisable to install plastic skirting boards only if the entire ceiling is also made of polymers. The design of plastic baguettes has special grooves that allow them to be attached to the frame or the ceiling itself. The question of whether to glue the ceiling plinth before or after the wallpaper can be said very simply. The plinth is attached directly to the ceiling, which makes it possible to glue wallpaper after its installation. To glue the wallpaper, the lower part of the baseboard needs to be folded back. - Polyurethane
. Polyurethane fillets are most widely used due to the low weight, high strength and elasticity of this material. Polyurethane skirting boards can be installed both before and after the wallpaper. - Plaster
. Gypsum stucco molding was very popular until products made of polyurethane and foam plastic appeared on the market. Plaster parts look very beautiful, but their strength leaves much to be desired, and the weight is quite high, which significantly complicates the installation process. Due to the heavy weight, the answer to the question of how to glue skirting boards to the ceiling with wallpaper is unequivocal - no way. - Foam plastic
. Visually, foam baseboards are very similar to gypsum and polyurethane, but foam products are much cheaper. In addition, this material has a very simple installation technology. You just need to know how to glue foam ceiling skirting boards correctly. Foam fillets can be glued on top of wallpaper - this provides an advantage if it is necessary to further replace finishing materials. - Wooden
. Wooden skirting boards have high decorative properties, but are used extremely rarely due to the high cost and complexity of installation. To fix wooden products, you need dowel nails, which are only suitable for fastening to flat surfaces. Even a layer of putty will not compensate for the existing unevenness. - Stone
. Stone products are much more expensive than their analogues and are extremely inconvenient to install. If we talk about compatibility with wallpaper, then two simple rules can be deduced: firstly, it is not always possible to select visually compatible materials, and secondly, heavy stone products cannot be installed on top of wallpaper.
In addition to the classification according to the material of manufacture, skirting boards are also divided into two types according to their main characteristics:
- Lightweight, flexible
. This category includes polyurethane, foam and PVC skirting boards. These products can be mounted either before or on top of the wallpaper. - Heavy, tough
. Accordingly, this group includes all the remaining options - gypsum, wood and stone. Hard skirting boards can only be installed end-to-end - the weight of such products is very large, and no wallpaper can support it. In addition, the installation of rigid moldings requires smooth walls, which not every home has.
Before gluing the ceiling plinth to the wallpaper or butting it, you need to thoroughly study the installation technology. You also need to figure out how to glue the ceiling plinth from one material or another.
Subtleties of arranging different options
Although there are many types of ceiling moldings, they can all be divided into 2 areas:
- Flexible and lightweight - this includes polyurethane, foam and polyvinyl chloride. This direction can be mounted both on top of the wallpaper and end-to-end with the canvas;
- Hard and heavy - here we have plaster, wood and stone. All of them are mounted end-to-end only. The fact is that not a single wallpaper, even the densest one, can withstand such weight, plus it is often necessary to level the walls under hard baguettes.
When and how the fillet is attached to the wallpaper
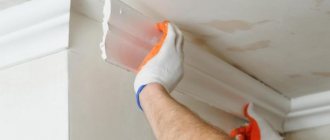
Experienced craftsmen are strongly against this approach, because this is, in fact, a one-time option. If you start changing the wallpaper, you will have to remove the frieze, which means double work. But people are afraid that without experience they will not be able to beautifully arrange the joint between the baguette and the canvas and glue the baguette on top.
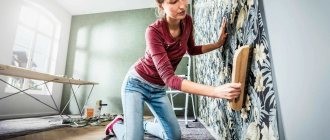
Only light baguettes can be glued to wallpaper.
But let's return to practice: let's start with the fact that the baguette can only be glued to non-woven wallpaper or vinyl wallpaper; the paper can only withstand a thin foam frieze, nothing more. I'm glad that the instructions are the same in all cases:
- The frieze is glued on top of the wallpaper after the walls are completely dry, which is about 2-3 days from the end of gluing;
- 1-2 strips of thick universal glue, such as “Moment-montage”, are applied to the back side of the baguette, after which the baguette is applied to the junction of the ceiling and the walls and held for about 30 seconds;
- If glue oozes out from under the baguette, it is immediately wiped off with a soft rag.
It is not recommended to glue the frieze onto canvases with large, protruding relief, as there will be small gaps under the plank, and this will ruin the look.
Foam baguette is considered the most affordable and simple option.
Another common question is how to remove the ceiling plinth without damaging the wallpaper? I’ll say right away - this is unrealistic. If the baguette is glued, then when you try to remove it, it will tear the top layer of the canvas. And if the strip is screwed on with self-tapping screws, which is also possible, then the screws have already gone through the canvas and it is damaged.
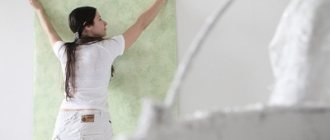
Installation of skirting boards on wallpaper
First of all, you need to figure out how to glue skirting boards to the ceiling with wallpaper. Experienced craftsmen do not recommend installing skirting boards on top of wallpaper. This opinion has one compelling argument - the plinth installed on the wallpaper can only be removed together with it in the future, as a result of which during repairs the amount of work performed and costs increase.
However, there is also the opposite argument - gluing ceiling plinths to wallpaper is much easier, especially if you have little experience in performing such work. You can install baguettes on vinyl and non-woven wallpaper. In the case of paper covering, an additional limitation appears - only lightweight foam products with minimal weight can be used.
At least, you won’t have to spend too much time figuring out how to glue a skirting board onto a wall with wallpaper - the technology for installing lightweight skirting boards looks exactly the same in all cases:
- You can start working only after the glue has completely hardened (this usually takes about 2-3 days);
- The back of the plinth is coated with adhesive suitable for the specific material, after which the product is pressed to the desired area and held in this state for about 30 seconds;
- Excess glue protruding from under the baseboard should be immediately wiped off with a soft cloth, being careful not to smear it on the surface of the wallpaper.
It will not be possible to painlessly dismantle the plinth installed in this way - in any case, it will pull the wallpaper along with it, and they will become unusable. Even if the product was screwed on with self-tapping screws, the wall covering will still be damaged, so it will have to be replaced. This factor may be decisive, so you need to think twice about whether it is possible to glue the ceiling plinth to the wallpaper in a particular situation.
Basic rules: how to trim wallpaper to fit a ceiling plinth
In order to get a good and high-quality result, all procedures must be performed competently and with the right approach. There are no small details in this installation, and the owner who neglects trimming wallpaper at the edges of the walls will become irresponsible.
In fact, not every craftsman knows how to properly cut or paste wallpaper around baseboards.
In order for the result to please you, all procedures must be carried out very competently.
In fact, every homeowner has baseboards under the ceiling. You need to know that each layer of coating on the wall must be glued in such a way that the edges protrude onto the fillets. After this, take a small spatula and run it along the lower edges of the contact between the panels and wallpaper. The result should be a fold.
Related article: Assembly and installation of a lighting board
After performing these steps, press the folded area with a spatula and carefully remove the protruding edges of the paper with a sharp construction knife. The trimming process is complete. If you notice that glue has released, it can be removed with a damp cloth or sponge. As a result, you will get a neatly decorated room with smooth edges.
Installation of skirting board butt with wallpaper
When figuring out what to glue first - wallpaper or ceiling plinth, you should pay attention to this option. In this case, the first step will be to attach the baseboard itself, and only then you can paste the wallpaper, bringing its upper edge to the baseboards. Only products made of polystyrene foam, polyurethane and gypsum can be glued. The last option will require a composition of gypsum and PVA, and all other skirting boards can be installed using universal glue.
The installation algorithm consists of the following stages:
- First you need to apply a layer of primer to the wall to improve the adhesion of the adhesive;
- After the primer has dried, the back side of the baseboard is smeared with glue and pressed against the wall;
- The gaps remaining between the plinth and the wall are covered with putty, after which you can paint the plinth in the desired color.
After gluing the baguettes, you can start installing the wallpaper. They are glued to the walls so that the upper part extends slightly onto the baseboard. Excess parts of wallpaper should be trimmed immediately after gluing using a wide spatula and a well-sharpened knife.
How to install ceiling tiles
Ceiling markings.
The first step is to stick the tiles on the ceiling. It can be laid on any surface; such work should not cause any difficulties. To work you will need the following tools:
- ceiling tiles;
- glue;
- rope;
- putty knife;
- putty;
- knife.
The work will include the following main stages
Options for gluing ceiling tiles.
- First you need to clean the surface on which the tiles are glued. If there is old lime on the ceiling, it must be removed with a spatula. If the ceiling was covered with water-based paint, then it will also need to be scraped off in those places where it crumbles or flakes. If there are cracks or holes in the concrete, they must be properly sealed with putty. You don’t have to strive for the surface to be perfectly flat.
- The second step will be to determine the center of the ceiling. This is necessary to ensure that the tile lies flat. Finding the center is not difficult. You just need to stretch two ropes crosswise to both corners of the room. The center will be located at the intersection of the ropes. This is where you should start laying tiles.
- You can start gluing the tiles. To do this you will have to use special glue. It must be applied on the reverse side in a very thin layer. To prevent the tiles from peeling off, you need to wait the exact time indicated on the adhesive package. Tiles must be glued in even rows, so that the distance between them is minimal. It's not a difficult job. The effort required is minimal. Most of the effort is spent on keeping the tiles in contact with the ceiling for the glue to set. Usually, at the end you have to lay the tiles in pieces, because the whole one does not fit into the remaining free space. Don't be afraid to cut tiles. This is a very thin material that can be cut perfectly even with a stationery knife. If the edges are not cut too evenly, then it’s okay. All errors will be hidden under the ceiling plinth.
- You need to carefully examine the glued tiles so that no traces of glue remain. You can simply remove them with a sponge. But this must be done very carefully. There should be no dark marks left on the surface. After all, they can ruin your mood for a long time and even push you to repeat repairs.
Recommendations
If you do not have independent experience in installing fillets, it would be useful to familiarize yourself with the following recommendations:
- sticking of decorative ceiling strips begins from the corners, then straight fragments of the perimeter are filled;
- when attaching fillets to a suspended ceiling structure, in order to prevent the adhesive from getting on the canvas, areas adjacent to the work site are covered with film;
- baguettes attached to the base of the wall will be attached more securely than to previously glued wallpaper;
- after preparing the adhesive composition, you should let it “settle” for 5 – 10 minutes, during which the composition will become elastic and will be easy to apply to the plane of the perimeter elements;
- if it is necessary to paint the perimeter elements, prevent the dye from getting on the plane of the wall and ceiling by using masking tape on both sides of the baguette;
- painting is carried out no earlier than one day after the completion of the main work;
- the best paint options are acrylic-based compositions;
- To avoid stains on the front side of the planks, wash your hands thoroughly before work or use gloves with a rubberized working side.
Installation
There are two ways to glue the ceiling plinth:
- Using special sealants after finishing the repair work, when the wallpaper has already been glued.
- After leveling the walls, glue it with putty or sealant. In this case, the wallpaper is glued after the baseboards are completely installed.
The second method is more labor-intensive, but experts advise using it. After all, sticking decorative elements onto wallpaper makes it much more difficult to carry out repair work in the future.
Another advantage of the second method is the ability to quickly repair wall irregularities. Gaps between the stucco molding and the wall can completely ruin the appearance of the room. When wallpaper is hung, it is extremely difficult to seal the cracks. Installing stucco before finishing the walls allows you to get an almost monolithic structure of the ceiling and baseboard.
Cutting fillets
Remaining putty mixture should be removed
The most difficult thing to do is glue skirting boards in the corners of the room. It is unlikely that the angle will be exactly 90 degrees. Therefore, the easiest way to decorate it is to use special fittings. If for some reason this is not possible, the baseboard will have to be cut at an angle.
Cutting plinths is carried out in different ways:
- Using a miter box.
- According to the stencil.
- By tags.
- Arbitrarily.
Regardless of the method used, it is necessary to choose the cutting line correctly, otherwise it will not be easy to obtain a gap-free angle. When cutting, the profile must be securely fastened in one position. The most important thing is that the cut is perfectly accurate, otherwise gluing the plinth in the corner will be very difficult, and it will be impossible to achieve a smooth and beautiful surface.
Rounded corners
Decorating rooms with curved elements and rounded corners can also bring a lot of difficulties. In order to evenly glue the plinth in such areas, it needs to be cut into several small parts. The shorter the element length, the more likely it is to obtain a perfect rounding.
Trimming and fitting is carried out for each element. Experts advise gluing straight sections first, and then curved ones. After gluing, the surface of the corner is cleaned.
Sticking
Trim the left outer corner of the baseboard
In order to fix the ceiling plinth, you will need regular putty. If the wallpaper is already glued to the walls, it is better to use special sealants, as there is a high risk of staining the surface of the ceiling.
Before sticking the decor, the corner elements are trimmed. After preparation, you can begin work. The putty is applied to the edges and ends of the planks using a spatula. The fillet is applied to the walls and ceiling and pressed. Excess putty is removed with a sponge.
It is very difficult to remove putty if wallpaper is glued, so experts do not recommend using this installation method. If there is a pronounced curvature of the walls or ceiling, the plinth should not be pressed too hard against the surface. If gaps form, they can be sealed with putty.
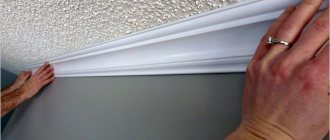
How to glue skirting boards to the ceiling: step-by-step master class
When the surface is prepared and the necessary materials and tools are at hand, you can begin installing the decor. In practice, there are 2 main methods of fixation - using a layer of thick putty and using a special adhesive composition such as “liquid nails”. The first option cannot guarantee reliable adhesion and is only suitable for polystyrene products, and the second installation method will ensure high joint strength, despite a slight increase in the cost of work. Installation processes are carried out in several stages:
- Each side of the room is measured with a tape measure, after which the resulting distance is divided by the factory length of one baseboard. As a result, the master knows how many whole elements he should use and how much he needs to trim the last part.
- Due to the fact that the plinth is mated in a perpendicular direction with precise joining of all elements on its surface, installation must begin from the corner of the room, and the element must be cut from the end at 45 degrees.
Rice. 9. Trimming the ceiling plinth with a corner cutter.
- The glue is carefully squeezed onto the back side of the baseboard, along the entire plane of contact with the ceiling and walls. If we are talking about a lightweight element with low density, and the master is confident in the smooth surface of the walls and ceiling, it is possible to save “liquid nails” by applying them intermittently to the baseboard.
If PVC or wooden plinth is used, and the line of the vertical structure is far from ideal, then “liquid nails” should be squeezed out with a continuous thin “snake”.
Rice. 10. Applying adhesive to the ceiling plinth.
- After applying the adhesive, the plinth must be lifted up and applied to the installation site, fixing it for 3 - 5 minutes with light pressure for better adhesion of the decor to the wall and ceiling.
- The next plinth is fixed closely to the first element in accordance with the same pattern, but without cutting the end at an angle of 45 degrees.
- After installing all intact parts, it is necessary to re-measure the required trimming length of the last element.
Rice. 11. Trimming the element manually.
- The element is cut on a stencil in 2 places - the joining line with the adjacent baseboard - at an angle of 90 degrees, and the junction with the corner of the room, similar to the first part, at 45 degrees.
- Before installing the first perpendicular plinth on the second wall, it is necessary to check the orthogonality of the room itself. If the angle is 90 degrees, then the joining line with a 45 degree trim of the plinth will exactly coincide with the perpendicular element on the adjacent wall.
If the apartment owner decides to install a wooden or PVC skirting board, trimming should be done with extreme caution, and the best solution would be to use a professional angle cutter.
Rice. 12. Trimming the wooden ceiling plinth at 45 degrees.
- Installation is carried out in a similar manner on all walls of the room.
When all the elements are fixed, you should check all the joints and the interface line with the wall - if partial detachment of the elements has occurred, they must be pressed back to the adhesion plane as soon as possible.
If a smooth white plinth was used for installation, and the master can observe a rough joint between the elements, such areas can be treated with sandpaper.
Types of grout
The step before painting the baseboards is grouting the joints. Compositions recommended by the manufacturer are used as grout. Baguettes made from foamed raw materials are grouted with putty, PVC, and similar acrylic or silicone grouts.
When carrying out this work, it is important to remove excess immediately after leveling, otherwise cleaning will take additional time, and in some cases the putty will ruin the appearance of the perimeter.
A homogeneous continuous plane is achieved at the putty joints by rubbing these places with sandpaper with minimal grit.
Grouting the baseboard
Calculation of skirting boards
Installation of ceiling plinth
Having chosen the type of plinth, you need to calculate the amount of material. This is quite easy to do. A standard ceiling plinth, regardless of what it is made of, has a length of 2 meters. By dividing the perimeter of the room by 2, you can get the number of products needed for finishing. Better to buy a little more.
When choosing products, it is necessary to take into account not only the material of manufacture and operational parameters, but also other criteria:
- Fillet width - the lower the ceiling height, the narrower the finishing elements should be. Wide decorative details can visually reduce space.
- Surface design. During operation, dust will collect on the surface of the decorative elements. Corrugated products can make life significantly more difficult, requiring constant washing.
- Color. This option, as a rule, is selected depending on the overall design of the room and the color scheme in which the wallpaper, etc. is made.