How to properly glue wallpaper in corners is a sore subject for beginners who have decided to renovate an apartment or house. If this is not done according to technology, unsightly bubbles may appear, spoiling the entire appearance of the finish.
Well, if the walls in the room are also far from ideal, then problems will almost certainly arise. What procedure must be followed to ensure that the result is neat and pleasing to the eye?
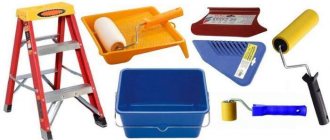
Tools for quality finishing
First of all, you will need a tape measure and a level to build a vertical line. This can be a bubble or laser level, or a plumb line - a weight on a strong thread.
If the corners are initially straight, the vertical line is applied once to orient the first strip of wallpaper along it. The rest are simply glued end to end without any additional markings.
For curved walls, you will have to draw a vertical line in each corner on both sides to avoid distortions. This is done in dotted lines using a soft pencil. The line should be barely noticeable, especially under light, thin wallpaper. The bold line will show through.
Particular attention should be paid to the cutting tool. A wallpaper or stationery knife must be very well sharpened so that cutting or cutting can be done quickly and accurately. To level the panels you will need a plastic spatula, and for cutting - a long one with a steel blade. It is applied like a ruler to the cutting line and does not allow the knife to move.
Of course, you need a container, a tray, a roller and a brush for glue, a brush or spatula to remove air from under the wallpaper, and a small rubber roller to smooth the joints. A brush is used if the finishing material has a relief pattern. It does not damage the surface, but presses the canvas well against the wall. To form corners, a short corner spatula is useful.
To remove glue, a soft rag is usually used. Some craftsmen advise using cellulose non-woven napkins for these purposes. They absorb well without leaving any residue. If rolls are cut on the floor, it is advisable to place clean plastic film or oilcloth under them. When working at height, you cannot do without a stepladder or other stable support.
Materials and tools
To glue wallpaper in the corners, you will additionally need the following materials and tools (the basic materials and tools for decorating walls with trellises are listed in the work “How to properly hang wallpaper with your own hands”):
- gypsum putty;
- corner spatula;
- metal profile for a lighthouse (any) 2.5 m long;
- a grinder or a hacksaw for cutting the profile to the height of the wall to be pasted;
- hammer drill for installing dowels;
- dowels with self-tapping screws;
- Phillips screwdriver or screwdriver.
How to properly glue wallpaper on inner corners: standard algorithm
It is recommended to cover the inner corner with a whole canvas only if the geometry of the room is absolutely correct and the wallpaper is not prone to stretching, for example, covered with hard vinyl. In all other cases, the algorithm is as follows:
- Step back from the corner by the width of the wallpaper minus 1-4 cm and mark a vertical line on the wall. The greater the curvature, the more allowance you need to make.
- Cut off the required piece from the roll with plenty of room for trimming at the top and bottom.
- Apply glue to the wall surface over the entire area of the strip, slightly extending to the edges. Apply glue to the wallpaper, if required by technology.
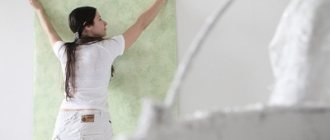
- Align the edge of the canvas with the markings and press it against the wall.
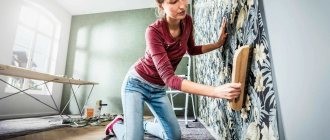
- Level the material with a spatula or brush and remove bubbles. Movements should be light, without strong pressure, so as not to stretch the wallpaper.
- Form a clear angle with a plastic spatula, pressing it towards the top.
- Apply a long spatula to the already covered wall at the level of the ceiling plinth. Run a knife along the blade and cut off the excess. Remove the strips, wipe the glue thoroughly with a rag. Similarly, cut the fabric near the floor.
- In the corner, perform the same operation - lean the spatula against the wall, carefully cut off the wallpaper and remove the excess. There should be an allowance of 1-2 mm.
- Make markings on the second wall so that there is a small overlap (1-2 cm). Glue the strip and cut it along the corner line. This must be done very carefully so as not to damage the underlying layer of wallpaper.
These corners will be clear and beautiful, without gaps, air bubbles or wrinkles. A slight curvature of the walls will not interfere with covering the room according to all the rules.
Proper wallpapering in electrical corners
If there are 1 or more switches or sockets located near the corner of the wall, then you need to remove the covers provided that the power supply to the apartment is temporarily disconnected. If you do not have the necessary experience in working with electrical appliances, then it is better to invite a housing office employee. Otherwise, there is a high risk of fatal electrical injury.
Wallpaper near sockets and switches must be glued correctly, that is, observing safety precautions
Having decided to do everything yourself, it is recommended to follow the procedure below:
- Carefully remove the casings;
- Slowly cover the corners and electrical appliances on the walls of the room;
- Make small cuts equal to the size of switches and sockets;
- Fix the previously removed cover in its original place.
Neatness, accuracy and safety are the key to correctly taping corners in a room with switches and sockets installed there. Regardless of the complexity of the work being carried out, it is necessary to turn off the power to the apartment. This is done on the staircase.
If the corners are very uneven
It happens that the walls are so crooked that finishing using technology is almost impossible.
Then it is recommended to do the following:
- Cut a strip of wallpaper 5-10 cm wide and paste it into the corner.
- Cover the wall on the right and left, not reaching the corner. Place the edges of the strips on top of the gluing with an overlap.
This option guarantees, albeit not the most ideal result, but there will be no gaps or visible distortions.
Closing corners: wallpapering
As soon as one corner has been pasted over, another section of the wall is covered with glue. It is advisable to continue work in close proximity to the previous site. If finishing the closing corner is carried out, then in this case each subsequent strip is connected to the previous one. In this case, you can get rid of unevenness.
Internal and external corners are pasted over differently, but if you follow all the requirements, the work will be easy and the result will be amazing
Among other things, it would be a good idea to pay attention to a number of other practical recommendations:
- The glue is rolled out in the direction from the left edge to the corner;
- The reverse order is recommended when you need to glue decorative or plastic wallpaper with a pattern;
- At the moment of fixing the wallpaper to the inner part of the corner, the excess amount is removed strictly along the inner line using a stationery knife.
The issue of gluing closing corners causes a lot of difficulties for beginners and more experienced people. In order for everything to go smoothly, it is necessary to apply each subsequent strip of wallpaper in close proximity to the previous one. Another secret to success will be to quickly remove excess pieces of wallpaper.
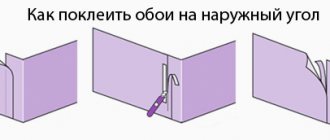
How to properly glue wallpaper on outer corners
For external corners, the rule is the opposite - the material must not be cut under any circumstances. The bulge is covered on both sides with a whole panel so that there is no joint. When drying, the wallpaper may shrink, causing a gap to appear between adjacent strips.
Here's how the craftsman recommends covering the outer corners:
- Apply glue to the wall to the width of the wallpaper with a margin along the edges.
- Apply the cloth first to one edge of the corner and remove the bubbles.
- Lightly stretching the material, wrap it around the ledge and press it against the wall. Gently iron the wallpaper with a spatula or brush until the air disappears.
Cutting under the ceiling and near the floor is best done in 2 stages. First, cut off the excess from the glued section of the wallpaper, then, after gluing, the remaining part. To do this, a long spatula is pressed along the cutting line close to the wall, the material is carefully cut through and removed.
It happens that the corners are so crooked that it is very problematic to go around them with a whole panel. Then another method is used, which by the way can be recommended, to strengthen the outer corners and reduce their damage during various manipulations. This is an additional finishing of corners with plastic or metal profiles.
As you know, scratches and abrasions appear very quickly on protruding parts of walls. And dense corners glued to the surface increase resistance to such damage. In addition, profiles in contrasting colors can be used as finishing to give the interior more clarity and graphics.
The only condition is that the corners must be flexible enough to fit snugly over uneven surfaces. Wooden ones can also be attached, but they are rigid and suitable for geometrically correct angles.
Other nuances of pasting corners
Every master in any field of activity always has his own little secrets. Wallpapering corners is no exception. It also has its own secrets.
- If the wall deviates significantly from the vertical, more than 2 cm, you should buy wallpaper without a pattern or with a pattern that does not require careful adjustment - a crooked angle will skew the pattern and spoil the effect of the repair.
- The corners must be primed to enhance the adhesion of the wallpaper glue to the wall - the lag of the trellises usually begins in the corners. If the primer was not applied over the entire surface of the walls, then instead of primer in the corners, you can use water-based paint or wallpaper glue, which is spread 4-5 hours before starting work.
- Glue in the corners must be applied only with a brush - the roller allows gaps (does not coat the entire surface), which will negatively affect the quality of the pasting.
- Before gluing the main panel, it is advisable to glue the corner with a strip of wallpaper 10 cm wide (the recommendation applies to smooth wallpaper). This will hide the unraveling seam and strengthen the trellises from tearing. Professionals often use Cobweb painting fiberglass instead of a paper strip.
- For heavy or thick wallpaper in the corners, you must use a special transparent adhesive.
- Non-woven wallpaper most effectively hides uneven corners.
- When folds form, while smoothing out a strip of wallpaper that has reached the other side of the wall, the spade needs to be trimmed in a herringbone pattern, which will allow it to be leveled. The next sheet glued overlapping will hide the cuts made.
- Ironing the trellises in the corners is carried out until the air cavities disappear - the sheet of wallpaper should fit snugly against the wall and not hang in the air.
- After removing the scraps formed after cutting the seam, the edges of the sheets are carefully moved away from the wall with a metal spatula and coated with glue. If this is not done, the edge of the wallpaper under which the cut strip was located will definitely fall behind - almost all the adhesive mass is removed with the strip.
How to join a drawing
Bright, expressive patterns on the walls certainly enrich the interior, but joining rapports (repeating motifs) creates additional difficulties, especially if the surfaces are curved.
Irregularities and deviations from the vertical can be easily determined using a building level. Depressions or curvature will be noticeable, just attach it to the wall. By the way, building codes do not allow defects of more than 2 mm across the entire height of the room. When purchasing wallpaper, you need to determine whether the pattern needs to be adjusted or not. Manufacturers usually mark their products with special marks:
For imperfect walls, a small pattern without a clear direction is suitable. The relief texture also allows you to hide some defects. If you want to experiment, you can cover one wall with patterned wallpaper, the other with plain wallpaper. In modern interior design, such solutions are used very often.
Wallpaper with large repeats requires careful adjustment. Material consumption is also higher than with an indefinite blurry pattern. To avoid color mismatches, you need to buy rolls from only one batch, the number of which is indicated on the package. This guarantees absolute shade identity. How to properly glue wallpaper in the corners of a room if there is a large or directional pattern? Experienced finishers advise:
- Unpack several tubes of wallpaper and place them side by side. This way you can determine in advance how to position the drawing on the wall so that there are fewer scraps. You may have to cut and glue strips from each roll alternately.
- It is advisable to number the canvases joined on the floor. This will reduce confusion and errors.
- Start pasting from the corner. Align the roll with the vertical markings, place the edge on the adjacent wall by 1-2 mm.
Glue the second sheet onto the perpendicular wall in the same way as the first. If the angles are right, the pattern will line up perfectly.
Where to start wallpapering a room?
Corners are considered the most difficult places to paste, not only because of their shape, but also because they are rarely perfectly straight. If you paste the walls joint to joint, then when you start pasting from the corner, a strong vertical distortion may appear. Many are sure that warping can be avoided if you start gluing from the window and doorway, mistakenly believing that in these places the walls are as smooth as possible and perpendicular to the floor.
Before you start gluing, you need to confirm that the window or door has no defects. This can be done using a simple plumb line. Very often, even such a simple study shows that the surface of the wall has significant flaws that can have an extremely negative impact on the quality of the cladding and the visual characteristics of the entire room after the completion of the repair work.
The method of window covering itself emerged from the tradition of using paper wallpaper. Starting from the window with an overlap and continuing to mount the panels clockwise, you can achieve maximum inconspicuousness of the joints. However, when using non-woven or vinyl facing materials, such an installation system is not at all necessary.
Pasting the wall should start from the corner
Professionals recommend starting pasting the wall from the corner, if at least one wall joint is fairly even. Therefore, you need to first examine problem areas with a slope and start work from the angle that has the least disadvantages. A preliminary study makes it possible to find out in advance the actual evenness of the walls and choose the most suitable method of installing the cladding.
Nuances when using different wallpapers
Meter
This coating allows you to reduce the number of joints, which certainly improves the quality of the finish. For large areas it is a very profitable option, since the price of meter rolls is 5-10% lower than regular ones. But high-quality pasting requires good preparation and careful alignment of the walls, as well as the help of another person. It is very difficult to glue wide wallpaper yourself.
Non-woven
Materials made entirely from non-woven non-woven fabric have proven themselves to be excellent due to their air and vapor permeability. They are durable and do not shrink when the glue dries. The cellulose fibers included in the composition reinforce small cracks, but they do not smooth out wall imperfections, so all defects remain noticeable.
A special adhesive composition is used for non-woven wallpaper. When gluing surfaces, the glue is applied only to the wall, which makes it possible to carry out finishing quickly and economically.
Vinyl
These wallpapers are made from non-woven fabric coated with PVC. It allows you to increase density and resistance to moisture, as well as diversify the surface texture. The material can be either smooth or with a relief pattern, which helps hide even large flaws in the base.
Vinyl wallpaper is glued dry onto walls coated with glue. If the pattern is convex, to prevent damage, do not squeeze or rub it too much. Glue can be used special or universal.
From what angle to glue
When you first take on the task of decorating an apartment yourself, you may get confused already in the first steps, when in front of you there is only a bare wall. Beginners ask questions about which side to put the first roll on correctly and whether the direction in which you move during the gluing process plays a role. Experienced users confirm that first of all you need to complete wallpapering the ceiling if you do not intend to finish it using another method. Once you're done with the hardest-to-reach surface, it'll be easier to focus on the adjacent walls without worrying about accidentally touching the fresh wallpaper. At the same time, both the ceiling and the walls require individual approaches to the selection of areas and direction for starting gluing. Wrong decisions at this stage will seriously complicate further finishing work, especially if you have no experience. Recommendations for solving this issue with your own hands are as follows:
- On the wall. When it comes to lap adhesive, the only correct choice is to apply the first strip near the window. This is done so that in the light of the sun the seams between them are not visible. In the case of wallpapering end-to-end, in addition to the window, starting positions are allowed at door frames and corners. Also take into account if the design of your facing panels includes drawings or complex patterns, which must match those on adjacent strips.
- On the ceiling. With this surface the problem is easier to solve, because All experts unanimously point to the need to glue the first roll strictly in the center of the ceiling. This way, it will be possible to adjust the remaining canvases so that they go symmetrically to the walls on either side of the central one.
Difficulty adhering to uneven surfaces
When you need to hide uneven walls with wallpaper , pitfalls may pop up here. You can use the leveling that is done before pasting. But if you do not resort to this procedure, then 3 main difficulties arise:
- You need to glue wallpaper on crooked corners, where the amount of curvature will be enormous.
- The relief is visible even after finishing.
- There are spaces under the canvas that will later form bulges.
Gluing external corners
- A strip is cut, the width of which should be equal to the distance between the last panel and the edge of the wall with a minimum allowance of 5 cm.
- The wall is treated with an adhesive composition.
- The straight edge joins the previously glued strip, and the cut edge fits onto the adjacent one.
- The trellis is leveled with a roller, spatula or brush.
- A wallpaper of similar width is being prepared.
- From the edge of the wall, at a distance equal to the width of the canvas, a vertical line is drawn with a level.
- Another strip is cut 2 cm wider than the previous one.
- The straight edge of the trellis is fixed to the line, and the cut overlap overlaps the previous strip.
- Applying a long metal ruler to the intersection of the wallpaper with a sharp knife, a cut is made in both strips.
- First, the upper excess piece is removed, then the lower one from under the canvas.
- The joint is carefully rolled out with a roller until it becomes invisible.
If the wallpaper has a pattern
Wallpaper with a monotonous small pattern, for example, checkered or striped, does not need to be adjusted to the pattern. The joints will not be visible to the naked eye. The situation is different with a more pronounced pattern, when the entire wall forms a full-fledged image or, if there is no pattern at all.
In this case, it is better to join the wallpaper end-to-end rather than overlapping. Non-woven wallpaper, which is always glued end-to-end, is perfect.
It is better to cut the sheets immediately before work on the floor covered with clean oilcloth. This way you can immediately cut strips that will match the pattern.
Recommendations for choosing the right wallpaper
Wallpapers differ in many ways. Most often, the choice is made taking into account the type of stripes, the number of their layers, as well as the pattern and color. When selecting strips that will be glued to an uneven surface, several important points should be taken into account. Let's take a closer look at them.
Recommendations for choosing wallpaper for uneven walls
It is not recommended to buy wallpaper that has a clearly defined pattern. In order to hide wall defects, blurry patterns are best suited. You can also purchase material whose surface has lines diverging in different directions.
Important! For curved walls, choose rolls painted in bright colors. You should also remember that striped wallpaper is not suitable if the walls in the room are not level enough.
Liquid wallpaper does not have to be applied over the entire wall area. If desired, you can apply this material to the most problematic areas. When choosing rolls, you should also focus on the thickness of the material. In this case, the following pattern can be traced: the greater the thickness, the better. However, it is worth remembering that the weight of the strip depends on the thickness, so for such wallpaper you will need to use much more adhesive.