Choosing an arched opening
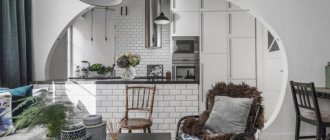
The absence of a door is not appropriate in every opening. An open pantry or bathroom will look strange. The kitchen, bedroom and office are also considered to be privacy zones, but in these cases there are exceptions. To create a feeling of intimacy, curtains, sliding screens and other solutions are added to the arch. There is no other alternative. It turns out to be a good compromise, creating the illusion of separation of rooms, but at the same time without creating dead zones.
Removing doors not only helps to visually expand the space. More air flows through the open passage, which adds freshness to even small living spaces.
Types of arches
The shape of the vault is a key point in the classification of an interior arch. The following design options are available:
- Classic . An ideal combination with any interior style. Performed in the shape of a semicircle.
- Portal . The simplest type of arch that does not require additional design of the corners. There is one minus - it requires careful selection of the style of the room, because it does not fit with every design.
- British (modern). From a design point of view, it is a middle option between a portal and a classic. The arch is rounded at the top point, but not as pronounced as in the classics. Used in modern rooms with ceilings of more than two and a half meters.
- Slavic (romantic). It differs from the above options in that the top is parallel to the floor. The only condition for matching the room is the presence of a smoothly rounded symmetrical corner.
- Trapezoidal . The best choice when zoning two small rooms. It is distinguished by sharp corners in the form of a trapezoid.
- Turkish . There are no roundings in the corners, which makes it possible to combine with a column. Can be installed in apartments with rooms of different heights.
- Thai . A striking difference is the curvature from the floor.
- Half-arch . A completely non-symmetrical object, representing a fusion of two, often completely different, styles. Rounding is determined by the characteristics of the opening.
Types and features of modern arches
Arched forms are almost similar in type, although each designer can introduce something new, it all depends on his imagination. But in practice, there are still different types of arches:
Types of door arches.
- classic form - a standard model, which is cut in the form of a regular arc;
- arch in the Art Nouveau style - has a raised upper part;
- romantic style - rectangular arch with rounded corners;
- ellipsoidal shape - its arc is an arc in the shape of an ellipse;
- arch made in any shape.
When choosing the shape of an arch, all parameters are taken into account: width, height, architectural design of the building, since any arch model significantly reduces the size of the passage between rooms.
In this regard, it is recommended to make an arched opening in cases where the dimensions fully allow for reconstruction. If the opening is wide, then an ellipsoidal and romantic model would be more appropriate; if it is tall, an arch in the “modern” and “classic” styles would be suitable. Well, if the opening is very large, then you can show your imagination and create more intricate and complex shapes.
Selection of materials
After determining the type of opening, you need to select the appropriate material. At the same time, it is worth taking into account the decoration of the walls of adjacent rooms. The most common options:
- Drywall . Available option for self-installation. Resistant to steam, moisture and sunlight. The sheets bend perfectly, due to which you can give them the most simple shape using liquid. A completely dry product maintains its desired shape. Installed on a previously assembled galvanized profile frame. The joint is puttied and primed, after which the finishing can be applied.
- Natural wood . Ready-made options are not distinguished by their pretentious design and richness of colors; their maximum is relief carving on the surface. However, a wooden arch can be made on your own. At the same time, it can be done in the desired form, having previously decided on the decorative finish.
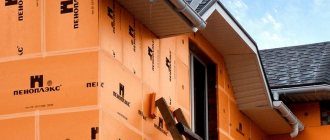
- Brick . Creates a feeling of massiveness, in no way inferior to the previous version. It can be erected at the time of installation of the internal partition or load-bearing wall.
- Chipboard and fibreboard . Budget materials that become a good option for an arch in an apartment. The raw materials are flexible, bend well, undergo manual correction of the form factor and do not lose their attractiveness after several years of use.
Methods for making interior arches
You can make an arch using one of two methods:
- using drywall and decorative elements;
- the surface of the wall is cut to fit an arched opening of any configuration.
If a European-quality renovation was undertaken, the old partition can be dismantled and in its place a new one can be made from plasterboard, with additional decorative elements. But it is important to take into account that if the wall is load-bearing, then it will be necessary to obtain permission for its redevelopment.
Diagram of a classic arch.
As mentioned above, an arched opening can be made in an old wall without the use of drywall. Using this method, the opening space is expanded and an arch is formed by stitching material at the top of the wall.
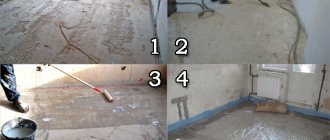
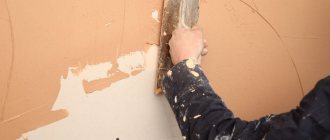
Before starting the arch, you need to carry out preparatory work. The first step is to remove the old plaster and putty. Then the surface inside the opening is leveled.
It is important to note that the walls must already be prepared before covering and have a final size, since subsequent measurements will be made according to these guidelines.
The next step is to create a project. To do this, the opening is measured, in particular the height of both walls, and the height of the arched opening is determined, which will determine the distance from the ceiling to the top of the arch. Using these points you can determine the radius of the proposed arch. After all the calculations, the arch is transferred to paper.
Article on the topic: Wooden floors in an apartment: floorboards made of natural wood, photo of parquet flooring, how to make planks
The simplest task is to create a diagram of an arched opening, and therefore measurements are taken right at the site where the opening is formed.
Step-by-step manufacturing instructions
Below is a detailed manual for creating an interior arch with your own hands. It is important to remember that the installation of frame-sheathing structures requires compliance with the entire process in stages.
Measurements and markings
Before proceeding with installation, it is necessary to measure the opening in which the product will be installed. You need to measure the height, width and thickness of the wall of the interior opening .
- The initial height of the doorway should not be less than 2 m, because installation of the arch will reduce this parameter by 10-20 cm.
- When measuring the width, you need to measure the entire opening and select the narrowest part to convey the size.
- The thickness of the wall is measured over the entire surface of the opening and the largest dimension is taken.
Next, you need to decide on the parameters of the arch: the radius of curvature and the rise of the arc. The rise of the arc is the distance from the top point to the point of intersection of the arch and the vertical line of the opening (the parameter of the “trapezoid”, “modern”, “ellipse” arches). The radius is necessary when measuring the “classic” and “romantic” arches. After measuring with a tape measure, it is better to transfer the dimensions on a cardboard scale.It must be taken into account that at a distance of 5 cm along the outer edge of the opening the platband will go, and at a distance of 8 cm the capital goes to the outer edge of the wall.
Frame installation
The base of the future arch is mounted to the end wall. Installation begins with installing a guide profile along the entire border of the opening. For these purposes, there are ceiling guides designed for plasterboard.
The profile is fastened using “bugs”. The vertical guide is installed indented from the interior wall. The indentation will be equal to the thickness of the plasterboard together with the layer of plaster. A pair of profiles are installed parallel on each side.
The arcuate part of the mounted frame is created by cutting the side flanges of the profiles and bending them to the size of the designed circle. Cutting iron is done with metal scissors or an angle grinder. Incisions are made at a distance of 4-6 cm from each other. The resulting arc is attached with a self-tapping screw to the main guide. To simplify the process, you can immediately use a special arched profile for drywall .
Arc-shaped profiles are installed and secured to the base of the frame. To securely fix the arches, they can be attached with a suspension to the straight guides in the upper part. Reinforcement crossbars are mounted along the perimeter of the frame, step 0.4-0.6 m. The guides of both circuits are fixed.
Sheathing
After installing the profile frame, you need to move on to manufacturing the sheathing components. Marking and installation of the side part of the arched opening is carried out using the technology below:
- The rectangular piece is marked on a sheet of drywall in accordance with the width of the opening. In the middle part of the depicted part, place a point from which a vertical line is drawn - it determines the center of the part. Taking into account that the arc has the shape of a hemisphere, it is necessary to make the correct side planes. It is necessary to divide the width of the opening by two, then you get the radius of the circle.
- In order for the shape of the side walls to be correct, you will need to find the top edge of the component and measure a distance equal to the known radius and add the distance from the top point of the opening to the top of the arch arc. After marking the part, a point appears on the center line of the part, defining the center.
- At this point you need to install a compass. An ersatz tool can be made from thread and a nail. Next, the length of the thread is set equal to the known radius and a hemisphere is outlined. After this, the diagram of the side elements can be considered ready.
- The part is cut out in accordance with the resulting markings. In this case, a jigsaw or a construction knife is used. The result is a rectangular figure with a cutout in the form of a semicircular arc.
- The resulting sample is “pretended” to be installed at the installation site. If the calculations turned out to be correct, then the part will turn out smooth. If there are any discrepancies, you can eliminate them with a knife, after marking the excess elements with a pencil. The final version is used as a template for the manufacture of a second, absolutely identical element.
- Next, you need to mount the first sheet of gypsum board. A standard sheet has a thickness of 1-1.25 cm - it is recommended to use a 3.5x35 self-tapping screw. When using sheets less than 0.95 cm thick, smaller fasteners are used accordingly. Repeat with the second side.
Performing an arched arc
You can make an arched arched part using two methods:
- " Wet ". In this case, we mean moistening the part. The surface of the element, cut to the required size, is processed using a needle roller, as a result of which many holes appear on the drywall. After this, the part is treated generously with water. The wet element is bent to the required shape. To do this, you need to place it on a previously created template and carefully transform it. The resulting arcuate strip is thoroughly dried, after which it can be fixed to the frame.
- " Dry ". This method involves making cross cuts or cuts on one side of the drywall. The other side remains intact, thereby ensuring the overall strength of the element. This option is disadvantageous because it reduces the reliability of the structure at the time of installation, as well as being more labor intensive.
After securing the strip and sides to the arc-shaped frame, you will need to level the entire surface using putty. She needs to cover up the joint of the sheet and the protruding fasteners. Now you can move on to the next step.
Preparatory activities
Choosing an arch type
Experts recommend focusing on the ceiling height and the general style of decoration of the room. There are several options for arched structures, but most of them reduce the opening by installing a supporting frame by about 150 - 200 mm.
- With low ceilings, it is hardly worth getting rid of interior doors. At the very least, you should think carefully. The only possible option for finishing the opening after their dismantling is plastering followed by pasting (wallpaper, fabric) to match the walls. Building an arch using this method is quite simple; it is only necessary to correctly process the end parts of the passage. But this room design option has a significant drawback, and therefore does not suit everyone - the lack of sheathing makes it impossible to install hidden spotlights in the opening.
- In some articles on the topic of making an arch, there are recommendations for giving the desired geometry to the passage between rooms using cellular blocks, bricks or concreting. Not to mention the complexity of such work, it is worth considering the additional load on the floor. And since you will also have to deal with the solution, it is not the best option for an apartment.
But if the decision is made, then you should take into account the features of the interior of the home. This will help to correctly determine the optimal type of arch.
- Classical. The upper part is an arc with a constant radius (semicircle). It is relatively easy to make, since it has the correct geometry. But it is advisable to install it only in openings between rooms with high ceilings.
- “Modern”, “Romatica” are well suited for multi-storey buildings. The latter type of arches has a large width, and therefore are recommended for installation in the opening leading from the hall to the hallway.
- "Portal". The fundamental difference from others is that this is a rectangular arch. It is advisable to install it in private buildings. When applied to an apartment, it looks great, but only if straight lines predominate in the design style of the room. A significant advantage of this design is that it can be installed without much difficulty, even if you have no skills.
- "Ellipse" and "Trapezoid" have a more original shape. When deciding how to make an arch in a doorway according to one of these schemes, it is worth considering that the correctness of the geometry largely depends on the accuracy of the calculations of the parameters of all elements and radii (angles).
There are other options for designing openings: Venetian, Florentine, with “shoulders” and a number of others. But it is so difficult to build an interior arch of any of these varieties that you should not choose them for independent installation.
Selection of materials
- Frame. There are only two options here - wooden slats and metal profiles. It is more difficult to work with the former, especially if the vault has a geometry with changing parameters. Bending wood is not only a complex process, but also a long one. In addition, wood absorbs moisture well, is susceptible to drying out, and therefore deformation cannot be avoided. In this regard, a door arch assembled on a metal frame is more durable and reliable.
- Facing. Panels made of plastic or chipboard with lamination look great, and they do not require further finishing. The downside is that it is difficult to choose their shade for a specific interior; besides, such an arch will be more expensive. It is better to use elements made of fiberboard, multi-layer plywood (small thickness) or gypsum board. Working with these sheet materials (cutting, bending) is much easier. Plus, the finishing design can be done in any way you wish.
But you should pay close attention to the recommendations on how to make a wooden arch. There is no doubt that the design will be strong, durable and inexpensive. But there are a number of nuances.
- You must have experience working with wood. It is difficult to bend and, in some cases, to process. For example, the selection of grooves and quarters cannot be done without special tools and devices.
- The lumber still needs to be selected correctly. First of all, by breed. Each has its own characteristics, and its use largely depends on the specific microclimate of the room.
Finishing methods
Finishing is done to level the surface of arched structures. The surface is treated with a primer, after which it dries, putty is applied. To reinforce the resulting layer and strengthen the corners, fiberglass mesh is used. A third layer of putty is created on it, which dries in about 10 hours. Next, sanding begins. If the work is done well, you can achieve a smooth surface without roughness.
Finishing is the final step that emphasizes the beauty of the product:
- Wallpaper . The simplest and most popular method. When considering this method, it is worth considering the fragility of the paper covering. However, the ease and high speed of installation, coupled with the low price of the material, make this option attractive.
- Varnish . Coloring emphasizes the texture of the natural decorative element - natural stones and wood. If this is not required, then you can use matte varnish - it will protect the above-mentioned components from mechanical damage.
- Polyurethane stucco . Almost every hardware store offers a huge assortment of these raw materials, which allows you to create the appearance of an expensive opening for little money. It is more appropriate to use it to cover a column or vertical post.
- Plaster . Used for processing arches made of plasterboard. A simple and inexpensive technology, which has two disadvantages: unsuitable for repair and difficult to maintain.
- PVC panels . Used in corner arches. The solution allows you to install lighting, but this will require the installation of additional sheathing.
- Mosaic - ceramic, glass and metal. Many small elements can be painted in different shades, thereby creating a unique image on the surface of the arch.
- Decorative rock . A popular solution due to aesthetic and functional advantages. There are many varieties of material available, which opens up the possibility of creating different textures.
Installation of an arch made of MDF or fiberboard
These materials bend perfectly. This is done by moistening and fixing in a bent position for a long time. After drying, the material takes the desired shape.
In the case of MDF, you can bend several thin sheets (5 mm) and glue them together. You can also use the so-called bendable sheet with peppered slots 8 mm thick.
For gluing, it is recommended to use a transparent sealant that will not be visible at the seams.
First, the frame is made. It is made from wooden blocks and metal profiles. The frame is mounted in the opening and then sheathed. Fixation to the frame is done with self-tapping screws. After installation, the structure is trimmed and all irregularities are puttied. Then the final finishing is done.
Beautiful design techniques
At first glance, it may seem that the arch design is difficult to imagine in another form. However, there are non-trivial solutions:
- A round opening is a classic option, the shape of which can be non-standard: Venetian, trefoil, with a shoulder, etc. This option is used both in traditional European and oriental interiors.
- Lancet is a simultaneous reference to the Middle Ages, and more specifically to the Gothic style, because similar to the pointed domes of buildings. The design is sensitive to style. A prerequisite is a high ceiling.
- Asymmetry . The appearance of this arch is limited only by the designer’s imagination and the material of the walls. Usually, one of the sides is made straight.