Modern renovation is not complete without decorating the surfaces that need to be prepared, and wall putty is often used to match the wallpaper. For high-quality alignment of seams between sheets of drywall or masking of brickwork, it is important to correctly select the starting and finishing mixture. Preparing walls for liquid, paper or fiberglass wallpaper is a simple process, but it is important to know all the nuances of the technology.
Why putty the walls?
Many who have had to do the repairs themselves are sure that at the preliminary stage of preparation it is enough to remove the old wallpaper. Sometimes this is enough if the walls are perfectly smooth. This rarely happens, so it’s better to find out how to properly putty walls under wallpaper yourself.
Peeling off old layers, you can often find:
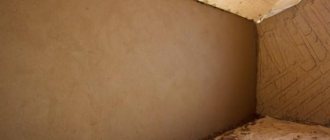
- Uneven surface with holes from shelves and cornices;
- Defects, cracks and crevices at the junction of plates;
- Wooden beams with a rough texture;
- Holes in the walls at the outlet of communications and heating pipes;
- Building materials of a contrasting color that shine through under photo wallpaper or thin rolls for painting;
- Peeling of old putty under wallpaper.
Minor troubles can be easily eliminated by using putty on the walls under the wallpaper yourself. Thanks to its plasticity, it is easy to seal cracks, creating a smooth surface for modern cladding. In this case, you can count on them not coming apart at the seams due to the curvature of the walls. It will be unpleasant if the whole room is lined with expensive wallpaper, and after drying there are gaping dents that you were too lazy to putty on.
It is not always necessary to carefully design the walls, for example, for “liquid wallpaper”. They partially mask defects due to their special texture. But under the thin paper photo wallpaper, even minor flaws will be visible.
To eliminate defects, you need to prepare a gypsum composition that dries quickly. Large differences in level are leveled with cement or polymer-based compounds. Particularly noticeable are chips and gouges in the outer corners, and discrepancies in the level of the concrete ceiling slabs. That's why it is necessary to apply putty under smooth wallpaper made of thin materials.
To eliminate defects, you need to prepare a gypsum composition that dries quickly.
Useful tips
In order to putty the base correctly and get a high-quality result, you must follow a number of recommendations from specialists:
| To obtain an even inner corner, a syringe gun is used to apply the solution. It allows you to feed the mixture directly into the joint. | |
| Beginners should use a short spatula. It is easier for them to get a flat surface. | |
| For work use 2 tools. Putty is applied to one, the mixture is applied to the second and the mixture is leveled. | |
| Puttying begins with a less noticeable area. Quality is checked by building level and rule. | |
| The corners are finished last. It is recommended to start from a flat plane. | |
| When drying layers, do not use heating devices or heat guns. | |
| Containers and tools are thoroughly washed before each batch. Pieces of old putty negatively affect the quality of the solution. | |
| After each layer, the walls are coated with a primer. |
Experts recommend putting putty under wallpaper on any type of surface, even if it is highly durable. The putty hides imperfections, evens out the color, and provides better adhesion of the wallpaper to the surface.
Have you puttyed the walls under the wallpaper? What putty did you use? Share your experience in the comments.
Types of putty mixtures
The process of leveling walls is divided into several stages. After removing the old wallpaper, defects are identified by filling cracks and depressions with cement mortar, if these are concrete slabs of an urban building. In most cases, a thorough study of the surface is required, where 2 types of wall putty for wallpaper are used with your own hands.
The starting mixture or base, which is used to fill seams and defects, is a coarse-grained composition with good adhesion. The leveling layer should not be thicker than 5 mm. At this stage it is not possible to achieve a perfectly smooth surface. To complete the work, when gross defects are masked, use finishing plaster of the walls with your own hands under wallpaper. This is a dry powder, reminiscent of flour, requiring dilution with water to the consistency of sour cream.
Finishing putty is often sold ready-made in plastic containers. The plastic mass is slightly shiny and kneads easily without sticking to your hands. It is evenly distributed with a thickness of 1.5-2 mm.
If you are preparing a wall for washable wallpaper with a laminated coating in a room with high humidity, you need a moisture-resistant mixture. It is important to ensure good waterproofing at the junction of the walls and floor, and to lay the baseboard after gluing the rolled materials.
Putty compositions differ according to the type of base:
- Cement
- Latex;
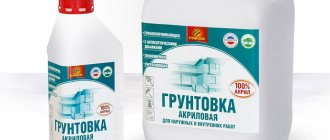
- Acrylic;
- Silicone;
- Oil-glue.
The polymer mixture is prepared in small portions, which will be consumed in about 2 hours of work. The residue is unsuitable for puttying 3-4 hours after preparing the solution; it hardens.
If you are preparing a wall for washable wallpaper with a laminated coating in a room with high humidity, you need a moisture-resistant mixture.
Step-by-step instruction
Puttying walls is an iterative process. It consists of sequential steps. When puttying, it is important to maintain time intervals between each stage and wait for the layers to dry.
The sequence of actions includes:
- preparation of the base;
- calculation of putty;
- kneading material;
- applying the base layer;
- padding;
- applying the finishing layer;
- sanding and priming.
Each stage is mandatory and cannot be skipped.
During the puttying process, it is important to perform all steps sequentially
Wall preparation process
Before applying the mass, it is necessary to prepare the walls. Of all the steps, preparation is the most important. The quality of the result depends on it. It involves several steps.
| 1. Stripping the old coating. Wallpaper, tiles or other types of finishing are removed. If the old plaster is peeling or cracked, it should be beaten off. | |
| 2. Elimination of defects. Places of potholes, chips and other defects are covered with soil and sealed. | |
| 3. Dust removal. Dust and small particles of dirt are swept away with a soft brush or rag. | |
| 4. Priming. The cleaned base is primed in two layers. |
It takes 12 to 24 hours for the primer to dry completely. After this time, you can proceed to applying the base layer.
If the base is made of gypsum plasterboard, then to prepare it it is necessary to seal the fasteners, reinforce the joints and corners.
Preparation of putty and calculation of the required quantity
Before starting repair work, it is necessary to calculate the required amount of mixture. This will require the average flow rate. It is indicated in the specifications on the packaging.
To calculate you need to know:
- room area;
- layer thickness;
- number of layers;
- average flow rate.
Manufacturers indicate on the packaging the approximate consumption of the composition for plastering 1 square. m
The required number is obtained by multiplying all indicators. It gives the number of kilograms for the entire area. To determine the number in bags, the value is divided by the mass of one bag. On average, consumption per square meter ranges from 500 to 1500 grams of solution.
The batch is made in small volumes, so that the entire portion can be consumed within 30-40 minutes. This is due to the short pot life of the putty. When the mass begins to set, it is not recommended for use. This coating is of poor quality. The solution is mixed according to the technology indicated on the packaging. To obtain a homogeneous mass, use a construction mixer.
Starting layer
The starter coating is applied first. Special or universal formulations are used for it. The technology includes several mandatory steps:
| 1. The mixture is scooped onto a wide spatula. Using a smaller tool, remove the putty from it and transfer it to the walls. The solution is leveled; the thickness of the coating should not exceed 3 millimeters. | |
| 2. Each layer overlaps the previous one by 6-8 centimeters. Layer quality control is carried out as a rule. It allows you to remove excess material and identify areas that need additional processing. | |
| 3. The corners of the room are processed separately. An angled spatula is used for them. |
Grouting of the coating is carried out several hours after application. It is important that the surface has already set, but not completely dried. Grouting is carried out using a float in a circular motion.
Finishing layer
Finishing putty allows you to create an even, smooth layer. It conceals possible unevenness and defects in the base coat. This stage is mandatory if you plan to use thin or light wallpaper. If the fabric is dense, then basic processing is sufficient.
Finishing putty will help hide minor defects and chips on the surface being treated.
Before applying the finishing putty, experts recommend priming the walls. The application technology is no different from the starting coating. The only difference is the thickness of the layer. It should not exceed 2 millimeters.
An excellent result is obtained if the spatula is held at an angle of 25-30 degrees during application. The material is distributed in even portions. When finishing, experts recommend using side or multi-sided lighting.
The mass is stretched from bottom to top. Craftsmen recommend applying 2 layers of finishing putty with drying intervals.
Sanding and priming
The final stage of work is grinding the putty surface. This is carried out after the layer has completely dried. For work, use a grinding machine or grater with a fine mesh. The movements are made in a circular direction, counterclockwise, without strong pressure.
Scheme for grinding a putty surface
The main task is to remove sagging and unevenness. After sanding, sweep away the dust with a soft brush. Finally, the walls are primed with a deep penetration compound.
Material consumption, how to calculate
When purchasing putty for uneven walls before wallpapering, it is important to check the consumption of the dry mixture and the finished paste. It is recommended to “stock up” on the scope of work for the room. Consumption rates are indicated in the instructions. It happens that recommendations are written illegibly, in an incomprehensible language, or are lost during transportation. Then they focus on general norms.
Experienced craftsmen know that a 1 mm layer takes about 1-1.5 kg of mixture distributed per 1 m2. This rate varies depending on the composition and method of preparation of the mixture.
Consumption is determined by the method of applying the putty, the experience of the technician and the type of surface. A rough wall “eats” the mixture much more than a smooth surface with a primer. Sometimes a base is not needed. In this case, craftsmen prefer a universal composition in order to properly putty the walls under the wallpaper and save a little money.
Coarse mixtures require more consumption than is indicated in standard calculations. But it is impossible to do without a base layer when preparing a brick or stone wall for wallpaper. Dry starting putty is sold in paper bags of several kilograms, so the consumption has to be rounded up. There is at least 1.5 kg per square meter.
Under the painting mesh, which is embedded in the putty, you need to double the consumption rate. To level out crooked walls when the house shrinks, you will need a thick layer - up to 5-8 kg of base for each square. If you trim off the bulges, alignment will be easier and there will be less material consumption.
The instructions for the Ceresit CT 29 starting mixture indicate great variability - 1 layer can be in the range of 2-20 mm, respectively, the consumption in a thick layer increases several times.
Consumption is determined by the method of applying the putty, the experience of the technician and the type of surface.
Tools and materials
The necessary tools for repairs are prepared in advance. Great attention is paid to their quality and purity.
From building materials you will need:
- putty;
- primer.
Tools needed:
- containers for putty and primer;
- set of spatulas;
- rule;
- roller and brushes;
- construction mixer.
Tools for puttingtying walls under wallpaper
Other tools may be required as you work.
It is important that everything you need is at hand. It is recommended to use cold water for dilution.
How to properly apply putty on walls
It is impossible to “trample” the plaster into a thick layer in one application - when it dries, it will crack. The minimum and maximum allowable layers are different for each type of base. This is indicated in the recommendations on how to putty walls under wallpaper with your own hands. Each layer of material is applied to a dry coating.
Important requirements when puttingtying walls under wallpaper with your own hands:
- Optimal room temperature and humidity;
- High-quality batch;
- Primer of walls;
- Distribution of mass in thin layers using a tool;
- Coat in 2-3 layers with a smooth surface at the finishing stage.
When drying the layers, it is important to avoid drafts. Do not ventilate the room by opening windows or doors. A low temperature, within 8-12°C, is even better than heat and dry air, which will quickly “pull out” all the moisture from the walls. It is also better to turn off heating appliances.
When drying the layers, it is important to avoid drafts.
Surface preparation
Before you putty the walls under the wallpaper, remove the old paint, peeling plaster and the previous layer from gluing the rolls.
- It is easier to remove the paper after thoroughly soaking it with a sponge roller or spray;
- To remove paint you need a “wash” and a hairdryer;
- Peeling plaster is cleaned with a sharp spatula and a metal brush;
- A thick layer of building materials and cement at the seams of the brickwork are knocked down with a chisel.
Before you putty the walls under the wallpaper, remove the old paint, peeling plaster and the previous layer from gluing the rolls.
For those who decide to do the repairs themselves, it is recommended to purchase a set of new spatulas of different widths. In addition to them you will need:
- Electric drill and container for mixing dry putty;
- A plumb line (to check the vertical) or a universal level with a “laser” (horizontal);
- Sanding machine (coarse sandpaper or mesh grater) for final work;
- Foam roller (for soaking the old layer);
- Vacuum cleaner (removing dust from grinding);
- A broad rule, from the word “edit” (distribution of putty over the surface);
- Brush and roller for primer;
- Water containers for soaking brushes after work.
The surface of a good tool for puttying walls should be free of nicks and bent corners, otherwise marks will remain.
It is better to remove the remaining mass from the instrument immediately so that it does not dry out.
The surface of a good tool for puttying walls should be free of nicks and bent corners, otherwise marks will remain.
Working with starting putty
It happens that old wallpaper is glued very conscientiously. They should not be left as a basis, as beginners think. The paper layer will quickly shrink and peel off during pasting with new wallpaper.
The starting mixture should be free of lumps. If you prepare your own cement composition for sealing joints, white cement and fine river sand are recommended. With this composition it is easier to learn how to putty walls by getting your hand used to working with a spatula.
Preparing dry putty for work:
- Pour a small portion of dry matter into a mixing container;
- The volume of water must match the proportion indicated in the recommendation on the packaging;
- It is better to stir mechanically rather than manually (if you don’t have a construction mixer, an electric drill with a “stirrer” will do);
- It is better to add water to dry putty in portions, stirring thoroughly until there are no lumps.
Using a narrow spatula, scoop up the finished mixture from the batch and place it on a wide rule (tool). The mixture is spread with confident gestures over a small section of the wall, starting from the corner. Before re-application, the wall must dry for 12-24 hours, depending on the temperature.
The starting mixture should be free of lumps.
Finishing putty
The final stage of preparing walls for wallpapering is leveling with a finishing compound. The principle of preparation of the composition and application is not very different from the technology of applying the base coat. The recommended layer should not exceed 1.5-2 mm.
Under thin, light-colored wallpaper, careful work is done. Without putty, all the defects of the walls and joints made of different materials are visible. Wooden beams, metal corners and gray reinforced concrete products will shine through. Therefore, they must be coated with a universal or specialized finishing putty.
It is advisable to purchase primer, starting and finishing putty for concrete walls under wallpaper from the same brand of manufacturer. This guarantees excellent adhesion and high-quality coverage.
With a plastic finishing mixture in a plastic container, you can finish the job at any time without worrying that the remainder will dry out. However, the packaging must indicate the expiration date and storage conditions, which cannot be ignored.
With a plastic finishing mixture in a plastic container, you can finish the job at any time without worrying that the remainder will dry out.
What to do after finishing putty: grouting
The leveling process can be completed with the application of a base coat if there are no defects. On smooth walls under textured wallpaper there is no need to do thorough grouting. It is performed in fragments where irregularities are identified.
High-quality wall putty for wallpaper is also sufficient for lining with fiberglass rolls for painting. In other cases, it is recommended to thoroughly clean the walls.
Grouting is a smoothing of the surface performed with a special tool:
- Fine-grained sandpaper;
- Sanding mesh;
- Grouting block;
- Grinder.
When working with starting putty, tool streaks often remain, especially for beginners. They are removed during the grinding process. Upon completion of this stage, carefully vacuum the wall before priming and gluing the trellises.
Tool streaks are removed during the grinding process.
Wall leveling technology
As an example, let's look at how to plaster drywall under wallpaper. The work is carried out like this:
| Illustrations | Description of actions |
Preparing the walls. Before plastering the drywall under the wallpaper, you need to prepare the walls as follows:
| |
| Padding. Regardless of what type of surface you are working with, before plastering them, you must apply a primer to the base. To do this, use a roller or brush. Keep in mind that the primer is applied in two layers. | |
Seam preparation:
| |
Alignment of walls.
| |
Preparing for finishing. Preparing plastered walls for finishing is done as follows:
|
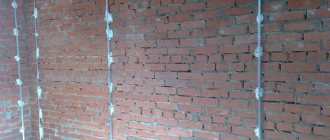
Puttying brick surfaces
The specificity of brickwork is its heterogeneity, deepening of the seams and possible vertical deviations. It is important to ensure that the wall does not have any bulges by using a plumb line. If there are no problems, the work will be easier and there will be minimal consumption of materials. In case of large deviations, alignment is performed using beacons.
To level the masonry, an inexpensive putty for wallpaper on any base is suitable:
- Polymer;
- Cement;
- Plaster.
Select a variety that meets functional requirements. If you have to do multi-layer leveling, there is no point in buying the most expensive compound.
The cement that sticks out at the seams must be chipped off or beaten off, but the masonry itself provides high adhesion. After preparing the surface, a working solution is prepared and distributed over the wall. The technology for applying the finishing layer of wall putty under wallpaper with your own hands is no different from working on any other surface.
In case of large deviations, alignment is performed using beacons.
Calculation of the required amount of putty
Each manufacturer will have different material consumption, so before preparing the solution, you need to study the information on the packaging. It is also worth considering that the thickness of the material layer will also affect the consumption of putty under the wallpaper.
On the packaging, the manufacturer indicates the putty consumption per 1 square meter (the layer thickness is 1 mm). Taking this number, you will need to multiply it by the surface area that you plan to treat, multiply by the thickness of the layer and add 10% to the result.
For example, the area of treated surfaces reaches 20 square meters. m., and putty consumption is 1.2 kg/sq.m. Layer thickness - 3 mm.
You need to calculate like this: 20 × 1.2 × 3 + 10% = 79.2 kg.
How to properly putty concrete walls
There are different ways to remove old coatings, under which wall defects are found that need correction. They “pop up” after expensive repairs are completed. First fill the cracks, then level them. But is it necessary to putty smooth walls before wallpapering in a city apartment?
Experts do not recommend gluing modern wallpaper onto “bare” concrete without a plaster layer. The cement will quickly absorb all the moisture from the glue; heavy vinyl rolls can quickly fall off.
Concrete slabs are treated with cement-based putty compounds. At the “finish” you can use other compositions. It is advisable to impregnate dry concrete with 2 layers of primer. No one can guarantee that the wallpaper will not slide off without additional surface treatment. You can take a risk by moistening the walls with a household spray bottle. No moisturizing is required after priming.
Concrete slabs are treated with cement-based putty compounds.
Purpose
A process such as putty is needed in any case, especially when it comes to wallpapering.
If you want your room to have perfectly smooth walls, a process such as putty cannot be ignored.
There are main reasons why it is necessary to putty the base:
- It is with this material that you can wipe out all the pores that remain after applying the plaster. Thanks to this finishing coating, it is possible to significantly reduce the consumption of adhesives. The putty also prevents the entire finishing layer from peeling off from the wall itself;
- It is a process such as putty that helps turn walls into smooth, perfect surfaces. It can be used to erase all existing microcracks and other defects on the base. For example, putty before wallpapering is needed to prevent the cement-sand surface from crumbling.
putty
It is necessary to apply wallpaper over putty in any case for high-quality repairs. If you first leveled all the walls with plaster, but did not apply a layer of finishing putty, then you may notice various kinds of reliefs and grains on the wallpaper.
This is due to the fact that plaster does not provide a clear, even surface, since its composition is heterogeneous like putty. Putty for chipboard under wallpaper is also a necessary process. Many people believe that the smooth surface of the boards allows them to immediately apply wallpaper, but in fact this is not the case.
In any case, it is necessary to apply a layer of putty to the drywall to seal the seams between the boards in order to eliminate the visible part of the screw.
Hiding the attachment points
Also, during their installation, dents may form on the material, which can also be removed by applying putty.
There is another reason why you need to putty the walls before directly gluing wallpaper - washing off the old layer of materials . Wallpaper, paint, whitewash and so on.
Removing old wallpaper
After removing all unnecessary materials, it is necessary to level the surface. You can find out how to level the walls with wallpaper putty later in this article.
Plasterboard putty under wallpaper
It happens that the walls and partitions are made of gypsum plasterboard, plywood, and other sheet materials. After pasting with expensive wallpaper, it will be very annoying if the joints of the drywall sheets and screws become “treacherously” visible.
Plasterboard putty comes down mainly to masking rough seams. The gypsum board itself is a smooth and even material. Gross defects in a structure made of a fairly fragile material can be hidden under putty with reinforcement made of sickle mesh. Protruding joints will have to be cut off, and the screws will need to be deepened. After eliminating the defects, you can putty with a finishing composition based on gypsum or acrylic.
Plasterboard putty comes down mainly to masking rough seams.
Is it easier to putty?
Almost the same thing if you putty in one layer. Anyone who knows how to putty, putty. If you don’t know how to putty, glue it onto the plaster (but you also need to know how to plaster), but remember that it needs to be smoothed out in almost the same way as you would with putty. It may be a little easier, but you don’t need to buy putty.
Recommend: Brickwork at low and subzero temperatures
If you take expensive putties, like Rotband Paste, then even a teenager will putty with such putty after watching 2-3 videos on the Internet, working “to peel off”, without giving a layer. That is, using a spatula, simply spreading the putty over the base with force. There is a separate detailed article about puttying walls, I won’t dwell on it here, → read (with pleasure!).
How to putty on wooden surfaces
Wood is a living material that is susceptible to rotting. When choosing a mixture for wood, you need highly specialized and universal compositions that retain some plasticity.
In rooms with specific conditions, it is important to choose appropriate labeling offers:
- Standard KR – normal conditions;
- The LR standard is used for places with high humidity.
Polymer compositions are ideal for “living” building materials due to their elasticity. You can trust the compositions of trusted manufacturers:
- VGT (acrylic wood putty);
- Eurocol;
- Eurofiller Wood Plus;
- Tikkurila Lakkakitti;
- Eurotex (acrylic);
- KNAUF Polymer Finish.
Puttying is performed on old wooden surfaces, partitions, beams and attic floors. Some design and architectural forms involve structures made from wood-derived materials. Under wallpaper they are also coated with a specialized primer.
When choosing a mixture for wood, you need highly specialized and universal compositions that retain some plasticity.
Requirements for the surface before wallpapering
Before gluing wallpaper, the wall must meet the requirements that allow this work to be done efficiently and for a long time.
- There should be no cracks, crevices or holes on the surface. They are reinforced and plastered.
- If there are metal objects that cannot be removed, they are coated with protection (regular paint) to prevent rusting.
- Primer coating is a must. This will protect the surface from moisture and provide good adhesion.
- In most cases, the surface is covered with putty. This protects the walls and ceiling from moisture and cracks. And dark spots do not appear on the wallpaper. The coverage has a long warranty period.
- Before gluing wallpaper, be sure to choose a suitable adhesive. Each type of trellis has an adhesive label on it.
Before gluing, the rough base is covered with putty mixtures. After grouting, a primer is used, only after that the finishing is carried out.
When can I start gluing?
After the obligatory sanding and priming, you can begin wallpapering. In houses where there are “damp” corners, waterproofing is done and problem areas are treated with a fungicide (a solution for mold and mildew). It is important that all layers dry well for 3-5 days before the final stage of repair.
After the obligatory sanding and priming, you can begin wallpapering.
A base coat without primer will absorb a lot of moisture. Therefore, sticking can present unpleasant “surprises”. For some types of wallpaper, it is not necessary to saturate the walls with glue, for example, when it comes to non-woven or fiberglass options. Under “liquid” wallpaper, it is enough to apply only the starting leveling layer and soak it with a primer.
How to putty with your own hands?
How to putty yourself - 5 stages of work:
- applying the first layer and leveling;
- 2-3 layers - for significant unevenness;
- surface drying;
- coating with a finishing composition;
- grouting and obtaining a smooth surface.
The application procedure itself is simple. Irregularities and grooves can be corrected with a spatula. For curly elements, corners and arches, a thicker solution is needed.
Attention
To get the most even coating, create markings. For this, metal and wooden plaster slats are used. Beacons are best secured with plaster.
For do-it-yourself puttying, you need dry mixtures to independently regulate the consistency of the solution. They are diluted with warm water. Let the mixture sit for a while before use. To avoid staining the floor, it should be covered with plastic film.
How to learn technology?
To learn how to putty, you need to combine theoretical knowledge and practice. You can level the layer until the material has completely hardened. This takes a lot of time, so you can practice.
You should not immediately take on large volumes or complex shapes. It will be difficult for a beginner to putty a surface with waves and curves.
Preparation of the solution
Next, prepare a solution from the dry mixture. To do this, you should first read the instructions on the packaging. It gives the proportions in which the mixture should be diluted with water.
The approximate consumption of the mixture per square meter is also indicated there. m, so it will be enough for you to simply calculate the volume of solution required for work.
If you are working with gypsum plaster, then it should be diluted in small portions, since the gypsum sets quite quickly. In this case, the gypsum cannot be diluted with water a second time, so the frozen gypsum mixture will have to be thrown away.
The solution is mixed as follows:
- First, pour the required amount of water into the container.
- Add the dry mixture to the water in accordance with the proportions indicated in the instructions.
- Stir the solution using a construction mixer, adding dry mixture into the container if necessary.
- As a result, you should get a plastic but fairly thick solution. The trowel should stand quietly in it, being stuck in a vertical position. The scooped solution, in turn, should not slide off the trowel, but should be held firmly on the spatula.
What happens if you glue it to plaster without decorative putty?
The consequences in this case will be unpleasant. The canvases will peel off very quickly. Another option is that dark spots will appear on the wallpaper. They can also tear. All three options are unpleasant and will lead to the need to do the repairs again. To eliminate all the listed consequences, rotband and putty are first applied to the walls.
The canvases will peel off very quickly if they are glued without decorative putty.
Is it worth priming?
For durable and high-quality repairs, wallpaper is glued to the plaster after preliminary priming.
Application of a primer is recommended to solve the following problems:
- Protecting surfaces from the appearance of fungus and mold, and from moisture getting on the rough base.
- Increasing the level of surface adhesion, ensuring durability of the repair.
When choosing a primer when applied to cement or gypsum decorative plaster, the compatibility of the mixture with the surface is taken into account. Experts recommend choosing a primer with antiseptic additives to prevent the formation of fungi.
The deep penetration primer mixture protects the rough surface from temperature changes and negative climatic influences. The primer can be heat-resistant, withstanding temperature fluctuations.
The list of popular primers includes the following products:
- Pufas;
- KLEO Extra;
- Methyline;
- Moment;
- KROST;
- Pufas Euro 3000 Vlies;
- QUELYD Special interlining;
- Ceresit CT 17;
- Quelyd Express and Super Express;
- Knauf Tiefengrund, etc.
Priming is done before wallpapering, using a brush or foam roller. The solution is applied to the surface in an even layer, carefully treating the corner areas. If it is necessary to level the base, apply a second coat of primer. The surface must be dried before gluing wallpaper materials.
Is it necessary to plaster the walls in a panel house?
Concrete wall slabs can be finished with high quality without plaster, the main thing is to properly prepare them for finishing. But in any case, I advise you to plaster the panel slabs that are in contact with the street. The apartment will be warmer. It is better to plaster concrete over a mesh mounted on the wall, or over an applied concrete contact, then the plaster will definitely not fall off.
Concrete itself does not need additional finishing if it is not used in an aggressive environment (acids, alkalis, etc.), or if special qualities are not required (increased water resistance, for example). Plaster, like wall putty, is only required if the quality of the surface does not suit you (uneven, with dimples, for example). If the surface is smooth, you can immediately apply a finishing coating (glue wallpaper, for example). If you are going to paint the walls, then it is better to putty on the walls in order to fill the micro-pits that usually exist in concrete. If there are unevenness in the walls, but do not exceed 5-10 mm, then it is better to level the surface with plaster or putty; if they exceed 10 mm, plaster. Typically, plaster does not adhere well to a smooth concrete surface, so either notches are made on the concrete, or a chain-link mesh is attached with dowels, or primed with compounds with high adhesion (in the simplest case, a liquid solution of water, cement and coarse sand with the addition of PVA glue in an amount of 100- 200 ml per bucket of solution).
Bagaliy, in my opinion, you confused finishing with concrete protection; putty is unlikely to save concrete from an aggressive environment.) As for notches, you have a valid method, but it is labor-intensive. In the early 90s, they plastered 20 low-rise buildings made of expanded clay concrete on a state farm near Moscow, and they were tortured by swinging axes and making notches with them. It’s good that the solution was imported and made of lime, it sticks to the concrete better than CPS.
, and there is no need to putty under the wallpaper. whether? Still as needed. Apparently you didn't see the bare panels. where else in the factory when they are manufactured are “sinks” obtained, and it is more expensive to glue wallpaper onto such ones. I have a friend. who lives with her mother, there is no man in the house, so they were engaged in such “pasting” of wallpaper. Then I had to tear everything off and putty the walls. and prime before and after putty. This is how they do it according to science. And the walls can be plastered if they do not suit the residents.
See for yourself whether to plaster or not, it all depends on the condition of the walls. In any case, you need to putty, even if you are going to glue wallpaper, at least in a layer of base putty and a layer of finishing putty. The base one will be like a base; all defects of the panel slab will be repaired with it; it has better adhesive properties. The layer of finishing putty will already be leveling and with it it will be easier to achieve a smooth surface of the walls.
How are your electrical wiring grooves and plumbing pipe passages in the walls sealed? It often happens that it is easier to plaster the entire wall than to correct these “jambed” patches, or level them with a thick layer of putty. Recently we plastered the crossbars in a monolithic frame building, covered them with mesh, and plastered them with ordinary cement-sand mortar, which we made ourselves.
With a mesh, the plaster consumption will be greater, and for slabs a thick layer is not required. It’s better to go through the walls with purchased concrete contact, or an analogue prepared with your own hands according to the Bagaliy recipe, they have a similar composition. It is better to plaster on concrete contact with gypsum mixtures, they set better with such a primer and then you won’t have to put a lot of putty, one layer of finishing will be enough.
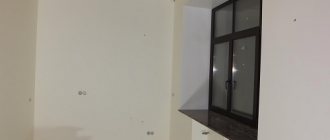
Yesterday I went to see my neighbor; he had already started renovations in his apartment. The hired finishers offered him to plaster only some walls that had large unevenness, but he decided to plaster everything. I, too, do not have unevenness on all panels, and most of them are precisely due to the patches of the grooves and pipe passages. It seems to me that you can knock off the plaster that is sticking out on the patches and just putty the walls.
Dmitry, you can putty right away, but in my opinion it’s better to plaster such walls. It is difficult to judge from the photo the unevenness of the walls, but it is noticeable that all the seams of the slabs are roughly sealed and there are also a lot of patches. Finishers will be tortured to bring such walls to zero using putty, and it is not a fact that in this situation they will be able to win financially.
Why argue here? Every weekend, through almost all channels, they teach how to renovate apartments)))) They come to a family where they plaster panels. where they just putty. and where they are finished with plasterboard. Anything can be plastered. even log walls, even cow dung and there will be no smell. If you want to properly level the walls, plaster them. no - don't plaster.
I won’t plaster with cow dung, but I’ll probably have to use some kind of gypsum mixture. The financial component is, of course, important, but that’s not why I was even interested in whether it’s necessary to plaster or not. For me, the timing of the repair is more important. As I understand it, with plaster the repair will take a couple of weeks longer than if you just putty the walls?
High quality finish. This is what exactly is meant by this concept. You need to look at the condition of the walls. Nobody will tell you. What kind of finish will there be? If all the walls are in gypsum board, then why plaster, if you are going to paint, then you need to bring them to zero. Would you share your plans with us? It’s difficult to give advice, but usually the walls are plastered, the surface is prepared for future finishing, and then it’s a matter of little things. Don’t save money, it’s better to start repairs later, collect money, think about whether you need plaster and what you will use in finishing.
The walls are leveled with plaster. It is applied along the beacons, which in turn are set strictly according to the level. There is no other way to level (by level). And if you just need to remove chips and shells, then putty is enough, but the wall will simply become smooth. And if the wallpaper is expensive, you may end up messing it up when applying it. Bubbles will appear and the seams will come apart. And they won’t fit in the corners. You can plaster with gypsum, cement and lime mixture. but after drying there will be shrinkage. and the cheaper the material, the greater the shrinkage. The best way is plaster. And there is no shrinkage, and the surface does not need to be puttied.
First, the walls are primed (but not any cheaper, but with a good primer, for example, I do this with a deep-penetrating primer, tifengrund, sold in 10-liter buckets. But I often read on forums about concrete contact - I have NEVER used concrete contact in the entire period from 1998 to 2018 You can plaster and hide glaring defects under a spatula, putty to hide the defects of the plaster and create a finer grain, then sand the walls, then prime them, then glue the wallpaper.
I read the comments and was a little surprised. Look at the approximate price list for 90% of the costs:
Primer Knauf Tiefengrunt 10 l for a room of 18 m2, well, let there be 2 buckets, I don’t remember the exact price, let’s say 800 rubles per bucket
Volma layer plaster mixture that does not require puttying 30 kg. Domestic plaster is better for me! rotband (albeit in dry rooms) it’s better to make bathrooms with rotband. Volma layer, what in my opinion is 300 rubles a bag + -, Well, let’s have 3 bags per room (naturally, there’s no question of any beacons) Prepare the walls for wallpaper if. Vetonit putty (I I love LR+) let 2 bags of 25 kg each. a bag will cost about 800 rubles. It might be cheaper.
I use sandpaper 2 m2 for the whole apartment, number 6 and 12 on the fabric.
Let everything be approximately 5000 rubles. Completion time is a week (the layer dries overnight, in the evening at 5-6 he left at 9-10 in the morning, he arrived, you can move on. If you are going to do the whole apartment, take 10 volma, 8 vetonite, 10 soil at once, in the process, taking into account the decrease, you will understand and calculate buy the missing amount of material. But in general, if you don’t have experience and time, as often happens, then YouTube may turn out to be not only ineffective but, as it were, not always 100 percent informative.
Yes, if for painting, then leveling the walls is necessary! The process is long and costly, by the way, not always justified, it often happens that people understand by the end of the renovation, well, sometimes in the process, that the walls are perfect, everything is painted as it should, although the price is several times more expensive and the furniture is much more expensive took up some part of the apartment, hid most of the walls and they are not visible as they were before the start of work, that is, in fact, euro finishing is not very bad, but if you want to get by with minimal costs, then it’s not so important to align the walls with beacons, unless of course they are they don’t “scream” and, for example, are more like the blocks of ancient pyramids.
It is better to plaster concrete over a mesh mounted on the wall, or over an applied concrete contact, then the plaster will definitely not fall off.
Pros and cons of plaster coatings
The smoothness and wear resistance of the walls depend not only on the hands of the master, but also on the components of the plaster:
- cement with sand;
- cement with lime;
- silicone;
- polymer type;
- gypsum
Each type of plaster has individual properties, pros and cons.
The most unsuitable option for wallpapering walls is a cement-sand composition. Sand creates roughness, which reduces adhesion. The choice of other materials is a very good decision. But the best option is inexpensive plaster, because the refusal of craftsmen to putty directly depends on the reduction in cost of repairs.
Gypsum plaster for wallpaper is preferable to other options
Preparing for work
Before plastering drywall, you should select the necessary tools and prepare building materials in advance.
Plastering plasterboard with your own hands requires the presence of the following materials:
- Plaster mixture.
- Primers.
- Serpyanka mesh for strengthening seams.
- Perforated corners.
- Self-tapping screws.
- Drill with mixer attachment.
- Container for mixing the mixture.
- A set of brushes and a roller, a set of spatulas.
- Screwdriver with a set of bits.
- Level, rule.
- Sandpaper.
What is the best wallpaper to use?
Determine whether it is possible to glue wallpaper onto plaster, taking into account the characteristics of the materials used. The composition of the canvas has requirements for the rough surface, fixation rules, humidity level and temperature conditions in the room.
The following types can be glued to plastered surfaces:
- vinyl;
- non-woven;
- paper
Vinyl wallpaper is two-layer, dense and heavy, so experts recommend priming the surfaces. In the absence of puttying and a large design area, it is not advisable to use vinyl sheets. The material is optimal for combined finishing when gluing to one wall, decorating an opening, arched structures, etc.
Non-woven wallpaper is made from polymer components and cellulose fibers. The material is dense and can be used for gluing to plastered walls treated with rotband and primer mixture. Non-woven fabrics are resistant to fading, simple installation, the ability to be re-dyed, environmentally friendly composition, and a long shelf life.
The fabrics can be entirely made of non-woven fabric or have a non-woven backing. Non-woven materials are multi-layered with a relief texture that reproduces a fine pattern. This type of canvas is designed to be dyed several times.
Non-woven fabrics have an additional paper, textile or vinyl layer. Original canvases are made using hot stamping technology. It allows you to make a three-dimensional image with imitation of printed fabric and artificial leather. The ornament can be stenciled using foam vinyl.
Paper wallpaper sheets are budget-friendly and come in a wide range of shades. However, it must be taken into account that the material quickly gets wet even when exposed to direct sunlight. The canvases are fixed without puttying or plastering. Paper materials are single-layer and can be used for finishing children's rooms, hallways, and living rooms. Canvases are not recommended for use in kitchen decoration. These materials are easily cleaned during repairs and replaced with sheets of a different color and texture.
Liquid wallpaper is made from cellulose fibers, water and fillers. Surfaces may not be puttied before application. It is enough to apply a suitable primer.
Also in demand are luminous wallpapers that contain powder components with glitter, phosphorus diodes, etc. These materials are glued onto a leveled base, which can be covered with a plaster mixture and primer.