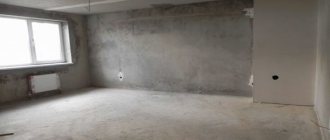
Among the variety of finishing materials for the walls of residential premises, wallpaper is given clear preference. Vinyl, non-woven, paper and other original varieties will add harmony and comfort to the room if the canvases are glued to a carefully leveled surface. A special solution can make the wall uniform and smooth. Finishing plaster is an intermediate composition, which is the basic basis for further decorative finishing. Knowledge of the types of mixtures and the intricacies of process technology will help you plaster uneven surfaces with your own hands.
Features of preparing a wall for wallpaper
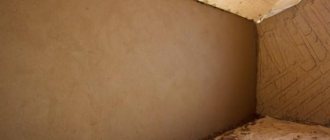
The walls have many pores. If they are left open, then over time voids and cracks will form under the canvases, destroying the base. When the humidity in the room is high, they are affected by a fungus that threatens their health.
Wallpaper glued to a bare base will not cover technical defects in the walls, such as potholes or bulges, but will rather highlight them. Metal parts will definitely come out as a rusty stain, and roughness will ruin the visual effect.
Important! Protruding reinforcement is treated with anti-corrosion compounds.
All these details do not provide proper adhesion of the wallpaper to the surface, leading to divergence of the seams between the strips and peeling of the canvases. High-quality preparation of walls in an apartment for wallpaper will protect their appearance from surprises after gluing and will ensure a long service life for the decorative coating.
Preparing walls for wallpaper
Advice from the experts
- A lamp located below will help to detect wall defects so that the light glides across the surface.
- When cleaning walls from old wallpaper, they need to be moistened with hot water. This way the previous layers will move away from the surface faster.
- If there was mold on the wall, these areas should be treated with white before wallpapering.
- It's easy to check where old plaster is coming off the wall. To do this, you need to tap the entire surface with a hammer. Areas with a ringing sound indicate a problem.
- Before starting all work, the surface must be treated with a deep penetration primer to avoid shedding of the material. The primer can be applied with a roller or brush. As soon as the primer has dried, you need to start plastering. There is no point in pulling, because... A primed surface that becomes dusty over time has no advantages.
When leveling walls under wallpaper using plaster, you need to focus on the properties of the surface in each specific case and choose the most suitable material.
Criteria for choosing plastering technology
To achieve the desired end result, the plastering process is strictly followed. Depending on the type and quality of the base, it is performed layer by layer, with the previous layer of plaster completely drying. The solution is applied in a thin layer to avoid cracking or sliding off the surface.
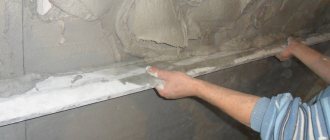
In the case of large convexities, too smooth or weak wall planes, reinforcement mesh must be attached. The correct geometry is obtained by using beacons.
The plaster composition is applied manually or using special mechanisms, which are justified for large volumes. The apartment or room is plastered by hand. If you have the necessary puttying skills, it will not be difficult to do the finishing yourself. It is performed in 2 ways:
- the solution is applied to the walls and leveled with a spatula;
- Beacons are installed, the composition is cast, and the rule is leveled.
How and in what way to plaster the walls in an apartment also depends on the technical characteristics of the wallpaper. For example, thin vinyl, plain, glossy canvases will highlight even the smallest flaws in the base. Paper wallpapers, photo wallpapers, non-woven wallpapers, and large prints cannot be glued perfectly to a curved surface. Therefore, before wallpapering, plastering the walls is the most important preparation requirement.
Plastering technology
Where to begin?
- Remove all protruding elements from the wall surface. Small ones can be sanded, but for larger ones a spatula will do.
- Remove remnants of previous wallpaper, dust, dirt. If in some places the plaster is already old and coming away from the wall, it is also better to get rid of it immediately. She won't last long anyway.
- Check the evenness of the walls using a special level or the old-fashioned way with a string and a weight. This is necessary in order to determine the scope of subsequent work: in some places it will be possible to get by with only a primer, but in others it will be necessary to straighten the curvature of the walls themselves. At the same stage, the geometry of the room is checked by measuring its diagonals.
- The walls are impregnated with a primer, the composition of which is selected depending on the surface material. The primer is applied in at least two layers, this will increase the adhesion of the wall surface.
- Before applying the compounds, you need to treat the walls with an antifungal solution.
Material selection
An important step in surface preparation is the choice of plaster. An incorrectly selected mixture will ruin all further work. Starting and finishing plasters and various types of putty are available. In such a variety, it is difficult for an unprepared person to figure out how to plaster the walls in his apartment.
Each specific situation requires certain materials. The choice of composition depends on the type of wall surface and humidity level.
| Surface type | Type of plaster |
| Brick, concrete or cement plaster with high humidity (balconies, loggias, basements) | Cement-sand mixture |
| Wooden dry | Gypsum or clay-gypsum composition |
| Wooden, upholstered with reinforcing mesh | Cement-sand mortar |
| Any surfaces with low humidity (up to 70%) | Gypsum mixtures for walls |
There is a main rule for choosing the finishing composition for a coating - it should not be stronger than the base and should not weigh it down. The best option is ready-made mixtures.
Cement-lime plaster is suitable for brick or concrete walls
Gypsum mixtures for walls
Ready-made dry finishing plaster based on gypsum for leveling the surface under wallpaper does not clog the pores of the base, keeping the surface “breathable”. The solution is plastic, easy to apply, non-shrinking (does not form cracks). The sizes of the filler fractions allow you to create a layer with a thickness of 50 to 80 mm. Low specific gravity does not load the surface even when applying a thick layer. Machine application is possible.
It has high adhesion to other materials and absorbs noise. After hardening, the fine-grained composition does not require additional processing, the surface is smooth and durable. Examples: Knauf Rotband; Rotgypsum; Prospectors Pros.
Gypsum plaster absorbs noise well
Cement mortar
The plaster composition, which contains cement M100 - 500, sand, plasticizers and additives, has moisture resistance and high strength. Solutions are used for coatings that are subject to impact and compressive loads. The reinforcement included in the composition increases the resistance of the base to torsion, stretching, and bending. Additional additives increase the frost resistance of the coating and allow it to be used at low temperatures.
Cons of the composition:
- used only as a starting plaster on walls under wallpaper due to the presence of large fractions that form a porous surface that requires additional putty;
- high specific gravity increases additional load on the walls;
- the presence of shrinkage in coatings made from fine fractions leads to cracking.
Fact! Despite the disadvantages, the cement-sand mixture has a relatively low cost and long service life, and is often used in finishing wet rooms.
Cement plaster has high strength
Polymer plaster
Ready-made mixtures based on binding dispersions: acrylic, epoxy resin or polyurethane are used for finishing wall decoration. In certain conditions they constitute an alternative to wallpaper. The composition is saturated with granules of filler made of natural stone of various configurations and sizes, as well as the ability of the composition to be tinted, allowing you to create various aesthetic reliefs. Special components give the plaster plasticity.
The elastic material is applied in a thin layer to the prepared surface. After drying, a mechanically resistant, vapor-permeable, hydrophobic coating of the desired shade is formed.
Polymer plaster can be an alternative to wallpaper
Gypsum mixtures
Plaster for wallpaper is made from gypsum mixtures, which are commonly called finishing or fine finishing. In some cases, a professionally applied and well-leveled layer practically replaces putty, which allows you to stick wallpaper directly on top of it. However, you need to keep in mind that gypsum material has the following disadvantages:
- First of all, it is unacceptable to apply it in thick layers exceeding 0.5 cm, which excludes the possibility of using the composition for leveling heavily “sunk” surfaces.
- Further, gypsum plaster for wallpaper cannot be used in rooms with high air humidity (more than 65-70%).
The listed disadvantages significantly limit the scope of its application (it is limited to wall surfaces with minor defects). In addition, this type of plaster can only be used in relatively dry rooms.
Tools and accessories
Each stage of finishing work requires certain equipment. With the help of special equipment, the labor-intensive process is facilitated and simplified. Tools are constantly being upgraded to improve finishing, but the basic plasterer accessories remain the same.
Tool for preliminary manual preparation.
| Name | Purpose |
| Plumb | Vertical level control |
| Mock brush | Applying primer and water |
| Kylo | Removing hard layers protruding from the wall |
| Bubble type level | Vertical and horizontal control, installation of beacons |
| Square | Checking the angle between walls and ceiling |
Kylo
In large areas and in the professional field, craftsmen use a laser level. And the pick was replaced by a hammer drill.
Equipment for plastering.
| Name | Purpose |
| Putty knife | Auxiliary tool |
| Semi grater | Leveling and rubbing of surface reliefs |
| Rule | Alignment of beacons and solution |
| Corner trowel (internal, external) | Bringing out 90° angles |
| Grater | Making the plane smooth |
| ironer | Auxiliary leveling tool |
| Master OK | Spreading the plaster mixture onto the surface |
| Metal lighthouse | Leveling the base of a wall with large uneven areas |
| Kovshik | Distributing the mortar along the wall |
Grater
Among the mechanical plastering equipment, a pneumatic ladle appeared. The device is connected to the compressor receiver. The plaster is evenly distributed over the surface.
What materials should I use?
The finishing plaster is similar in composition to the starting plaster . The only differences are in the size of the components and the consistency of the prepared mixture. Due to fine-grained fillers, it makes the surface smooth. This does not apply to decorative plaster, which was created for other purposes and, on the contrary, contains fillers of different sizes that form a decorative coating. At the same time, decorative plaster can be applied with your own hands without any problems, without additional equipment.
If you have time and the desire to experiment, you can try and select the optimal composition of plaster for independent use.
Need to buy:
- fine quartz sand, similar to dust;
- cement 400 grade;
- polyvinyl acetate glue - PVA.
Preparing the wall surface
The quality of the finish depends on the sequence of base preparation. It is important to follow its order so that the glued sheets hold tightly, the seams do not come apart, fungus and other undesirable defects do not appear.
Stages of preparing the base of the walls:
- Removing old decorative covering.
- Elimination of defects (sagging plaster, hardware).
- Repairing cracks.
- Primer.
- Installation of beacons.
- Starting or finishing plaster.
- Puttying or sanding.
- Primer.
If large cracks have formed on the “rough” surface, they are glued with “serpyanka” (after priming). If the entire surface is fragile, tighten it with reinforcing mesh.
Important! Between each stage, it is mandatory to dry the walls in natural conditions.
Repair work in secondary housing and finishing in a new building differ significantly. In a residential area, preparation includes additional points and nuances.
Wall primer
Is it possible to plaster over old wallpaper?
The old technique of leveling surfaces and gluing differed significantly from the modern one. No one cleaned the walls to the very foundation. They removed only the flaking elements and sealed the gaps (very noticeable in 100-year-old houses when you try to get to the foundation). Soon the layers of wallpaper and plaster swell and fall off again. Mold is also found under the multilayer folder.
Today it is not recommended to apply plaster to old wallpaper; it is better to completely dismantle the old coating.
Leveling the wall after wallpaper
Ways to remove old finish
Modern plasters have a low specific gravity. However, they still won’t hold up the old wallpaper, so according to technology, you should get rid of it completely. At the moment, there are several ways to remove the previous coating from the walls:
- water - make punctures or scratches on the wallpaper; using hot water, the canvas is moistened with a brush or spray; after a few minutes (until the surface has dried) they are removed with a spatula;
- chemical - under the influence of special but safe reagents, the wallpaper swells and is removed with a spatula (KLEO anti-wallpaper product);
- steam – heating a small area with steam (steam iron); There are specialized wallpaper removers in rental stores.
Multilayer wallpaper is removed in several stages. Work is carried out in small areas so as not to damage the base.
Removing paint is much more difficult. From small painted areas, the coating is ground off manually using a scraper, chisel, spatula or other sharp tool. Another option: heat it with a hair dryer. The paint rises and is removed with a spatula. Third: chemical. A remover is applied; it contains acids or alkalis that soften or dissolve the paint.
For large areas, electrical devices and machines are used:
- drill with an abrasive attachment;
- stripping milling cutter;
- grinder with a special brush attachment.
None of these methods are considered safe for health. You should work in a well-ventilated area and use protective equipment.
Removing old plaster
Applying primer
After cleaning the walls from old coatings and removing foreign objects, a primer is applied. The choice of material depends on its purpose and properties. If dark spots are detected that indicate the presence of fungus, obvious traces of mold, they should be treated with an antiseptic composition. The affected area is soaked at least 5 times, with drying and scraping.
You should not ignore disinfection; if the fungus is not removed, it will come out through any coating.
To get rid of dust, grease residues, and strengthen the surface, deep penetration acrylic primers are used. They further increase adhesion to leveling materials. The primer is applied with a brush or roller.
Applying primer
Installation of beacons
There are often such distortions and bulges that leveling the walls without special devices is impossible. In this case, beacons are installed that are mounted vertically. These can be store-bought galvanized or plastic strips, or even improvised materials: wooden blocks, pipes, corners. The beacons create a strong frame that simplifies alignment.
Basic installation principle:
- using a level and plumb line, mark vertical and horizontal lines on the wall;
- install landmarks in the corners, for example self-tapping screws;
- find the most protruding point (the place where the threads adjoin the wall);
- outline the plane (pull the threads), taking into account the profile pattern of the lighthouse;
- install the bars at a distance slightly less than the length of the rule.
There are several ways to attach beacons; they are selected individually. The main thing is to securely fix them so that they do not move during plastering.
Installation of beacons
Leveling solutions
The composition of leveling plaster consists of a binder (gypsum, cement, lime, or a combination of them), a filler (usually river sand or expanded perlite, sometimes synthetic fibers are added), modifiers and water. The main groups of plaster mortars used in the preparatory interior decoration of premises remain gypsum and cement compositions. Lime and composite mixtures with lime are used less frequently.
Gypsum
This binder is optimal for heated rooms with normal and high humidity levels. Gypsum plasters are applied in a layer of 5 to 50 mm in one operation. Thicker layers are also possible, but their strength must be ensured with reinforcing mesh.
Gypsum plasters are leaders in the field of leveling walls and ceilings. They have no equal in a number of key properties - plasticity, level of adhesion to most building materials, quality of the resulting surface, ease and speed of application, as well as speed of drying. It is not for nothing that gypsum was chosen not only for liquid plasters, but also for dry leveling using panels.
Rice. 2. Gypsum plaster
Gypsum has moisture-regulating properties. It absorbs water from the air and evaporates it back when the temperature rises. However, gypsum plasters are less moisture resistant than cement plasters.
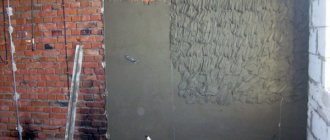
Cement
Cement mixtures are often used for finishing building facades. If we talk about interior plaster, the preferred area of use is limited to bathrooms, dryers, and utility rooms with high humidity. This is due to the waterproofing properties of cements. The high strength of cement mortars determines their application to concrete and brick surfaces. Walls made of porous, less durable materials quickly lose their initial adhesion to cement plaster, which leads to its peeling.
Rice. 3. Cement-sand plaster
Cement binder is better than others for forming thick reinforced layers. Therefore, it is chosen for leveling rough masonry made of concrete blocks or stone (for example, in basements). The strength of cement plaster makes it preferable for preparing the base for heavy decorative coatings (ceramic tiles, etc.) Another advantage of cements is that they prevent corrosion of steel reinforcing mesh even if they are not coated with zinc. This ensures that there are no rust stains on the plastered surface.
Lime
Lime binder is rarely used in modern construction. The main reasons are the low technological efficiency of working with the solution, significant shrinkage and slow drying. It is recommended to plaster in one layer with lime mortar to a thickness of 15 - 30 mm. To apply the second layer, you must wait until the first one has completely dried. Due to shrinkage, visible depressions and, with a high probability, a network of cracks are formed between the vertical beacons. All this led to the displacement of lime mixtures from the market. They are produced only by small factories, and it is extremely difficult to find qualified plasterers working with lime.
At the same time, lime plasters have two undoubted advantages. The first is the ability to destroy fungal and bacterial spores in the thickness of walls. Lime plaster acts as a biofilter, which accumulates pathogenic inclusions and neutralizes them due to the pronounced alkaline environment. The second is maintaining optimal humidity levels in the living space.
Composite plasters (cement-lime and gypsum-lime) are already suitable for high-quality leveling of walls, plus they can be used in wet rooms. But they largely lose their environmental advantages compared to lime mortars.
Rice. 4. Lime plaster
Preparation of the solution
Plastering walls is a labor-intensive process. The solution plays a decisive role. Plastic, the correct consistency will easily lie on the surface and will not slip. It is important to observe the proportions and order of mixing, taking into account the properties of the components. Ready-made mixtures have clear instructions that will help you determine the consumption of the dry product and make the correct batch.
Manual
Small portions are kneaded by hand, adhering to a certain sequence, for example, gypsum mixtures are poured into water, and not vice versa. If it is necessary to add liquid components to the solution, they are first mixed with water and then combined with the bulk mixture. The container is selected taking into account the expansion of the product. For ease of mixing, use a drill and a mixer, because all components of the composition must be evenly distributed. Otherwise, cracks will appear when it dries.
Plaster solution
Mechanical
For large volumes of plastering, it is advisable to use a concrete mixer. The mixing time and labor intensity of the process are reduced. The principles of mixing are no different from manual kneading. You just need to follow the operating instructions and observe the proportions of the mixture.
Cement mortar
Based on cement, base mixtures are created that can be used to level out significant defects. They can be applied in separate layers up to 5 cm thick or more, but this is only possible if the finishing is carried out in stages. Unlike gypsum analogues, cement mixtures are not afraid of dampness, which allows them to be used in kitchens, bathrooms, as well as in basements and other wet rooms.
A significant drawback of this method is the inadmissibility of sticking wallpaper directly onto a surface treated with a base solution. Due to the fact that the filler in it is dispersion sand, the surface is slightly rough.
For final leveling, the walls will need to be finished using putty.
Most often, cement mortar is used for plastering surfaces with significant unevenness (with mesh reinforcement mesh, for example), or when processing brickwork.
How to plaster walls under wallpaper
Inexperienced repairmen, having read the long list of plastering steps, think that plastering walls under wallpaper with their own hands is an impossible task. In fact, everything is very simple. It is necessary to understand the purpose of each operation.
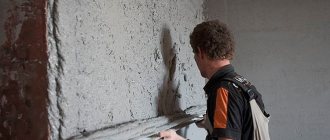
Spraying
The first thin layer is applied to the base with a liquid solution. Its function is to fill cracks, potholes, and chips. Increase surface adhesion for base plaster. To do this, the working solution is diluted with water up to 60%.
Spray plaster
Basic alignment
At this stage, you need to look at how to level the wall with plaster. It is impossible to apply a layer of more than 7 mm. If the unevenness is deep, it is better to once again apply a thin layer of a thicker solution (35%). Each layer must be dried in natural conditions for at least 12 hours. The main layer is applied according to the beacons as a rule.
Covering
The final step is to smooth the surface. Its maximum thickness is 3-4 mm.
Important! If the screws remain in the beacons, then they are coated with an anti-corrosion agent before covering.
Grouting and ironing
As soon as the covering “sets” a little, they begin to rub the surface with a grater. With these actions, excess solution is finally removed. For ironing, use a metal grater. The surface is moistened with water and smoothed. Gypsum surfaces are treated with a water emulsion. In this way, evenness, smoothness, and water resistance are achieved.
Grouting plaster
Puttying
Do I need to putty the walls after grouting? If it was not possible to achieve an ideal surface, as required by some types of wallpaper, then puttying is provided.
What to do next after plastering the walls
The smooth surface is primed with a deep penetration compound. It is better to do this immediately after the plaster has dried, so that the surface does not lose or absorb moisture.
How plastering is done: all stages
Finally, we can consider the procedure for plastering walls under wallpaper, because all theoretical issues have been covered. It all starts with preparation.
Preparatory work
This stage must be performed efficiently so that there are no unpleasant surprises in the future. The preparation is as follows:
- There should be no old finish on the surface, whatever it may be. Wallpaper, paint, whitewash, unstable plaster - everything must be removed to the last piece. On another it is impossible. Old plaster can be left if it adheres firmly to the surface and has no traces of disease-causing organisms.
- Large protrusions are removed with a hammer drill and chisel. Cracks are deepened to the base and sealed with cement mortar.
- Dust and other debris are removed from the surface.
- The wall is covered with soil. In this case, Betokontakt is perfect. The primer is applied in two layers.
- A plaster mesh is attached to the wall. To fix it, dowels with clips or mortar can be used. This stage should not be ignored, since the mesh allows you to reduce the load that will fall on the plaster.
- The corners are covered with perforated covers, and beacons are installed in flat areas.
So you have learned how to prepare walls for plaster after wallpaper. This stage is voluminous and significant; it largely determines the successful outcome of the entire work.
Leveling work
When all the preparatory work is completed, it's time to move on to leveling the surface. Professional builders use special tools that make it much easier to apply mortar to walls. This could be a spray gun or a hopper bucket. There is no point in buying them specifically for one-time work. You can cope without them. The practical guide is as follows:
- Prepare a small amount of solution according to the instructions. It is necessary to achieve medium thickness so that the mixture adheres well to the surface and can be leveled.
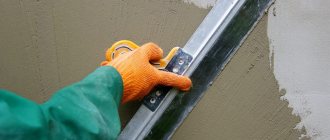
- We use a trowel to scoop up the solution and throw it on the wall between the two lighthouses.
- This way we fill the entire space of a separate work area.
- We level the sketched mortar using the rule, and remove the excess mortar with the edge of the lath.
- Having completed the initial leveling, we pick up a grater. It will allow you to make adjustments to the plastered surface. The grater must be periodically moistened and the adhering solution removed.
- Since wallpapering is planned in the future, you will need to remove the previously installed beacons. Although, if plastic guides were used, this step can be skipped.
- After removing the beacons, the formed holes are filled with mortar, which is leveled and smoothed.
- We look at the surface and assess its condition. You may need to do the finishing plaster on the walls yourself to match the wallpaper. This move will allow you to hide the manifested/remaining defects. The solution for such work should not be thick, even a little thinner than the main mixture.
Finishing work
There is very little left and you will know how to plaster walls under wallpaper with your own hands. We are already at the finish line. Here you will have to work with your hands, even if the mixture was applied with special tools. We're talking about grout. This stage will allow you to smooth out the wall so that it is as prepared as possible for further wallpapering. To complete this work you will need to do the following:
- Mechanical leveling is performed after the mortar has set. Not completely drying, but setting. This moment must be clearly guessed. If the solution is soft, the desired effect will not be achieved and excess plaster will be removed. If it hardens too much, the surface will become too hard and the sandpaper will require replacement after just a few centimeters.
- You need to attach 80-grit sandpaper to the grater. Movements should be circular, with slight pressure. The corners of the grater should only remove protruding particles, but in no case should they go deeper into the surface.
- When such preparation of plastered walls for wallpapering is completed, all that remains is to remove dust from the wall and do a level check.
- The last stage will be grouting. This job requires a thin abrasive material. Movements should be smooth, without pressure or effort. In this way, it will be possible to remove traces and defects that were made at the previous stage.
We carefully, meticulously, critically examine the surface from different angles, with good lighting. Is everything perfect and there is nothing questionable? You can safely move on to wallpapering.
Putty and primer
If at least something raises doubts, let them be insignificant - you need putty on the plastered walls under the wallpaper. It’s better to spend a little money now than to regret it later, but it will be too late.
After completing all plastering and putty work, it is necessary to cover the surface with primer. It is better to carry out this work immediately after the last applied solution has dried. In this case, you can expect deep penetration of the primer and excellent adhesion. When the time comes to paste the wallpaper, priming can be repeated. It will only get better.
We told you everything about how to prepare plastered walls for wallpapering, how to prepare the surface before plastering, how many times to prime, what is needed to plaster walls under wallpaper and in what case to apply putty. We hope that the question will never appear in your head again: is it necessary to plaster concrete walls for wallpaper? We convinced you of the need to carry out this work, right? You will succeed if you follow the recommendations and do not deviate from the practical guidance.
Consumption and price for plastering work
Calculating the cost of plastering work by craftsmen depends on many factors. Price list in St. Petersburg:
| Job title | Price per 1 m2 |
| Plastering walls | 300 — 500 |
| Plastering walls on beacons | 400 — 500 |
| Removal of slopes | 300 — 600 |
| Textured plaster | 300 — 800 |
| Decorative | 400 — 1000 |
| Application of "Bark Beetle" | 350 — 1000 |
Prices depend on rough preparation of the base and additional work.
The amount of solution applied depends on surface defects: quantity and depth.
Never be afraid to learn something new. With the help of modern materials and the Internet, it is easy to finish the walls with wallpaper yourself. You just have to show a little diligence and follow the plastering technology.
Was this information useful to you? Share in the comments!
What wallpaper lines the walls
In addition to various materials, wallpaper itself can also be used as a wall leveler, but you need to choose it very carefully, because not every type is suitable for leveling:
- paper wallpaper;
- vinyl of various options;
- liquid;
- textile; velor;
- cork and others.
Using liquid wallpaper, you can level the wall.
To level the walls, it is most effective to use foam wallpaper, made in different colors and various patterns and characterized by sufficient density.
The same role is played by non-woven wallpaper, which, due to its texture, reliably hides the curvature of the walls.
Advice. When choosing wallpaper for uneven walls, it is better to abandon clear patterns, which will only sharpen attention to the defect.
How to make a surface even
These components are needed to give the surface a smooth and even texture. Conventional finishing compositions are aimed at creating a finish as part of the decor. In this case, the plaster has a translucent color and affects the final result of the finish. Sometimes ground glass, calcite dust or dyes are added to obtain a specific opalescent or marble pattern.
Often, finishing or superfinishing compositions for plaster with an acrylic primer are purchased for work. This solution will be more reliable than experimenting with different recipes. Typically, the consumption of dry mixture per square meter is indicated by the manufacturer on the packaging of the material. It is important to check the package release date and purpose.
Types of mixtures
There are several types of mixtures that differ in composition.
Cement
– often used in damp rooms and on walls where there is no mechanical stress.
Divided into 2 types:
- — cement-lime;
- - cement-sand.
A high-quality mixture of the brand - Rotband. They produce solutions for wet rooms that are resistant to mechanical damage. In terms of price, the material is in the average range. The disadvantages are that cement bases crack, no matter where the work is carried out - outside or inside.
Plaster
– more resistant to damage, has plasticity and does not crack. A good option for interior decoration. Not suitable for outdoor use, as it does not have high moisture resistance.
Polymer
– a universal material for leveling surfaces. There are different compositions of additives that can be used to regulate the properties of the mixture. Very large assortment. The most popular plaster is acrylic polymer.
If we consider the areas of application - for interior and exterior work, then the mixture is almost the same. The only difference is in the additives that are responsible for frost resistance and hydrophobicity.
Plastering process
When the main layer of plaster has completely dried and become a little stronger, the condition of the walls is checked using a special tool - the rule.
The steps look like this:
- The working surface of the tool is applied to the old plaster and, with successive advances, dips or, conversely, bulges on the wall are examined. Once such areas are found, they are marked with a pencil.
- If there are large humps, armed with a mild tool or sandpaper, you need to clean up the problem areas and check the surface again.
- The boundaries of the deepest and crooked places of the wall are marked.
- The surface is primed with an acrylic mixture.
Important! There is no need to cut off a large area with a spatula or other tool, otherwise cracks will appear in the plaster layer. And this can only be done within 60 minutes after finishing the process of leveling the main layer of plaster.
Working with the surface
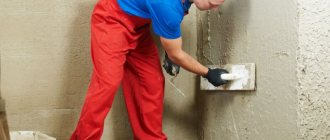
When working indoors, the temperature should exceed 10 degrees and humidity - 50%. You need to prepare spatulas - wide and narrow, a container for diluting the mixture. It is better to buy ready-made finishing plaster, which only needs to be diluted with water. It is good if you use a construction mixer when mixing.
The initial stage of work involves spraying. For this, a liquid solution is prepared, which will create the basis for the next layer. The finishing composition is diluted in parts to the consistency of sour cream and applied to the most crooked and sunken areas with intensive rubbing movements of a spatula. Work is carried out from the center to the border of the area. Then a more liquid plaster solution is diluted and applied to the wall from bottom to top. The entire surface is treated with it. The thickness should not exceed more than 3 mm.
Armed with a grater dipped in soil, the most problematic areas are leveled and leveling begins.
The disadvantage of finishing solutions is that they are weak. If the thickness does not exceed 3 mm, then the liquid layer levels out normally. But, after a quarter of an hour, the sublayer of plaster absorbs moisture and the finishing composition acquires viscosity. If you try to stretch this mixture along the wall, it will tear and the old base of the wall will begin to show through again.
In order for the work to be accurate, the actions must be slightly different. When working with the tool, you do not need to pull it along the surface of the finishing plaster, but rather slowly press it down in small steps towards the edges of the wall. In this case, the effort should be minimal. You can even alternate between pressing and pulling.
The layer that is usually collected along the side surface must be removed with a spatula and quickly rubbed with a wider tool. The resulting residue can be used elsewhere.
Grout
When grouting, you should be able to control the force applied to the tool. When the finishing solution has already hardened on the wall, you can rub or level it with rotational movements of small amplitude. The main thing is not to forget to wet the surface of the plaster or the tool itself with liquid.
The quality of the finished finishing is almost impossible to immediately assess. Basically, imperfections only appear after painting the wall.
Some recommendations
- Adhesion is very important. If the rough finishing was carried out with cement mortar, then the finishing layer must be applied with cement-based plaster. The same rule applies to gypsum and polymer.
- A small amount of the mixture is applied on a spatula in a vertical manner from the upper left corner downwards.
- Using a wide spatula will help level the plaster and keep the layer minimal.
- Working with walls made of plasterboard, concrete blocks, or a brick base requires applying the mixture from bottom to top. To achieve a smooth surface, the spatula must be held at an acute angle to the wall and not come off it.
Textured plaster
It can be divided into several types:
Structural, consisting of various particles in the form of mica, pebbles, quartz.- Relief, with marble particles. This texture shimmers in the sun and is very impressive.
- Textured - characterized by the heterogeneous structure of the mixture and additives. This group includes the popular bark beetle, which is most in demand recently.
- Terrazite, with a cement base with the addition of marble chips, mica, glass. Particles reach a size of up to 6 mm.
- Flocks, so-called acrylic flakes of different colors and sizes. Requires varnishing.
Often finishing plaster can be found as an independent surface finishing. To give the work a beautiful look, rollers, stencils, and spatulas with teeth are used. These tools can be used to create various decorative patterns. There are a lot of stencils on the Internet, where you can download them and add individuality to your walls. To make the drawing clear, the stencil is moistened with water and imprinted into the solution. Of course, such decor will take a lot of time, but the result is amazing.
With a simple spatula and brush you can create the texture of stone, concrete, etc. Fantasy in this matter is unlimited.
Recommendations for plastering walls before wallpapering or painting
Requirements for the base
Bringing the wall surface to a condition suitable for subsequent painting or wallpapering is a long and labor-intensive process. The reason lies in the fact that in addition to the requirements for the plane, it is also necessary to obtain a surface of a certain quality. There should be no microwaves present on it, and the grain size of the top coating layer should be minimal (up to 0.3 mm).
Otherwise, any flaws will appear on the finished wall.
Rule #1. Even before starting work, think about whether you will subsequently paint the walls, apply decorative plaster to them, tile them or wallpaper them. The interior of the hall is decorated with decorative stone and wallpaper for painting photo?
This will allow you to give the surface the desired characteristics at the stage of leveling the base, saving time and money. For example, when using gypsum compounds, with the right approach, you can finish the wall without the need to use putty - carry out the so-called glossing of the plastered surface.
The result of the work should be an almost ideal plane. By ideal we mean a coating on which defects will not be noticeable to the naked eye, and the deviation from the plane will not exceed 2 mm per 2 m (checked by a long rule). In order to avoid unpleasant discoveries at the final stages of finishing, the quality of the plastered surface is checked using lighting devices (it is better to use fluorescent lamps).
Remember that coating defects can appear from different angles.
Rule # 2. Plastering walls for painting is much more difficult than for wallpapering. If you have no experience in leveling walls, then it is better to prefer the second option. Half measures don’t work when it comes to painting: either do it perfectly or don’t do it at all.
Of course, there is always the opportunity to seek paid help from specialists.
Applying a leveling layer
Immediately after the primer has dried, in order to avoid dust on the wall, begin plastering the surface to obtain a plane with the required parameters. The material can be gypsum or cement mortar. The cost of their use is commensurate, but gypsum plaster is more convenient to work with.
Rule #4. For each name of plaster (we consider only ready-made mixtures), the manufacturer indicates the maximum and minimum layer thickness. This must also be taken into account when choosing a specific composition in accordance with the wall’s deviations from the plane. The recommendations regarding the minimum layer thickness should not be neglected: leveling plaster is characterized by high adhesion to the base in the thickness range specified by the manufacturer. Too small a layer thickness leads to a violation of the curing mode of the solution, which can subsequently lead to the appearance of defects in the plaster coating. Exceeding the thickness of one layer can lead to collapse of the mortar or subsequent “bumping” of the plaster.
First, the solution is thrown onto an area fenced with beacons, and then pulled together using a rule.
The resulting voids are filled with an additional portion of the solution. After 15-20 minutes, the coating is trimmed, and after another half hour, it is glossed in order to obtain a surface that does not require additional putty, or rubbed - in this case, subsequent leveling coatings are supposed to be applied in the form of fine-grained putty. As a rule, each type of dry mixture is accompanied by detailed instructions for use, so you will not have any questions regarding the use of this or that product. We have already looked at the features and range of Knauf and Ceresit plasters. But the choice is not limited only to such famous brands. This is not a complete list of plasters for leveling walls.
| Manufacturer | Name of product | Type of plaster | Approximate price* |
| Perel | Robust | cement-lime | 170 rub. for 25 kg |
| Plast | plaster | 230 rub. for 30 kg | |
| Founds | BIGWELL | cement | 210 rub. for 25 kg |
| SLIMWELL | 220 rub. for 25 kg | ||
| GIPSWELL | plaster | 235 rub. for 30 kg | |
| BAUSTROL | Fusion | 220 rub. for 30 kg | |
| STROYBRIG | Giplane | 230 rub. for 30 kg | |
| Lismix | Gypsum plaster | 240 rub. for 30 kg | |
| Prospectors | Gypsum plaster | 270 rub. for 30 kg | |
| Volma | Volma Layer | 290 rub. for 30 kg |
(*) – values are indicated for comparison of price levels.
What to do before starting leveling
The walls must be dry - otherwise it will not be able to provide the required adhesion. You can check the actual moisture level of the wall by sticking a piece of cellophane (on tape) overnight. If nothing has changed in the morning, the wall is dry. If a film of dew appears on the inside, additional ventilation of the room and drying is required.
The crumbling, peeling old coating guarantees peeling of the wallpaper within a minimum time after completion of the repair. It is easy to check its actual strength. Run a coin, key, or fingernail across it. The condition can be considered satisfactory if there is no obvious trace.
Before gluing, it is necessary to remove the old finishing coating from their surface. To speed up the process, it is recommended to moisten the pasted wallpaper with hot water, then carefully remove it with a spatula. Areas that could not be cleaned are smoothed with sandpaper (by hand or with a sander). If plaster has been applied, you need to check its condition. There is a high probability that it will begin to fall off in pieces. To prevent this from happening, it is completely removed.
Pathogenic microflora on the surface of walls negatively affects visual appeal and affects health. Therefore, all identified affected areas must be cleaned and treated with an antiseptic primer. You can use bleach.
You should check that there are no old screws, dowels, or nails left. They are also removed or clogged with subsequent puttying of these places. The cleaned surface is washed. After drying, check for microcracks, pits, and protrusions. Preliminary alignment is intended to eliminate such defects.
You can align the walls with wallpaper using one of three existing technologies:
- puttying – used to eliminate small cracks, minor curvatures of the vertical plane, protrusions/depressions ≤ 2-3 mm;
- plastering – required when eliminating defects ≤ (5-100) mm;
- the use of plasterboard - for large unevenness exceeding 100 mm.
Rice.
1. Methods for leveling walls: puttying, plastering and using drywall Before choosing a technology, check how smooth the surfaces in the room are. You will need a plumb line, side lighting, or a building level. Using the latter, be sure to:
- the vertical of each wall is measured (at several points);
- the horizontal of the areas intended for wallpaper is determined.