Plastering the surface
New construction necessarily includes plastering work, with rare exceptions when the walls are lined with curtain walls (plasterboard, plastic panels, etc.). Before painting or wallpapering, all vertical planes of indoor fences are plastered. What to do after plastering the walls in order to prepare the bases of the fences inside the building for subsequent finishing? All plastered surfaces are puttied. The finishing of the walls after plastering should form a smooth surface. During major renovations, wall plaster is applied to the walls after the wallpaper.
Why do you need to putty plaster?
Cleaning plaster with sandpaper
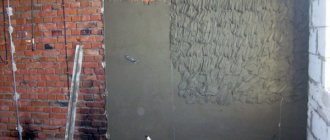
Before plastering, evaluate the amount of work and select the type of plaster solution. All this affects the timing and quality of work. No matter how carefully the plastering work is performed, it is impossible to obtain a perfectly flat surface. Due to the large fraction of solid fillers in the finishing mortar, the surface of the walls turns out to be porous with small dents and cracks. To remove mortar build-ups, the walls are sanded with a grinder or sandpaper.
As for dents and cracks, they need to be puttied. Putty is a material that you can use to level the walls with your own hands until they are perfectly level. People often wonder whether it is necessary to prime plastered walls. The short answer is definitely.
Before plastering the walls, they must be coated with a primer after plastering. This significantly increases the adhesion of the wall surface. Treat the walls with primer after the plaster has completely dried.
Types of putties
Putty is a paste-like mass. It can be used to level walls and ceilings before final finishing of surfaces.
Based on the quality of formation of the putty surface, leveling materials are divided into three groups: starting, finishing and universal:
- Starting solutions are intended for sealing gross defects of treated surfaces. The name of the product indicates that the putty mixture is used for the initial treatment of plastered surfaces. Unlike the finishing coating, the starting solution has a coarser grain size of the solid filler (usually quartz sand). The starting composition is applied to the cement surface in those places where there is curvature of the coating, there are cracks and holes.
- The finishing putty is applied over the starting coating. It is intended to be the final finish before painting or wallpapering the walls. If the worker is sufficiently qualified and the material is of high quality, the finishing coating is completed in one go. The thickness of the finishing layer on plaster is made in the range from 0.5 to 2 mm. The finishing coating has plasticity, so the dried layer can be easily sanded with abrasives, thereby achieving a glossy effect.
- The universal mixture is used as a starting and finishing coating simultaneously. Like all universal products, putty is the most expensive compared to its analogues. The universal product is applied in one layer at once and forms the final finish of the walls before the final coating.
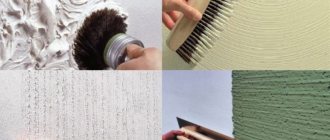
Types of decorative plaster
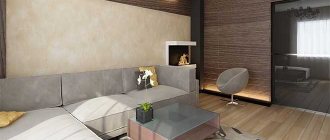
Decorative plaster - a marvelous interior decoration
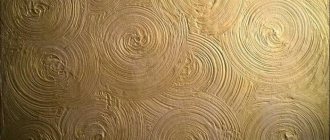
Decorative plaster is used for finishing walls and ceilings indoors and building facades. The basis can be various substances of both natural (gypsum, cement, marble dust) and artificial (acrylic, silicone, silicate) origin. It is called so because it forms an attractive surface with different textures - from smooth Venetian plaster like marble to embossed stone or “fur coat” plaster. The number of options is endless - applying decorative plaster is a creative process and it is unlikely to be repeated exactly. This is another advantage of this type of finishing.
Based on the type of surface being formed, the following types of decorative plaster are distinguished:
- Embossed. After applying such compositions, some inhomogeneities and irregularities are often formed on the surface, that is, they create a relief. Their advantage is the low requirements for foundation preparation. It should be durable and should not crumble. There should also be no significant differences, but perfect smoothness is not required.
- Textured. The relief is formed due to various inclusions - sand of different grain sizes, stone chips, mica plates, etc. Applying this type of decorative plaster is done with spatulas (metal, plastic, rubber - depending on the composition). Usually no other special tools are used.
- Structural. Plastic, usually homogeneous plaster. The relief is created using various types of devices - rollers, special graters, and the use of various techniques. To make structural plaster look organic, considerable skill and artistic flair are required.
It must be said right away that textured and plastic plasters are often difficult to separate, since different techniques can be used on the same composition. The photo below shows options for only one type of plaster - different techniques for applying decorative plaster make it possible to obtain surfaces that are very different in appearance.
Surface options that can be made using ONE composition using different application techniques
Some decorative plasters are so plastic that they can be used to create a work of art. The results are very beautiful and original panels.
By changing the application of decorative plaster, all these different reliefs are obtained - from simple to complex.
It is worth considering their division by area of application. There are two large groups - for external and internal work. There are also universal compositions, but rarely. Almost all of the compounds discussed above are for interior work. These are more interior solutions. Some of them are abrasion-resistant, some can be washed with detergents and even brushes, but they will not withstand harsh outdoor conditions.
Some types of textured plaster are suitable for external use - bark beetle, for example. This type of finishing material is just universal. It can be seen on the façade and indoors. In apartments these are usually corridors and hallways; in offices and institutions, corridors or service rooms can be decorated in this way.
An example of finishing a house with decorative plaster on the outside: stone plaster on the base, bark beetle on the walls above
Putties for external use generally have a coarser structure and contain components that increase resistance to ultraviolet radiation and other climatic influences. In this category there are specific plasters - stone. They consist of small fractions of natural stones in a binder solution. This type of decorative plaster can be applied simply with a spatula or a stainless trowel. Other elements are rarely used. Creating reliefs on facades and fences is not the best idea - dust will get clogged and spoil the appearance, and it is not easy to wash it out.
Composition of putty mixtures
Based on their composition, putties are divided into three groups:
- gypsum;
- cement;
- polymer.
Plaster
Gypsum gives the solution increased plasticity. Thanks to this property, it is possible to achieve a very even plane of the walls. When making the next batch of gypsum putty, you need the correct measure of the volume of the solution. The liquid solution hardens quickly, so it is necessary to balance the volume of the finished mixture with the time of its production.
On the packaging of the powder, the manufacturer indicates the time for producing a certain volume of the finished mixture. Gypsum putty is used only for interior work.
Cement
Cement plaster is used in rooms with high humidity. In bathrooms, toilets and kitchens, the walls are leveled using cement putty. Tiles are laid over the cement finish.
With cement putty after plastering, you can immediately treat large areas of walls with your own hands in one batch. It takes much longer to harden than the gypsum composition requires.
Polymer
Polymer-based putties are called universal compounds. The main advantage is the virtual absence of shrinkage. Among putty mixtures, universal is the most expensive material.
All of the above is presented in this table:
Table of properties of basic putty compositions
| № | Putty composition | Application | Flaws |
| 1 | Cement based | Sealing irregularities | Takes a long time to dry |
| 2 | Plaster | Final formation of a smooth surface | Gives more shrinkage |
| 3 | Polymer | No shrinkage | High price |
Plastering brick walls indoors
Brick is still one of the most popular capital building materials. It is strong and durable. Masters know how to work with him, and people trust him. The only drawback compared to new porous blocks is their reduced thermal insulation characteristics, which is why brick walls often have to be additionally insulated.
Features of plastering brick walls
Plastering brick walls is a technology that has been proven over centuries. But it is also not universal - it all depends on the type of base, which can be:
- New. Working with new masonry is the easiest and most enjoyable, since minimal preparation is required and you can use different types of mixtures to choose from.
- Old. What is important here is thorough preliminary cleaning of the masonry from old mortar, repair work, and thorough priming. Plastering brick walls in used buildings is always a challenging task.
- Silicate. Typically, such masonry is smooth and even, it helps to minimize the consumption of materials. But it also has reduced adhesion, which is why it is necessary to apply the solution in two layers or use a polymer mesh for reinforcement.
Plastering brick walls is a job that allows you to not only level the surfaces, but also protect them from moisture and slightly increase the sound and heat insulation parameters of the structure.
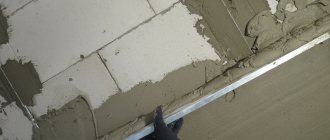
How to plaster brick
Considering that brick is a material with almost zero vapor permeability and prone to moisture absorption, it is best to plaster it with cement-sand mortars and their modifications. However, it all depends on where and why the brickwork is plastered:
- If you need cheap, strong, durable plaster in utility rooms or a base for finishing with panel materials, it is better to use cement-based solutions.
- It is advisable to use mixtures with increased moisture resistance under tiles and in wet rooms. If you are plastering silicate or another surface that does not require leveling, you can immediately apply tile adhesive and begin finishing the walls.
- When plastering under wallpaper, it is best to use a combination of rough cement and an external gypsum layer, since the latter can be made perfectly smooth.
Without knowing exactly what to use to plaster the brick walls inside the house, consult with the craftsmen before purchasing materials. They will evaluate the object, determine the cost and recommend what is most suitable.
Delivery form for putty mixtures
Form of supply of putty to the retail chain
In building materials stores, wall putty mixtures are sold both in the form of dry powders and in a ready-made state.
Dry formulations are packaged in paper bags weighing from 5 to 25 kg. Dry mixtures are inexpensive and have a long shelf life. Each manufacturer prints instructions on the bag for preparing putty. Only strict adherence to it allows you to obtain a high-quality solution.
The prepared solution is sold in plastic buckets. Before you buy a solution, you need to pay attention to the production date and shelf life of the putty.
Preparing walls for putty
If you have minimal experience in construction and are near an experienced craftsman, you can learn to do all the work yourself.
To begin finishing the walls, you need to prepare the plastered surfaces for putty:
- after the plaster has completely hardened, vertical beacons are removed from the walls;
- beacons made of metal profiles, when removed from the walls, leave behind vertical grooves; they can be sealed with cement mortar, but this will prolong the hardening time of the wall cladding;
- gypsum putty is best suited for filling cavities in walls; if this is done in rooms with high humidity levels (bathrooms and kitchens), then cement or polymer-based putty is used;
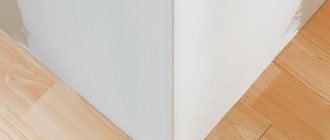
- Aluminum perforated corners are installed on the external and internal corners of the room, which are secured with putty; in problem areas, the corners are installed with self-tapping screws;
- all surfaces are primed; The primer increases wall adhesion and reduces the consumption of leveling material.
Sealing cavities left after dismantling beacons
Foam block plaster indoors
Foam block is a building material for walls that are not load-bearing or partially loaded. Lightweight, due to its cellular structure with clogged cavities, it has reduced thermal conductivity, providing a high level of thermal insulation of buildings.
Features of foam block walls
The surface of this material is not hard and requires additional processing even in those rooms where decorativeness does not matter. Plastering a foam block is the most logical way to protect it, and at the same time give aesthetics to the surfaces.
Functions that should be performed by plastering walls made of foam blocks:
However, the last two are not critical, since foamed artificial stone is good in this regard.
How to plaster foam block
The question of whether it is necessary to plaster foam blocks if the building is built from this material should not be on the agenda. The reasons are given above. But you need to think about how to plaster foam blocks inside the house in order to get the optimal balance of strength and decorativeness.
There are two main options:
- Mortar based on a cement-sand mixture. It will add strength and provide good protection from moisture. True, it is better to choose ready-made dry compositions with increased moisture-proof characteristics. Its disadvantage is that in order to paint or wallpaper the walls you will have to putty additionally.
- Gypsum mixtures. Plastering walls made of foam blocks with them is always suitable, with the exception of the bathroom and areas for laying ceramic tiles.
Preparation of putty
To prepare the solution with your own hands, you need the following tools, materials and equipment:
- container for diluting the solution; it must have sufficient volume to freely mix the mixture using a mixer;
- mixer; it can be done by inserting a screw attachment into the drill chuck;
- dry putty mixture;
- water at room temperature.
Prepare the mixture as follows:
- Water is poured into the container.
- The powder is gradually poured into the water. At the same time, the solution is mixed with a mixer.
- Stirring is continued until a paste-like mass is obtained.
Water and dry mixture are added in the proportion specified in the instructions. If there is none, add the dry powder by eye until you get a solution with a consistency similar to sour cream.
Putty kneading
Technique for filling plastered walls
How to putty the walls in order to do it correctly with your own hands? It is necessary to follow the puttying sequence in the following order:
- First, deflections, cracks and dents are sealed with the starting composition. Align the corners of adjacent surfaces. If the internal corners are simply pulled out with putty, then the external corners will be ideal if you install perforated metal corners on them.
- To apply a portion of putty, use two spatulas. On a wide tool, apply a liquid solution along the entire blade, and with a narrow tool, apply it directly to the wall.
- Puttying with the finishing solution begins from the corners to the center of the wall.
- Excess mortar is removed with the same spatula, holding it almost at a right angle to the base of the wall. This process is called stripping the putty.
The lower the angle of inclination of the spatula, the thicker the finishing layer will be, or vice versa, a high angle of inclination of the tool will allow you to make the thinnest layer of coating.
The final coating may be glossy. Gloss does not promote high surface adhesion, so before subsequent painting or wallpapering, the walls are sanded with fine sandpaper.
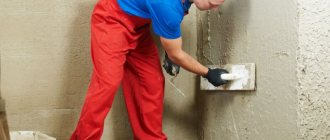
Application technology
The process of applying the building mixture is quite simple, so you can do the work yourself. All you need is a little patience and a set of the right tools. The following tools should be on hand:
Applying plaster with a fur roller
- Fur roller;
- Spatulas of different sizes;
- Paint bath;
- Trowel;
- Grinder machine;
- Stencils.
All work is divided into successive stages; approximate instructions for performing putty look like this:
- Preparation of the working surface - the walls should be as smooth as possible; after leveling, a layer of primer is applied to them. This is done for strength, increasing the adhesion of the wall to the building material and to regulate absorbency. After treating with a primer and drying, the surface must be thoroughly cleaned from adhering particles of dust and dirt;
- Preparation - paint is added to the construction mixture if the surface of the walls is to be colored. It is necessary to stir the composition well until smooth, it is convenient to do this with a construction mixer;
- Application to the wall is done using a spatula or trowel; experts advise starting work from the corner and ending with the corner - this will avoid unevenness. If the walls are finished with stone-like plaster, then three layers must be applied. The layers are applied sequentially, after the previous one has dried. The quality of the final result depends on the quality of each layer. If drawings are planned on the wall, then they can be made using stencils, which are available in a large assortment in construction stores.
Wall treatment during renovation - Finishing – if the room being repaired has normal humidity, then the surface does not need to be treated with anything. Wax is applied on top to repel moisture. It is applied in a thin layer, as if peeling off. After a couple of days, the walls can be polished with felt or using a sanding machine. The finish can be considered high quality if you can see your reflection in it.
Do-it-yourself work is of impeccable quality and saves a lot of money. In addition, such a renovation will become the pride of the owner of the house and will cause a lot of admiration from relatives and random guests.
Wall painting
Before painting, putty walls are primed. The modern building materials market offers a wide selection of paints that can be used to create original interiors. The combination of different colors and their shades forms colorful and soft panels and accent vertical planes in the home.
There are interior and exterior paints. According to their composition, paints can be oil (based on natural drying oil), acrylic, water-dispersion, pentaphthalic, nitro enamels and others. Each type of dye meets one or another requirement of the homeowner.
Many factors influence the choice of paint:
- quick drying;
- resistance to the negative effects of fungi and microorganisms;
- durability;
- immunity to moisture and ultraviolet radiation;
- ease of application;
- environmental friendliness (no harmful fumes);
- paint consumption rate per 1 m2 of wall;
- price;
- When buying paint, you need to pay attention to the presence of the inscription on the container “For walls”.
Internal plaster of aerated concrete/gas silicate walls
Aerated concrete and gas silicate blocks are used for residential and non-residential construction. They have good thermal insulation and sound insulation characteristics due to their porous structure. They are light in weight, which makes it possible to get by with a lighter foundation and lighter floors, ultimately reducing the cost of construction.
Features of aerated concrete walls
Taking into account the high vapor permeability of the material, plastering of gas silicate blocks should be carried out on the basis of mixtures that have similar or similar characteristics. It is necessary that the plaster layer absorbs moisture accumulating in the air and “gives it” to the wall, which will then remove the excess outside the room.
Wallpapering
The choice of wallpaper material is so wide that a separate article should be devoted to this. The most common types of wallpaper are:
- paper;
- vinyl;
- non-woven;
- fiberglass;
- PVC coating;
- cork
Respirator required when carrying out work
Liquid wallpaper deserves special attention. They are applied without glue directly to the primed wall. This type can be reused, unlike other types of wallpaper.
Each type has its own glue. Along with this, the industry produces a wide range of universal adhesive materials that are suitable for most wallpapers.
When working with wallpaper, you must use personal protective equipment.
Choice of putty
| putty | pros | minuses |
| made of cement |
|
|
| made of plaster |
|
|
| made of polymers |
|
|
After applying the plaster, you need to select the finishing material for finishing the wall. It is better to do this initially, since the type of plaster used during the finishing of the wall may not be suitable for the finishing layer.