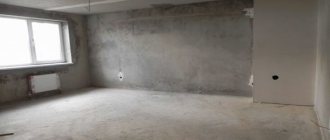
Most apartment owners are faced with the difficulty of choosing finishing materials for their premises. Country property owners have no less of a problem - what kind of finishing is suitable for the façade of the house. The fact is that many materials in the construction market are expensive. Therefore, owners have to look for a better alternative. For example, turn ordinary putty into decorative plaster. But this type of finish is gaining more and more popularity, despite its high cost. In terms of quality, homemade decor proves to be no worse than licensed products, and it is also a cheap alternative.
Decorative plaster made from ordinary putty is a great way to save on interior decoration
Features of putty and plaster
Both types of finishing materials have their own characteristics. The use of plaster, like putty, allows you to make surfaces smooth, but they differ in the method of application and price. Homemade decorative finishing material provides ample opportunities for conducting various experiments. You can implement non-standard design ideas.
You can find out how to do relief plaster with your own hands by following the link.
But before considering the prospect of creating decorative plaster, it is worth familiarizing yourself with the features of finishing materials:
- Plaster is easily prepared by mixing different components, which even novice craftsmen can handle.
- Putty and plaster have individual characteristics.
- Both types of ready-made mixtures harden quickly, which means preparing small portions.
- The coating is formed depending on the appropriate technology for applying a specific composition.
- Plaster differs from putty in that it requires the addition of water to prepare the mixture before work.
- The putty has a different color range, based on the components present.
- The easiest way to create the desired pattern on the surface is with the help of plaster.
Fact!
The principle of working with solutions is partly similar to each other, but there are significant differences in terms of the thickness of the coating and the method of preparing the composition.
Advantages and disadvantages
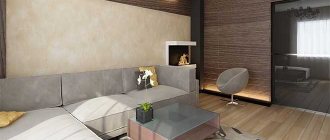
Textured plaster is not intended to level the surface, but to decorate it in accordance with the designer’s plans. It allows you to replace wall cladding with wallpaper and tiles. Decorative plaster is a popular type of finishing of internal and external surfaces based on innovative materials, depending on their composition and physical properties. Like every finishing material, it has advantages and disadvantages:
- The main advantage is the non-standard external textured appearance, which directly depends on the technology used for applying layers, the component composition of the material, and methods for achieving the desired relief. Do-it-yourself textured plaster from putty allows the designer to create types of wall and ceiling designs in accordance with the overall style of the project.
- With proper preparation and application of the molding mixture, the finished surface is highly durable, hides flaws and uneven walls, and has no joints like wallpaper.
- The use of a modeling mixture allows you to achieve the appearance of a 3D surface, and Venetian plaster with a wax coating will give a glossy look to the walls with an imitation of natural marble, precious minerals or metal.
- The main components are natural. This makes the mixture environmentally friendly, the surface does not fade, constantly maintains its original appearance, and a service life of up to 30 years is guaranteed.
- Additional functions performed by decorative plaster made from simple putty include providing thermal protection and interior sound insulation.
- When caring for surfaces with decorative plaster, using a vacuum cleaner or wet cleaning is allowed.
- Disadvantages include the relative difficulty of performing installation processes, repairing individual places, when it is difficult to replicate the original style and color shade.
- Preparing high-quality model mass with your own hands reduces costs by 5-10 times.
Advantages of decorative putty plaster
The most important advantage is the low cost in comparison with products from world brands, the long service life of the coating without loss of aesthetic and practical qualities. Decor made from simple putty has other advantages:
- obtaining an original texture with elegant relief, which allows you to create a unique interior design;
- The putty mixture adheres well to any surface;
- putty is not able to absorb odors, and also provides heat and sound insulation;
- there are no harmful compounds, which makes the material environmentally friendly and safe;
- The material has high plasticity, making it easy to apply to surfaces and convenient for repair work.
The range of construction stores today is very wide. There are compositions that allow the addition of colors for the desired shade.
The material is highly plastic, so it is convenient to work with.
How does putty differ from plaster?
The modern market is filled with a variety of finishing mixtures. Putty or plaster - many novice repairmen confuse these concepts and their purpose.
The task of plaster is to correct unevenness, defects, and create a protective coating. If you need to hide serious defects, do a double application. Plaster is not a final and independent type of finishing. Paint, wallpaper, tiles or other materials are always applied on top of it. Its distinctive feature is its large grain size and pronounced structure.
Putty differs from plaster in the level of granularity
Putty is a composition for final finishing. It has a soft and plastic structure. Dries completely in 24 hours and is easy to sand. Can be used independently. The top is covered with varnish or paint.
Decorative putty mixture: composition and varieties
How to make decorative plaster with your own hands, so as not to hit your wallet too hard? First you need to clearly understand what putty is, as well as what its types are, since it is used as the basis for creating a decorative mixture. It, like plaster, includes a number of components - a binder, filler, additives. All this allows us to provide the composition with the necessary working and performance qualities.
Any putty is suitable for preparing home decor, with the exception of oil putty, as it does not meet plastering requirements. It is also necessary to take into account the adhesive and other qualities and purpose of the material - starting, finishing, universal. For example, a good Venetian will be obtained from finishing putty.
Plaster mixtures based on putty can be obtained:
- textured;
- structural;
- Venetian.
To choose the appropriate composition, first of all, you should rely on the operating conditions - for the street (extreme) or indoors (gentle). For example, finishing compositions Knauf Uniflot, Knauf Rotband, Ceresit ST127 are suitable only for finishing walls from the inside. Accordingly, only the internal surfaces are covered with the prepared solution.
For your information!
Cement putties can be successfully used for facade work.
Textured putty, its features and varieties
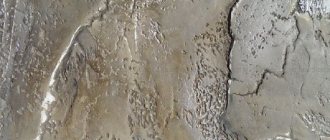
An example of plaster with a rocky surface.
This material is an interesting option for decorating a room; with its help you can create an unusual and original design for any room.
A small fragment of a wall covered with this type of cladding can decorate a room and add a certain flavor to it.
Using the material in question, you can create various reliefs and patterns on the wall.
To decorate the interiors of houses and apartments, several options for textured putties of different structures are used.:
- bark beetle, imitation of the surface of a tree eaten away by a beetle;
- rocky surface;
- rain texture;
- stone surface;
- silk effect;
- marble chips;
- Venetian plaster.
“Bark beetle” effect
Not every type of decorative putty listed can be installed independently; some types of coating require certain skills.
If you decide to create the decor yourself, it is better to choose a rocky or stone texture; you can also create a decorative coating using imitation rain.
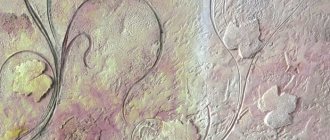
Patterns, embossing and textures
Forming texture on surfaces using ordinary putty is practically no different from using any decorative plaster.
In order to favorably emphasize the texture of the surface and give it a characteristic shade and gloss, it is recommended to use glazing compounds for decorative plaster. This will give the treated areas a shine.
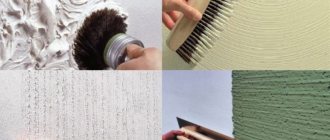
Spatula and trowel
Spatulas with serrated edges and a trowel create original patterns on the walls. Depending on the type of teeth, the resulting patterns will differ.
Spatulas are found with rectangular, wavy, sharp teeth. Metal instruments have a clearer pattern. Silicone spatulas are also available. They provide a softer pressure and allow you to create an imitation of wood or other materials.
Thanks to spatulas and trowels, it is possible to obtain designs in the form of waves, zigzags, curved lines, arcs, and abstractions.
The sequence of work does not differ from the traditional one. Putty is applied with a thickness of 1-2 millimeters, then the design is applied in a given order. It is important to finish the job within 30-40 minutes until the surface has set.
Using putty tools you can get various original designs
Roller
You should choose a roller with a long pile, which is why the corresponding texture of the plaster is formed. In this case, the putty is applied in several layers - first the base layer with a thickness of no more than 3 mm. Adjusting the degree of pressure creates the desired effect.
To make the solution stick less to the instrument, the surface should be periodically sprayed with water. Defects should be corrected as soon as possible. When the layer has dried, remove sharp growths with sandpaper, after which the dust is brushed off with a broom.
Stencil
Using a stencil allows you to create a more beautiful effect - the drawing turns out to be voluminous and convex. It is done on a flat base surface or on a surface with slight relief (sandy bottom).
The stencil material may vary, but the most popular are:
- Plastic - can be used more than once. It is commercially available, but the template is easy to make with your own hands. The thickness of the products does not exceed 5 mm.
- Paper – for single use. There are restrictions on the height of the relief.
- Silicone - you can also make such a stencil yourself or buy it.
When working, follow several rules:
| 1. The frame is fixed in the desired place. For fastening, use tape or hold it by hand. | |
| 2. The holes are filled with a plastic mass. | |
| 3. The frame is removed only after the surface has set. After the composition has completely dried, all that remains is to correct the contour of the pattern with sandpaper. |
The disadvantage of this method is the need for several identical frames to speed up the process. The advantage is the original convex pattern.
Among the varieties of stencils and seals, rollers with a printed pattern are distinguished. To create an ornament, it is rolled over a wet mass, obtaining a pattern. This technology is also successfully used to create brickwork.
Stage 1 – preparation
This part will describe what materials and tools will be needed for the work, and will also discuss how to prepare the bases for applying a decorative putty coating. The preparatory stage is the same for all options for applying the composition, which is why we consider it first.
Necessary materials
The list of everything required is quite simple; all data is presented in table form.
Vetonit compositions are the best option for those who carry out the work themselves
| Material | Description |
| putty | It is used to level the surface before starting work, and it will also be used for textured finishing. I recommend using “Vetonit”, since this option is characterized by ease of application, ease of processing and a long setting period (the composition retains its plasticity for a day, and in a closed container for two days). The price for a bag weighing 25 kg is 420-450 rubles, which is not much for a mixture of this class |
| Primer | We need it both when preparing the surface and when strengthening the finishing coating. Most often I use acrylic-based options that penetrate deeply into the surface and strengthen it; for wet rooms it is better to take compositions with antiseptic additives. As for the cost, it ranges from 50 to 100 rubles per liter, depending on the manufacturer |
| Dye | The finished finish must be painted to give the surface a more attractive appearance. Moreover, the coloring can be either monochromatic or more complex; below I will talk about this option. It is important to choose the optimal shade for a particular interior so that the putty looks most advantageous |
| Varnish | To protect the surface from dust and moisture, it must be treated with acrylic varnish. It allows you to avoid contamination of surfaces, because if necessary, you can simply wipe them with a damp cloth or sponge |
Everything you need can be purchased at any hardware store.
If the amount of work is small, then instead of the Vetonit dry mixture, you can purchase the ready-made Shitrok composition. It has excellent properties, and its only drawback is its high cost; a bucket weighing 17 kg costs 1100-1200 rubles.
"Shitrok" is a very high-quality, but very expensive putty
Work tool
To perform the work, you must have the following set of devices on hand:
- The putty solution is prepared in any container of a suitable size. It is best to mix all the ingredients using a drill or hammer drill with a special mixer attachment. This will ensure the best quality of work and minimal time and effort spent on this process;
Using a drill you can ensure the perfect quality of putty
- The composition is applied to the surface using a spatula or a metal trowel; the width of the tool should be approximately 30 cm. You will also need a narrow spatula about 100 mm wide, with its help the putty is applied to the working tool, and also applied to hard-to-reach areas;
Using spatulas, the composition is applied to the wall.
- As for the decorative application of putty, a variety of devices can be useful for the job. I will talk about them in more detail below, when considering different decoration options, since you don’t need to have everything on hand;
- The surface is primed with a roller or brush; the same tool is also used when painting finished surfaces. Moreover, such a tool can also be used for decorative application of putty; this is one of the tool options;
Brush and roller - the main painting tool
- Leveling the surface is done using a grinding block, and control of the plane during preparation is carried out using a rule or a long level.
Surface preparation
The instructions for carrying out the work look like this:
- First of all, you need to check the surface using a level or rule to find out what unevenness there is on the base. If the differences are a couple of millimeters, then you don’t have to level the walls, but most often you have to carry out additional preparation;
Checking the surface allows you to identify all irregularities
- The walls are cleaned of dust and dirt; for this you can use a vacuum cleaner or a regular brush. The main thing is to remove dust, which negatively affects the adhesion of the primer and putty;
- A primer is applied to a clean surface; before use, the composition must be thoroughly mixed (if you have a concentrate, then it must be diluted in the proportions indicated on the package). The primer is distributed over the surface with a roller; hard-to-reach areas are easier to treat with a brush. After application, you should wait for the walls to dry completely, this takes from a couple of hours to a day;
The walls must be primed
- The putty is prepared in a volume that you can use in one go. When preparing, the mixture is poured into water, and not vice versa; all proportions of the components are indicated on the packaging. After mixing, you should get the consistency of thick sour cream so that the composition is easy to work with and sticks well to the wall;
It is important that the consistency of the composition is optimal
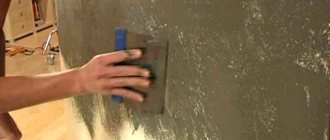
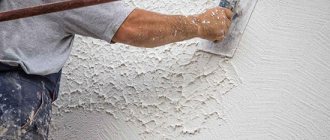
- Application begins from a corner or joint of the wall; it must be distributed in an even layer about 2 mm thick. The spatula is held at an angle of 30 degrees to the surface and carefully moved along the plane with moderate pressure. You should not pay attention to sagging and streaks, the main thing is to level the plane, and you can easily remove minor flaws later;
The spatula is held as shown in the photo
- Drying the wall takes about a day, after which you need to use a sanding block with P120 sandpaper to level the surface. The work is simple, the main thing is to process the walls section by section and check the result with a light bulb or flashlight. Do not pay attention to minor flaws and irregularities - they will be repaired with a decorative layer, a perfect result is not needed here ;
Sanding allows you to eliminate all the flaws that arise when puttying the surface.
- The last thing you need to do is clean the base from any dust that occurs during grouting, after which you can apply a primer. The soil strengthens the walls and improves the adhesion of the decorative coating.
Prepared surfaces must be primed
Options for textured putty mixtures
There are different recipes for creating textured finishes and methods for applying decorative plaster. Large material costs will not be required, since all components individually are inexpensive.
Polyvinyl acetate (with PVA glue)
This is the simplest technology for preparing a decorative mixture from PVA glue and simple putty. 2 liters of water (room temperature) are poured into a prepared clean container, 6 kg of gypsum putty is poured in and everything is mixed well. Next, add 200 g of glue to this amount and stir everything again. If desired or necessary, the glue can be replaced with a drywall grout mixture in a 1:1 ratio.
Dry putty
2 liters of water
PVA glue
With PVA glue and chalk
The adhesive mass has high strength and ductility. To prepare it you will need:
- drying oil – 25 grams;
- PVA glue – 2 kilograms;
- sifted chalk - 2 kilograms.
Drying oil
PVA glue
Sifted chalk
The glue is heated to a temperature of 35-40 degrees and mixed with drying oil, chalk is added and kneaded until smooth.
With primer
There are two manufacturing options here. For the first option, you will need universal dry putty (6 kg). It must be diluted with ordinary white primer (in liquid form), which is used for interior decoration. Add until desired consistency is achieved. Next, add grout for the seams. Both colored and neutral shades are acceptable.
The second option is to use an acrylic primer. This material is able to penetrate deeply into the surface of the base, and therefore is an ideal option for increasing the service life of decorative plaster. This composition is diluted with water in an amount of half its volume. Then you need to slowly pour in Satengips putty until a paste-like thickening forms.
It is recommended to use components one to one
Versailles textured finish
A distinctive feature of Versailles putty is silver. It allows you to get a special shine to the surface. For guidance you will need:
- starting and finishing putty;
- acrylic paint;
- silverfish
Starting and finishing putty
Serebryanka
Acrylic paint
The mass is mixed 1 to 1, diluted with water and stirred until the consistency of sour cream. If the area is small, then add color. The mixture is thrown on, leveled and the desired pattern is created. After drying, apply silver.
Concrete texture
It is worth taking any putty mixture, adding stone flour with clean fine sand. The amount of additive should not exceed 15% of the total volume of the composition. Otherwise the product will become crumbly. This recipe allows you to create travertine plaster, imitation of small fur coat, bark, including other types of wood.
You can add clean fine sand and stone flour to the putty.
Preparation and application of putty
What is textured wall putty?
Before you putty the wall, you need to prepare it and improve the adhesion of the putty mixture to the surface. That is why we do the following:
- First of all, you need to clean the wall of old finishing materials.
- If the wall is pre-plastered, then a thorough inspection is carried out for cracks and chips. The surface is tapped, the resulting voids and chips are re-plastered and cleaned
- Textured putty does not require creating a perfectly flat surface, and differences should not exceed 1 cm. Large flaws are primed and plastered
- Using deep penetration primers improves the adhesion of the base. In this case, it is better to abandon the use of conventional solutions. After treatment, the walls are thoroughly dried
Important! You can see the process of creating a textured wall from ordinary putty with your own hands in a video for beginners. In them, professionals describe all the subtleties and pitfalls when working with a textured mixture.
You can add texture to the walls in several ways and movements:
- Horizontal
- Circular
- Vertical
- Cross to cross
During the process of applying the material, you can change the texture until the solution begins to set, so do not apply a large amount of putty if you are not sure that you can recreate the desired pattern the first time.
Textured putty in the living room
With putty you can create not only a pattern, but also a drawing - it all depends on the skill of the person carrying out the repair. If you do the repairs yourself, then keep a little life hack from the master:
- A drawing that resembles a beautiful rose is very easy to make. To do this, you need to take thick paper and crumple it into a ball, then wrap it in cellophane, thereby protecting it from getting wet and damaging. Next, just press the ball into the applied putty and get a familiar pattern. After looking at the photo, you can decide in advance on the size of your ball and the future flower on the wall
Important! Textured putties begin to dry approximately 25 minutes after application. This time should be enough to give the walls a beautiful pattern.
The economical solution makes it possible to create a “rock” or “rain” texture. For example, to get a “rain” wall that resembles bark beetle plaster, you should perform the following steps:
- Choose a direction - it can be vertical or inclined. The peculiarity is that this direction will need to be followed throughout the entire process.
- For ease of applying putty, markings are made on the walls.
- The putty is applied with a thickness of no more than 3 mm and a width equal to the tool.
- The trowel is pressed against fresh putty and a stripe is drawn in the desired direction - all the thorns are subsequently removed
When the surface dries, you can begin to correct defects and finish the wall, which will protect the surface from the negative effects of the environment.
Options for structural putty mixtures
In such homemade products, the main role is given to filler particles. These are grains or fibers of mineral, organic or synthetic origin. Due to their inclusion, a coating with an original and unique structure is formed on surfaces.
Structural plaster is obtained by using other components:
- flocks;
- broken parts of shells;
- sand (river or quartz);
- balloons;
- any type of metal powder;
- mica, foil (crushed);
- granules (polymer, ceramic);
- sawdust.
Recipes for budget structural plasters:
1. With marble chips (for interior decoration). Ordinary dry putty (4 parts) is poured into the prepared container, then fine marble chips (1 part) are added. Add water until the desired consistency is formed. It is better not to add color to the solution, but to paint the finished coating.
Water
Marble chips
Ordinary putty
2. Travertino plaster and other textures. To create this material, a gypsum mixture containing mineral additives (Satengypsum) and gypsum putty containing polymer additives (Fugenfüller) are taken. Plus coarse sand (3 parts). First, the dry mixtures are mixed together, only then a gentle amount of water is added to form the desired consistency.
3. Bark beetle. In this case, granite or marble chips of a suitable fraction are added to the putty. The amount of additives is no more than 10-15% of the total volume.
Most of the components for preparing structural plaster can be found not only in various stores. Mother Nature herself provides a wide range of shells, pebbles, sand and other ingredients.
Important!
It is necessary to sort, wash and dry to get rid of dust, otherwise the strength of the future coating will decrease.
The clay, including lime, is pre-soaked and then passed through a sieve (you can use a nylon stocking) to remove unwanted inclusions.
Acrylic putty is most often used to imitate the structure of marble.
Crafting Recipes
In order to create your own decorative arrangement, it is not at all necessary to spend large amounts of money on purchasing an expensive composition, since everything you need can be made yourself using the following recipe options:
- putty with PVA glue;
- adding to the primer composition;
- using gypsum mixture as a base;
- adding marble chips to the solution;
- production of Venetian putty;
- production of the Versailles version of the material.
In each individual case, the usual universal putty is used for arranging structural elements and certain structures, and in addition an additional component that acts as a base or auxiliary substance.
Important. When preparing a mixture, it is necessary to rationally use the available components, and in addition, follow the technology for producing the appropriate mixture.
With PVA glue
In this case, we are talking about the simplest option for preparing the appropriate structural mixture. Here we use a regular tube of PVA glue, and also universal putty. To prepare, you will need to grind the glue, then thoroughly mix the finished solution. The substance should be applied to the surface immediately after preparation, as the rate of hardening of the finished device significantly increases.
With primer
Here it is recommended to use the components one to one, which will achieve the necessary adhesion, and also a decorative structure. To do this, mix universal putty and a regular primer for interior finishing. The compositions are combined, after which thorough mixing is carried out. This substance can be applied using a sprayer, which will significantly simplify the procedure for arranging a structure or other structural element.
Gypsum based
This involves adding the required amount of gypsum mixture to the universal putty. As a rule, the following proportion is used: one liter of putty will require 200-300 grams of gypsum. This substance is added evenly, with thorough mixing using a construction mixer. Subsequently, after mixing, the composition is immediately used to work with the surface, since after creation it tends to harden quickly due to the presence of an auxiliary component such as gypsum. Here you should use a construction spatula for work.
With marble chips
In such a situation, you will need to use 100 grams of marble chips per liter of putty solution. The substance is thoroughly mixed, after which it settles for some time to obtain the required concentration of the solution. Subsequently, application is applied using a construction spatula, or a roller or brush with natural bristles. The entire surface is coated evenly, and after the surface coating work is completed, the finished layer is properly polished.
Venetian
In this case, the usual universal putty is used, and in addition alkyd varnish, the use of which allows you to create the necessary glossy surface. During the work process, 100-200 grams of varnish are added per liter of putty. Subsequently, thorough mixing is carried out, after which the finished solution is immediately applied to the surface. As a rule, for arranging such situations, a regular roller with long pile is used. Immediately after installation, you will need to polish the surface.
Versailles
In this case, you will need to use a universal or finishing putty, which is mixed with an ordinary gold-colored dye. If necessary, you can use a different color shade. Here it is necessary to thoroughly mix the compositions, and then use a construction spatula and appropriate technology for application. The essence of such a coating is that unevenness, roughness and small cracks should remain on the surface, which, together with the color tint, gives an attractive appearance.
Important. If a dry mixture is used in the preparation of any recipe, then the required amount of water is used, as well as a bucket and other auxiliary tools for preparation.
A variant of Venetian plaster made from putty
Any of the putties has a characteristic roughness, which should not exist to create a real Venetian coating. To obtain a smooth surface, water-based acrylic varnish is added. You will also need a finishing putty with microcalcite or marble flour, a special color designed for water-dispersion paints.
The creation algorithm is as follows:
- In a prepared container, mix varnish (1 liter) with water (100-150 ml).
- Add dry putty (about 2.5 kg).
- Mix the mixture thoroughly.
- Add dye (less than 10% of the total volume).
- Stir everything again.
The result should be up to 3.5 kg of Venetian solution. The average consumption of decorative material varies from 0.4 to 0.5 kg per m2 of surface. To increase the life of the mixture, it is worth adding a little plasticizer. PVA glue in an amount of 1% by volume, lime and a special liquid are suitable for gypsum putty.
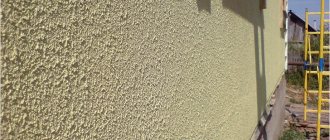
In most cases, interior walls of premises are covered with Venetian, however, such cladding is also suitable for the facade of buildings. It is recommended to treat the outer coating with a polymer-based waterproofing mastic (Plitonit hydroelast) to withstand the aggressive effects of weather conditions.
Attention!
To protect the facade, you need to apply more than one layer and dry each of them well.
Composition and technical characteristics
Decorative putty varies in consistency, grain size, and fillers. The main components are:
- cement;
- gypsum;
- chalk;
- resins;
- latex;
- PVA glue;
- varnishes.
Common additives include quartz sand, marble and granite chips, sawdust, and foam balls.
Components for changing the texture of putty material
When choosing a putty, you should rely on its technical parameters. Average indicators for putties:
- water consumption per 25 kg of powder – up to 4 l;
- compressive strength – from 4 to 8 MPa;
- bending strength – from 1 to 3 MPa;
- layer thickness – from 1 to 20 ml;
- consumption per 1 m2 – up to 1 kg;
- setting time - from 10 to 120 minutes.
The introduction of additives improves performance characteristics, increases ductility, strength, and degree of adhesion.
Required Tools
After preparing homemade plaster, it can be applied using almost any suitable means:
- spatulas - both narrow and wide, made of steel or plastic, with a straight or curved blade, are suitable;
- trowels, graters - here, too, there are no restrictions regarding the design and material of manufacture;
- rollers - the composition is applied using ordinary tools, and with the help of textured models the desired surface texture is created;
- brushes - brushes, brushes, flute brushes, as well as other varieties;
- a drill with a suitable attachment or a mixer - for mixing the solution;
- spray guns, pistols - increase the productivity of mechanized labor;
- sponges - not only soft and dense ones are suitable, abrasive ones can also be used.
Auxiliary items may be useful in your work - stencils, matrices, stamps. Household items will also be useful in creating the desired surface texture.
Rollers, trowels, and spatulas are used for finishing walls.
Creating a decorative surface
The formation of decorative relief plaster is carried out in various ways. The main thing is to get the intended finished result that matches the project design.
Roller
Forming the relief using a roller allows you to get a predictable result; it is carried out immediately after applying the base layer. The relief pattern is created by the selected textured attachment from bottom to top. Make each subsequent pass by capturing the edge of the previous one. Apply the texture carefully, maintaining symmetry and distances when forming the pattern.
After drying the decorated layer, go over it with P60 sandpaper and correct the design if there are any overlaps. The formation of a finish of this kind involves subsequent painting of the surface 2 times - completely at once and the top of the relief with paint of a different tone at the end.
Another way to apply decorative plaster with a roller is to paint the base layer with a liquid mixture with added color or textured paint. In this case, immediately after drying, a relief pattern is obtained on the surface.
It is not recommended to make relief with a nozzle made of fleecy material. Purchase a ready-made plastic textured roller for this work.
Spatula
Most types of decorative plaster are made using a spatula to form the relief. This relies on the mixture adhering to the bottom of the spatula or trowel when it touches the surface flat. This is how the “fur coat” finish is formed. Pulling the trowel 5-10 cm in straight or wavy lines and then tearing it off the surface causes additional unevenness. Using these methods, a pattern of decorative plaster is formed. When the mixture dries a little, the peaks of the relief are smoothed out. In some cases, with a trowel or trowel, ornaments, flowers, and seams like brickwork are drawn on the surface.
Available means
By the principle of pressing a workpiece into the mixture or tearing it away from the solution, drawings of the most incredible shapes are created. Here the flight of imagination is limitless. This could be: crumpled thin or thick polyethylene, paper, a comb, a fork, a broom, even a finger. It’s impossible to list everything; there is a use for any item.
Stencil
A stencil according to the design is cut out of a sheet of cardboard, applied to the surface of decorative plaster or base layer, and secured with tape. Prepare the required amount of molding sand and fill the cut holes.
After the solution has completely dried, the stencil is removed, the resulting pattern is modified with a stationery knife and sandpaper P60, P120. The resulting relief pattern is painted 2 times with glazing compounds.
Preparing walls and other surfaces
It is highly recommended not to ignore the preparatory stage, which is a prerequisite when using any plaster. Venetian finishing has the highest requirements, since the layer thickness is no more than 2 mm:
- It is necessary to completely remove the old coating from the walls, leaving no residue. Fill cracks and potholes, as well as remove mold, grease stains, dust and other contaminants. That is, the surface should become as clean as possible.
- The walls are coated with a primer taking into account the base material.
- You also need a smoothing step using sandpaper, after which you need to remove the dust.
- At the end of the preparation, the walls are dried.
For pronounced relief such as bark beetle, the Versailles coating requirements are not strict. It is acceptable to leave minor defects that will be hidden under the thickness of the plaster.
The material of the walls, in turn, also imposes certain obligations. Gas silicate blocks have a high level of water absorption, so without preparation they are able to draw all the moisture out of the solution. As a result, the strength of the coating is lost, which can crumble. For this reason, such a surface must be covered with three layers of primer (no less), which will form a dense film.
Types and features of the material
Do-it-yourself textured putty on walls can bring a lot of positive emotions, as well as troubles. In order to avoid mistakes in the process of creating a decorative surface, you should study the sequence of work and the features of preparing the base.
Textured putty on walls in the interior
The texture on the wall is created using various painting tools. These can be brushes and rollers, spatulas and machines - an additional effect is created by painting the base. Textured putty has clear advantages that set it apart from other putties:
- In terms of strength, the material is not inferior even to plaster, which is used to level surfaces
- The wall surface is easy to care for; the finished finish does not require special care
- A variety of colors and textures allows you to choose the most suitable option for your interior
- Adding originality to interior solutions is possible thanks to textured putty on the walls
Among the disadvantages, one can highlight only the labor-intensive work of applying the material, which requires some skills and knowledge. At the same time, the price for the services of professionals and their assistance in textured designs of wall surfaces increases. Before making a textured wall from putty, you should decide on its relief and pattern. Remember that the pronounced relief tends to accumulate dust and dirt, so it is better not to apply it in the corridors, hallway and kitchen.
Do-it-yourself textured putty (video)
Mixing putty
When using polymer compounds, it is enough to mix the components. In the case of dry mixtures, you need buckets (how many depends on the portions), water, material plus auxiliary components. First you need to mix the dry mixtures, and then add the liquid and mix everything well. With the help of a construction mixer, the process will be faster and more efficient.
Advice!
To get a pronounced decorative effect, it is worth adding an auxiliary ingredient. After mixing the solution, you can start working.
Mixing putty
It is recommended to prepare the molding mixture from dry mixtures of starting and finishing putty. The process consists of the following steps:
- The required volume of solution for all work is determined, or how much is planned to be produced.
- Water at a temperature of 20 - 25 degrees is poured into the container, and the calculated amount of plasticizer is added.
- Dry mixtures of starting and finishing putty are poured in small portions, alternating with sifting by hand.
- The solution is mixed with a whisk or mixer on a hammer drill at low speed.
- As mixing progresses, the dry mixture is added until the required consistency is achieved.
- The mixture is kept for 5-6 minutes. At the same time, the reaction begins, the remaining lumps are soaked. Then mix again until a homogeneous consistency is obtained; filler, color, and glitter are added if necessary. The setting time of gypsum-based putty after applying a layer is 25-30 minutes.
Applying the base layer
Like any plaster material, the decorative mixture is also applied in several approaches (usually two layers are enough). The first - the base one is applied evenly to the entire surface of the wall. The thickness of the coating is no more than 10 mm, otherwise the homemade plaster risks crumbling. And when the coating dries and gets stronger, you can begin to create the required texture.
First, a base layer of composition is applied
Necessary calculations and tools
When using textured putty, one of the main stages is the preliminary calculation of material consumption. This is necessary if you have a large finishing area. The calculation can be done on almost all manufacturers' websites. They provide a handy calculator that only requires you to measure the surface: length, height and width.
The calculation also makes sense if financial possibilities are limited. She will not knit with the cheapest material. If the mixture remains, it may not be needed in the near future. But textured putty also has its own shelf life.
To work you will need:
- Textured putty (colors if necessary);
- Spatulas of different lengths;
- Primer solution;
- Rollers with different handle lengths;
- Masking tape;
- Protective clothing;
- Plumb line, construction ruler or level.
- Tassels;
- Construction trowel;
- Rule for alignment;
- Paint and varnish or polymer protective coatings.
- Container for mixing textured plaster;
Secrets of the masters and tips
Useful recommendations from the experts will help, if not speed up the work, but certainly make it easier. All manipulations with putty applied to the walls must be carried out as soon as possible, until the solution has completely set.
To form several reliefs, the border is made with masking tape. It must be removed before the mixture dries, otherwise damage to the outer contours cannot be avoided.
There are small tricks:
- In order for the mixture to adhere well to the surface, notches should be made at intervals of 50 mm.
- If the quality of the base is in doubt, it is better to glue a special mesh as a reinforcing layer.
- Professional builders advise preparing the solution in a small container, without diligence. If there is too much composition, it will harden quickly.
- Containers used, as well as tools, must be washed thoroughly after use.
- Since putty usually hardens quickly, it is best to apply the mixture in small areas.
- It is recommended to avoid long breaks in work, otherwise the texture will be uneven.
Purpose and scope
Putty is a construction mixture intended for leveling and decorating. Its purpose is to decorate building facades, interior spaces, and various outdoor objects.
Areas of application include:
- leveling the base;
- sealing defects;
- creating a coating for painting or wallpapering;
- creation of bas-reliefs, panels, stucco moldings;
- decoration of the facade of the house.
Decorative putty for walls with moisture-repellent properties has found its use in places with high humidity, bathrooms, and swimming pools.
Using decorative putty, you can hide flaws on the wall and create relief with different textures
How to prepare the surface
The instructions for preparing walls for applying textured putty are as follows:
- All old finishing materials are removed from the wall.
- The previously plastered surface is inspected for reliability and adhesion density of the material. If it has a loose base and crumbles, the coating must be removed from the wall. With a reliable majority of the coating on the surface, everything remains as is.
- The plane is leveled, the difference in levels should not exceed one centimeter.
- The leveled surface is covered with a primer (see Types of construction primers and their area of application) and dried.
Tip: To ensure optimal adhesion of relief plaster, it is necessary to use a special deep penetration primer.
To prepare textured plaster you need to prepare:
- A large capacity container or bucket for mixing ingredients.
- Electric drill with mixer.
- Sandpaper of different grits.
- A special grater to level the layer after applying the material.
- Spatulas of different widths.
- A trowel to structure the surface.
- Brushes and rollers (see Painting rollers: let's look at them in detail) for painting plaster.
- A sponge to obtain different effects when applying a coating to a wall.
Textured plaster can be prepared from any putty that allows you to create the necessary consistency of the solution to achieve the desired design idea.
In this case you should prepare:
- Putty.
- Mixture for sealing joints in the presence of plasterboard sheets.
- White acrylic primer.
- Acrylic varnish.
- Paint the desired color.
- Glaze that allows you to further decorate the surface.
When preparing the mixture:
- Mix in a container:
- putty;
- seam sealer;
- cold water.
- All materials, except water, are taken in equal proportions,
- Water is added gradually, while adjusting the consistency of the solution: the plaster should not be so liquid that it flows over the surface, but its thickness ensures the formation of the required relief on the wall.
Preparation of putty solution
Textured putty can be purchased either in a mixed form or presented in separate components. In any case, all ingredients are placed in a container and filled with cold water. Water should be added in parts. At this time, the solution is stirred all the time. This way you will have an idea of the consistency. It should be neither liquid nor thick. If necessary, either water or a mixture is added. The main thing is that the composition does not spread, but also prevents the creation of texture.
Preparation of materials and tools
Before starting puttying, you must purchase:
- Rollers of different sizes.
- Tassels.
- Rule.
- Special plaster trowel.
- Ironing iron.
- An ordinary grater.
- Spatulas, the width of their working part is 10 and 30 centimeters.
- Angled spatula.
- Construction plumb.
- Construction water level.
Prepare the necessary materials:
- Plaster compositions.
- Pigment colors.
- Various primers.
- Protective coatings – paint or polymer.
When applying textured plaster, a certain technological process must be followed.
Initial preparation before application
No construction work can begin until various preparatory measures have been completed.
In particular, if a white seamless texture of plaster is used, then it is necessary to prepare the surface on which it will be laid.
The sequence of actions will be as follows:
- you need to start by cleaning the surface . Remove old wallpaper using a spatula and water. In addition, to speed up the process, you can use a hair dryer or solvents.
Wall cleaning
- The next step will be washing the cleaned surface. There are no special recommendations here; you can take ordinary detergents and some kind of cloth.
- if there are many holes and cracks on the surface, they must be sealed with putty. This is especially true for Venetian plaster, which needs to be applied only to an even wall structure.
Sealing cracks
- The next step will be priming the entire wall .
Primer
- Each type of plaster requires its own primer, so you need to carefully study the information from the manufacturer on the boxes.
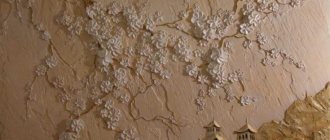
Textured putty: how to make it yourself
Textured putty for walls is an extraordinary way to decorate walls in a living space. Despite the large number of interesting solutions when decorating rooms, it is textured putty that makes a traditional interior original, attractive, distinctive and memorable.
The article tells you what kind of putty there is for textured putty, and what can happen after a competent approach to finishing work.