June 24, 2020
The impression of the appearance of a house or apartment speaks volumes. When you come to visit for the first time, you probably pay attention to the interior of the premises. Today, there is a huge selection of materials and finishes that will help bring to life projects that emphasize uniqueness, attractiveness and functionality. The appearance of the house depends only on your own preferences, as well as taste and wealth.
It is not necessary to spend money on expensive building materials, holding the opinion that the quality of analogues will be much worse than branded compounds. For a long time, people have resorted to an alternative solution, for example, making decorative plaster from putty. This is a suitable option for those who do not need professionals for quality repairs. Before you start, you should study information about its types, compositions and tools. In this article we will try to understand these issues.
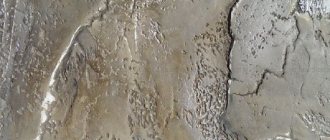
Application of textured plaster
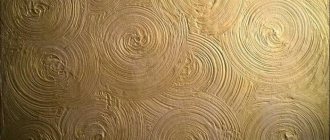
High-quality finishing with decorative plaster is an opportunity to make your bold dreams of transforming your interior come true. A relief surface can be obtained in different ways. It all depends on the composition of the dry mixture, into which you can add pigment and additives at your discretion.
Having mastered the skills of distributing the composition over a vertical surface, it is easy to move on to creating a textured surface. With this type of coating it is easy to hide wall defects, and at the same time imitate more expensive finishes, including stone and brickwork.
Unique wall decor can be created in any room:
- Entrance hall and corridors;
- Kitchen and dining room;
- Studio apartment;
- Living room (hall);
- Bathroom or bathroom;
- Bedroom and children's room.
In this sense, decorative plaster of walls can be considered a universal solution.
Helpful advice! In order to save money, you can take one composition, but vary the color (wall color) and texture pattern. Some formulations differ in composition, which gives additional shimmer, like “Venetian”, it costs more, application is more labor-intensive.
Painting
Typically, relief plaster is painted with water-based paints. Use a roller with long pile and paint the wall with a base color, and after drying it, either rub it with fine sandpaper to add depth to the design, or apply a second color of paint with a sponge or dry brush with light movements only on the protruding parts of the relief.
Painting decorative plaster in 2 shades
Remember that when the paint dries, it becomes 1-2 shades lighter.
Design techniques with decorative plaster
When first applied, new cladding may seem difficult to apply. Having acquired the skill of decorating a balcony or toilet, it is easy to “get your teeth into” and move on to more important areas of cladding an apartment with your own hands.
Many people have heard that decorative plaster made from ordinary putty is in many ways similar to the method of applying liquid wallpaper. Indeed, working with narrow and wide spatulas, the base is applied to the walls, spreading in a thin layer. In the case of plaster, all that remains is to create a decorative layer.
Note! For interior designers, this type of cladding is considered the most “friendly”. The textured surface goes well with wallpaper, painting, brickwork and “wild stone”. You can make several imitations from one composition, but this will cost several times less.
A textured surface with plaster is an excellent replacement for natural analogues. It can imitate agate, malachite, jasper and opal. The special “mission” of Venetian plaster is to imitate walls, vaults, columns (straight and other convex surfaces) like marble.
Interior solutions
If you have previously worked primarily with wallpaper or paint, then most likely plaster appears to be an inconspicuous cement mortar that can hardly be used in finishing.
Let's dispel the misconception.
"Silk" on the walls
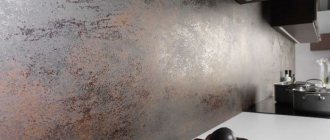
- Mother-of-pearl coating, differences in degree of gloss and grain. Adding sophistication to the room. Various application methods, use of almost any color scheme. All of the above is a brief description of this type of decorative plaster.
- Its composition includes rayon, cotton and cellulose fibers, as well as water-soluble glue flakes.
- This is a unique material that imitates a silk surface, while creating the illusion of transparency of the walls. You can definitely create a stylish design, you just have to remember to carefully prepare before application.
Sandstorm effect
- Externally it resembles sandstone. Apply with a brush. The technique is different, so the drawing depends on your hand. Ideal option for interior decoration.
- The composition most often includes quartz sand, but river sand can also be included. For a sparkling effect, finely crushed shell particles are added. There is a coating with reflective beads. In the interior it looks impressive and unusual.
- Textured sand is resistant to dampness, and the fine quartz included in the composition protects against fungi.
"Travertine"
- This decorative plaster imitates the calcareous tuff used for construction in Ancient Rome. Can be applied smoothly to walls or rubbed in until glossy. The thickness of application is determined by the size of the fraction.
- It contains marble powder to create shine, pigments, binders and slaked lime. The material itself is durable and acts as protection for the wall.
- It can be used to create various designs, such as a world map.
"Texture"
- Masks unevenness and other wall defects. A universal material that is suitable for those who do not want to waste time on perfectly leveling the wall. Can be used to imitate natural materials.
- The composition includes small stones, elements of granite or marble chips, and sometimes cotton and flax fibers are present. Coarse fillers are placed in a thick layer, due to which all defects are covered.
- When applying, stencils, structural rollers are used, and artistic modeling is performed.
"Bark beetle"
- Currently one of the most popular decorative plasters. The material is used not only for interior decoration, but also for the facades of the house. For this, different factions are taken. The interior looks restrained and sophisticated.
- Consists of mineral filler, granules (of different sizes) and liquid.
- Several application methods: horizontal, vertical, circular.
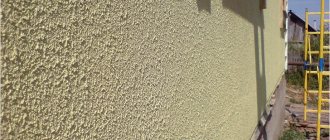
"Fur coat"
- Acts as a protector against sudden temperature changes. Otherwise called pebble plaster. Most often this coating is used in the bathroom and kitchen. Can be applied to concrete, stone, gypsum and cement plaster, drywall.
- Acrylic, cement, silicate are the main components. Texture is achieved through mineral chips.
- Small price. Anyone can handle this finishing method, so professional help is not needed.
"Home Venice"
- Venetian decorative plaster is a complex and capricious material. However, it can be found in the interior with noticeable frequency. It will be difficult to recreate this type of coating without experience, but the result is worth it.
- Three important components: stone dust, slaked lime and pigments to give color.
- This coating can be single-color or multi-color. It replicates marble with a glossy surface. Sanding can be done by hand or using polishing equipment.
Types of mixtures
Decorative plaster is offered on a polymer, cement and gypsum basis. They contain various additives that determine the final design of the wall covering. Sometimes plaster is packaged not in bags, but in plastic containers - these are polymer and acrylic compositions that are completely ready for application and quickly harden.
A budget-friendly way is to prepare a dry composition yourself by mixing dry putty in water with the addition of river sand, PVA, pigment and stone chips. It will look no worse than most “elite” plaster compositions.
Important! When purchasing decorative plaster, see the recommendations. There are universal, external (facade) mixtures and only for interior work.
Design style is an important point when choosing a composition. If you plan to sculpt some decorative elements with your own hands, then it is better to choose a gypsum base. Facade compositions can “exhale” harmful components, but they perfectly hold together the outer layer, which resists the destruction of weather and climatic factors.
- It is advisable to protect spectacular Venetian plaster with a wax coating.
- If desired, the usual textured surface can be painted and covered with colorless varnish to make it easier to wash and clean.
- However, not every textured pattern is suitable for beginners.
- It is better to entrust the “Venetian” to experienced cladding masters, and master the method of applying the “bark beetle” yourself.
Varnishing
To make the color of the plaster look brighter and the relief to stand out more visually, the wall is coated with water-based varnish. This should be a special varnish for decorative plaster.
The varnish is applied in 2-3 thin layers with a paint brush, sponge, or a hard roller will do. There should be no leaks. Each layer is applied after the previous one has dried. Usually the varnish dries quickly; check the drying time of the varnish on the product packaging.
The process of creating a particular relief can be found on the Internet for each type separately. There are many detailed video instructions.
Before working on the wall, you can first try applying decorative plaster on a square of plywood or plasterboard.
Finished coating option
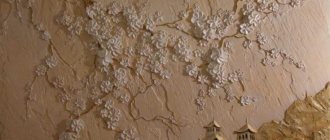
Do-it-yourself relief plaster is not an easy task, but if you do it well, you will get an expensive-looking interior, and people with artistic talent can even create a beautiful panel with natural, animal and other motifs.
Tips for beginners
Each type of decorative plaster pattern is formed on the basis of a specific composition and method of application. For example, to draw three-dimensional “roses” you need a simple base, while “bark beetle” and “fleece” require their own composition.
- It is better to gain experience from simple methods of applying the finished mixture in order to save yourself from mistakes and unnecessary steps in mixing compositions, where maintaining proportions is important.
- It is better to purchase dry inclusions and pigment separately, but before application add them to liquid wallpaper and French plaster, which looks amazing in the interior of a living room or bedroom.
- Stencils, combs, and hard roller attachments will help you form an interesting design if you work with them in a certain direction.
- The gypsum-based mixture sets quickly, so it is prepared in small portions. But it is the most pliable and plastic - it is easy to fashion three-dimensional decor from it.
- The “bark beetle” pattern is formed with special granules, but the pattern can be varied by moving the spatula differently.
When creating repeating fragments of a textured pattern, special devices are needed - stencils, roller attachments, and a notched spatula. You can read about their necessity in the recommendations on the packaging so you can purchase them in advance.
When purchasing a mixture for interior decoration, look at the composition; this will eliminate allergic reactions when working indoors.
Materials and tools
In addition to whether you chose dry putty or a ready-made mixture, you will need additional materials:
- deep penetration primer (for preparing the base and before painting the plaster);
- water-based paint (possibly several colors or shades);
- water-based varnish (for finishing panels).
List of main tools:
- small spatula;
- long spatula 50 cm;
- paint roller or brush for priming walls;
- chisel + hammer for surface preparation;
- roller with long pile for painting;
- paint tray for painting;
- a thin brush or sponge (for applying varnish) or a hard roller;
- tools for applying texture.
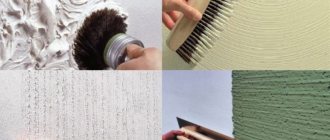
Variants of patterns with various objects
You can apply textured plaster with your own hands using various objects, your imagination will help here: sponges, polyethylene, brushes, spatulas, special rollers with a pattern, etc. You can create a relief with your own fingers, most importantly, wear gloves to comply with safety precautions. To create a panel, you will need a special set of tools for decorative artists.
Panel on the wall with plaster
What is important to consider when applying decorative plaster?
The finished paste from plastic packaging is completely ready for application. It is not advisable to open it in advance so as not to change the consistency. Some ready-made mixtures have a short shelf life, so be sure to find and read these recommendations.
The dry mixture is prepared strictly according to the recipe, kneading before application. When the suspension is mixed, it needs to be allowed to swell for 10-15 minutes so that all the additive components that form the surface have time to soak and mix with other components.
It is better to knead in a separate bucket or plastic container, using a construction mixer or drill with an attachment. This will eliminate clumping and heterogeneity. First, pour water (the volume specified in the recipe) with liquid pigment. If the dye is dry, it is pre-mixed and filtered so that there are no defects.
Important! The solution is added to water, and not vice versa, so that the mixture is homogeneous and has the required consistency.
What kind of putty can I use?
To create decorative surfaces, all types of gypsum putty are used. The ideal option is a finishing type Knauf Uniflot, Knauf Rotband, Ceresit ST127 or their analogues.
- A high-strength composition similar to adhesive, called Knauf Uniflot, is intended only for interior work. It has a low degree of shrinkage and is practically not susceptible to cracking.
- Knauf Rotband plaster is used for plastering concrete walls and ceilings - its adhesion (stickability) is excellent. The surface is very even and smooth. The mixture has a reduced consumption and is used even in rooms with high humidity.
- White polymer putty Ceresit ST127 is suitable only for interior work. It can be applied to many types of bases, including concrete, cement-sand and gypsum.
The price for regular putty is:
finishing putty
Acrylic, silicone and other types of polymer putties are well suited for creating decorative surfaces. Fillers (sand, flock, stone chips, etc.) introduced into them are distributed evenly. Cheaper cement-based plaster is used for finishing facades.
Work algorithm
Stages of decorating walls with textured mixtures:
- It is better to purchase the required amount of dry mixture corresponding to the footage of the walls (the consumption of textured plaster is indicated in the instructions).
- Preparation of tools, including a round for kneading and application, a set of spatulas of different widths.
- Cleaning the surface of the walls, removing old paint, wallpaper, flaking putty, as well as sealing small cracks.
- Applying a starting base, if wall leveling is required, is often enough to eliminate minor defects and irregularities.
- Cover the surface with a primer and leave until completely dry (time specified in the instructions for use).
- The main stage is the application of plaster with an even distribution over the surface with the formation of a relief.
- After the layer of decorative plaster has dried, you can “preserve” the walls by painting or covering them with moisture-resistant varnish.
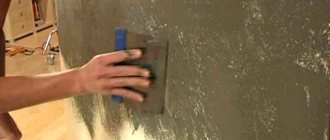
The textured plaster solution is applied with a wide spatula and stretched over the surface with confident gestures. It is advisable to level it with a grater, work confidently, but without effort, so as not to “pull” the layer.
The rustic texture is formed with special devices, but you can experiment with crumpled foil, convex elements, and a roller attachment with faux fur.
For more details, watch the video of applying decorative bark beetle plaster with your own hands.
Selection of plaster
Depending on the complexity of the future pattern, you can use inexpensive but high-quality putty for relief plaster, but a more correct and easier option is to use ready-made textured plaster, especially for creating panels. This plaster was developed by manufacturers specifically for decorative finishing; it is more flexible and easier to achieve the desired shapes and curves.
Textured plaster is usually sold ready-made, it does not need to be diluted with water, and even after opening it can be stored in a closed container for a long time (read the instructions on the product packaging). You need to dilute the mixture yourself for the entire room in strictly identical proportions, otherwise the pattern will not be the same, which will negatively affect the visual perception of the entire interior.
To make your own hand-made relief plaster look high-quality and professional, do not rush into purchasing the material. First, decide exactly what kind of wall or ceiling pattern you want to get, based on this, you will need to purchase certain materials and stock up on certain tools.
Relief plaster with a “wave” pattern
Photo of decorative plaster
Stages of work
Wall finishing with decorative plaster occurs in several stages:
Choice of texture. Considering that different types of plaster are made from different materials, the surface for application must be prepared accordingly. The application technology and, as a result, the appearance of the walls depend on the texture.
Some types of textures can hide surface defects, others, on the contrary, are applied only to a perfectly flat wall, before applying which it is important to properly prepare the surface.
Surface preparation. The essence of this process is to ensure good adhesion between the wall and the plastering composition
The process of preparing walls varies depending on the material from which they are built. While brick and concrete walls only need cleaning and leveling, wooden walls require the use of plaster mesh, wooden slats or reed mats.
Choice of plaster. In addition to the fact that when choosing a composition for interior wall decoration, they take into account the design of the room, they also take into account practical properties. You need to pay attention to the level of humidity in the room, temperature, operating conditions, condition of the building and its location. Depending on the totality of the listed criteria, you need to choose the most suitable option that will provide the desired appearance of the walls, high strength and resistance to various external influences. If you do not find a suitable one among the ready-made compositions, you can prepare it yourself.
Application. Direct finishing of the wall surface, giving them the desired texture and design. This process should be carried out as carefully and efficiently as possible, since the service life of the finishing material depends on it.
REFERENCE: in houses that are located near highways or railway tracks, it is recommended to use plaster for interior decoration with increased strength indicators, so as not to encounter the problem of surface cracking during operation.
Making your own mixtures
Almost any textured plaster can be made independently. The only exception is mosaic mixtures.
Production of textured compositions such as bark beetle and lamb beetle
In principle, you can take a ready-made composition, dry or in the form of a mixture, as a basis. It can be cement, cement-lime, silicate, acrylic, gypsum or gypsum-lime plaster. The choice is made based on your needs: for facade or interior work, for dry or wet rooms, etc.
There is no specific recipe here. Just take a package of the finished mixture and dilute it according to the instructions. Next we introduce the filler – stone chips. The amount of the latter will have to be determined experimentally. We start with 1 kg per 10 kg bucket. We try to apply it on some flat surface, if we see that the texture turns out to be inexpressive, we add more. If the textured decorative plaster ends up being too thick, thin it out a little.
Textured plaster for walls: the photo shows an example of finishing with the optimal amount of filler
And now regarding the nature of the filler. The type of stone is not important here; the grain fraction is more important. The bark beetle contains crumbs with a diameter of 1.5 to 3.5 mm. For interior decoration, it is better to take a grain of up to 2 mm; larger grains are suitable for facades. The lambs contain a mixture of stones of different fractions, from 1.5 to 3 mm. How to apply textured plaster - you can watch the video in the next section.
Please note: mosaic textured plaster cannot be created at home. This is due to the characteristics of acrylic resins used in such compositions as a binder. In the wide market you can only find acrylic for creating artificial stone, but this is not suitable for us.
Relief plaster on walls: photo of “lamb” coating
Textured mixtures based on putties
Textured plaster made from ordinary putty successfully imitates expensive Venetian mixtures and “marbled” ones. The basis of the composition can be any, at your discretion. We choose it according to the same principle as described above for the bark beetle and lamb. As a filler we use sifted white sand in the proportion of 1 kg of sand per 10 kg of putty. Tinting is done “by eye”; you just need to check with the seller whether it becomes lighter or darker when it dries.
Textured plaster in the kitchen: finishing based on putty
The type of texture that can be obtained using such a composition depends on the application technique - we will talk about it below. Textured plaster made from ordinary putty requires a finishing coating - it provides the missing visual effect. The recipe is as follows:
- Wax for decorative plaster – 1 part.
- Water or other suitable liquid, depending on the type of wax - 10% by weight of the latter.
- Metallic or pearlescent color – 30% of the wax weight.
Roughly speaking, if we take 1 kilogram of wax, then we will need 100 g of water, and 300 g of color.
How to make textured plaster: video of making and applying the finishing coat.
Application
Applying plaster
The solution should be prepared based on the recommendations on the package, then you will get the required consistency. Moreover, you need to prepare such a portion that you can take it out at once, because otherwise the solution will “set” right in the container. This is a job that does not tolerate long smoking breaks.
The plaster must be applied with a spatula. When it thickens a little, you can go over it with a grater without excessive pressure, creating the desired pattern. It is better to practice in a small area first.
Most often, beginners create rain in different directions, circles, waves, crossed lines on the walls. The easiest to implement is horizontal relief. You can also use a special figured roller, then applying the pattern is much easier.
All this must be done at maximum speed, because the layer of plaster dries very quickly
It is necessary to pay special attention to the joints of sections to avoid sagging
Next, after 15-20 minutes, when the wall loses its wet shine, you need to lightly smooth the relief using a wet trowel. It is recommended to constantly clean the ironing board and dip it in a container of water.
After complete drying (usually about 24 hours), the plaster needs to be treated with fine sandpaper, which will remove all excess.
Liquid
At this point, finishing the wall with decorative plaster can be considered complete. But there are people who are not happy with this and want to paint the wall. In this case, you should use only high-quality paint that is resistant to moisture, sunlight and mechanical stress.
After the first layer has dried, a second coat of paint should be applied.
Consumption per 1 m2
Before starting finishing work using decorative plaster, it is important to make a competent calculation of the material. As a rule, it is customary to consider the mixture consumption per square meter
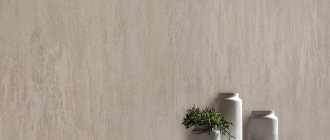
Decorative plaster perfectly imitates stones, wood or leather. Despite its cost, it is very budget-friendly in terms of consumption. Most often, the consumption per square meter of wall or ceiling ranges from one to one and a half kilograms.
Plaster, which resembles wood in texture, has the lowest consumption. The total thickness of the layer should not be more than one centimeter.
Structural plaster is made from a mixture of acrylic, cement or gypsum. This mixture is sold in 25 kilogram packages. To decorate a ten square meter wall you need one or two bags.
The mixture based on acrylic dispersions is homogeneous in consistency with the presence of small grains. The size of these grains does not exceed two millimeters. Finished plaster has a fairly significant consumption. If there is a fraction of one millimeter, the consumption is two and a half kilograms per square meter of wall or ceiling.
This plaster is usually sold in plastic packaging of 15 kilograms. For 10 meters of wall you need about two plastic packages. This amount of material will be needed to apply one layer of decorative plaster.
Structural materials containing marble chips or a mixture of marble and granite chips are in great demand. The layer of material can be from one to three millimeters. This depends on the depth of texture required. To apply the material to a wall of 10 square meters, you will need one package of material with a volume of 25 kilograms.
If we consider the structural material, then most often it is used to decorate the fireplace. A solution of such plaster is sold in plastic packaging of 15 kilograms. To apply plaster to a ten square meter wall, you need to buy two packages of the material.
Separately, it is worth mentioning the decorative plaster “Bark beetle”. The consumption of this product ranges from 2.5 to 4 kilograms per square meter. This scatter is due to the different grain sizes in the structure of the product and the thickness of the layer.
Still, before purchasing, you should consult with the seller at the hardware store. A specialist will accurately determine the possible consumption of decorative plaster of this type. It would be a good idea to read the information about the material on the packaging.
Venetian plaster allows you to create an imitation of marble on the wall in all its splendor. In terms of consumption, it is the most budgetary. Savings result from a perfectly level surface. Considering the cost of work and the price of the material itself, Venetian plaster is the most expensive.
Types of textured plasters for facade and interior work. Application technology
For internal and external work, almost the same set of compositions is used. An exception is Venetian textured plasters, which are used only indoors.
Textured plasters for exterior use
Mixtures of the “bark beetle” type are often used for finishing facades. They are named so for the similarity of the finished coating to wood eaten by wood-boring beetles. When applied, the filler contained in the mixture forms many short grooves on the surface, similar to traces of beetle activity. The width of the paths depends on the stone grain fraction (from 1.5 to 3 mm). The nature of the drawing is determined by the nature of the movements of the trowel during finishing. This could be crosshairs, circles or rain.
Textured plasters for external use such as bark beetles are produced on the basis of cement, cement with lime, liquid glass and acrylic. The first two options are suitable for any type of base, have a long service life and are cheaper than others. Disadvantages: tendency to crack if applied incorrectly, heavy weight, limited choice of colors. Liquid glass and acrylic are more plastic, hydrophobic, and have a wide color palette. The downside is the high price.
Textured decorative plaster: photo of facade finishing with pebble composition Please note: textured “lamb” and “pebble” plasters are made on the basis of the same materials as bark beetles. The only differences are in the nature of the filler - the stone grain in lamb is of different sizes, but in stone mixtures there is more of it in quantity.
Another type of textured plaster for exterior use is mosaic. The surface is slightly rough, looks like an agglomerate of stone chips, plain or multi-colored. The filler here is marble, granite or other stone grain, natural color or painted. Acrylic resins are used as a binder. The finished coating is resistant to atmospheric agents and operational loads. Most often, mosaic mixtures are used to decorate the bases of houses, less often - for walls.
Mosaic decoration of the facade
Invalid Displayed Gallery
Textured plasters for interior work
The mixtures described above such as bark beetle, lamb beetle and pebble are also used for finishing rooms. In private houses and apartments - for corridors, kitchens and utility rooms. In offices - in corridors and other places with high operational load. Mosaic compositions are used only in offices. The stone grain fraction of all mixtures here is finer, within 2 mm.
More often, marble and Venetian textured plasters are used for interior decoration. These are thin-layer coatings with high decorative qualities, suitable for both walls and ceilings. They are resistant to moisture and cracking, have a wide color palette, and allow you to create interesting patterns on surfaces. Here you can use textured rollers for decorative plaster.
Decorative plaster: types of “Venetian” textures will allow you to decorate your interior in historical styles
Bark beetle application technology
Using a spatula, we put small portions of the working solution on the trowel and apply it to the walls with a quick, long movement. The pressure on the trowel should be small, just enough to feel the movement of the stones under your hand. We work without delays, covering an area of 1-1.5 m2 in one go.
Please note: after each wire of the trowel along the wall, a small amount of so-called “milk”, a mixture with no filler in it, will remain on the instrument. This residue is immediately thrown back into the container with textured plaster and mixed into the total mass. You cannot apply this milk directly from the trowel to the wall, since this area will not receive the desired texture in the future. Applying mortar to the wall
Next, smooth out the solution. Here, again, milk will remain on the trowel. We already throw it into a separate bucket - it is already waste unsuitable for further work. The photo below shows the area of the smoothed solution and the amount of milk that has collected on the instrument.
Leveling the wet coating
Leave the smoothed surface to dry for about 10 minutes, and then proceed to create the texture using the same trowel:
- Rain - moving the tool strictly vertically.
- Crisscross - first vertically, then horizontally.
- The curves are in a semicircle, in different directions.
Applying texture
There is another way to grout relief plaster with your own hands: the video below talks about the mechanized method of applying texture.
Application of lambskin and pebble textured plaster
Here the technology will be the same, so we have combined both finishing options into one subsection.
- We put 3-4 spatulas of the working composition on the trowel.
- Apply the plaster to the wall using long strokes, lightly pressing the tool. We cover an area of 1 m2 at a time.
- Smooth out the applied material. We return the milk that accumulates on the trowel to the wall or throw it into a bucket. You should work like this until there is no more plaster left on the tool.
- We immediately apply the texture - with short movements in an arc.
How to apply textured plaster: video of lambskin finishing.
Wall decoration with Venetian plaster or its imitation
Thin-layer types of textured finishes require preliminary puttying. The walls must be perfectly smooth, without scratches, cracks or cavities. It is also necessary to apply a deep penetration primer. It should be painted the same color as the future plaster.
Next is a description of the process of applying decorative plaster from putty mass. Make the first layer continuous and smooth it so that there are no traces of the trowel left. Next we do this:
- Apply the second layer using short, rounded strokes. It must be very thin, so it is necessary to constantly remove excess mortar from the trowel.
- Take a foam roller and roll out the applied material.
- We wait about 5 minutes and use a clean trowel or wide spatula to rub the surface of the wall - we make ironing.
- The dried finish is treated with colored wax.
Applying textured plaster with your own hands: video of finishing walls under sandstone. The working composition is ordinary putty.
Please note: before further waxing, apply a deep penetration primer to the dry surface. This will improve the adhesion of the compounds to each other.
Tools used when applying textured plaster
The standard set will be like this:
- A trowel 35-40 cm long - it is used to carry out the bulk of the work.
- Spatula-assistant - used for throwing the solution onto the trowel or onto the wall, depending on the situation.
- Wide spatula (40-50 cm) – used for ironing Venetian plasters.
- Drill with mixer attachment.
- Plaster roller, textured and simple.
- Backlight.
Plastering tools
Drawing options
Wood-like decorative plaster is used by those who like to create an atmosphere of comfort and natural environment with the help of modern materials. At first it may seem that imitating wood is extremely difficult. So it is, but only at first, if you have not held a spatula in your hands before. With practice comes ease of use. It is immediately worth noting that wood imitation can be carried out in several directions at once.
- Creating a tree bark effect
- Imitation of a wood surface that has been damaged by woodworms
- Creating the effect of boards laid closely together
- Using a saw cut pattern, the so-called transverse pattern
- Making panels repeating the texture of wood
In each of these five cases, different techniques, tools and decorative plaster itself are used. Therefore, you need to decide in advance on the option you like. Of course, in some cases it will be extremely difficult to cope on your own, so if you are applying decorative plaster with your own hands for the first time, it is better not to try to create complex designs. In any case, you first need to practice, because not only the technique of applying the solution will be important, but also the correct finishing.
Therefore, you need to not only try your hand at working with the solution, but also choose the right color to get the desired color. The gel or paint in the bucket may be the shade you want, but once applied to the wall, the color will become less intense and may not be what you want.
Scope of application
Many experts consider this product to be one of the most versatile types of finishing material. It can be used on any surface. The result is a very interesting and intricate relief of the walls and ceiling.
The widespread use of plaster is explained by its good vapor permeability, durability and resistance to various natural influences.
When using this material in a children's room, you should carefully choose the composition. Decorative plaster should not contain resins of synthetic origin. When applying the material to the walls, do not make sharp corners
It is important to think about the safety of your child
In the bathroom and toilet it is worth using cement-based material.
For the kitchen area it is worth using glass and plastic aprons. This is especially true for the food preparation and dishwashing areas. For those who want to use decorative plaster in the kitchen, experts recommend covering the walls with an additional coat of paint or clear varnish. Such additional means of protection will help protect the walls from grease and soot, which are simply inevitable in the kitchen.
There is a special type of material on sale that is intended for outdoor use. This type of plaster is absolutely not suitable for use at home. This is due to the substances included in the composition. They give the plaster additional resistance and strength to the effects of snow, rain and sun.
Other mixture options are only suitable for indoor use. This decorative plaster is environmentally friendly and contains natural ingredients. This material cannot be used for finishing building facades. Due to its natural composition and the absence of aggressive components, the material will not withstand the effects of natural disasters.
In specialized stores you can also find universal plaster. It can be used in residential apartments. It also performed well when used on building facades. This decorative plaster contains substances that are safe for people. The composition also contains special components that extend the service life of the material on facades. This type of decorative plaster is the most expensive.
Many builders are sure that such plaster looks great in rooms with a large area. Decorative plaster is used to decorate all walls or small fragments of them. Designers are confident that some types of material can visually increase the area of a room.
Currently, the material can be applied to wood, drywall or brick. You can use a concrete or already plastered wall as a base. A plastic surface is not the best option for applying decorative plaster.
It is a fairly strong material, so it is important that it is applied correctly
It can also be used in the hallway. It will be able to withstand minor mechanical damage that can happen in everyday life.