How to prepare the composition
The main task that arises when making a homemade analogue of “Venice” is to achieve the same consistency and smooth texture from the plaster.
Those. There should not be that slight roughness that is inherent in gypsum. Acrylic varnish will help us with this. When varnish is applied to a wall, a glossy film is formed. But if you mix simple gypsum putty on it, you will get a solution very similar to Venetian plaster from the store.
And this is not surprising, because it is also made on the basis of acrylic copolymers.
Of course, it also contains ground marble and other components that allow it to achieve a striking resemblance to natural stone. But in our case, we will get a good alternative for covering walls with smooth color transitions and translucency. And all this can be done inexpensively.
Pros:
- availability, acrylic varnish and gypsum putty are available in many construction stores;
- low price;
- suitable for wet rooms - bath, toilet;
- wet cleaning of walls is possible.
Features: dries quickly, cannot be left on the next day, the entire prepared volume must be applied to the wall. When working on volumes over 10 sq.m. You need to work together or mix a small amount of material.
Also, do not forget to stir the plaster in the bucket every half hour. This prolongs the pot life of the solution.
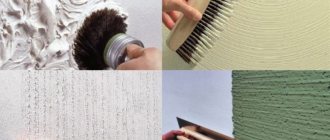
So, for work we need:
- Acrylic lacquer. Any water-based varnish for interior work is suitable, for example, Tikkurila Paneeli Assa, Dali or cheaper ones. Acrylic primer is not suitable for making “Venetian”. It is too liquid, it will not give the plaster the required strength and, accordingly, the finish cannot be polished to a shine.
- Finishing putty. Any polymer or gypsum dry mixture that contains filler - marble flour or microcalcite. Suitable brands: Knauf Polymer Finish, Osnovit Ekonsilk, Bergauf Finish Polymer, Weber LR+ and their analogues. It is also possible to use putties on white cement.
- Color. We take a universal one for water-dispersed paints or for decorative plasters. Color - whatever you like, ivory, peach or other calm shades. I worked with tinting pastes of the Tury, Palizh, Design Color brands, in general, there is no difference.
The sequence of actions when mixing Venetian plaster from putty will be as follows. Recipe for 1 liter of varnish:
- Take a 5 liter plastic bucket.
- Pour acrylic varnish into a bucket and dilute it with water by 10 - 15%. Those. add 100-150 grams of water to 1 liter of varnish.
- Next, add putty - approximately 2.5 kg of dry mixture.
- Mix the material well using a drill with a mixer attachment.
- Add color until the desired shade strength is obtained. Usually this is no more than 10% of the volume of the “Venetian”. Mix again.
- The result should be a mixture with the consistency of regular putty.
To extend the life of the plaster mixture, you can add some gypsum plasticizers to it.
Plastering works
In this subparagraph, the first thing worth noting is that the whole difficulty lies in applying this coating. This process is a complex and labor-intensive system, on which the final result of all the work done will depend. You should pay attention to the correct application, the angle of application, and a large number of small but important details. If all the requirements are correctly fulfilled, you will get a result that will delight both you and your entire family, and your guests will be completely impressed, especially if you brag a little and say that it’s all your doing!
Materials and equipment necessary for work
To obtain an ideal result, observing all the subtleties of work and long-lasting beauty, you will need all of the following tools:
- Several spatulas.
- Trowel.
- Rags.
- Roller.
- Sponge.
- Mixing container.
- Construction mixer (drill with mixer attachment).
- Polishing machine and wax polishing attachment.
When considering each individual situation that arises, additional materials may be required, but the basic ones listed above must be included.
Surface preparation before application
Another one of the most important stages of working with Venetian plaster. Here you should pay special attention to the smoothness of the surface. If the initial surface is not of the proper appearance, then even after covering it with Venetian putty with your own hands, you will also get a hard, rough surface. It also stops at cracks; they need to be completely eliminated, because the transparency of the putty will show everything right through.
Another important detail is the absence of dampness, because if the wall is wet, the coating can pull together some too wet pieces of the wall, which subsequently causes unevenness to form. Before applying Venetian plaster, the wall should be treated with a primer; a primer with quartz filler is possible. It is desirable, but not mandatory, that the wall can be treated with the same color that will be added to the putty, this will provide greater brightness and saturation.
Application technique
One liter of varnish will yield about 3.5 kg of finished plaster, which is enough to decorate 8 m2 of wall.
Consumption per 1 m2 is equal to 400-500 grams of the finished mixture.
In our case with imitation, the application technique will be completely similar. I won’t repeat myself, I’ll just highlight the main points:
- The walls are leveled and primed before plastering.
- The first layer of “Venetian” is applied with a metal trowel in multidirectional movements, the putty is leveled to a thickness of 1 - 2 mm. They leave small layers of strokes without smooth joining lines.
- Make sure that the material on the instrument does not dry out, otherwise lumps will leave marks on the decorative plaster. Clean the trowel blade from time to time.
- After 1.5 - 2 hours, apply a second layer to enhance the depth of color. The same composition is used. Its thickness should be 0.5 - 1 mm. Dries quickly, about 15 - 20 minutes.
- The third layer is applied “to scratch” as if finishing putty was being applied.
- After half an hour, when the entire surface has dried, they begin sanding. Using the finest sandpaper, we clean all the bumps and protrusions on the surface. We remove the dust.
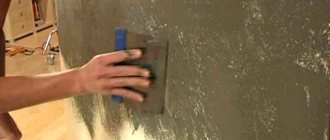
- Using a spatula or trowel, we polish the “Venetian” - we hold the tool at an acute angle to the wall and drag it across the plaster with force, as if smoothing it. At this stage, gloss will already appear.
- Rub in wax for decorative coatings and polish it with a soft cloth.
This is how you can create beautiful decor with your own hands without ready-made purchased materials, while saving a lot.
Applying Venetian plaster (step-by-step instructions and video):
Step 1. Using masking tape, tape off the border of the wall that you do not plan to plaster. It is better to use less sticky tape, since when the tape peels off, part of the wall may be pulled behind it.
Step 2. Surface preparation. Venetian plaster is applied to a dry, perfectly smooth, pre-putty surface. Subsequently, a classic primer is usually applied to the surface of the finishing putty, which performs the following functions:
- elasticity;
- strengthening and dust-removing function;
- reduces subsequent consumption of paints and varnishes;
- evens out the absorbency of the surface;
- crack resistance;
- due to the fact that it prevents premature loss of moisture from our solution, uniformity is ensured;
- has adhesive properties.
The drying time of the soil varies from 4 to 6 hours.
Step 3. Venetian plaster, previously tinted to the desired color manually or using special equipment, is applied in at least two layers to create a marble effect. We will do it in three layers: for the lower and upper layers we will take a paint of a darker shade, for the intermediate one - white. You can do the opposite by placing a darker shade between light layers.
Do not immediately mix a large portion of the plaster solution. This will eliminate the risk of premature drying and, as a result, hardening.
To apply the first covering layer, we use a spatula, scooping a little Venetian plaster onto it. Then we transfer the paint to the edge of the trowel, and from the upper left corner, pressing the trowel to the selected area at an angle of 30°, apply the plaster solution to the surface of the wall with multidirectional strokes. In this case, each subsequent stroke is located perpendicular to the previous one. It is better to work from a dry surface to a wet one - to the area where the plaster has already been applied - since otherwise trowel streaks may remain. Therefore, try to make strokes starting from the edges of the wall or from its dry part.
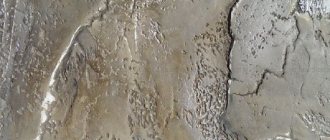
Carefully ensure that the layer of Venetian plaster does not exceed 1-1.5 mm, but is also as smooth as possible. As soon as the Venetian plaster begins to dry out (lighten in places), polish the surface with the corner of a spatula. The result of polishing the wall surface should be thin veins characteristic of marble.
If gaps form during the application process, it’s okay. That's how it was intended. Your goal is to create some kind of flow that will appear as the number of layers increases.
A prerequisite is to use a clean tool, since the slightest grain of sand will leave streaks. Therefore, after completing the application of plaster, rinse the tool used well with water. You should also wipe the spatula and trowel with a damp cloth from time to time. This will help avoid the appearance of dried particles that leave marks on the decorative surface.
Although the indicated drying time for Venetian plaster is 6-12 hours, we recommended leaving the first layer to dry for 24 hours.
After the plaster has completely dried, remove blemishes (roughness and small irregularities) using a spatula.
Step 4. Apply the second layer and third layers using the same principle. Light paint will be used for the second layer. We pick it up on a spatula and transfer it to a trowel; and from the upper right corner, gradually moving to the lower left corner, with the thinnest chaotic strokes possible, we begin to apply white paint.
I would like to note that it is best to continuously distribute the paint from one corner to another.
We polish the still damp surface with the angle of a spatula, randomly crossing the direction of the strokes until a pattern and gloss appear. Working on an area of 0.5 m2, we continue application, subsequently also dividing the surface into sections of 0.5 m2.
Step 5. After finishing applying the third layer, let the material dry. Finishing with Venetian plaster usually ends at the stage of glossing, or ironing. This stage involves giving the surface a shine using a trowel. It is very important to wait for the material to dry completely, because if it does not dry completely, chipping may occur during the glossing process. We would advise waiting until the plaster has completely dried, leaving it untouched for 40-46 hours.
When all layers have dried, you can proceed directly to the glossing process. To do this, take the trowel with your right hand, and with your left hand press the blade well (almost tightly) to the surface to create additional pressure. Be sure to hold the trowel at an acute angle, and press all layers towards each other with semicircular movements. In this case, pay special attention to the cleanliness of the surface. If debris remains on it, a scratch will immediately remain on the surface of your plaster, which will be quite difficult to remove later.
Step 6. In order to give the coating additional wear resistance, moisture resistance and color contrast to the texture, after glossing you can perform a waxing operation. To do this, special wax for Venetian plaster is applied to the surface of the wall, and then rubbed using a polishing machine with smooth circular movements.
To give an additional decorative effect, you can tint the wax with a special decorative powder, the approximate consumption of which is 20 grams per half-liter jar of wax. To do this, you need to dilute the powder with a small amount of water; add powder to wax and mix thoroughly. If you want to get a more intense gold-plated or pearlescent effect, you can increase the amount of powder, but not more than 50 grams per half-liter package.
Video lesson: How to apply Venetian plaster with your own hands
Video: Textured method of applying Venetian plaster
Express lesson on applying Venetian plaster to the wall
Expert recommendations
- For those who are wondering “how to make Venetian plaster,” we recommend trying this technology on a small plasterboard sheet.
- Pay close attention to the cleanliness of the tools you use.
- Avoid getting particles of dust and debris on the material, which will subsequently be noticeable on the finished wall.
- If a bucket of decorative plaster is left indoors for a long time, thoroughly shake the container with the solution before applying.
Types of Venetian putty
Today, this finishing option is used everywhere. As a rule, depending on the purpose, the following options for technical devices for covering walls differ:
- mineral solutions , with the addition of appropriate components;
- acrylic compositions , where acrylic resins are used as the basis;
- silicone substances , where synthetic resin is used;
- silicate solutions , where liquid glass is used as a basis.
Additionally, one should highlight a type of plaster such as “Bark Beetle”, which subsequently, after application, does not require additional processing, since the composition contains special granules, which, when hardened, acquire the structure of a stone.
IMPORTANT. WHEN SELECTING SUCH SUBSTANCES, YOU SHOULD UNDERSTAND THAT THERE ARE COMPOUNDS EXCLUSIVELY FOR EXTERNAL WORK, AND IN ADDITION, THERE ARE SOLUTIONS FOR INTERIOR FINISHING.
How to make Venetian plaster with your own hands
Classic Venetian includes dust of marble and onyx. granite, quartz or other natural materials. The binding element is slaked lime. It is this that gives the plaster the strength of real stone over time. In addition to these components, the composition contains a coloring pigment (color).
Modern plaster manufacturers offer ready-made mixtures. Moreover, each manufacturer offers its own formulations with different effects - glossy or matte, velvety or some other surface. An exception may be the option when the master wants to make his own drawing on the wall, according to his artistic vision, in this case the color can be added to the composition at the request of the master.
When purchasing a ready-made mixture, you should pay attention to the production date and batch, so that several plastic containers with the mixture are from the same batch. Then there is confidence that the color of the plaster will be the same. Otherwise, when the mixture is prepared on the spot, it should be done at once for the entire volume of work, since when preparing again, the color of the composition may not be guessed if there is a mistake in the proportions somewhere.
If you purchased white plaster, then the color for it must be purchased from the same manufacturer and the same brand, otherwise the properties of the ingredients may be incompatible.
Quite often, not all walls are finished, but only fragments of them. In this case, before starting work, you should fence off the work area with masking tape, which is removed immediately after completion of work. If you do not allow the last layer of Venetian to dry and then remove the tape, unattractive chips and cracks may form at the joints.
In residential areas, it is recommended to use Venetian in calm pastel colors, with which it is easier to create a cozy interior.
Preparation of working tools
Before you can make Venetian plaster yourself from ordinary putty, you need to prepare a working tool. To complete the work you will need:
- At least two plastic buckets.
- Drill with a nozzle for mixing the solution.
- Steel graters 25x25 cm.
- Spatulas with rounded corners.
- Sanding material or sanding float.
- Brushes.
- Construction level, ruler and pencil.
- Scotch.
- Sandpaper.
- Sponge.
- Respiratory and hand protection.
After you have assembled your tool, you need to prepare the surface.
Multicolor plaster
Making a multi-color coating with your own hands is not particularly difficult. The process consists of a number of stages, each of which ends with grinding. This gives the desired texture.
In order for the treated area to have the selected colors, the appearance of granite or marble stone, it is necessary to combine different colors and their shades.
To add shades, it is better to divide the mixture into parts. When adding dye, you need to calculate its amount. In order not to make a mistake in the proportion, you need to take a piece of plywood or cardboard and apply the solution to it exactly as you would on a real surface. If you are satisfied with the experiment, then you can begin applying the solution.
The first layer will be the base and it is applied over the entire wall, regardless of its color. This color fills all surfaces or depressions in the treated area. The layer should be applied as thinly as possible to ensure a smooth transition to another color.
The next layer with its own shade is applied on top of the first layer.
Preparatory moments
Before you start mixing the substance, you need to take care of the tools that will be needed during the work, namely prepare:
- a couple of plastic buckets;
- construction mixer or drill with an attachment for mixing construction mixtures;
- steel graters with different sizes of working blade;
- spatulas with rounded edges;
- brushes and roller;
- grinding floats;
- etc. additional items (pencil, tape, level, ruler, sandpaper, sponge, etc.).
Advantages of Venetian plaster
When the tool is ready, you can prepare the surface for the upcoming work. To do this you will need:
- Level the walls. In order for Venetian plaster to lay flat on the surface, the walls must be perfectly smooth without defects. To remove all blemishes on the walls, you can use gypsum masses, which are easy to work with and dry quickly.
- Clean surfaces. It is very important to remove all kinds of debris, dust, remnants of building mixtures, etc. from the walls. Cleaning can be done with fine-grained sandpaper.
- Carry out processing. When the surface is ready to apply plaster, it must first be primed. As a rule, such preparation does not take much time; 2-3 days will be enough. To prepare the plaster yourself, you will need:
- get dry putty;
- select the necessary dyes;
- select additional components if you plan to create a relief;
- buy wax.
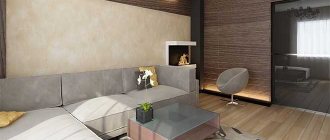
Venetian plaster in the interior
The process of preparing the solution is simple. The first thing to do is mix a substance that gives relief (for example, marble chips) with a dye. Please note that you need to make the calculations as correctly as possible, because if you prepare less plasters of the desired shade than required, the next batch may be very different.
Then the resulting mass is mixed with dry putty and kneaded until smooth. To evaluate the color of the resulting mass, a little of the substance can be diluted with water. If the color is not saturated enough, you can add dye. When the shade of the mixture matches the expected and desired result, the entire mass can be diluted with water by pouring in the liquid in a small stream, constantly stirring with a construction mixer. During such manipulations, a solution of a creamy consistency should be formed.
Rules for applying the first layer
Special attention is paid to applying the first layer, since it is the basis of the work. It is performed in the following sequence:
- Application begins from any upper corner.
- The putty is applied in small doses onto a spatula. It is applied to the surface in small strokes in different directions. The frequency of application and form can be any.
- The spatula must be kept close to the application area. There is no need to rush when doing the work; it takes a lot of time.
If an accumulation of mass appears upon completion of the smear, then it must be dispersed to the sides with a spatula.
- In the lower corners, work begins from the bottom up according to the same principle.
- After applying the first layer, the surface should dry. This can last from several hours to a day. This depends on the thickness of the plaster, the humidity in the room and the ambient temperature.
- To apply the second and subsequent layers, it is necessary to sand the first layer. Using a fine mesh or sandpaper, only clearly visible protrusions are sanded. After sanding, dust and dirt must be removed. The second layer of plaster is applied with a spatula tilted at 30 degrees.
This is the creative part of the work, since the surface pattern will depend on the size of the spatula and the direction of acceleration of the mixture.
It is very important to know that after the next 3-4 strokes, the tool must be cleaned from adhering plaster with a wet rag. If particles of dried plaster get onto the treated area, it will cause scratches and unevenness.
Features of the material
Venetian is one of the types of wall decoration with plaster, which was used by the Greeks and Romans since time immemorial. Plastering surfaces with Venetian plaster allows you to imitate a valuable stone, giving the wall sophistication, grace and originality, which other materials are not capable of.
When working with Venetian plaster, it is very important to adhere to the technology of applying it to walls. To master the technique, you need to practice for some time and watch how an experienced master performs the work. If you put in maximum desire and effort, even a novice finisher can master the peculiarities of applying plaster and will be rewarded with an unsurpassed result.
Finishing
Having finished applying Venetian plaster with your own hands, you need to treat the area with wax. This will add special beauty and depth to the entire surface, protecting it from external influences, dust and dirt.
Adding bronze or silver filler to the wax will give the plaster a metallic tint.
- Wax is spread on the surface to be treated with a soft rag or napkin. If the wax is very thick, then a spatula is used for application. Having finished applying the wax to the surface, slowly rub it in until the wall becomes glossy.
- Venetian plaster is very popular when performing finishing work. You can prepare it at home with your own hands and there is no need to go to the building materials store for it.
Features of Venetian plaster - advantages and disadvantages
The standard composition of Venetian plaster is described above. Obviously, it can be made either in a factory or manually.
As for the second option, it is more risky, if only because there is a possibility of making a mistake with the proportions when mixing and ultimately getting a result that is not exactly what was expected. However, it is quite possible to create a Venetian with your own hands in both minimal and fairly large quantities. It is important to find everything you need: stone chips, lime or acrylic, as well as the required color.
In addition, it is worth understanding in advance whether in this case it is really appropriate to apply Venetian plaster, and not some other finishing composition.
Let's look at the benefits of Venetian plaster in interior design and construction.
The main advantages of this finishing material include the following:
- An appearance that is sometimes really very similar to real marble. It always looks noble, aristocratic and suitable for a wide variety of rooms.
- Marbled Venetian makes the treated surface glossy due to good light reflection. This visually expands the room, filling it with light and brightness. This effect can be further enhanced by covering the top of the plaster with special wax.
- The plastered surface becomes more durable. Venetian plaster easily tolerates temperature changes, high humidity and even mechanical stress (impact, pressure, abrasion, etc.). This coating is suitable for baths, baths, saunas, basements, boiler rooms, kitchens, swimming pools and many other rooms.
- Provided that the plaster was applied in compliance with all the rules, its average service life reaches a quarter of a century - a record figure for finishing materials.
- The color of the Venetian also lasts for a long time. You can strengthen the color with the same wax coating.
- Venetian plaster is ideal for interior wall decoration. It lays amazingly smoothly, without the need to create seams or any joints.
Venetian plaster also has some obvious disadvantages. Most often noted:
- High cost in comparison with classic budget materials - traditional plaster, wallpaper, panels.
- The need for strict adherence to precise technology for applying plaster. Only in this case can you count on the expected effect.
- High demands on the quality of the surface where plaster is applied (usually walls). The surface must first be leveled and thoroughly cleaned. Theoretically, you can apply Venetian paint to an uneven wall, but outwardly it will look quite sloppy.
The most important advantage that Venetian plaster has for interior decoration is the ability to create the final result in accordance with your own ideas. The point is that you can control the color and thickness of the plaster application. This will ultimately allow you to get a more textured and clear pattern, or one that is quite blurry and weightless. And the query “Venetian plaster photo” in an Internet search engine will allow you to get a sufficient portion of inspiration.
About the material
Venetian plaster is a finishing material for walls and ceilings that has come down to this day from time immemorial and has not yet lost its relevance. Venetian plaster, which imitates natural coatings of granite, marble or malachite, is especially popular. First used in ancient Rome, the composition included marble dust (construction waste) and lime.
After drying, the surface with this composition resembled natural rock, which was beautiful and practical.
In modern design it is actively used to create an atmosphere of luxury and give the interior status. For this purpose, additives are used that imitate precious metals, ancient trees and stone masses.
In addition to its outstanding appearance, this finish is very durable; the service life of the coating is measured in tens of years.
The walls under the coating do not accumulate moisture, breathe, and environmentally friendly materials are used in the compositions. The cost of compositions from elite manufacturers is high, but there is an alternative way to obtain the material of their acrylic putties with the addition of coloring pigments.
What is Venetian plaster and its composition
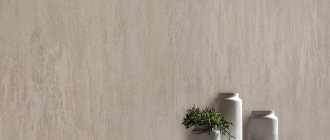
If the wall in appearance resembles a marble surface, but there are no seams on it, it is finished with Venetian plaster. This finishing material was invented centuries ago in Ancient Rome. When someone came up with the idea of mixing marble dust and slaked lime. The result was an elastic composition that looked like natural marble on the walls. For a clearer pattern, natural dyes were added to the mixture.
Venetian plaster is applied to walls, ceilings, columns
The most popular was clay. The walls had reddish or pinkish (depending on the color of the clay) stains, which made the decoration more similar to natural marble. To make the coating durable, the plastered surface was covered with a layer of wax, which was then polished. The walls were indistinguishable from marble. Only there were no seams.
And only centuries later, during the Renaissance, Venetian plaster appeared in Venice, where it began to be used instead of marble slabs. The technique for applying it was not simple, but working with Venetian plaster is much easier than adjusting and polishing marble slabs. Therefore, this type of finishing has become very popular. It was used to decorate walls, ceilings, and columns in palaces. The finish was beautiful and durable, and did not respond well to changes in humidity and temperature, which, in the high humidity of Venetian canals, led to literally widespread use of this material. The popularity was also facilitated by the fact that marble dust is easier to import and is cheaper. The remaining components were added locally mined. The fame of this beautiful finishing material quickly spread among merchants, and they called it Venetian plaster. Since then it has been like this.
Decorative Italian plaster can be light or rich in color
The composition of Venetian plaster described above - marble dust, slaked lime and coloring additives - is still used today. Absolutely natural finish. But there are compositions in which synthetic dyes (acrylic) are added or modern binders are used instead of lime. There may also be sap from rubber trees, crushed granite. Whether all or some additives are contained depends on the manufacturer, but this material is also called Venetian plaster, since the main component - marble dust - remains the same.
Composition and technical characteristics
This type of material has a rather complex composition, which varies depending on the type of plaster. Let's take a closer look at the main components that are present here:
- dry mixture, which is also used in the manufacture of ordinary plaster for wall decoration;
- mineral additives, if we are talking about the appropriate version of the composition for coating structural elements;
- components such as acrylic resin, synthetic resins, and also liquid glass may be present;
- pigment is added separately to the composition , which gives the coating a certain color range.
Separately, it is worth highlighting the presence of the required amount of appropriate sand, and in addition hardeners, which allow the substance to have a strong and solid structure after hardening. Such devices are characterized by fairly high adhesion.
They dry quickly and, unlike conventional mixtures, do not crumble under mechanical stress. In addition, this finish is moisture resistant and easy to apply.
IMPORTANT. THIS SUBSTANCE IS RELIABLE AND DURABLE, BUT THESE EFFECTS ARE ACHIEVED ONLY AFTER COMPLETE CURING AND APPROPRIATE PROCESSING.
Consumption per 1m2
This substance is consumed depending on how it is applied. As a rule, the consumption is directly influenced by the thickness of the applied layer, as well as the need to level the surface.
If you have average values, and in addition appropriate application by a specialist, you can achieve 500 grams or less of the finished solution per square meter of surface.
If the surface is leveled, and the work is performed by a beginner, then up to 600-800 grams of the prepared solution can be spent on this area. The factory setting is 350-450 grams.
Tips and recommendations for use
To properly apply such a substance to the surface, it is recommended to adhere to the following series of tips from experts and manufacturers:
- it is necessary to use a small container for work so as not to rush during the application process;
- when arranging the surface, the coating should be carefully leveled so that there are no protrusions;
- Before applying the solution, the surface should be moistened for better adhesion to the surface;
- The composition must be thoroughly mixed before direct use.
Taking into account a number of these recommendations, you can correctly apply the coating to the wall, and then give it the decorative effect of stone.
Classic finish
The standard version of Venetian plastering involves sequential application of 3 layers of plaster to the surface. The first is basic, laid directly on the base:
- a portion of the material of the main shade is applied to the edge of the trowel (this operation can be conveniently performed using a metal spatula);
- the tool is pressed against the wall in this way, raising its front edge by the thickness of a finger;
- With multidirectional strokes, the plaster is applied to the surface in a thin layer.
Plaster the wall in separate sections of up to 1 m2 each. Moreover, each of them overlaps each other by 0.5-1 cm along the demarcation line. After applying the base layer, you can let it dry, but this is not necessary: laying the second layer “wet” allows you to get smooth shade transitions.
- The second layer is formed from Venetian of the same composition. Layer thickness – 0.5-1 mm. After about 15-20 mm it dries and a third layer is applied to it. The technique of its application is reminiscent of finishing putty.
- After half an hour, the master arms himself with sandpaper and treats the entire surface with it, removing all the tubercles. Then, holding the trowel at an acute angle to the wall, he drags it forcefully along the plaster, as if smoothing it. A gloss appears on the Venetian.
- After plastering is complete, the dried Venetian can be coated with decorative varnish or wax. This treatment increases the strength and wear resistance of the finish. You can apply a protective layer with a sponge, soft spatula or mitten (this option is only suitable for wax).
- To obtain veins, when laying the second layer, apply white and colored mixtures to the trowel simultaneously (without mixing). A two-color portion is applied to the base layer with long continuous strokes parallel to each other.
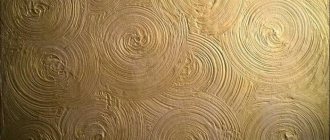
Textured Venetian
This application technique differs from the previous one:
- First, a covering compound is applied to the penetrating primer. It enhances adhesion;
- after 1.5-2 hours, apply a thin layer of Venetian with a fur roller. It is allowed to dry for 2-3 hours and the sharpest protrusions of the plaster are removed using a spatula;
- Using a trowel, apply the next layer, creating a semblance of islands. In this case, the tool must be in contact with the base layer with its entire plane. The thickness of the coating is no more than 1 mm. Drying time – 5-6 hours;
- the surface is cleaned with a spatula;
- the finishing layer is applied. Finishing varnish is added to the mixture. Apply with a wide spatula in a very thin layer;
- after 5-6 hours they begin polishing the decorative coating (iron plating). The operation is performed with a Venetian trowel until a metallic sheen appears on the plaster.
The result should be a matte finish with glossy areas.
Setting up the craquelure
To age the finish, a special varnish is applied to it. As it dries, it will pull off the outer layer of the Venetian, and unevenness and small cracks will appear on it. These defects do not affect the durability of the plaster.
The top of the “antique” wall is coated with protective varnish.
- Another way to create craquelure is to dry the surface layer of the Venetian using an infrared emitter, reflector or hair dryer. At the same time, it is necessary to constantly keep the process under control: as soon as cracks appear, heating is stopped. With further natural drying, the cracks themselves will increase.
- Next, a plaster mixture painted dark gray or black is rubbed into them using a dental spatula (you can also use dark red lead). The remaining filler is wiped off the wall with a sponge and a thin layer of colorless translucent Venetian is applied.
Marble effect
Venetian marbled plaster must be applied in random strokes. 10 minutes after finishing work, use a trowel to give an arbitrary relief.
- The second layer can be performed no earlier than 2 hours later. This is the application of a tint coating. The composition of different shades is applied and mixed onto the blade of a wide spatula. There is no need to achieve uniformity. The mass is applied with pulling strokes. After 5 minutes, you can level the coating using a trowel.
- After a day, you need to sand the coating using sandpaper or a sanding machine. After that, polish with a stainless steel spatula. At the final stage, the Venetian is coated with wax. After 50 minutes, polish again with a machine with a soft nozzle. After such actions, the coating acquires a unique gloss on the wall.
A little history
It is curious that although the plaster is called Venetian, it does not come from Venice, or rather not only from there. The fact is that the technique itself, the Venetian, arose much earlier than Venice itself.
According to historical references, even at the dawn of Ancient Rome, master builders began to imitate marble on the walls, masterfully using dust and crumbs from quarries. Then, for the first time, technologies began to appear for mixing these substances with other ingredients to obtain a composition that could be easily applied to the wall. Over time, the technique was honed, and its own nuances and features of creating and using plaster appeared.
During the Renaissance in Venice, where many famous architects worked, the technique of decorating walls with “fake marble” experienced a rebirth. It was then that almost the whole world learned about it, which assigned the name “Venetian” to the plaster.
As many years ago, today, the main components of Venetian plaster are stone chips and lime. The stone can be very different - actually marble, as well as quartz, granite, malachite or onyx.
In general, any minerals are used. The main condition for obtaining Venetian marbled plaster is that the stone chips should be very fine, almost like dust.
As for lime, it is traditionally used in slaked form. Moreover, in our time, various kinds of substitutes are increasingly being used instead. The most common of them is acrylic.
Acrylic-based Venetian plaster is no different in appearance from limestone, both in its structure and application format, and in its final appearance. The advantage here is that the improved composition allows the putty to dry much faster.
Another useful achievement of modern technology is the ability to give plaster almost any color shade. There is no shortage of dyes, so you can ideally choose the color to match the style of the room.
Main advantages
- Putty belongs to the category of universal multifunctional building material.
- Used for both residential and industrial premises.
- When using Venetian plaster, any design solution can be realized.
- The finishing material goes well with any interior style.
- Putty has a wide color spectrum.
- When using finishing on the walls there are no joints or seams, which makes the surface of the walls and ceilings perfectly smooth.
- Thanks to its long service life, the finishing material is widely used in restaurants, office buildings, and shops.
- When exposed to direct sunlight, the material does not fade and has its original color background.
- Venetian plaster is waterproof.
- Decorative plaster got its name due to the fact that from a universal putty you can create a real masterpiece that will resemble natural marble or rare types of wood.
- Before you start finishing work, you should know that the modern “Venetian” coating is transparent. Using a special application method, specialists create a marble effect.
- In order to achieve this effect, decorative material is applied to the work surface in small strokes from 5 to 10 layers. For work, use a triangular stainless steel spatula.
- After the surface has dried well, natural beeswax is applied to the plaster, which is transparent.
Venetian plaster pros and cons
Let's look at the main advantages:
- the coating of such plaster is easy to wash and clean;
- real Venetian is an environmentally friendly material, since it uses only pure natural materials;
- is characterized by durability, a long period of operation, estimated at more than tens of years;
- unique surface patterns enable designers and artists to create a wide variety of interior styles;
- like any stone, Venetian stone enhances sounds in a room, so it can be used for finishing concert halls and conservatories, recording studios;
- the applied pattern is preserved for the entire period of its operation, without fading or erasing;
- The lime contained in the plaster prevents the development of various fungi and molds.
And now a few words about the shortcomings:
- Venetian plaster can be wet cleaned if the surface is treated with a special acrylic-based water-repellent composition. In other cases, if only one beeswax is applied to the Venetian, it can be wiped with a damp sponge, otherwise the entire coating can be washed off or wiped off.
- High price.
- Difficult to apply.
- High demands on the base surface.
- Making such plaster with your own hands is almost beyond the capabilities of the average person. Only highly qualified specialists can reproduce a real Venetian so as to create the feeling of real polished marble. At the same time, the base under it must be perfectly level and smooth, which is not always possible to achieve with your own hands.
Application area
Venetian putty is used only for finishing the interior space of premises. It is not recommended to apply it to an unprepared surface, especially in rooms with high humidity.
It is equally applicable both in living rooms and in administrative premises, including shopping centers and offices. It can be used to decorate not only vertical surfaces, but also the ceiling, as well as individual fragments.
It is important to consider that the texture and shade of the plaster mixture must correspond to the interior concept.
In small rooms, it is undesirable to use bright, saturated colors. You can achieve an aggressive effect, with a visual reduction in area. Despite its relative resistance to external factors, it is not advisable to apply Venetian putty plaster near sinks, kitchen sinks and stoves.
They are combined with brick or stone masonry, as well as wood. Depending on the style of the interior, the type of material is selected.
Types of Venetian plaster
Despite the generalized name, this type of plaster has several varieties. They differ visually in their textures. Venetian can be smooth, matte, embossed, glossy and so on.
Further, it is customary to classify it depending on the type of base and binding component:
- Mineral is available in the form of a dry mixture with special additives. Thanks to this, you can achieve a textured and elastic surface;
- Acrylic contains acrylic resin. Does not require additional dilution, is available in ready-to-use form, which facilitates the application process;
- Polymer contains silicone resins, which impart a high coefficient of plasticity. Equally applicable for interior decoration and facades;
- The silicate base contains liquid glass. Easily applied to any type of surface, resistant to moisture and temperature fluctuations;
- Bark beetle plaster has a rich variety of colors . Its advantage is that there is no need for additional processing.
Before you start finishing the walls with Venetian putty with your own hands, you need to know that the result obtained depends on the application technique. Only an experienced specialist can determine the expected pattern.
Useful tips
To guarantee success in working with Venetian plaster yourself, it is useful to pay attention to some nuances:
- Make sure that you have chosen a truly suitable finishing method. The usual Internet request “ Venetian plaster photo in the interior” or “Venetian plaster for interior wall decoration photo” completely solves the external part of the problem. The other side of the coin is the correspondence of the features of this technique to the specifics of the room, its purpose and conditions.
- It is important to study the technique in theory, watch video master classes and consult with those who already have experience in similar activities.
- Before starting large-scale work, it is useful to practice applying Venetian paint on a small area of the surface - on a piece of drywall or on a wall in the workshop.
- The key point is keeping utensils, tools and your own hands clean. Mixing putty shades at a time when this was not planned can ruin the entire effect. The same applies to the influence of dust and dirt.
- Since finished plaster can form sediment, it is worth stirring the composition periodically during work to avoid the appearance of layers.
- For all methods of applying Venetian plaster, the recommendation is to periodically change the direction of work, and if several experts are involved in the process, they should change places. This will avoid unnecessary zoning of the surface according to the direction or shape of the pattern.
Similar articles
- Plaster facade "American".
The method of creating... Finishing facades with finishing decorative relief
plaster
. This is an inexpensive, durable coating… Read more - Plastering the facade over insulation. Step by step...
Insulating the outside of the walls allows you to retain heat inside the room. It is performed at the stage of construction or reconstruction of a building. Read more
- How to plaster the basement of a house with your own hands.
Instructions? Plastering
the basement of a house with your own hands. The basement is the lower part of the building down to the floor of the first floor. As a rule, it protrudes beyond the plane of the load-bearing wall, forming... Read more - Decorative plaster for the facade of a house - photo, video
The word "
plaster
" comes from the Italian "stuccatura" (plastering). Previously, gypsum and alabaster were used as the basis for the mixture. Read more - Wet facade: technology for installing a plaster facade?
Plastering
the walls of a house is a special coating for the external and internal walls of a building that protects them from adverse atmospheric influences and has additional heat-shielding properties. Read more - Facade plaster bark beetle: types, finishing technology?
If it is necessary to preserve the retro style when decorating a building, then plaster solutions are widely used for this. Read more