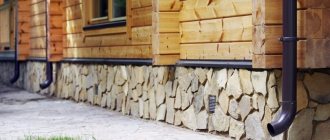
The basement is the above-ground part of the foundation that connects it to the walls of the house. This part of the building performs many functions - it is a barrier to moisture from the soil, which inevitably penetrates into the foundation material. The base also distributes the load from the building onto the base of the house and provides thermal insulation of the living area from the basement.
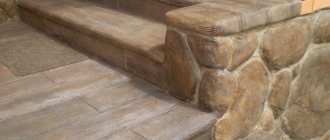
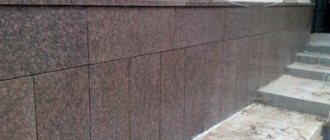
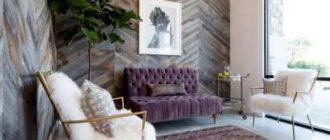
Finishing the base with stone-like panels insulates the house, protects it from destruction and improves the appearance of the building
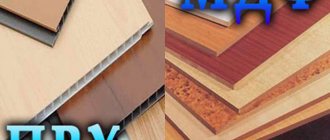
Types of raw materials for finishing with photos
The basement of the building needs additional protection from the effects of precipitation and temperature changes. For this purpose, finishing material such as panels is used. They provide safety from external factors and create the desired decorative effect.
The following types of finishes are distinguished:
- Fiber cement.
- Acrylic.
- Vinyl.
The choice of panel depends on the required strength indicators, ease of fastening and operating conditions. Take into account the necessary decorative characteristics, a wide selection of colors
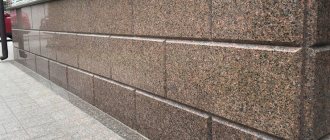
Fiber cement
The panels are highly durable, since a grade of cement of at least 700 is chosen for their production. They can be installed on any plinth - made of wood, aerated concrete, foam concrete.
Thanks to simple installation, costs are significantly reduced. You can handle the work yourself, as it does not cause difficulties at different stages. Advantages of fiber cement panels:
- can be painted in any shade;
- resistant to any weather conditions;
- do not absorb moisture and water;
- are environmentally friendly;
- have a high level of sound insulation and thermal insulation;
- long service life;
- remains attractive over time;
- withstand temperature changes.
Manufacturers offer cladding in different sizes. One of the most popular solutions are the 1000 or 3000 cm options. They allow you to install the cladding with a minimum number of connections.
Acrylic
Acrylic panels can imitate not only stone, but also wood chips or brick. They are suitable for outdoor work due to their characteristics. The chemical composition guarantees resistance to temperature changes and changes in humidity. The material copes with weather conditions, its operating temperature is from -50 to +50 degrees.
Advantages and features of acrylic panels:
- Light weight structure.
- Possibility to carry out communications and install insulation behind the cladding layer.
- Almost non-flammable material.
- The warranty period is up to 50 years, but with proper care it significantly exceeds it.
- Used when arranging a ventilated base.
- The appearance of the building is completely changed.
- The base element is reliably protected from exposure to cold, moisture and ultraviolet radiation.
- Resistance to chemical components.
- You can choose decor with a textured design.
This material fits into almost any budget. It allows you to organize high-quality coverage without additional effort. Can be installed on almost any base. This will require additional thermal insulation. In addition, the material has little repairability.
Vinyl
Vinyl panels are used not only for finishing the facade, but also for cladding the base. The coating is suitable for finishing complex elements. Imitation of brickwork or natural stone looks good.
These plinth panels have a number of features:
- increased strength;
- sufficient thickness of individual elements;
- lightweight design weighs up to 4-5 kg per square meter. m.;
- if the installation and maintenance rules are followed, the service life reaches several decades;
- resistance to moisture and water;
- attractive appearance due to a wide selection of textures and shades;
- no special care is required, since dirt and dust practically do not linger on the surface;
- If visible dirt appears, just rinse the surface with water.
The material resists the effects of frequent heavy rains well and is not subject to changes when snow and ice melt. Moreover, it can be combined with other natural or artificial materials. It is combined with wood, stone pavement, and aerated concrete.
It is worth considering that
the material is suitable for installation in the middle zone and southern latitudes , as it has a limited range of operating temperatures.
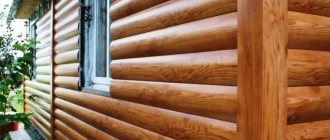
Modern types of siding for exterior home decoration
Initially, siding was made from natural wood. The boards were laid from bottom to top, sometimes end to end, and paint or varnish was applied to them as a protective layer. This coating is expensive and short-lived. In conditions of high humidity, the boards still lose their appearance and integrity after a certain amount of time.
In the demonstration photos, the finishing of houses with brick siding (or imitating other materials) is made of the following compositions:
- wood pulp;
- vinyl;
- fiber cement;
- metal
The wood-cellulose mixture is made like MDF. The crushed wood is pressed under high pressure and temperature, and resins are added to it for strength and moisture resistance. Externally, the coating has a pleasant appearance, it is inexpensive, but is not durable.
The most popular is vinyl siding. The advantages of this material include:
- resistance to temperature changes, ultraviolet radiation, humidity;
- variety of colors, high aesthetic qualities;
- light weight, ease of installation;
- non-toxic and does not support combustion.
Due to its affordable price, vinyl siding is the most popular. Please note! Dark types of plastic siding panels are somewhat more expensive, since color stabilizers and a large number of coloring pigments are added to them during production.
Metal siding is a more expensive facing material. It is made of zinc, steel or aluminum and is a metal that is coated with a primer and a polymer coating. The top layer usually has decorative embossing.
Fiber cement plastic is made from cellulose compressed with cement. The facing material is heavy. It is with the help of this composition that natural stone is most often imitated.
Selection requirements
When choosing a material, it is important to select high-quality cladding elements. Only in this case are long-term operating conditions guaranteed and the service life is significantly extended, regardless of the complexity of climatic conditions.
The following criteria must be met:
- The front surface should be painted evenly.
- There are no chips or scratches on the surface.
- The locking connections work reliably and provide easy latching.
- The material is rigid and thick.
- The joints have no gaps and are tightly connected.
Stone-look panels are inexpensive compared to the original. At the same time, you should be wary of the fact that the price of the products is too low. Experts recommend buying finishing from trusted sellers. If necessary, you can request a valid certificate of conformity.
How to glue decorative stone on corners. Decoration in the apartment
Finishing the corners with decorative stone indoors will not only protect the walls from damage, but will also give the interior an unusual look and, decorating the room, will become one of the main decor of the room. This design material is convenient and practical. It can be used in any room. Walls lined with stone in the kitchen, living room, hallway, and balcony will give the interior of the apartments a feeling of spaciousness and uniqueness. See photo:
Stone is a noble material
Using this material, you can show your own imagination. The room in the design of which it is used has long been not uncommon. It has become very popular in the building materials market because it is not only beautiful, but also stylish. This stone looks great in the design of corners of apartments, decorating any design. Before you start finishing, think about where and how you will use this material.
When starting a renovation, it is better to start with a drawing of the future premises. This will make your work easier. You should not decorate all the corners of the room with it if it is not very large. This will visually “heavien” the room; it is better to veneer one of the corners by choosing an unusual and beautiful pattern. Examples can be seen in the photo:
Stone drawing on the wall of the apartment
If you decide to decorate the openings with stone, also include the corners of the opening, this will also look creative and stylish. See photos on our website.
The advantages of this method are obvious:
- Heavy-duty, long service life. For any room this moment is very important.
What supplies and tools will be needed?
Finishing the base with stone-look panels requires preliminary preparation. You need to prepare supplies and construction tools to complete the job in the minimum amount of time and without interruption.
You will need the following tools:
screwdriver;- drill or hammer drill;
- building level;
- hammer;
- metal scissors;
- roulette;
- Bulgarian;
- pliers;
- nail puller
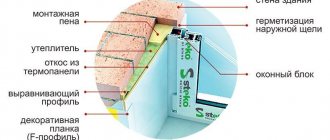
For high-quality construction, you will need to install a frame, which will require metal or wood. It is also important to choose reliable panels. It is possible to choose additional insulation to improve the protective qualities of the building.
How to calculate the required quantity?
If the work is planned to be carried out with the participation of a construction team, specialists will perform the calculations themselves. To do this, specialists first visit the site. They take accurate measurements, perform calculations, and purchase the required amount of material.
To do the calculations yourself, you can use an online calculator . To do this, you need to first take measurements of the perimeter of the building and select the necessary panels.
You can perform preliminary calculations without using a special calculator. To do this, it is important to clarify the total length of the walls. The resulting value is divided by the length of one panel.
It is necessary to select the right amount of material. At the same time, it is important not to forget to provide about 10% of materials for reserve.
Installation of cladding of a private house step by step
Installing imitation stone panels is not difficult. It is important to act in accordance with the instructions and perform all calculations and measurements correctly. It is easier to install panels under stone on a wooden sheathing or metal frame. Installation on a concrete base is also allowed.
The work is carried out as follows:
Calculation of the required number of panels in one row. It is necessary to divide the length of the wall by the useful length of the panel. This does not take into account the places where the corner elements will be installed.- Installation of panels. The product is connected to the base in the place where it should be located. Using a hammer drill, drill a hole for fastening. For reliable fixation, special fasteners are used.
- At the next stage, the next part is installed. It is fixed in 6 places to provide resistance to wind loads. In this case, 1 fastener is installed on the side, and 5 - on top. The top connection line starts from the center. This way the subsequent elements are secured.
When cutting material, it is important to take into account an important nuance. Do not cut more than one part on each product. Otherwise, the finish will look unnatural.
Installation of fiber cement panels is often performed on a frame . If wooden lathing is used, additional treatment with a fire-resistant and antiseptic composition is necessary. Fastening is often done with nails or self-tapping screws. Hidden installation using special clamps is also allowed.
Installation of acrylic and vinyl panels is allowed both on the frame and on a concrete base. It is important to choose inconspicuous fasteners and accurately calculate the required amount of materials.
Installation instructions
You need to glue the decorative stone on the wall according to the instructions, which will be given below. In addition, this process requires compliance with certain rules. You need to know that the drywall (working surface) on which you will glue this finishing material must have a temperature slightly less than +25 oC. If the surface is hotter, then it will be necessary to wet the back of the material with water. This should be done 20-30 minutes before installation. The part of the wall that was previously prepared must also be moistened with water. Remember that the final result directly depends on the correctness of the preparatory work and compliance with the installation technology. The step-by-step installation instructions here are as follows:
Marking
- We apply markings on the wall. It looks like horizontal lines running every 10-15 cm. Check the evenness of the lines against the building level;
- Leave some space at the bottom for scraps. This must be done if the standard number of rows does not fit on the wall;
- Apply glue to the back side of the stone using a spatula. If it is uneven, apply a 6 mm layer of glue. Apply the glue in an even layer, without gaps;
- then we press the elements tightly against the wall and hold them for some time until the material adheres to the base at the desired level;
- When installing a pair of elements, use special plastic crosses. This will make it much easier to align the seams between the material;
- It is best to glue the stone from the corners of the room;
- Next we do the laying horizontally;
Note! Complete each row a little earlier than the next.
- The masonry itself can be carried out from the bottom up or from the top down. This point is not fundamental, as it will be more convenient for someone.
Masonry
If it is necessary to lay incomplete elements, then the stone must be cut. For these purposes, a grinder with a metal or diamond disk or an ordinary hacksaw for metal is suitable. After completing the work on a certain area (after installing approximately 15 tiles), smear the released adhesive into the seams with a wooden stick. When the solution begins to dry, remove any excess using a dampened brush or rag. After gluing all the tiles, you need to give the glue time to crystallize. This process usually takes about a day, but sometimes it can take a little longer. After this we carry out the following manipulations:
- wipe the surface of the stone with a damp sponge;
- clean and dry the seams;
- After this, fill the seams with grout of the desired color. To do this, you can use a special syringe gun. Or you can get by with a regular plastic bag with one corner cut off. The grout may differ in tone from the color of the tile. This will give the finish more elegance;
- slowly squeeze the grout into the seams, carefully filling them;
Possible errors and ways to eliminate them
When installing panels, it is important to follow safety precautions and installation rules. In this case, the material will last a long time and does not require serious maintenance and repair efforts.
It is important to perform the calculations correctly and buy 10% more material. This reserve is necessary in case of damage to part of the panels for finishing the base. Otherwise, there may not be enough material and you will have to buy new panels, which may differ in color and texture.
It is necessary to buy panels from the same batch . In this case, they have the same size, texture and color scheme. When selecting samples from different batches, noticeable differences may occur.
It is important to check the quality of the fastening so that it is not too rigid. This ensures the correct response to temperature changes, resulting in expansion compensation. For the same purpose, gaps are provided between the panels. When installed in summer, the distance is 10 mm, in winter - 15 mm.
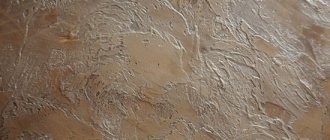
How to make stone plaster?
This decorative plaster is supplied dry. But it is very important to prepare it correctly in order to avoid future problems when working with it. In a spacious container you need to pour water in an amount of 1:4 parts of the volume of the entire dry mixture. Next, plaster is added and thoroughly mixed using a drill with a specialized attachment, or an electric construction mixer. Infuse the mixture a little for 7 minutes and mix again.
As an option, you can make such a mixture yourself, it’s not difficult. To make such a solution, mix sand and cement in a ratio of 4:1, constantly adding water and stirring until the result is a thick, homogeneous mixture.
Important! There should be no bubbles and/or lumps in the finished composition!
Materials and tools
When completing the design, you may need special tools, and of course the material itself for the work.
Tools:
- Hammer
- Chisel
- Bouchard
- Trowel
- Boaster
- Putty knife
Each of the presented tools helps to create a different design style. So, with the help of bush hammer blows on an already dry and leveled wall, a grainy texture is created.
Using a scarpel, you can make various recesses, resulting in a complex and beautiful facade decor.
To imitate the style of Roman stone - travertine, apply 2 layers of plaster and smooth it out with a trowel. Next, the surface is ruffled and slightly leveled with the edge of the trowel. After 30 minutes, a thin layer of cement mixture is applied to the wall. This type of decor suits both classic style and modern solutions.
Choosing plaster
Compound:
The basis of such mixtures is crushed real stone. To ensure that the composition is resistant to environmental conditions and also holds its shape well, quartz sand, lime, plasticizers (to impart elasticity during subsequent processing), marble chips, cement and mica are added to it.
There are also coatings based on fine crumbs that allow you to imitate small pebbles. Such coatings are distinguished by their resistance to mechanical stress. At the same time, they look quite attractive; the color and shape of such crumbs is achieved by etching with acid during its manufacture.
Grain
The compositions are also distinguished by grain size. Fine, coarse, or powder to create different types of texture.
Type of plaster
Perlite plaster is a good choice; it is easy to apply and has good soundproofing properties as a bonus. It is also an environmentally friendly option.
Polymer plaster is good at resisting dampness and high temperatures, and can withstand temperatures up to 100 degrees. At the same time, it is relatively inexpensive.
Silicone plaster. This mixture is simply a collection of the best qualities. It has a breathable structure, is quite durable, and is not too fragile. But you have to pay for all this; such a thing costs more than its competitors.
The cheapest options include acrylic and mineral plaster. The advantages include the wide range of available colors.
Surface preparation
Before starting work, you need to carefully prepare the surface. The walls need to be leveled and cracks, if any, covered. To do this, use a solution of sand and cement if the crack (gap) is large, or a gypsum solution if the gap is small. Apply the mixture using a spatula and smooth it out. This will ensure the strength and durability of our finish.
The next layer is a primer, this is done 2-3 hours after applying the first layer.
Price of products and installation work
The cost depends on various factors, including the volume required, delivery requirements and location of the project.
The decorative and practical qualities of the material, the presence and quality of fasteners are taken into account. The cost of cladding depends on the composition of the coating, the inclusion of plasticizers and modifiers . If the surface is represented by multi-colored tinting, costs increase.
The characteristics of a particular type of panel are also taken into account - frost resistance, impact resistance, protection from mechanical damage.
The cost of vinyl panels varies among different manufacturers. It is in the range of 80-1500 rubles. Acrylic coatings cost from 250 to 2500 rubles. The cost of fiber cement panels is 500-6500 rubles.
The cost of installation of cladding depends on the location:
- in Moscow - from 500 rubles;
- in St. Petersburg - from 350 rubles;
- in Kaliningrad - from 300 rubles;
- in Krasnodar - from 300 rubles;
- in Yekaterinburg - from 300 rubles.
It is important to choose the right material, taking into account cost and installation capabilities. If you have personal experience, you can do the work yourself. In other cases, you can conclude an agreement with the construction team.
Pros and cons of use
Before choosing stone imitation panels, you need to familiarize yourself with their advantages and disadvantages. positive aspects of using this material can be highlighted
- Moisture resistance.
- The service life reaches 50 years.
- Resistance to biological factors.
- Easy installation.
- Choice of textures and colors.
- Possibility of installation at almost any time of the year on any base.
- Environmental Safety.
- UV resistance.
- Protection from chemical components.
Among the negative aspects for most types of finishing, one can highlight low maintainability. You will also have to use an additional layer of thermal insulation material.
You will find a lot of important and useful information about plinth panels and their installation in this section.