When the construction of the house comes to completion, the turn of finishing work begins. This is one of the most important and, at the same time, interesting stages, on which the final result of the entire construction depends.
Today, there are hundreds of ways to decorate walls, and one of the most beautiful options can rightfully be called decorative plaster, which is distinguished by a wide range of colors, affordable price and practicality. Decorative plaster allows you to create an original, unique style and embody any design ideas.
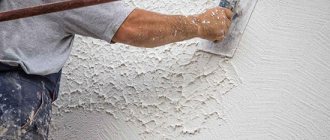
Plastered facade of a house
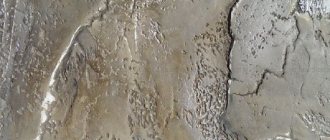
If you prepare decorative plaster correctly and get used to applying it correctly, you can create magnificent decor on the walls, no different in appearance from a fresco.
Plastered house
But many reject this building material as a decorative finish, considering it very complex and labor-intensive. In fact, this is not true at all. In this article we will tell you about the advantages and features of this material and will dwell in detail on the process of preparing decorative plaster from ordinary putty with your own hands.
What is decorative plaster and where is it used?
Features of facade plaster
Due to the fact that the material contains modern plasticizers, the plaster is flexible, which allows even a beginner to work with it. It is universal, it can be applied to almost any surface (foam concrete, drywall, brick).
Thanks to proper application, textured plaster allows you to give the building an expensive and presentable look. Therefore, working and creating designer masterpieces on the wall using ordinary putty is a pleasure.
Applying plaster is not difficult
Special grades of plaster
To create a pattern on the wall, it is not necessary to use a special tool; there are other finishing methods. To create a decorative coating, there are special types of plaster that allow you to create a beautiful and individual design.
Decorative plaster bark beetle
This name was given to the plaster for the resulting pattern, which resembles the marks left by a bark beetle on wood. This mixture is suitable for both interior decoration and exterior facades of the building. Bark beetle plaster is resistant to temperature changes , high humidity and even direct contact with precipitation. In addition, it is very difficult to damage it by mechanical influences. Plaster has received such advantages thanks to the materials from which it is made. The technique of obtaining a drawing is accessible to anyone and is quite simple.
The plaster contains the following substances: these are synthetic polymers that impart viscosity to the mixture; fillers - marble, quartz and even granite. The pattern is obtained thanks to marble particles, which, when rolled under the instrument, create an extraordinary pattern.
Marble plaster
An equally beautiful design option is a marble finish. In order to perform this type of design yourself, you need to follow the instructions, take your time and perform all operations sequentially . Marble coating is very strong and durable, resistant to external influences and does not burn. This type of finishing is suitable for both internal and external work.
What is the difference between plaster and putty?
Before we move on to the process of creating decorative plaster from ordinary putty, let's understand these two concepts. In general, plaster is usually called a building mixture that is intended for leveling walls. Putty is also commonly called a building mixture for leveling walls, but, unlike ordinary plaster, we are talking about small errors.
What is the difference between putty and plaster?
What is the difference?
- Grinding _ If we carefully study the composition of both building materials, we will see that the putty uses substances of much smaller fractions, this makes it possible to create a thin coating.
- Price . There will also be a difference in the price of these two materials, which is due to the lower consumption of putty compared to plaster. Coarse filler costs much less for manufacturers.
- Strength. Plaster will be much stronger than putty. That is why it is often used to decorate external walls. If we recall the composition of concrete, we know that crushed stone is added to the composition to impart strength. So it is here. The larger the fraction of substances included in the mixture, the stronger and more durable the material itself will be.
- Compound. Plaster is mainly made from a cement-sand mixture with various additives. It can be clay-lime, clay-cement, gypsum and, less commonly, clay-cement composition. To produce putty, manufacturers use cement with sand, to which various plasticizers are added.
Starting plaster with coarse dispersion
Facade putty
In order to understand the scope of use and performance properties of various types of plaster and putty, let's take a closer look at the composition and types of these two materials.
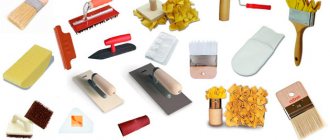
What tools are needed to plaster a facade?
In order to apply the plaster mixture manually, you will need a set of the following special tools, which can be found in any hardware store:
- A plaster hammer with a pick or a special hatchet. These tools are used to trim protruding parts throughout the entire working area. To obtain a solution that adheres flawlessly to the surface, a hammer with a pick is used to score the area of the applied substance.
- Instead of the usual brush, malkovitsa will come in handy. Due to its large size, it is convenient to apply a deeply penetrating primer.
- The primer serves to strengthen the top layer and ensures long-lasting adhesion of the mixture (also called adhesion).
- Plumb lines are used for weighing, which allows you to find out how firmly a particular surface is plastered. Also, using a plumb line, special construction threads are tensioned.
- Beacons are installed on ceilings or slopes using rack levels
- Laser levels are used by professionals to save time. They are quite easy to use and much more effective than rack and pinion ones.
- with nylon threads .
- Using a wooden or metal square you can determine corner slopes and beacons.
Types of plaster for facade work
Today there are several types of plaster on the market, which differ in composition and connecting link.
| Kinds | Description |
Mineral | The composition includes a mixture of quartz chips, marble, lime hydrant, light mineral aggregates, plasticizers and Portland cement. The advantage of this material is high strength, moisture resistance, long service life and low price. To decorate the material, pigments or marble chips are often added to the mixture, which allows you to play with the design of the walls. |
Acrylic | In addition to sand and coarse cement, acrylic resin is added to the composition, which gives elasticity and high strength. This plaster is quite easy to work with, it can be leveled, and has good water-repellent properties. But there is also a serious drawback. Plaster is highly flammable, so it is not recommended to use it near mineral wool insulation. |
Silicone | The main connecting link here is natural silicone, which gives extraordinary plasticity to the material. Despite the fairly high price, silicone plaster has a number of unique qualities (insensitive to UV rays, plasticity, strength, high adhesion, resistance to mechanical damage and a wide variety of colors). Another advantage is the speed of operation. The composition contains antiseptic substances, so preliminary priming of the walls before application is not required. The only drawback of this mixture, perhaps, is the complexity of finishing. That is, the walls should already be fairly well prepared before application, since silicone plaster is applied in one layer. |
Silicate | The main connecting link here is liquid glass, which imparts excellent astringent properties. Silicate plaster has a high rate of fire resistance, so it can be used on almost any surface. This is one of the most durable finishing materials, with a service life of more than 50 years. |
Cement-sand | One of the most common types, which differs from plaster only in grain size. |
Oily | It can be classified as a very exotic option for a building material that is not often found on sale. The manufacturer here uses drying oil as the basis for the thickener. It is highly resistant to moisture and is excellent for treating walls before painting. |
Epoxy | The base here is epoxy resin, which makes this building material very versatile in use. It can be applied to concrete, metal, plastic, drywall, wood. It has a very high degree of strength and resistance to external factors. |
Latex | Latex is excellent for both external wall treatment and interior use. The base is regular latex, which gives the material high elasticity. With this composition it is easy to seal all cracks and potholes on the surface. The plaster sets quickly, dries and does not form cracks. |
Prices for popular types of plaster
Plaster
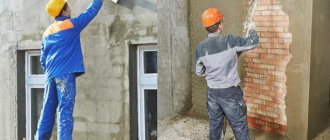
Plastering wooden walls
This procedure will also be covered in this article. There is nothing difficult about plastering wooden walls with your own hands, and such a thing can affect anyone, for example, you will need to plaster a wooden partition in your house. The procedure is a little specific and has a number of features that will be discussed below.
So, to apply plaster it is necessary to prepare the surface by making notches. This is necessary for better adhesion of the plaster to the surface of the wooden wall. After applying the notches, you need to nail down the so-called shingles, which will create a sheathing.
When making shingles, you need to take into account that the cell size is four by four centimeters. The slats must be nailed at an angle of forty-five degrees relative to the floor and crosswise relative to each other. The edges of the slats must be nailed to the wall to avoid subsequent warping, because this may damage the plaster.
The slats are nailed at every third intersection, i.e. two intersections must be skipped, and a nail must be driven into the third. To prevent wooden slats from cracking from nails, they must be moistened with water. Since a material such as wood tends to expand when temperature changes, it is necessary to create a gap of two millimeters near the ends of the slats.
The option described above has been used for quite a long time and has been tested for years. Currently, shingles can be replaced with metal or synthetic mesh , which can be purchased on the construction market. Metal mesh can be of several types:
- woven mesh;
- mesh stockings;
- all-metal mesh;
- and expanded metal mesh.
The mesh must be fixed to the wall, and then the work is carried out according to the principle described above.
For plastering wooden walls, it is better to use a lime-cement or lime-gypsum mixture. To slow down the setting, you need to add PVA glue to the solution in a proportion of 200 grams per bucket. The desired layer of plaster should not exceed two centimeters.
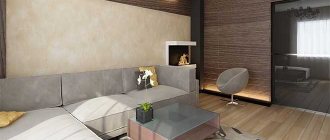
Advantages of textured plaster
If you decide to choose ordinary putty as a façade finish to create an intricate decor, you will have to work hard and practice applying the finish to get a really high-quality finish. But the result is worth it.
Decorative plaster is, first of all, a play of textures. And the color scheme plays the second part. It is important to understand when starting work that it is through texture and relief that you will achieve a complex texture on the wall.
Stone-like facade plaster
Textured plaster has the following qualities:
- easy to apply;
- is highly resistant to moisture and UV rays;
- can be applied to any surface (foam concrete, brick, etc.);
- allows you to give the wall an original style;
- does not require perfect leveling before application;
- it is possible to choose any color scheme;
- goes well with other finishing materials;
- has a long service life;
- environmentally friendly material;
- increases the thermal insulation and sound insulation properties of the room;
- you can create a complex texture.
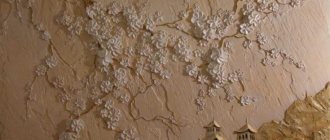
The possibilities of decorative plaster are not limited to creating an original texture. Decorative plaster can be used to create intricate patterns and paintings.
Decorative plaster at home
It is best to use silicone putty mixtures as a base. They are more elastic, allow you to achieve perfect texture and the necessary relief, and also have high resistance to mechanical damage. Despite the intricacy of the texture, this material is quite easy to care for. Dust and dirt can be easily removed with ordinary detergents.
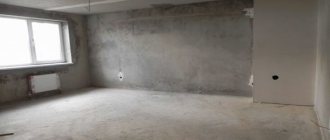
Visual alignment of walls
For further work on applying decorative plaster with your own hands, it is necessary to carry out work to visually level the walls and give the surface an appropriate appearance, which will allow you to move on to the next stage of work.
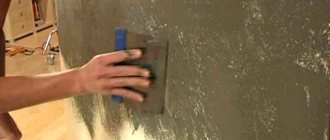
To carry out the visual alignment procedure, you need to thoroughly moisten the wall with water . A grater is taken in the left hand, and a trowel or spatula in the right. You need to put a small amount of mortar on a grater and use a spatula to spread the mortar onto the wall. This must be done carefully with wrist movements. After the mortar has been applied to the wall, you need to smooth the surface using a grater. Do this in a circular motion with a slight pressure on the grater. If there is not enough solution in some place, you can add it there using the same spatula in a small amount.
After the solution hardens, you need to grout. The evenness of the resulting surface is checked using a level.
Process technology for working with decorative plaster
- Preparatory work for leveling the walls.
- Preparation of decorative plaster from putty.
- Creating a base layer of plaster.
- Working on creating a textured coating.
- Finish coating.
Stage 1. Preparatory work before applying decorative plaster
Step 1. We carry out surface preparatory work. We clean off all paint, varnish and other debris. Wash the wall thoroughly.
Brick façade cleaning
Step 2. Prime the surface. This will allow you to seal all the cracks, level the walls as much as possible and stop the putty from being absorbed by the wall surface, since the primer has excellent waterproofing properties.
Facade primer will extend the life of walls and exterior finishes
Facade primer
Step 3. Apply an antiseptic and anti-corrosion protective layer. If decorative plaster is applied to a surface where there are metal nails, screws, pipes, then it is necessary to first apply a protective layer to all these parts. Otherwise, in the future, a rusty stain may appear through the plaster. The antiseptic will protect the surface from the formation of fungus, mold and other microorganisms.
Step 4. Let the primer and protective layer dry thoroughly for at least 12-14 hours. It is very important to wait this period of time, otherwise, after a short period of time, the plaster will lag behind the surface. If after the first primer a layer lag is visible or there is a suspicion that the surface is friable, then it is recommended to apply the primer in several layers, each time waiting for complete drying. The average time for polymerization and drying of the mixture is 15 hours, but before starting work, be sure to read the instructions on the package, since depending on the chemical components, the period can be significantly increased.
Video - Application of Ceresit CT 16 primer
Prices for facade primer
Facade primer
Video - The process of applying primer to walls
Important! All finishing work must be carried out at a temperature not lower than +5°C. Otherwise, the quality of the result and the performance properties of the facade finishing will be low.
Step 5. Using a building level, we determine the degree of leveling. Keep in mind that checking the evenness of the walls should be done in several positions: horizontally, vertically and diagonally.
Now that finishing can be applied to the walls, we are preparing decorative plaster.
Stage 2. Preparing decorative plaster: step-by-step instructions
You can make textured plaster from almost any ordinary putty.
In order to decorate walls with textured putty, you need to prepare the following materials:
- putty (regular from any manufacturer);
- white acrylic primer;
- water (cold);
- acrylic lacquer;
- paint of the required color;
- glaze for finishing coat.
Step 1. Take a deep vessel (bucket) and mix in equal proportions ordinary putty, water and a building mixture for sealing seams. You can first mix only the bulk ingredients, and then slowly add cold water. Then you will speed up the mixing process and eliminate the formation of lumps.
Filling dry ingredients
Step 2. Mix the mixture thoroughly with a construction mixer or electric drill with a whisk attachment.
Kneading process
Step 3. If the final version requires a certain color, then after thoroughly mixing, add pigment to the finished consistency.
Step 4. Check the texture of the finished material. If you feel that the consistency is too thick and does not allow you to work and create the necessary patterns on the surface, then you can add a little water, but do not overdo it, otherwise the material will roll or flow down the surface for a long time.
The consistency of the solution should be like mashed potatoes.
Advice! Prepare only as much mixture as you need in the near future. The solution will thicken quite quickly and will be difficult to work with.
Stage 3. Creating a Base Layer
Take a small amount of the prepared mixture with a spatula and apply a thin layer to the wall surface. The layer thickness should not exceed 2-3 mm. Use a special spatula for facade work and start stretching from the lower right corner.
Applying the base layer
Wait for a technological break (10-30 minutes) before starting to perform the relief. The drying time of the base depends on the technical features of the working mixture.
Stage 4. Working on creating a textured coating
Step 1. Mark the wall . This is an important point if, say, you are planning to turn your idea into a designer masterpiece and do not want to limit yourself to the usual application of textured putty. We use masking tape to mark the work area, and the solution can extend onto the paper. Once the job is complete, this tape will need to be carefully removed.
Step 2. Take a spatula, pick up a small amount of putty again and apply the mixture to the wall . It can be applied in several movements, depending on the design intent: scarring, circular movements, horizontal or vertical strokes. If you want to create chaotic strokes on the wall, without a specific pattern or relief, then you can alternate the technique. If your plan involves a certain pattern, then choose movements in one direction.
Application of decorative plaster
After each application of the mixture to the wall, thoroughly clean the spatula or grater before adding a new portion of the solution. Under no circumstances should the remaining mixture be placed back into the bucket of plaster.
Important! Practice applying the relief to a sheet of drywall first. This will give you the opportunity to “feel” the material and create exactly the design you had in mind.
With a spatula with a serrated edge, you can create a specific design, and with a special roller with a ready-made design, you can transfer beautiful patterns to the wall. The structure and relief of the wall can be adjusted during the process. If the strokes are too harsh and thick, take a trowel and, lightly touching the wall, walk over the surface.
The “bark beetle” style is performed with progressive, continuous movements performed in a horizontal or vertical position. The pattern will depend on the movement of your hand and it is better to apply it with a trowel; it will appear already while applying the mixture to the wall. But individual strokes can be created with a grater, applying it to the wall and pressing lightly.
The consistency of the solution should resemble thick sour cream, otherwise the mixture may flow off the wall, disturbing the pattern. After applying one layer with a trowel, the “milk”, which no longer contains pebbles, is removed from the trowel with a spatula. If this is not done, then the “bark beetle” relief will not be pronounced. Hold the tool at an angle of 60 degrees when applying the solution.
The thickness of the layer will depend on the grain size in the finished mixture. The average drying time is 24-72 hours.
Decorative bark beetle plaster: application method
Drawing
Video - Technology of applying bark beetle plaster
Advice! If you need to take a break from work, then cover the border of the completed finished drawing with masking tape, over which apply a wet solution. When you return to work, carefully remove the tape and continue the process. This will avoid visible grooves and transitions in the terrain.
The “pebble” texture is achieved by sharp movements in a clockwise direction. It is very important not to interrupt the finishing work, since the hardening of the plaster can give a sharp transition on the wall.
Technology of applying pebble plaster - photo
Video - Lesson on applying pebble plaster
Step 3. For the drawing to dry completely, you need to protect the facade from direct exposure to sunlight and wind. To do this, it is necessary to install a protective construction screen made of mesh or film.
If the film is pressed tightly against the plaster, you will get very interesting patterns.
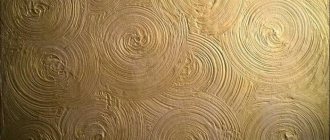
Creating complex terrain using a special roller
Using a special roller covered with steel mesh, rubberized or porous, you can create a unique pattern of any complexity on the surface. You can purchase such a tool in a store or get creative with the process and make such a roller yourself by wrapping it with twine or cord. Keep in mind that the more often the rope is wound, the denser the relief structure will be.
Plaster rollers
Textured rollers
All work is carried out with a roller, which is carefully dipped into the putty and then the mixture is applied in a thin layer to the wall. Here you can use your imagination and work with the roller in different directions.
Prices for textured rollers
Textured rollers
Stage 5. Finish coating
Now that the desired pattern on the wall has been created, we proceed to the final stage. You can paint decorative plaster in any color or varnish it. This process is not complicated, but in order for the result to really please you for many years, you should take into account several nuances.
Painting decorative plaster
Textured putty is best painted in 2 colors. This will give the surface greater relief and add volume.
Methods of painting decorative plaster
If you want to focus on the convex parts of the picture, then it is better to paint these places using the dry brush method. But all the depressions and recesses, on the contrary, will be emphasized by the wet brush method, which will slightly blur the color.
If you decide to paint textured putty in dark colors, then it is better to choose the wet brush method, which will slightly blur the pigment. When painting the surface in a light color, apply the paint with a dry brush.
After the painting process has reached the finish line, let the paint dry well and cover it with varnish. Firstly, it will give a beautiful shade to the paint, fix it and protect it from fading and fading. Use a water-based varnish and apply 2-3 layers, each time waiting for the previous one to dry completely.
How to paint decorative plaster
Despite the fact that the process of creating decorative plaster from putty is not complicated and does not require serious skills, watch the video with step-by-step instructions to do everything correctly.
Video - Painting decorative plaster
Preparing the surface for applying the material
After completing the construction of the walls of the cottage, select a suitable design. Think over the finishing sequence yourself, develop a plan, and use the services of experienced designers. In the latter option, they will not only help you place an order for the project, but will also be able to calculate the consumption of materials.
Before plastering the facade, find out whether any mixture has been applied to the wall before. If such a coating has been applied, it will have to be carefully leveled by removing the top layer completely or partially. The surface is cleaned of dirt using a brush, and then degreased. Then take a primer that is suitable in composition for the plaster (information on the appropriate type of primer will be written on the bucket with the plaster).
You can often find a primer from the same manufacturer as the plaster.
Then there will be perfect adhesion between the walls and the mixtures. when the home has just been erected, carry out preliminary work by cleaning the walls with a brush, then cover them with soil. The preparatory work has been completed. Decorative facade plaster is supplied ready-made, or as a dry powder from which the mixture will be made.
Types of external plaster
Plastering the external walls of a house will be an excellent way to make the building brighter and more noticeable against the general background. Plaster mixtures are:
- Silicate;
- Silicone;
- Mineral;
- Polymer;
- Self-cooked.
In addition to the main components, all these compositions are allowed to contain:
- Polymer particles that provide heat retention;
- Stone chips for visual effect;
- Glass sand will add shine;
- Small particles of crushed stone will help create an original texture.
How to plaster external walls? It is necessary to consider in more detail:
- Silicate solutions are ready for use immediately after hiding the original packaging. Such mixtures are not presented in the widest range of colors. Full use of the product is necessary, since it can no longer be stored once the container is opened. This type of plaster is a reliable barrier to moisture penetration and can withstand moderate mechanical loads;
- Silicone mixtures are also quite elastic, have good resistance to various atmospheric phenomena, and are prone to self-cleaning. The plaster coating has high performance characteristics. The disadvantages include the rather high cost in comparison with other finishing options;
- Mineral mixtures. Cement is the main component. Dry components require dilution with water according to the manufacturer's recipe. Plaster mixtures of this type are inexpensive, “breathe” well, and are easy to work with. The disadvantages include not very good elasticity, and high requirements for the surface that will serve as the basis for the plaster layer.
If you are a beginner and don’t know the best way to plaster the exterior walls of a house, use polymer plaster mixtures. They are suitable for almost all substrates, are resistant to temperature changes, and create an attractive cladding that has a long service life.
Such properties are made possible thanks to the artificial resins included in the composition.
You can also make your own mixture. To do this, you will need to take cement, fine sand and water, and then mix them in the proportions specified in the recipe. This is an affordable, but quite labor-intensive method, which is very attractive for its financial accessibility.
It is important not only to know how to plaster external walls, but also on what surfaces the solution will adhere well:
- Stone surface;
- Wooden;
- Reinforced concrete;
- Monolithic concrete.
A separate approach is required for concrete pavement. When choosing what to plaster the outer walls of a house with, you need to take into account the fact that the material both absorbs moisture and releases it back. It turns out that the exterior finish should be softer than the main surface. Such measures will help prevent cracking, and the correct product will not lead to evaporation and condensation.
Plastering external walls made of gas silicate blocks should proceed differently than brick or concrete surfaces. It is unacceptable for plastering of external block walls to be done with cement-sand mortar, since in this case it is not necessary to disrupt the vapor permeability and internal climate in the house.
Plastering of external walls made of aerated concrete is carried out using special lightweight plaster mixtures. One of the best options is a mixture of lime, sand, and a small proportion of cement.
And if the external walls are made of plaster, what should I use to plaster them? For such a base, gypsum will be the best option. You can also use gypsum mixtures with the addition of lime. Cement mixtures are not suitable for these purposes, as chemical incompatibility occurs.