Both specialists and industry forums often have questions about the possibility of using finishing coatings on external façade walls. Of course, painting the facade using putty is quite possible, but this should be done correctly and in compliance with all technologies.
The facade is a protective layer of walls. At the same time, it influences the aesthetics of the building and a correctly chosen color gives it a specific character, optically improving the proportions of the building. From an aesthetic point of view, it should form a single whole with the roof, window and door frames.
What are façade putties made of?
Such putties are easy to model, and after complete curing they become resistant to many adverse factors (for example, acids or solvents). However, different types of fillers are available on the market and the choice of the appropriate one should be dictated by the specific application.
The putty should be chosen depending on the surface you want to level - some are suitable for use on a wide range of surfaces (eg aluminium, galvanized steel, old paintwork, etc.), others only on some (eg plastics) . You should also pay attention to the drying time of individual compositions to prepare the required amount of putty.
You should also remember to follow the putty manufacturer's advice regarding the mixing ratio with the hardener or the thickness of the applied layer. Only with a properly selected, trained and assigned agent can you expect him to perform his function correctly.
Painting instructions
To begin, the master puts on work clothes. If the paint has a pungent odor, then the room must be ventilated, but there should be no draft. The technology for doing the work is as follows:
- First, you need to cover the windows and doorways with film. If the flooring is new, you need to protect it too. You can also protect your plumbing in the same way.
- Now the working composition should be poured into the tray. It must be mixed first. At the same stage, the paint is diluted if necessary. Consumption depends on how many layers will be applied, the area of the wall, and how well the base is prepared.
- Paint should be applied from places that are difficult to reach: corner joints of walls, areas behind radiators. Sometimes painting tools with long handles are required.
- First, the composition is applied in the direction from left to right and from top to bottom. If a roller is used for work, then the first layer can be applied with a product with a long pile, then with a medium one.
After painting, you need to let the coating dry. This should happen naturally. There is no need to dry the base artificially, as streaks may appear and the paint will peel off over time. Since painting a plaster wall is not difficult, you can do it yourself.
Types of putty and their use
As we have already mentioned, in order for all facade repair work to be effective, it is necessary to choose the right mass to fill the defects. Here are the products we can choose:
- All-purpose putty is the main product in this category. Depending on its specific type, it can be more or less flexible, and also suitable for covering different types of surfaces. More flexible compounds are easy to apply and work on, while harder putties are recommended for covering small areas and machining. Also, universal putties are characterized by good adhesion to the base.
- Another type of putty is one with the addition of glass fibers. Thanks to this component, the putty acquires high mechanical strength and resistance to high temperatures. This putty is characterized by high hardness, so it is recommended for use in small areas and in places where maximum filling strength is required.
- Putty with the addition of aluminum dust is another product intended for use in facade and painting work. Thanks to the addition of aluminum dust, such preparations are characterized by high flexibility and mechanical resistance. They are resistant to high temperatures, so they can be applied in areas prone to overheating. The elasticity of the putty with the addition of aluminum dust makes it suitable for filling large surfaces and can be easily processed even after a longer period of time after application.
- Facade putty for painting may include products for repairing plastic elements. It is characterized by good adhesion to popular plastics and flexibility. Some of these products are also suitable for leveling other raw materials such as metal or wood.
- External finishing putty is used to smooth out minor defects and is used in sanded and cleaned areas. It is usually a fine-grained mass that fills small cavities well. By wiping the cavities filled with it with sandpaper, we obtain a perfectly smooth surface.
- Another type of putty is putty, which is applied to large surfaces using a spray device. Characterized by short drying time and ease of sanding.
Useful tips
We have described the general principles of work, however, each case is individual, and here a few more recommendations may be useful.
- There is no point in painting walls covered with mold: they will appear again. Here you cannot do without processing with special means.
- Pour paint into the paint tray compartment. Saturate the roller thoroughly: this will help prevent air from getting between the fibers. To easily remove excess paint, roll the tool over a ribbed surface.
- In the bathroom, the water emulsion will remain only with forced ventilation. Otherwise, steam and moisture will destroy it.
- The kitchen needs stain-resistant paint. To preserve the original appearance of the walls as long as possible, they are coated with water-based varnish. It is better to lay tiles in areas near the stove and sink.
- A room in dark colors will appear smaller and lower; in light colors, it will appear larger and taller.
- If several cans of the same color are used, they are mixed in a common container before use. This will eliminate the risk of getting different shades when drying.
Advice
Thick canvas fabric will help protect the floor from splashes. It will not slide like film, and will not absorb excess paint like cotton.
To get a perfectly painted surface, you need to prepare materials, tools, and follow the recommendations for performing repair work.
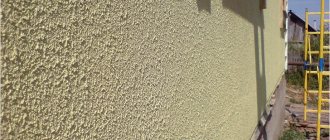
The most popular types of facade putties
Facade putty - depending on the needs, we distinguish between different types, so when choosing it, pay attention to potential threats, such as mechanical damage, dirt and, of course, weather conditions.
On the market you can find acrylic plaster (resistant to rain, but sensitive to strong sun and frost), silicone (resistant to rain, sun and light dirt), silicate (moderately resistant to mechanical damage, temperature, sunlight and dirt) and mineral (resistant to sunlight, low temperatures, but sensitive to rain and mechanical damage).
Note: enamels for facades on plaster are also quite popular and are used to create an additional layer in order to improve adhesion between putty and paint.
Latex putty is not suitable for facades
It is characterized by poor resistance to frost and therefore is not suitable for the facade.
Adhesive putty
Used for interior work. Mainly for leveling wooden, plastered and concrete surfaces, for painting with enamels, oil and water-dispersion paints.
Facade acrylic putty
The product is intended for decorative and protective painting of concrete surfaces, cement and cement-lime plasters outdoors, as well as walls and ceilings in residential, office and public buildings.
Facade frost-resistant putty
Suitable for materials such as: stainless steel, acid-resistant, thickness: 0.45 mm, for applying 2-4 mm acrylic plaster/
Wall painting options
You can paint the walls in your apartment using putty using tinted varnishes, waxes or paints. Some plasters are offered by manufacturers tinted, while other materials are colored during the preparation process using pigments.
Taking into account the texture of the putty and the design project, you can use the following painting options:
- plain tinting of wall panels;
- tinting surfaces in several shades;
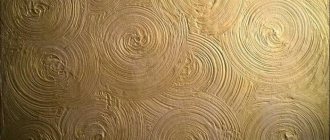
- painting walls to resemble polished marble and Venetian plaster;
- the “dry brush” technique allows you to create artificially natural unevenness on the base;
- toning with the effect of highlighting individual areas.
How to choose façade putty for painting
You will not get such a smooth and white surface as after applying gypsum putty. A big advantage is their high mechanical strength and the ability to be used in rooms with high humidity. Walls covered with a cement layer do not dry out after drying, so the house will not be pollinated.
Polymer. Like all other layers, they come in dry mixes to be mixed with water, but you will also find those that are ready to apply, packaged in plastic buckets. They differ significantly from gypsum and cement finishing coatings. They should be used on so-called complex substrates, such as walls that are subject to small structural movements. They are also moisture resistant.
Polymer surfaces require sanding, so dust cannot be avoided.
Cement and lime. They provide a very smooth surface. They are easy to cut and have good adhesion to the ground. They can be used in rooms with high humidity. They should be smoothed out wet without sanding, but this is acceptable. Such smooth surfaces should not be laid over plaster surfaces. One of their advantages is that they are more resistant to mold than other finishes.
Some types of putty, such as PermoSan NQG, are best suited for repairing insulation painted with dispersion (organic) paints or dispersion plasters (acrylic or silicone).
Essentially, PermaSilan NQG is an elastic silicone paint with NQG technology, thanks to which it can be used not only for hair scratches and plaster cracks on walls, but even for cracks in insulation coatings where good vapor permeability is required, which is usually insufficient for elastic paints . It can be used prophylactically, even if cracks have not yet appeared.
Hair scratches occur mainly as a result of reactions associated with rapid cooling of the façade or rapid evaporation. Those most vulnerable to this phenomenon are thin layers of plaster applied to insulation material (and therefore all insulation) as they have too low a heat capacity so temperature changes can occur quickly.
What paint to paint the walls after puttying
It is almost impossible to imagine a house without walls, so we can safely say that it is extremely important that they have a well-groomed appearance; this effect can be achieved in two ways:
- using decorative painting of walls.
Before you start painting the walls with your own hands, it is imperative to study all the options for painting the walls, how to prepare the walls for painting and what exactly to guide the selection of paints for painting the walls.
Preparing walls for painting
The question of how to prepare walls for painting is incredibly important, due to the fact that it is this stage that affects the quality of the entire work. Wall finishing for painting occurs as follows:
- first of all, it is necessary to clean the surface from traces of the old coating;
- level the walls for painting, all types of defects are eliminated: small cracks are sealed with putty, if the cracks are large, then you cannot do without a solution. Do not ignore when pieces of plaster fall off; make sure that the remaining coating is firmly attached to the wall. Sometimes it is necessary to plaster walls before painting;
— having leveled the walls for painting, you need to treat the entire surface with a special solution against fungus;
- priming walls for painting. It is advisable to use an acrylic primer. Make sure that absolutely all areas are treated evenly;
— it is necessary to glue a special fiberglass. It will give strength to the entire surface;
— putty walls for painting;
- fine grouting of putty;
— the final stage in the question of how to prepare walls for painting is the final priming of the walls before painting.
Methods of painting walls
The technology for painting walls primarily depends on the type and quality of the surface being treated and, naturally, on the room where the walls and ceilings are painted.
Painting the walls in the bathroom
. Applicable only if there is a good ventilation system in the room. The walls are painted with water-based paint, and avoid drafts, steam, and high humidity until the paint layer is completely dry.
Remember that painting the walls in the bathroom requires a special approach, due to the fact that this room has high humidity.
Painting the walls in the kitchen
. It is extremely important to choose a durable paint that is sufficiently resistant to constant cooking conditions. Do I need to prime the walls after the starting putty before the finishing putty?
Proper painting of the walls in the kitchen requires that tiles be laid in the work area, since they are much easier to clean and are more wear-resistant.
Painting the walls in the nursery
. When it comes to the health of our children, there cannot be a word about saving. Therefore, for such premises it is necessary to choose only the highest quality building materials.
It is not recommended to paint the walls in different colors; it is better to choose one tone. But to prevent the room from looking too dull, you can decorate it with a special border.
Painting the walls in the bedroom
.
A well-chosen color scheme in the bedroom is the key to your quality rest, so you should not give preference to very bright and aggressive colors, and the room should not be gloomy. It is quite appropriate to paint the walls with decorative paints .
Painting the walls in the room
. Textured wall painting is also quite suitable. Moreover, due to the structure of these types of paints, the walls may not be very level.
Moreover, in this room your flight of imagination is completely unlimited; here you can bring to life all your most daring design decisions. If you wish, you can paint the walls in different shades; by the way, today such solutions are incredibly popular. Is it possible to paint concrete walls without putty?
You can also use a special roller to apply a design to the surface, or paint a thematic picture on the entire wall.
Wall painting technique
The painting of the walls in the apartment also depends on the type of surface.
Painting wooden walls
. Preparing such walls for painting with your own hands is not so easy; for this you need:
— primer to ensure better adhesion;
— primary painting of the walls in the house;
— in order to protect the pulp from moisture, it is necessary to do intermediate grinding;
— apply the last layer of paint;
It is very important to monitor the condition of the end surfaces and for more reliable protection from moisture, you can treat them with a sealant.
Painting plasterboard walls
.
First of all, it is necessary to seal the seams so that they do not stand out later. This is done either with the help of a sealant or by putting putty on the walls for painting .
In general, drywall can be painted without pre-treatment, but in this case you risk getting a not very good result. The color may not be uniform, and all surface defects will be very noticeable, so don’t be lazy, but still apply a primer to the sheets first.
As for the paint itself, its choice should also be taken quite seriously, and remember that on a glossy surface all flaws will be more noticeable than on a matte one.
Painting a brick wall
. If we are talking about interior work, then painting the walls with acrylic paint is perfect. Mold, dust, and salt deposits must be removed from the surface of the brickwork.
Moreover, it is very important to pay due attention to the preliminary work, otherwise the applied coating will not last very long. In addition, make sure your brick wall is not damp; if you notice even the slightest signs of moisture, it is better to try to eliminate the causes of its appearance before you start painting.
Also, the walls should not have any defects, chips, cracks, poorly sealed seams, etc.
Painting concrete walls
. It is forbidden to treat a concrete surface if a month has not passed since the date of its manufacture, otherwise high humidity will be detrimental to the applied coating. Surface preparation is as follows:
— old coating is removed;
- clean the surface from dust and traces of dirt;
— the question of how to putty walls for painting is also relevant, since this procedure must be done at least twice;
- finally painting the walls with color.
Painting putty walls
. Of course, this is the best option. The paint adheres much better, the coating looks much more beautiful, there are no various transitions (when compared with painting drywall), etc.
In addition, you can stick special wallpaper for walls to be painted. And thus, create a unique room design.
Also, it is recommended to putty most surfaces before painting, so, to some extent, this option can be called the most common.
If you decide to resort to painting the wallpaper, then you should clean it thoroughly, remove any glue residue, dust, dirt, etc. from the surface. Then the surface must be treated with fine-grained putty and primer. If the wallpaper is highly absorbent, then the priming process is of particular importance for it.
By avoiding this procedure, you can get an uneven color, and the result, instead of positive and joyful emotions, will only bring disappointment, and you may even have to redo the whole job again, and this is a waste of time and material resources.
Additional Information:
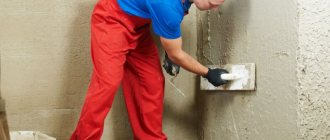
An important step before putting putty on the walls for painting is preparing the putty mixture itself. This is not as difficult as it might seem at first glance. Pour water into a wide bucket, a little - it is difficult to quickly work out a large amount of putty, it will simply thicken, and it will be very difficult to work with it.
Here it is worth pointing out one nuance - you should not re-dilute the putty, as the builders say, it will form in small lumps and begin to “paint.”
Preparing the putty is quite simple; instructions can be found on the packaging. If there is none, then follow the following instructions: take 1-2 liters of water into any bucket-type container, or into the bucket itself, but then it will be white on the inside. Add putty to the water, about 1-1.5 kilograms. When adding this mixture, stir the mixture thoroughly with a spatula until a homogeneous thick composition is formed that can be applied to the spatula and applied to the wall.
Do not prepare a lot of putty at once, because... It dries quickly, it is better to dilute it several times and little by little.
From personal experience I can say that the better the quality of the paint , the lower its consumption, and despite the apparent high cost, the costs ultimately turn out to be even lower than if you paint the walls with cheap paint. High-quality paint adheres well, does not run down the walls, and does not drip from a brush or roller. In a word, painting with it is a pleasure.
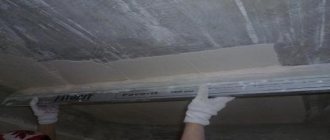
To carry out puttying, the ceiling must be cleared of the previous putty. Do I need to prime the walls before painting after puttying? Since this work is labor-intensive and dusty, you should dress appropriately, not forgetting about a mask or respirator. Using a sprayer, part of the ceiling is wetted, and after that, when the water is absorbed into the plaster, it is cleaned using a spatula.
The ceiling should be wetted as much as possible, then it can be cleaned faster.
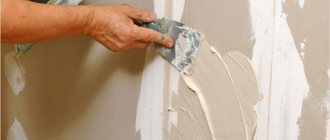
How to properly putty a facade for painting
If walls are filled with old paints, the surface must be properly prepared. Careful testing of substrate adhesion is very important in the context of proper adhesion of later applied leveling compounds. The putty is applied in an even layer in all directions.
It is applied in a very thin layer of 3 mm. You can apply smoothing on any mineral base, including concrete. It can be laid on old cement, cement-lime, gypsum, lime plaster - provided that it has a fairly flat surface.
Types of paints for putty
Acrylic paints. They are made from polyacrylic resins and pigments. They are non-toxic and therefore safe for children. They have a creamy consistency and are an alternative to heavier and more difficult to use oil paints.
They are great for painting facades over putties. They contain trace amounts of water, so they dry quickly, leaving rich colors. They are often used in hobby decoupage and model making.
Emulsion paints. One of the oldest types of paint. Emulsion paints are used in the tempera painting technique. They are made from dyes, resins and oils.
For complex substrates covered with fiberglass paneling or wallpaper and additionally subject to minor construction movements, the use of Knauf Rotband Finish is recommended.
Facade painting technology
Before painting, it is advisable to carefully protect the façade elements that will not be painted and may become stained with paint. You can use masking tape and foil for this. The tape should be applied to a dry surface and preferably peeled off immediately after painting. This prevents the tape from coming off along with the fresh coat of paint.
Before painting, plaster surfaces must be thoroughly cleaned of dust and, if necessary, degreased with a suitable product. It is also necessary to evaluate the adhesion of the old coating and remove (scrape out) poorly adhered plaster elements. Defects must be filled with plaster mixture and then smoothed by rubbing with a plaster spatula. You may need façade varnish.
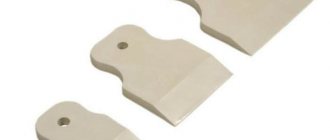
Tools for work
Having chosen what to paint the walls with, let’s consider what tool you will need for this. In addition to the paint itself, you will need:
- brush or roller for priming;
- two brushes for applying paint – one wide, for the main surface, the second, narrow, for hard-to-reach places; a wide brush can be replaced with a paint roller;
- to create a decorative surface (for example, grainy or patterned), you can use rollers with attachments;
- if necessary, color of the desired shade to dilute the white base;
- grater for polishing small irregularities;
- large capacity (tray);
- ladder;
- personal protective equipment: gloves, a respirator when using a spray gun, a hat when painting ceilings.