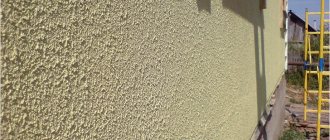
Mechanical plastering of walls inside the building with all the features. If necessary, plastering work can be carried out mechanically inside the building. The order of work differs significantly depending on the foundation. The composition can be applied to vertical and horizontal substrates. It is acceptable to use gypsum, lime and cement mortars. The price of mechanized plaster directly depends on the type of composition used.
Various compositions can be used for interior work.
Mechanical plastering of walls: sequence of actions
Mechanical plastering of walls is performed in the following sequence:
- preparation of the base. Remove dust and dirt from the wall. A layer of primer is applied. Beacons are installed that determine the thickness of the applied layer;
- the equipment is assembled, the required modes are set, the solution is prepared;
- Using the selected equipment, the mixture is applied to the wall. The gun is positioned at a right angle. The thickness of the formed layer is adjusted by changing the pressure. The composition is applied from a corner or joint;
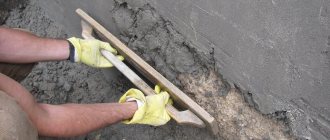
- The coating is leveled using a rule. Half an hour after application, the plastered surface is moistened and rubbed with a float.
A professional team copes with the task quite quickly.
We invite you to watch a video that describes in detail how mechanized plastering of walls is performed:
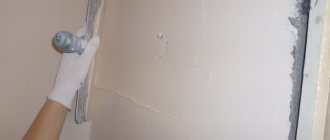
Surface primer
1. The initial stage of work is priming the walls. Removes dust and dirt from walls, increases resistance. After priming, the plastering station will ideally apply the solution to the wall and secure it there in the most reliable way. Neglecting this stage leads to subsequent peeling of the plaster mixture or cracking.
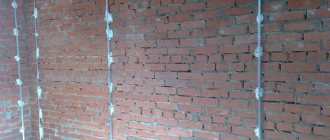
Installation of beacons in the wall
2. To obtain a perfectly flat surface, you need a plane in which the work will be done. This plane is defined by beacons. A prerequisite is their installation using a laser level.
Application of the solution
3. The main stage using a station is applying plaster using a mechanized method to the wall. The automated process involves preparing a solution with specified parameters of viscosity and plasticity and spraying it under high pressure onto a wall, ceiling and other surfaces.
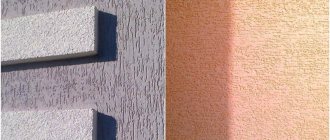
Trimming by beacons
4. The first leveling of the plaster plane after spraying the solution is trimming. This can be done when the plaster reaches a certain viscosity without missing the moment of complete drying. The main tool is a high-quality rule of great length, the support for which is previously installed beacons.
Removing beacons from walls
5. For finishing, it is recommended to remove all beacons. Neglecting this process causes rust to appear, which can subsequently ruin the repair. All grooves from lighthouses are sealed with the same gypsum mortar.
Final trim
6. The final trimming is done after removing the beacons, ideally leveling the surface plane in all directions. The outcome of the work done depends on this process.
Surface blur
7. The penultimate stage of the entire plastering cycle is washing the surface. The wall is saturated with water, the released gypsum milk fills the slightest irregularities, leaving a perfectly smooth wall.
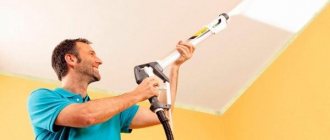
Surface glossing
8. We carry out glossing of the surface of the walls at the request of the customer. Already at the previous stage, the surface is ready for wallpapering and other types of finishing, and if painting is required, then glossing will bring the wall to perfection.
Mechanical ceiling plaster: subtleties of the process
Ceiling cladding is performed in the following sequence:
- surface preparation. All dirt, debris, cobwebs, metal objects are removed, and unevenness is smoothed out. A layer of primer is applied;
- determining the location and installation of beacons along which mechanized ceiling plastering will be carried out. Lighthouses are located at a distance of 1–1.5 m from each other. Special attention is paid to their location, since the evenness of the formed layer directly depends on this;
- preparation of the working mixture, if necessary when using the selected equipment;
- applying the mixture to the surface in strips of equal width. In this case, it is necessary to ensure that each subsequent one overlaps;
- leveling the surface using a rule that is pulled towards oneself, making movements from side to side;
- final processing of the ceiling.
Careful adherence to technology is a guarantee of quality.
We invite you to watch a video that clearly shows the process of performing the work:
Preparing the wall surface before plastering
In order for mechanical plastering to be carried out efficiently, the mixture to be well fixed on the surface, and the treated wall to be used for a long time, it is necessary to carry out mandatory preparatory measures:
- Carefully remove old finishing materials and inspect the surface for cracks, pits and loose areas of the wall. All defects must be corrected and the surface strengthened.
- Be sure to clean off oil, grease stains, mildew or mold (if any). Treat the surface with protective compounds.
- If there are metal elements on the wall, they need to be cleaned of rust and coated with a special anti-corrosion agent.
- Knock down the projections on the wall if their height exceeds 1 cm.
- Prime the wall with special primers. It is better if there are several layers of primer.
- If the wall is made of brick, cinder concrete or aerated concrete slabs, it must be impregnated with fastening compounds with a high degree of penetration.
- Painted surfaces are treated with a primer.
- Slots, cracks and joints of slabs must be covered with a special reinforced mesh.
Be sure to check the curvature of the surface. To do this, fix the screws in the corners of the room, which will fix the threads stretched diagonally. Also fix the threads vertically using a plumb line. Angles are checked using a special rule or beacons.
Mechanical plaster: Pros and cons
The advantages of this method include:
- high performance. With their help, you can apply up to 1 m³/hour, which allows you to finish up to 40–60 m², depending on the thickness of the layer being formed;
- high quality of the formed layer. When using an automated system, an even layer is initially obtained, which is unattainable manually;
- high adhesion of the coating to the base due to the uniform distribution of the layer and the same feed rate of the mixture. This helps fill the solution with all the unevenness on the wall surface;
- minimum consumption of plaster for mechanized application. When applied, the solution lies evenly on the wall and practically does not splash;
- the possibility of eliminating the preliminary preparation of walls, which helps reduce the cost of finishing work.
The thickness of the formed layer may vary.
Mechanized plastering of walls has not only advantages, but also disadvantages, which include:
- high cost of equipment. Because of this, the method is practically not used in everyday life, since it will not be possible to perform cheap mechanized plastering of walls in this case;
- the need to connect to the water supply system and have a sufficient amount of the mixture;
- the need to use a solution with a suitable composition.
The high cost of equipment is the main disadvantage
What is better to choose and in what case
Determining whether machine or hand plastering is more profitable can be determined by assessing several points:
- The mechanized process produces a layer of even consistency and a high quality finish. The result of manual labor is related to the qualifications of the worker.
- The consumption for automated application is lower. The manual technique requires more solution and is determined by the application method.
- The machine method requires space to accommodate the station. This method is not suitable for finishing small surfaces.
- Mechanized application allows operation at any temperature (with the correct choice of solutions). Manual plastering is carried out only at positive temperatures (optimal mode 15-24 degrees).
Taking these factors into account, experts conclude that the automated method is used for finishing large areas where speed of work is important. In the case of finishing small rooms, hard-to-reach places or increased requirements for the quality and decorative properties of the surface, they opt for manual plastering.
When making a decision in favor of a suitable technology, you need to focus on the working conditions
It is impossible to say unequivocally which finishing method is better and more profitable. To make a decision, it is necessary to take into account such points as the area of the premises, the presence of hard-to-reach places, the timing of repairs, the budget, the availability of specialized equipment, and the qualifications of workers. If large surfaces are to be finished, then preference should be given to the mechanized method. For small jobs - manually.
Did you learn something new? Share in the comments!
Technology for applying wall plaster using a mechanized method
Various equipment can be used to apply plaster to walls using a mechanized method. Its design largely determines the order of use.
When using special equipment, it is important to follow the manufacturer's recommendations
Mechanized plastering of walls using machines and stations
Using machines and stations, professional mechanized plastering of walls is carried out. With their help, not only the mixture is transferred to the wall, but also its preparation is carried out. Due to this, these units have a rather complex design. They include:
- a special hopper designed for loading dry mixture;
- chamber in which the solution is prepared;
- a screw mechanism that supplies the mixture into the chamber, and a special pump;
- air compressor;
- mortar gun
- various cables and hoses.
The station includes special components.
When using machines and stations, the dry mixture is loaded into a special bunker. The device is connected to water, an electrical supply system, and a compressor, if the latter is not part of the unit. Inside the equipment for mechanized plastering, a mixture with the required ratio of components is prepared, and then it is supplied through a special mortar hose to a distance of up to 20 m. The gun allows you to adjust the feed speed.
The gun must be positioned correctly
Thanks to this device, the station is able to operate continuously for several hours. Instead of a team of workers, plastering the walls can be done by two specialists: one applies the solution to the base, the second levels it using a rule.
We invite you to watch a video showing mechanical plastering of walls:
Using a hopper pneumoshovel
This apparatus is a steel structure in the shape of an inverted pyramid with a volume of 5 liters. With its help, the plaster mortar is transferred to the prepared base. At the other end there is a special lever that allows you to adjust the supply of compressed air and plaster mixture.
The pneumatic hopper has a relatively simple design
During operation, the solution is drawn from the tank. After this, the nozzle of the tool is directed to the wall and, by pressing the lever, is activated. Compressed air ensures transportation of the mixture to the base and its uniform distribution over the surface.
The relatively simple design allows you to apply the plaster using a mechanized method with your own hands. The productivity of such a device can reach up to 60 m²/h. At the same time, mechanized plaster is relatively inexpensive.
Up to 60 m² can be processed in an hour
Attention! The pneumatic hopper for plastering walls differs in design from the same tool for treating the ceiling.
Using a pneumatic gun
To apply the mixture, a special tool is used that allows you to apply the finished mixture to the walls through a short nozzle barrel with a variety of nozzles that ensure the solution is sprayed. A hose with compressed air is connected to the gun, creating the necessary pressure. After pressing the trigger of the pneumatic gun, the solution is supplied to the base being treated. Pressing again stops the mixture.
The pneumatic gun allows you to adjust the mixture flow rate
How to apply plaster with a machine
Before work, the walls must be cleaned of dust and unnecessary elements (boxes, nails, holes). Next, you should definitely prime the surface with a primer that is most suitable for this particular surface - wood, concrete. You also need to take into account the humidity of the room. The primer layer will ensure less moisture and mortar consumption (absorption) by the surface, protect the walls from fungi, and ensure high adhesion of the mixture material.
The next important point: you should definitely apply beacons to the walls - you can either leave them after the plaster layer has been grouted, or remove them by filling up the holes. The beacons (or rather, their thickness) determine how thick the plaster layer will be.
You will find out in this information what is the difference between putty and plaster.
To correctly place the beacons (which the rule will follow when leveling the wall), you need to use a laser leveler, a two-meter rule and a water level.
Next, you need to pour the mixture into the machine’s hopper, add as much water as required for 1 bag (or according to the rules for using a particular machine). Open the valve of the sleeve that will supply the mixture. The nozzle should be 30 cm from the wall. Application is made from the upper left corner of the wall, movement - from bottom to top. The slower the builder's hand moves, the thicker the layer of plaster falls on the wall.
The width of one strip is about 70 cm, after which you need to move the nozzle to the next line - lower, capturing the previous line by 5-10 cm, and so on.
At this time, the second worker can regularly level the applied plaster, periodically removing excess mixture from the rule. In places where there is an obvious lack of mixture, you need to add plaster from the sleeve and again pave the finishing area with the rule. Excess mixture or minor imperfections on the ceiling or baseboard can be corrected separately with a spatula, adding more mixture or removing excess.
In addition, we also recommend exploring other materials for exterior decoration of the house.
It is important to remember that you cannot leave the mixture idle in the hose for more than 15 minutes, and it is also not recommended to use the mixture in the hopper for more than 30 minutes - it will simply lose quality and worsen the operation of the machine due to the mixture beginning to harden.
Machine plastering significantly reduces the cost of work. This is due to accurate calculation of materials - the correct consistency of the working mixture saves resource consumption, and the accuracy of application and speed allow you to avoid loss of the mixture due to accidental hardening, splashing into blots, etc.
And most importantly, the work of builders may not be needed: not a very large amount of work can be done using a machine even by one person; in any case, plastering the walls will take only 1 day. With further grouting and sanding, such plaster will give ideal walls for painting or wallpapering. Not a single goldsmith will do the job better, cheaper or faster than a machine.
The price for machines for plastering walls varies, but on average you need from 120 to 300 thousand rubles or more. However, you can always rent equipment or order a team with an existing unit. The craftsmen will provide the owner only with a price list for services and a request for consumables.
After the plaster layer begins to harden (90-120 minutes), you need to moisten the wall with water from a spray bottle and smooth out all the irregularities with a wide sponge grout. A plaster trowel can also be used. Later, when at least 5 hours have passed, you can bring the wall to a gloss by rubbing it again, after moistening it with water using a wide metal spatula.
It will also be interesting to learn about facing materials for house facades, which are described here.
Using the machine you can apply the following types of plaster :
- gypsum mixture for machine plastering (much cheaper than that for manual work) for finishing finishing work in residential premises - rooms, buildings;
- cement-lime mixture - for the walls of garages, basements, technical buildings, sheds, swimming pools.
Services provided and prices
Cement plaster of walls 510 RUR/sq.m. “turnkey” The use of cement plaster on walls indoors allows you to create a durable, moisture-resistant, frost-resistant layer and strengthen the wall. Cement plaster is not affected by moisture, it can be widely used in bathrooms, in unheated rooms, in basements, basements, technical floors and during facade work. from 280 rub/sq.m. “all work”: priming walls, installing beacons and corners, protecting windows and doors, plastering, glossing, cleaning the room 510 rubles/sq.m. “all inclusive”: delivery of materials, all work, concrete contact, beacons, corners, plaster Make an appointment for a measurement Gypsum plaster of walls 510 RUR/sq.m. turnkey The use of gypsum plaster walls indoors allows you to save on heating and finishing time, since it creates a good thermal insulation layer, which additionally plays the role of sound insulation and fire protection. Due to its porous structure, gypsum plaster performs another significant function inside a heated and sealed room. In those rooms where air circulation is poor and humidity is high, it is able to absorb excess moisture, and when the temperature rises, quickly return it, thereby improving the internal microclimate. from 280 rub/sq.m. “all work”: priming walls, installing beacons and corners, protecting windows and doors, plastering, glossing, cleaning the room 510 rubles/sq.m. “all inclusive”: delivery of materials, all work, concrete contact, beacons, corners, plaster Make an appointment for a measurement Semi-dry floor screed from 450 rubles/sq.m. Turnkey use of semi-dry floor screed indoors has the following advantages: – increased coating strength and surface density; – uniform floor level in all rooms; – complete shrinkage of the floor upon completion of work; – minimum drying time for floors; – you can walk on the screed after 24 hours; – absence of excess water and dirt in the room; from 450 rub/sq.m. “all inclusive”: delivery and unloading of material, all work, Portland M500 cement, washed sand, fiberglass, plasticizer Make an appointment for a measurement
Timeframe for completing work in a 2-room apartment with an area of 65 m2
Day 1 We meet, measure the application layer, calculate the amount of material, sign a contract. Day 2 We deliver the material and equipment. We go up to the floor. We prime the surfaces. We install beacons. Day 3-4 We plaster the walls, slopes, openings, level them, rub them, polish them for wallpapering. Day 5 We do the cleaning. We remove the equipment. We deliver quality work. We issue a work acceptance certificate. Get smooth walls
Equipment of our specialists
Putzmeister MP 25
- Weight – 240 kg
- Dimensions – 1324 x 728 x 1443 mm
- Loading height – 984 mm
- Power – 380V
- Capacity – 55 l/min
KALETA A5S
PFT Ritmo XL
- Weight – 113 kg
- Dimensions – 1300 x 700 x 1400 mm
- Loading height – 960 mm
- Power supply – 230/380V
- Capacity – 45 l/min
PFT G4
- Weight – 250 kg
- Dimensions – 1200 x 720 x 1550 mm
- Loading height – 970 mm
- Power – 380V
- Capacity – 55 l/min