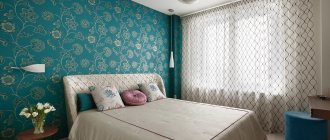
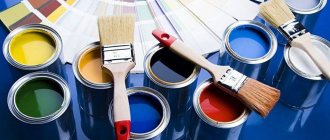
What do they paint?
As a rule, coloring compositions are applied to:
- Smooth or decorative plaster;
In the second case, the work process is clear: you cover the walls with wallpaper and paint them in the desired color. If we are talking about plaster, then you will have to work hard.
Removing whitewash
It is necessary to remove whitewash from the walls as carefully as you remove wallpaper. Poor quality surface cleaning may ultimately prove to be detrimental. All imperfections in the walls will become more noticeable after painting.
A common way to remove whitewash is to soak the coating with water and work with a scraper to the base. Use a warm water sprayer or a large, soft sponge and scraper for this step.
In most cases, whitewash must be removed from the ceiling. You need to stock up on a long-nap roller on the telescopic handle. The surface must be cleaned in two stages. First, moisten the entire area, let the moisture absorb, and then remove the whitewash in sections and immediately use a scraper.
If it is known that the whitewash was applied in one layer, then it can be washed off with a sponge and plenty of warm water. A more “dusty” method is to walk over the dry coating with a wire brush. In this case, you cannot do without a construction vacuum cleaner and a respirator.
Just like for wallpaper, there is a special solution for removing whitewash. This will make the work of preparing the walls in the apartment several times easier and faster.
Removing the bleaching composition leads to severe contamination and the formation of large amounts of dust. Therefore, it is necessary to cover the floor, furniture and other surfaces with protective film, as well as protect the respiratory system and hands using special equipment.
Additional recommendations
Advice from experienced craftsmen will help you do all the work correctly:
- Before performing extensive work on preparing the walls, practice on a small area of them.
- Apply each subsequent layer only after the previous one has dried.
- Do not dilute the putty in large portions.
- When drying the applied layers, avoid exposing them to hot air currents or direct rays of the sun.
- If any textured surfaces (fiberglass, plaster) are painted, they are also primed. Moreover, special adhesive-based compositions are selected for wallpaper.
Knowing how to prepare walls for painting with your own hands , you can save a lot on the services of professionals.
Write in the comments: How did you cope with preparing the walls for painting on your own?
How to remove old paint from drywall
Paint can be carefully removed from a plasterboard wall using sandpaper.
As a rule, no one ever paints plasterboard walls boldly, so in the vast majority of cases they do not need to be cleaned of paint, and minor irregularities or holes can be smoothed out with putty.
If such a need arises, then it is important to remember that by peeling off the paint, you can also tear off the cardboard. Therefore, it is better to carry out cleaning work using sandpaper or washes. Then the wall is dust-free and impregnated with primer. This completes the preparation of the plasterboard base.
Having finished removing the old paint, we will begin preparing the base.
Thank you for reading our article!
Rate the quality of the article on a scale from 1 to 5.
Add a comment Cancel reply
Alexander / 08/06/2019 16:21
My walls did not have any special defects. But I didn’t want to work laboriously. I found a way out. I took glass wallpaper for painting. I simply covered up the defects in the wall, pasted wallpaper and painted it.
Kirill / 08/06/2019 16:22
I simply removed the old wallpaper and primed the walls. When I saw all the flaws, I filled it with finishing compound. Then I painted it. All.
Source: nedvigdom.ru
Removing ceramic tiles and plaster
Cracked plaster coating must be removed to avoid future problems. The old layer will begin to crumble over time and ruin the appearance of the painted wall. Preparing plastered walls for painting will become much easier if the old coating is of high quality and in good condition.
If there are obvious cracks on the surface, then for cleaning you only need a metal spatula, which can easily pick up the separated pieces.
If the coating is high-quality and dense, you will need a hammer drill with a special attachment. If a hammer drill is not available, use a chisel and hammer. This method is also suitable for removing ceramic tiles from prepared surfaces.
The plaster can be removed using a professional sanding machine with a construction vacuum cleaner connected to it. With this device, time is saved and the room is less dirty.
After removing such coatings, the wall requires more thorough preparation for painting. The walls will require leveling and should be re-plastered.
How to prepare walls for painting after wallpaper?
Nowadays you can increasingly find interesting and easy-to-use facing materials, but this does not mean that consumers have given up painting walls. This decoration option is quite simple, and besides, when using it, you can fully express your imagination. Interesting and rich shades can completely transform the room. But everyone knows that paint cannot hide imperfections on the surface. Therefore, it is important to know how to prepare walls for painting after wallpapering.
How to paint walls after wallpaper: 3 steps to a beautiful finish
Today we have to figure out how to paint the walls after wallpapering. We will discuss the choice of finishing materials and solutions to problems that may arise at different stages of this work. Let's get started.
To begin with, let’s analyze the global task facing us into its components.
We have three stages of work ahead:
- Removing old wallpaper with minimal time and, if possible, without damaging the walls;
- Preparing walls for painting;
- Actually painting.
Preparatory process
The walls, of course, differ in structure, and this must be taken into account when preparing. But most often the same procedures are performed:
- Level the surface.
- Get rid of imperfections using putty.
- Clean and prime the surface.
Alignment
To prepare walls for painting after wallpaper or other material by leveling, the surface can be:
- Grind. You can grind a fairly strong base, the level of which changes by no more than 2-3 mm. In addition, it should not have significant defects. This removes the old coating and a small layer of plaster underneath. To do this, use a simple tool: a block with sandpaper wrapped around it.
- Level with plaster. If there is significant curvature of the surface, plastering along the beacons or finishing with drywall is performed.
Important! After the leveling procedure, the walls must be primed and dried for six to seven hours.
- Use drywall sheets. The simplest and at the same time effective way by which you can even out even very crooked walls.
Important! The only caveat when using plasterboard sheet material is a large “cut” of the usable area of the room.
Puttying
The first layer is applied with starting putty, which is sold as a ready-made solution or dry mixture. To apply the starting putty, a fiberglass painting mesh is used:
- Apply 2-3 mm putty to the surface using a wide spatula.
- A narrow spatula is used to smooth out small ridges and spread the solution.
- We put a painting mesh on the wall and rub it into the putty using a spatula.
- Apply starting putty to the mesh with a layer of 2 mm.
- Dry the surface for 5-7 hours.
- We rub down the wall.
Important! Finishing putty is used to get rid of the marks left by coarse grout. Its consistency is uniform and finely dispersed, so the surface ends up being perfectly smooth. In addition, paint does not absorb much into it.
The finishing putty is applied in the same way as the starting putty, but its layer will have a different thickness. The optimal layer thickness is considered to be 1.5-2 mm. When the surface is dry, it needs to be sanded using fine-grained sandpaper.
Padding
To ensure that the process of preparing walls for painting after wallpaper is of high quality, the surface must be primed before applying the decorative solution.
Important! Before applying the primer, the resulting construction dust should be removed from walls covered with finishing putty. To do this, use a vacuum cleaner, dry rags or a soft brush.
Acrylic primer has gained the most popularity. It is universal and can be applied to almost all surfaces.
For priming use:
Important! This coating should dry for 4-6 hours.
After this you can start painting. If the walls were covered with paper, it is important to learn how to paint the walls after wallpapering.
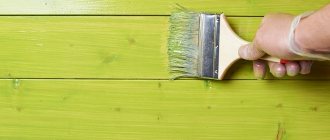
How to apply acrylic paints
Acrylic paints are quite easy to apply. If necessary, to create the optimal consistency, they can be diluted with special thinners for a matte or glossy effect or with plain water.
Depending on the strength of the material, it is applied in 1 or 2 layers. The second layer can be painted on the wall only after the first has completely dried. If you need to paint a large surface area, it is better to use a roller. Although the paint fits perfectly on the wall even when applied with brushes of different widths.
Walls are usually painted only after applying a base coat of paint. But there are a lot of ways to make simple and very effective drawings on the walls immediately when applying the first layer.
Removing old wallpaper
Of course, there are some features that need to be taken into account to ensure a smooth surface.
Important! After removing the wallpaper, there will be glue left on the wall, which is not so easy to remove. But if it remains, the painting may not be successful.
To clean the surface proceed as follows:
- To remove duplex or paper wallpaper, soak it. To do this, use a wet rag or sponge. After half an hour, the paper base is removed using a spatula. If necessary, the procedure is repeated.
- On acrylic, non-woven and vinyl wallpaper, first get rid of the top moisture-proof film. Then you need to proceed as described in the paragraph above.
- The remaining adhesive solution is removed using a spatula.
- A thin layer of primer is applied to the scratches that appear, and then finishing putty.
Important! In order for a metal spatula to become a good scraper, its blade is shortened to a length of 2-3 cm. You can use old tools - the blade is made of thick and stiff metal.
Now you know how to prepare walls for painting after wallpapering.
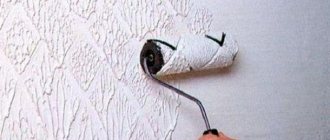
How to paint wallpaper correctly
When producing non-woven wallpaper, cellulose is added, which is processed using special technologies. The canvas has two layers: the inner one is non-woven fabric, the outer one is polyvinyl foam. When buying just these, check, because there are two types of them - paintable and regular.
Wallpaper with a uniform structure is painted exclusively from the front side using a roller or spray. For those who like to experiment, you can paint non-woven fabrics on the inside and, after the paint has dried, glue them to the wall. After drying, the paint will appear on the front side and will have its own specific tone in those places where there is no top polymer - this looks quite interesting.
Non-woven wallpaper will look much more interesting if you paint it first in one tone, and then apply a completely different tone of paint. The first paint will show through under the second in places.
How you want to paint it is up to you to decide, there are many options and there are absolutely no difficulties in doing so. You should never be afraid to experiment, because if anything happens, everything can be repainted again. I think we all loved to paint on the walls as children! Plus, painting wallpaper is a fun activity that the whole family can get involved in. The renovation will be twice as pleasant!
>Video – technology and technique for painting wallpaper
How to get rid of paint?
But what to do if you need to remove the paint itself? It is also quite difficult to cope with:
- Sometimes in this case they use a metal brush with short bristles. But it will not always help, since it can only smooth out the paint layer.
- Most often, it is more effective to use a set of nozzles, which includes scrapers of different shapes. To make them yourself, chisels, wide screwdrivers and spatulas are used.
- To facilitate and speed up the process, use a special nozzle. It looks like a rod with short chains attached to it. A few links will be enough. It needs to be inserted into the drill chuck and clamped. The drill should be parallel to the surface being cleaned. When the drill starts to rotate, the chains will simply knock off the paint.
- You can also use special chemical removers, but they must be used in compliance with all safety measures and instructions from the manufacturer. They give the effect of removing old coating quite quickly.
Important! If paint will be applied to the wall again in the future, it must first be puttied.
Acrylic paints for wall painting: varieties
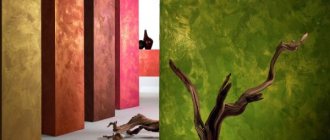
One of the advantages of painting walls with acrylic is the ability to create an original interior and unusual surface design thanks to the wide selection of materials on the modern market. In addition to regular acrylic paint in a wide range of colors, the buyer can purchase the following options:
- fluorescent paint that can glow under ultraviolet light;
- invisible coating, unnoticeable under normal lighting conditions; when illuminated with a UV lamp, the pattern applied with such paint appears;
- pearlescent acrylic paints;
- paints with glitter or metallic effect;
- luminescent materials that accumulate light during the day and emit it at night;
- waterproof coatings for use in rooms with high levels of humidity, for example, in swimming pools or bathrooms; This paint option is often used in kitchens near work surfaces.
Such a variety of choice of materials allows you to paint walls with acrylic paints in almost any room, not only inside, but also outside of buildings. In addition, using acrylic on walls you can create incredible effects that have no analogues when using other materials.
How to prepare walls for wallpaper for painting with your own hands: step-by-step instructions, video
We advise you to take the main topic of our conversation very seriously: how to prepare walls for wallpaper for painting with your own hands .
It’s definitely not worth calling specialists for such work. Preparing walls for wallpaper for painting is done on your own. Even an inexperienced person will be able to cope with the entire volume of work.
Removing wallpaper from wall surfaces
High-quality wallpaper is not easy to remove. To do this, use a proven method of processing canvases with a roller dipped in warm water, and using a scraper or spatula to separate the layers. A more effective way is to use a steamer.
With such manipulations, paper wallpaper is easily separated from the walls. For vinyl and non-woven fabrics, a needle roller is used. Thanks to processing with such a roller, moisture will quickly penetrate the paper base of this type of coating. In both cases, the wallpaper is moistened generously with water. If you cannot clean the surface the first time, repeat the entire procedure again.
To enhance the soaking effect, add household dish detergent or vinegar to the water. For five liters of water, take two tablespoons of the product.
The process of stripping old wallpaper occurs when there is visible deformation of the canvas. Using a scraper or spatula, pick up the edge at the junction of the strips and try to remove the entire strip. Remove the remaining pieces of old coating with a spatula. After wallpaper, the technology for preparing walls for painting involves washing off the adhesive.
The procedure for soaking old wallpaper can be made easier if you purchase a special product at a hardware store. It is diluted according to the instructions, which describe in detail what needs to be done.
Non-woven, vinyl, and paintable wallpaper require more effort to remove from the walls. The use of a steamer, in such cases, is necessary. Hot air heats the canvas itself and dissolves the glue. The surfaces are first passed through with a needle roller. Walls cleared of wallpaper are cleaned of glue residues first with a damp cloth, then the clean surface is passed over dry. This is how the surface is prepared for painting.
On video: how to remove wallpaper from walls.
In cases where the wallpaper cannot be removed, they are left and carefully primed with a deep-penetrating compound, and then the surfaces are puttied.
Why is preparation important?
The benefits of preparatory work should not be diminished. They play a great role in further work and the quality of the result obtained. If the walls are not prepared for wallpaper for painting at all, then the following troubles may appear on the surface of the wallpaper after painting:
- cracks;
- spots;
- uneven color change;
- clear viewing of wall defects (chips, cracks, pits and bulges).
It's a sad picture, isn't it? Especially when you consider the wasted money and wasted time. Such negative aspects can appear even on expensive wallpaper and premium paint. If you think that the surface looks decent and can do without preparation, then you are not immune from incidents.
We hope that the arguments described above have convinced you to carry out surface preparation. If this is the case, then you can move on to the next stage of the conversation. It will describe in detail the preparation of walls for wallpapering for painting.
Removing old coating
Before you start preparing the wall for painting, you need to get rid of the old finish, and this is not easy. Our tips will help you do this quickly and without unnecessary labor.
Wallpaper
At first glance, removing wallpaper is not difficult, but sometimes you have to work hard to get rid of all the remnants of the coating. The base must be cleaned completely, and only then can you proceed to the next stage.
Paper sheets are quite easy to remove. Pry them from below with a spatula and they will easily come away from the surface. If the material has firmly grown into the base, arm yourself with a spray bottle. Fill it with warm water and treat the old finish. Do not skimp on water - the more the wallpaper is soaked, the better. When the paper gets wet, it can be easily removed with a trowel.
Modern options are non-woven, vinyl ones cannot be removed so easily. Such wallpaper, especially the latter, is almost impossible to get wet through. Therefore, all that remains is to literally “punch” the way for the water using a toothed roller or knife. Moisture will penetrate through the damaged surface and soak the dried glue. If the toothed roller fails, a steamer will come to the rescue, of course, if you have one at hand.
Try replacing the steamer with a powerful hairdryer. Warm the moistened problem areas with it and remove the sheets with a knife.
If your household does not have such units, you will have to prepare yourself for the long and painstaking process of scraping off wallpaper and glue. If you need to clean the wall down to the concrete or brick base, you have every right to skip this unpleasant process and remove the wallpaper along with the old plaster.
Whitewash
Cleaning walls from whitewash is an incredibly difficult and tedious task. It is necessary to get rid of even the reminder that this material was present on the walls. Remains of lime or chalk will not allow the new finishing layer to be applied evenly and efficiently. A lot of pellets will form on the walls that will need to be cleaned off.
The following will help completely remove whitewash residues:
- warm water - spray the wall with a spray bottle and remove the composition with a spatula. Water is quickly absorbed, so you need to repeat wetting from time to time. Compositions that do not contain special hardeners and other additives can simply be washed off with plenty of water;
- tools that can be used to scrape off whitewash - a grinder, sandpaper, an iron brush and a spatula. During grinding, a large amount of construction dust is generated in the room. From time to time you should take breaks and leave the room until the suspension settles;
- a folk remedy consisting of soda, crushed laundry soap and water. A thoroughly mixed solution is applied to the surface, after which the finishing layer is removed using a spatula or sponge.
The main requirement is thorough cleaning of the base. If you do not pay due attention to this stage, you will have to say goodbye to the dream of beautiful walls.
Plasters and ceramic tiles
Old plaster can sometimes be left behind. If there are small defects, it is more profitable to simply repair them and thereby save a lot of money. Sometimes the putty comes off and voids form between it and the plaster. Then you can remove only this thin layer, after moistening it with water. If, after a thorough study of the formation, you find places of shedding, this is a sure sign of the presence of voids. It is better to get rid of a weak foundation. Often the problem is removing stubborn areas, but don't let that fool you. It is impossible to guarantee their reliability subsequently.
The tiles must be removed along with the tile adhesive. Cleaning the walls from ceramic cladding is done using a hammer drill equipped with a chisel-shaped attachment. First, the tile is knocked down, then the fixing material is removed. If there are defects in the exposed layer of plaster, you need to clean it down to the concrete base. There is no need to give up durable coating.
Old paint
The paint is removed using special solvents. The composition must be applied to the wall, then scraped off with a spatula. It is not recommended to cover old paint with new one, since it is impossible to guarantee a perfect result.
A hair dryer will be an excellent helper. When the painted area is heated with hot air, the paint swells with bubbles and is easily removed.
Surface preparation steps
There are no difficult moments in the upcoming work. The main rule concerns the consistent implementation of all stages and listening to advice.
Preparing the premises
The essence of this stage is to remove the furniture and dismantle the baseboards. It is also recommended to cover the floor with polyethylene. The protective film should also be placed on the windowsill and window. Such precautions will provide protection for expensive elements and reduce the time required to clean the room. Sockets must be de-energized for safety.
Working with the surface
The initial preparation of walls for painting after wallpaper involves removing the old decorative coating. There should be no wallpaper, paint or other covering. Wallpaper intended for painting cannot be pasted onto such a surface. Vinyl and non-woven fabric will not stick at all, and other wallpaper options will come off after a short time. You shouldn't tempt your fate.
We identify and remove fungus
Preparing walls for painting after wallpaper must include this item. If the fungus is not identified and removed before wallpapering, it will certainly appear on the finished wall in the future. The fungus loves to live in corners, so these are the places that need to be carefully examined. When these harmful organisms are identified, it is necessary to treat the surface with special means, but first it is necessary to remove the layer of old plaster along with the primer.
Moisture Test
Many builders simply underestimate this stage. Very in vain, by the way. If the wall is damp, the wallpaper will not adhere well and will eventually fall off. Especially after re-painting. And the likelihood of fungus appearing on wet surfaces is much higher than on pre-dried ones.
To determine the presence of high humidity in the wall, it is necessary to conduct a simple experiment. We take a small piece of cellophane and glue it on all sides to the wall with tape. Leave the structure in this position for 12 hours. If drops of water appear on the cellophane, then the wall needs to be dried.
Ways to level walls
Under the old finishing layer, a surprise may await you in the form of uneven walls. For high-quality painting of walls, a flat base is necessary. It is not advisable to proceed to the next steps if this condition is not met. There are various ways to level walls, each of which will be optimal in each specific case. Surfaces can be adjusted using plaster, putty or drywall.
Drywall
A great way to quickly level up. Smooth material does not require plastering. The paint can be applied directly to gypsum boards, or to a thin layer of putty. For large rooms this method is ideal. But it is worth mentioning that to cover walls with plasterboard, you need to build a frame of metal profiles. The structure will serve as a basis for sheets of material, but at the same time it will “eat up” a lot of space. It is better not to resort to this technology if every cm is important to you. The material is not strong enough, it is impossible to place heavy suspended structures on it.
Plaster
Plaster is the most successful intermediate finishing option if the walls are to be painted. It is applied directly to the wall and allows you to create a perfectly flat surface. To form a thick leveling layer, work is carried out in several stages using beacons.
Step-by-step instruction:
- Mark the wall by setting and fixing landmarks at 60 cm intervals using a plaster mixture.
- Apply a primer to improve the adhesive properties of the surface.
- Prepare the solution by combining the contents of the bag with water according to the instructions.
- Apply the mixture to the surface using sharp strokes using a trowel.
- Spread the plaster using the rule. Your movements should be short and zigzag.
- We glue strips of façade mesh or fiberglass and leave the wall until completely dry. This must be done to prevent cracks in the finish coat.
Do not try to achieve a perfect surface with plaster. This is the function of the next layer - putty.
Putty
Sometimes you can do without plaster altogether. Replace it with putty, which comes in the form of a dry mixture. On relatively flat walls it is enough to apply two layers of this material.
Before you start puttingty, you need to prime the wall. This can be done with a roller, but a spray gun can handle this task faster and better. Next, apply the putty using top-to-bottom movements. After drying, sand each layer with a spatula. It is necessary to eliminate transitions and tubercles formed during the distribution of the composition. The second layer is sanded using 150-grit sandpaper attached to a special platform. The next step is re-priming the wall and gluing the fiberglass.