There may always be a desire to update the interior of your home, but there is not always the financial opportunity to make your desire come true. Therefore, there are various alternative options for replacing expensive materials with more affordable ones. One such option is to imitate marble with putty. This may seem like a fairly simple process that can be done quickly and easily on your own. But in fact, not everything is so simple.
Firstly, for the best effect, it is better to use not ordinary putty, but a certain composition that includes additional natural components.
For example, option 1 will be needed:
- Dry putty - 2 liters.
- Liquid soap – 30 grams.
- Marble chips 1 pack
- Water 200 ml
- Dye.
After mixing, you get a kind of not too thick plaster.
Option 2 will be needed:
- Dry putty 1.8 l,
- Marble chips 1.8l
- Soap base 30 g.
- Flaxseed oil, 360 ml.
- Water 180 ml
- Mineral dye
Putty is a universal and multifunctional construction product. It is used both for interior work around the house and for the facade. Thanks to its versatility and functionality, putty can be used to implement any of the most daring ideas. This material is suitable for almost any interior. Imitation of marble with putty is carried out in stages.
How to prepare the composition
The main task that arises when making a homemade analogue of “Venice” is to achieve the same consistency and smooth texture from the plaster.
Those. There should not be that slight roughness that is inherent in gypsum. Acrylic varnish will help us with this. When varnish is applied to a wall, a glossy film is formed. But if you mix simple gypsum putty on it, you will get a solution very similar to Venetian plaster from the store.
And this is not surprising, because it is also made on the basis of acrylic copolymers.
Of course, it also contains ground marble and other components that allow it to achieve a striking resemblance to natural stone. But in our case, we will get a good alternative for covering walls with smooth color transitions and translucency. And all this can be done inexpensively.
Pros:
- availability, acrylic varnish and gypsum putty are available in many construction stores;
- low price;
- suitable for wet rooms - bath, toilet;
- wet cleaning of walls is possible.
Features: dries quickly, cannot be left on the next day, the entire prepared volume must be applied to the wall. When working on volumes over 10 sq.m. You need to work together or mix a small amount of material.
Also, do not forget to stir the plaster in the bucket every half hour. This prolongs the pot life of the solution.
So, for work we need:
- Acrylic lacquer. Any water-based varnish for interior work is suitable, for example, Tikkurila Paneeli Assa, Dali or cheaper ones. Acrylic primer is not suitable for making “Venetian”. It is too liquid, it will not give the plaster the required strength and, accordingly, the finish cannot be polished to a shine.
- Finishing putty. Any polymer or gypsum dry mixture that contains filler - marble flour or microcalcite. Suitable brands: Knauf Polymer Finish, Osnovit Ekonsilk, Bergauf Finish Polymer, Weber LR+ and their analogues. It is also possible to use putties on white cement.
- Color. We take a universal one for water-dispersed paints or for decorative plasters. Color - whatever you like, ivory, peach or other calm shades. I worked with tinting pastes of the Tury, Palizh, Design Color brands, in general, there is no difference.
The sequence of actions when mixing Venetian plaster from putty will be as follows. Recipe for 1 liter of varnish:
- Take a 5 liter plastic bucket.
- Pour acrylic varnish into a bucket and dilute it with water by 10 - 15%. Those. add 100-150 grams of water to 1 liter of varnish.
- Next, add putty - approximately 2.5 kg of dry mixture.
- Mix the material well using a drill with a mixer attachment.
- Add color until the desired shade strength is obtained. Usually this is no more than 10% of the volume of the “Venetian”. Mix again.
- The result should be a mixture with the consistency of regular putty.
To extend the life of the plaster mixture, you can add some gypsum plasticizers to it.
Painting work
Walls can be painted using brushes or rollers. Using paints you can create a variety of designs and patterns.
To imitate marble you need paint of 3 different colors. One shade will become the background. The color of this paint is selected taking into account the predominance of which shade should be obtained. It is recommended to buy paint with a glossy, semi-gloss or semi-matte sheen. But the base background should always be the darkest shade. To obtain a lighter background, apply white paint or a material with a small amount of impurities of other colors.
Walls with a combination of yellowish-white, light gray, and yellow-brown shades will look great. For example, to imitate the popular green marble, dark green, gray-green and black paint are used. The most difficult part is creating the veins that are a feature of marble. They are made with paints of colors close to white.
If necessary, you can use shades of light green and light gray. These colors are more contrasting. You should adhere to the principle that 2 additional colors should be close in shade, and one color should act as a contrast.
Application technique
One liter of varnish will yield about 3.5 kg of finished plaster, which is enough to decorate 8 m2 of wall.
Consumption per 1 m2 is equal to 400-500 grams of the finished mixture.
In our case with imitation, the application technique will be completely similar. I won’t repeat myself, I’ll just highlight the main points:
- The walls are leveled and primed before plastering.
- The first layer of “Venetian” is applied with a metal trowel in multidirectional movements, the putty is leveled to a thickness of 1 - 2 mm. They leave small layers of strokes without smooth joining lines.
- Make sure that the material on the instrument does not dry out, otherwise lumps will leave marks on the decorative plaster. Clean the trowel blade from time to time.
- After 1.5 - 2 hours, apply a second layer to enhance the depth of color. The same composition is used. Its thickness should be 0.5 - 1 mm. Dries quickly, about 15 - 20 minutes.
- The third layer is applied “to scratch” as if finishing putty was being applied.
- After half an hour, when the entire surface has dried, they begin sanding. Using the finest sandpaper, we clean all the bumps and protrusions on the surface. We remove the dust.
- Using a spatula or trowel, we polish the “Venetian” - we hold the tool at an acute angle to the wall and drag it across the plaster with force, as if smoothing it. At this stage, gloss will already appear.
- Rub in wax for decorative coatings and polish it with a soft cloth.
This is how you can create beautiful decor with your own hands without ready-made purchased materials, while saving a lot.
Do-it-yourself decorative plaster from putty: mixture recipes and application methods
All about homemade decorative plaster paste
New technologies open up wide possibilities for wall decoration. Pronounced or, on the contrary, slightly noticeable textures, imitation of wood, fabrics or leather - all this is possible when using structural plaster materials. Their selection is very wide. A significant disadvantage is the high cost of such decor. Let's look at how to make decorative plaster from ordinary putty with your own hands.
Features of finishing material
The sought-after coating is durable, environmentally friendly, attractive in appearance and has a long service life. It successfully imitates a variety of textures, is repairable, and can be repainted over time if desired. All this is thanks to the special composition, which includes three main elements.
- The binder is also the main component. It can be cement, lime, gypsum, silicate glass, acrylic, silicone, etc. Determines the basic properties of the finished solution.
- Filler. Responsible for the texture and decorative characteristics of the composition. For mineral bases, various fractions of sand and stone chips, shell fragments, etc. are used. Synthetic fillers and stone powder are used for polymers.
- Plasticizer. Various substances that increase the viscosity, elasticity and adhesion of finishing paste.
To give the required shade, pigments are added to acrylic, silicate and silicone pastes. All others are painted after application to the wall. Multi-color painting looks especially good
There are several main types of finishing plaster mixtures.
- Textured. Contains special impurities that form an original relief during application.
- Venetian. Imitates noble natural stone of various types.
- Flock. Contains flocks or multi-colored decorative flakes that are applied to a damp base. After drying, it is covered with a layer of protective varnish.
Putty for decorative plaster: how to do it right
To imitate an expensive coating, you can use any putty. It is made on the basis of cement, acrylic, gypsum, etc. Most often the last option is chosen. You just need to remember that gypsum surfaces are hygroscopic. They absorb water and deteriorate, so this decor cannot be used in rooms with high humidity. In addition to the varieties of the main component, putty mixtures are divided into several types.
- Starters. Initially intended for leveling fairly large base defects. Include coarse additives, which makes the hardened material rough.
- Finishers. Used for final leveling. The filler is finely dispersed, so the cured coatings are perfectly smooth. They have less strength than the starting ones.
- Universal. Combines the properties of both varieties.
To make decorative plaster from ordinary putty, finishing paste is often used, especially if you plan to make an analogue of the Venetian.
For textured varieties, you can choose a universal or even starting mixture. The variety of relief is achieved not only due to the difference in composition, but also due to the method of application.
Venetian and its variety Versailles plaster are applied only to a perfectly leveled base. For them, finishing material is used, which is laid in a layer of no more than 3 mm. Then, using a trowel or spatula, the design is applied in chaotic strokes. After drying, the surface is first cleaned with a spatula, then sanded. So that you get a relief, but at the same time quite smooth coating.
Textured decors are imitated in other ways. To obtain a “bark beetle” type coating, coarse sand or stone chips are added to the composition in a ratio of 1:4. The solution is applied to the wall and allowed to dry, after which it is smoothed with a grater. The tool moves the filler from its place, thereby forming a relief.
The structure can be obtained using special tools and devices. It's pretty simple. The putty mixture is applied to the base, after which a textured pattern is applied to a flat surface. This can be done with a roller, any device or a regular stencil. Let's figure out what is used for this.
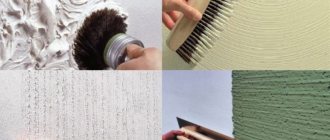
Tools for applying texture
The appearance of the coating depends on the device used to apply the design to it. For such work, choose one of the tools below.
Rollers and stencils
The easiest way to work is with a roller. It is rolled over the base, leaving a mark in the form of a pattern or small pattern, which form the texture of the coating. The tool is installed at the top of the wall and smoothly lowers down. The pressure should be minimal, otherwise the quality of the print will suffer. It also depends on the material from which the device is made:
- Rubber. A relatively soft base that gives a clear indented or raised impression. The downside is that the mixture sticks to the instrument.
- Tree. Similar to rubber, with the difference that the solution does not stick to the work surface. But it dries quickly on it, so regular cleaning is required.
- Leather. Used to imitate the texture of natural stone when working with Venetian.
- Plastic. Experts do not recommend using it, since the plastic cracks and leaves flaws on the plaster.
- Pile fabric. The size of the pile determines the resulting relief. Before purchasing, it is recommended to test how firmly the fibers are held in the base. If they fall out easily, you should look for another device.
Types of Venetian putty
Today, this finishing option is used everywhere. As a rule, depending on the purpose, the following options for technical devices for covering walls differ:
- mineral solutions , with the addition of appropriate components;
- acrylic compositions , where acrylic resins are used as the basis;
- silicone substances , where synthetic resin is used;
- silicate solutions , where liquid glass is used as a basis.
Additionally, one should highlight a type of plaster such as “Bark Beetle”, which subsequently, after application, does not require additional processing, since the composition contains special granules, which, when hardened, acquire the structure of a stone.
IMPORTANT. WHEN SELECTING SUCH SUBSTANCES, YOU SHOULD UNDERSTAND THAT THERE ARE COMPOUNDS EXCLUSIVELY FOR EXTERNAL WORK, AND IN ADDITION, THERE ARE SOLUTIONS FOR INTERIOR FINISHING.
How to beautifully make imitation marble from ordinary putty
There may always be a desire to update the interior of your home, but there is not always the financial opportunity to make your desire come true. Therefore, there are various alternative options for replacing expensive materials with more affordable ones. One such option is to imitate marble with putty. This may seem like a fairly simple process that can be done quickly and easily on your own. But in fact, not everything is so simple.
Firstly, for the best effect, it is better to use not ordinary putty, but a certain composition that includes additional natural components.
For example, option 1 will be needed:
- Dry putty - 2 liters.
- Liquid soap – 30 grams.
- Marble chips 1 pack
- Water 200 ml
- Dye.
After mixing, you get a kind of not too thick plaster.
Option 2 will be needed:
- Dry putty 1.8 l,
- Marble chips 1.8l
- Soap base 30 g.
- Flaxseed oil, 360 ml.
- Water 180 ml
- Mineral dye
Putty is a universal and multifunctional construction product. It is used both for interior work around the house and for the facade. Thanks to its versatility and functionality, putty can be used to implement any of the most daring ideas. This material is suitable for almost any interior. Imitation of marble with putty is carried out in stages.
Preparation of working tools
Before you can make Venetian plaster yourself from ordinary putty, you need to prepare a working tool. To complete the work you will need:
- At least two plastic buckets.
- Drill with a nozzle for mixing the solution.
- Steel graters 25x25 cm.
- Spatulas with rounded corners.
- Sanding material or sanding float.
- Brushes.
- Construction level, ruler and pencil.
- Scotch.
- Sandpaper.
- Sponge.
- Respiratory and hand protection.
After you have assembled your tool, you need to prepare the surface.
Multicolor plaster
Making a multi-color coating with your own hands is not particularly difficult. The process consists of a number of stages, each of which ends with grinding. This gives the desired texture.
In order for the treated area to have the selected colors, the appearance of granite or marble stone, it is necessary to combine different colors and their shades.
To add shades, it is better to divide the mixture into parts. When adding dye, you need to calculate its amount. In order not to make a mistake in the proportion, you need to take a piece of plywood or cardboard and apply the solution to it exactly as you would on a real surface. If you are satisfied with the experiment, then you can begin applying the solution.
The first layer will be the base and it is applied over the entire wall, regardless of its color. This color fills all surfaces or depressions in the treated area. The layer should be applied as thinly as possible to ensure a smooth transition to another color.
The next layer with its own shade is applied on top of the first layer.
Preparing the mixture
An alternative to ready-made compositions, the purchase of which is associated not only with financial costs, but also with time delays in deliveries from foreign manufacturers, can be the preparation of Venetian from available raw materials - acrylic putties from Russian manufacturers. Putty for Venetian plaster is prepared using two or more containers: about 60-70% of the base (acrylic putty) is tinted using light acrylic or natural dyes, mixed until a uniform shade and creamy state is formed, the rest of the base is mixed with a darker color and achieved similar effect.
The mixture dries quickly and should be used within a few hours as... After hardening, it is only suitable for discarding.
To prepare a textured mixture, you can add marble chips or quartz sand and mix thoroughly to obtain a homogeneous mass. It’s easy to understand how to make a Venetian from putty, but to achieve the intended decor you will have to experiment with the amount of coloring pigment. When making a coating with your own hands, you will have to prepare a piece of the wall for experiments: when mixing and applying layers, the final shades may be far from intended, the number of layers must be calculated after the fact.
If you make the mixture yourself, you should experimentally paint a small area in 2-3 layers and wait until the coating dries. Wet and dry coatings look different, and the required number of layers can be determined.
Rules for applying the first layer
Special attention is paid to applying the first layer, since it is the basis of the work. It is performed in the following sequence:
- Application begins from any upper corner.
- The putty is applied in small doses onto a spatula. It is applied to the surface in small strokes in different directions. The frequency of application and form can be any.
- The spatula must be kept close to the application area. There is no need to rush when doing the work; it takes a lot of time.
If an accumulation of mass appears upon completion of the smear, then it must be dispersed to the sides with a spatula.
- In the lower corners, work begins from the bottom up according to the same principle.
- After applying the first layer, the surface should dry. This can last from several hours to a day. This depends on the thickness of the plaster, the humidity in the room and the ambient temperature.
- To apply the second and subsequent layers, it is necessary to sand the first layer. Using a fine mesh or sandpaper, only clearly visible protrusions are sanded. After sanding, dust and dirt must be removed. The second layer of plaster is applied with a spatula tilted at 30 degrees.
This is the creative part of the work, since the surface pattern will depend on the size of the spatula and the direction of acceleration of the mixture.
It is very important to know that after the next 3-4 strokes, the tool must be cleaned from adhering plaster with a wet rag. If particles of dried plaster get onto the treated area, it will cause scratches and unevenness.
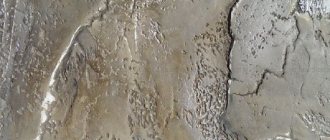
Do-it-yourself marble putty: step-by-step instructions
Decorative plaster of walls with a marble effect is an interesting and currently in demand method of interior design. You can buy ready-made building mixture in the store, but its price is quite high - you can save a lot on repairs if you prepare the marbled putty yourself.
What tools and materials will be needed
To putty walls, use a simple set of tools - with their help you can get the job done efficiently
The main component of the self-prepared mixture is acrylic putty. This universal, multifunctional material is used for interior and exterior work and is distinguished by its plasticity and trouble-free application on any surface.
To obtain an imitation of marble, 2 types of coloring pigment in contrasting shades are prepared. During the work you will also need:
- two containers for preparing the solution;
- drill with a special attachment;
- spatulas;
- sandpaper;
- soft brush.
Sequence of work
The main secret to success in this creative work is to prepare high-quality materials and take your time
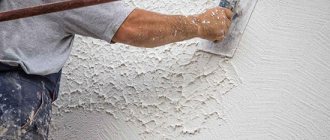
The first stage of finishing the room is preparing the wall. The surface is cleaned of dust and old materials, then degreased. All irregularities are smoothed out, holes are sealed with gypsum plaster or cement-sand mixture. After the walls have dried, the main stage of work begins:
- A mixture of putty and coloring pigment of different shades is prepared in two containers: dark and light.
- A small amount of a light-colored mixture is scooped onto a wide spatula and applied to the wall in small strokes. Work starts from the top corner. Strokes are made in different directions for uniform application.
- After the first layer has dried, the wall is sanded with sandpaper. The resulting dust is cleaned off with a brush.
- Putty of a dark shade is applied at an angle of 30 degrees, spreading in different directions - chaotic movements help to achieve the effect of a marble surface.
- The dark layer is dried and the final stage is started: a thin layer of white putty is applied to the wall, through which the dark base will appear. After drying, the finishing layer is sanded.
- The wall, decorated with marble putty, is covered with varnish or special wax. This technique will give the surface a glossy shine that imitates natural stone.
Finishing
Having finished applying Venetian plaster with your own hands, you need to treat the area with wax. This will add special beauty and depth to the entire surface, protecting it from external influences, dust and dirt.
Adding bronze or silver filler to the wax will give the plaster a metallic tint.
- Wax is spread on the surface to be treated with a soft rag or napkin. If the wax is very thick, then a spatula is used for application. Having finished applying the wax to the surface, slowly rub it in until the wall becomes glossy.
- Venetian plaster is very popular when performing finishing work. You can prepare it at home with your own hands and there is no need to go to the building materials store for it.
About the material
Venetian plaster is a finishing material for walls and ceilings that has come down to this day from time immemorial and has not yet lost its relevance. Venetian plaster, which imitates natural coatings of granite, marble or malachite, is especially popular. First used in ancient Rome, the composition included marble dust (construction waste) and lime.
After drying, the surface with this composition resembled natural rock, which was beautiful and practical.
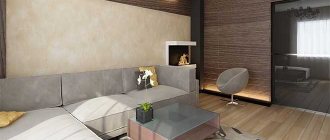
In modern design it is actively used to create an atmosphere of luxury and give the interior status. For this purpose, additives are used that imitate precious metals, ancient trees and stone masses.
In addition to its outstanding appearance, this finish is very durable; the service life of the coating is measured in tens of years.
The walls under the coating do not accumulate moisture, breathe, and environmentally friendly materials are used in the compositions. The cost of compositions from elite manufacturers is high, but there is an alternative way to obtain the material of their acrylic putties with the addition of coloring pigments.
Preparatory activities
The number of preparatory stage operations depends on the quality of the wall material and their current condition. First of all, the previous coating must be removed until a reliable base is exposed.
When removing paper or non-woven wallpaper, to speed up the procedure, they should be moistened generously with a hot solution of soap and water. After 15 minutes, use a spatula to carefully remove any loose pieces.
Large defects, potholes and joints of slabs, uneven brickwork should be repaired with ordinary gypsum-based putty. Then carry out priming, it is advisable to do this in two stages. The first treatment will saturate the wall material, this is especially important for reinforced concrete; the second layer will prevent moisture from being drawn out of the final coating.
Small potholes, up to 2 mm deep, do not need to be repaired; the finishing coating will cover these defects without causing damage. Venetian plaster, and indeed plaster in general, is rarely used for finishing wooden walls, but if necessary, you should purchase a primer with antiseptic properties and fire-retardant impregnation.
For very crooked walls, you should think about leveling with plasterboard and then applying a finishing layer over it, because Leveling with plaster will be completely unprofitable. When carrying out finishing work in a new house, you should remember about possible sedimentary deformations in the first few years.
It is not recommended to decorate walls with expensive original coatings in newly built houses. The settlement process and settlement will lead to the appearance of cracks and the need to do the work again.
When carrying out the preparatory stage, it should be remembered that the quality of the base determines the durability, beauty and costs of finishing materials, so it must be carried out thoroughly, following the process technology and maintaining the required time frame.
Composition and technical characteristics
This type of material has a rather complex composition, which varies depending on the type of plaster. Let's take a closer look at the main components that are present here:
- dry mixture, which is also used in the manufacture of ordinary plaster for wall decoration;
- mineral additives, if we are talking about the appropriate version of the composition for coating structural elements;
- components such as acrylic resin, synthetic resins, and also liquid glass may be present;
- pigment is added separately to the composition , which gives the coating a certain color range.
Separately, it is worth highlighting the presence of the required amount of appropriate sand, and in addition hardeners, which allow the substance to have a strong and solid structure after hardening. Such devices are characterized by fairly high adhesion.
They dry quickly and, unlike conventional mixtures, do not crumble under mechanical stress. In addition, this finish is moisture resistant and easy to apply.
IMPORTANT. THIS SUBSTANCE IS RELIABLE AND DURABLE, BUT THESE EFFECTS ARE ACHIEVED ONLY AFTER COMPLETE CURING AND APPROPRIATE PROCESSING.
Consumption per 1m2
This substance is consumed depending on how it is applied. As a rule, the consumption is directly influenced by the thickness of the applied layer, as well as the need to level the surface.
If you have average values, and in addition appropriate application by a specialist, you can achieve 500 grams or less of the finished solution per square meter of surface.
If the surface is leveled, and the work is performed by a beginner, then up to 600-800 grams of the prepared solution can be spent on this area. The factory setting is 350-450 grams.
We imitate veins
Mix the darkest shade of all selected with the glaze in a ratio of one to four. Using the prepared solution, paint veins on the painted surface using a brush with a long pointed end. Using a brush, we draw heterogeneous interrupted lines, similar to veins on a natural marble surface.
In the same ratio, mix the glaze with the lightest shade of paint. Lightly dip the pen into the solution and draw it across the surface with a small crosshatch. If somewhere the lines turn out to be too obvious and noticeable, you can shade them a little with a sponge.
Tips and recommendations for use
To properly apply such a substance to the surface, it is recommended to adhere to the following series of tips from experts and manufacturers:
- it is necessary to use a small container for work so as not to rush during the application process;
- when arranging the surface, the coating should be carefully leveled so that there are no protrusions;
- Before applying the solution, the surface should be moistened for better adhesion to the surface;
- The composition must be thoroughly mixed before direct use.
Taking into account a number of these recommendations, you can correctly apply the coating to the wall, and then give it the decorative effect of stone.
Conclusion
Using putty for decorative plastering of surfaces allows you to significantly save on finishing. At the same time, the appearance of such a coating and its durability are not inferior to special decorative mixtures and textured paints.
I recommend additionally watching the video in this article, which clearly shows the process of applying Versailles plaster. If any points raise questions for you, leave them in the comments and I will be happy to answer you.
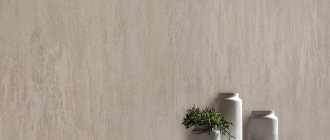
Marble is an elegant building material. With such a surface, any room looks elegant and sophisticated. But not everyone can afford marble interior elements. However, the same result can be achieved using certain technologies that create an imitation of marble. How to create such a surface? Let's look at this later in the article.
Classic finish
The standard version of Venetian plastering involves sequential application of 3 layers of plaster to the surface. The first is basic, laid directly on the base:
- a portion of the material of the main shade is applied to the edge of the trowel (this operation can be conveniently performed using a metal spatula);
- the tool is pressed against the wall in this way, raising its front edge by the thickness of a finger;
- With multidirectional strokes, the plaster is applied to the surface in a thin layer.
Plaster the wall in separate sections of up to 1 m2 each. Moreover, each of them overlaps each other by 0.5-1 cm along the demarcation line. After applying the base layer, you can let it dry, but this is not necessary: laying the second layer “wet” allows you to get smooth shade transitions.
- The second layer is formed from Venetian of the same composition. Layer thickness – 0.5-1 mm. After about 15-20 mm it dries and a third layer is applied to it. The technique of its application is reminiscent of finishing putty.
- After half an hour, the master arms himself with sandpaper and treats the entire surface with it, removing all the tubercles. Then, holding the trowel at an acute angle to the wall, he drags it forcefully along the plaster, as if smoothing it. A gloss appears on the Venetian.
- After plastering is complete, the dried Venetian can be coated with decorative varnish or wax. This treatment increases the strength and wear resistance of the finish. You can apply a protective layer with a sponge, soft spatula or mitten (this option is only suitable for wax).
- To obtain veins, when laying the second layer, apply white and colored mixtures to the trowel simultaneously (without mixing). A two-color portion is applied to the base layer with long continuous strokes parallel to each other.
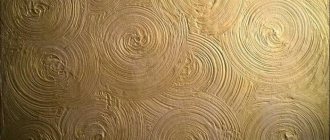
Textured Venetian
This application technique differs from the previous one:
- First, a covering compound is applied to the penetrating primer. It enhances adhesion;
- after 1.5-2 hours, apply a thin layer of Venetian with a fur roller. It is allowed to dry for 2-3 hours and the sharpest protrusions of the plaster are removed using a spatula;
- Using a trowel, apply the next layer, creating a semblance of islands. In this case, the tool must be in contact with the base layer with its entire plane. The thickness of the coating is no more than 1 mm. Drying time – 5-6 hours;
- the surface is cleaned with a spatula;
- the finishing layer is applied. Finishing varnish is added to the mixture. Apply with a wide spatula in a very thin layer;
- after 5-6 hours they begin polishing the decorative coating (iron plating). The operation is performed with a Venetian trowel until a metallic sheen appears on the plaster.
The result should be a matte finish with glossy areas.
Setting up the craquelure
To age the finish, a special varnish is applied to it. As it dries, it will pull off the outer layer of the Venetian, and unevenness and small cracks will appear on it. These defects do not affect the durability of the plaster.
The top of the “antique” wall is coated with protective varnish.
- Another way to create craquelure is to dry the surface layer of the Venetian using an infrared emitter, reflector or hair dryer. At the same time, it is necessary to constantly keep the process under control: as soon as cracks appear, heating is stopped. With further natural drying, the cracks themselves will increase.
- Next, a plaster mixture painted dark gray or black is rubbed into them using a dental spatula (you can also use dark red lead). The remaining filler is wiped off the wall with a sponge and a thin layer of colorless translucent Venetian is applied.
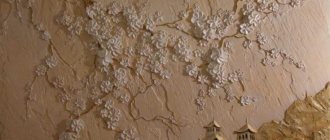
Marble effect
Venetian marbled plaster must be applied in random strokes. 10 minutes after finishing work, use a trowel to give an arbitrary relief.
- The second layer can be performed no earlier than 2 hours later. This is the application of a tint coating. The composition of different shades is applied and mixed onto the blade of a wide spatula. There is no need to achieve uniformity. The mass is applied with pulling strokes. After 5 minutes, you can level the coating using a trowel.
- After a day, you need to sand the coating using sandpaper or a sanding machine. After that, polish with a stainless steel spatula. At the final stage, the Venetian is coated with wax. After 50 minutes, polish again with a machine with a soft nozzle. After such actions, the coating acquires a unique gloss on the wall.
Main advantages
- Putty belongs to the category of universal multifunctional building material.
- Used for both residential and industrial premises.
- When using Venetian plaster, any design solution can be realized.
- The finishing material goes well with any interior style.
- Putty has a wide color spectrum.
- When using finishing on the walls there are no joints or seams, which makes the surface of the walls and ceilings perfectly smooth.
- Thanks to its long service life, the finishing material is widely used in restaurants, office buildings, and shops.
- When exposed to direct sunlight, the material does not fade and has its original color background.
- Venetian plaster is waterproof.
- Decorative plaster got its name due to the fact that from a universal putty you can create a real masterpiece that will resemble natural marble or rare types of wood.
- Before you start finishing work, you should know that the modern “Venetian” coating is transparent. Using a special application method, specialists create a marble effect.
- In order to achieve this effect, decorative material is applied to the work surface in small strokes from 5 to 10 layers. For work, use a triangular stainless steel spatula.
- After the surface has dried well, natural beeswax is applied to the plaster, which is transparent.
Preliminary stage
One of the basic rules for wall finishing is surface preparation. The wall must be absolutely clean and level. Initially, it is necessary to clean the surface of the old finish and degrease it. Afterwards, if the wall has defects and unevenness, it needs to be leveled and the cracks filled with gypsum plaster. You can use regular sand-cement mortar. But a quick effect (drying) is achieved by a mixture of gypsum. The surface will dry completely in a couple of days.
Application area
Venetian putty is used only for finishing the interior space of premises. It is not recommended to apply it to an unprepared surface, especially in rooms with high humidity.
It is equally applicable both in living rooms and in administrative premises, including shopping centers and offices. It can be used to decorate not only vertical surfaces, but also the ceiling, as well as individual fragments.
It is important to consider that the texture and shade of the plaster mixture must correspond to the interior concept.
In small rooms, it is undesirable to use bright, saturated colors. You can achieve an aggressive effect, with a visual reduction in area. Despite its relative resistance to external factors, it is not advisable to apply Venetian putty plaster near sinks, kitchen sinks and stoves.
They are combined with brick or stone masonry, as well as wood. Depending on the style of the interior, the type of material is selected.
Types of Venetian plaster
Despite the generalized name, this type of plaster has several varieties. They differ visually in their textures. Venetian can be smooth, matte, embossed, glossy and so on.
Further, it is customary to classify it depending on the type of base and binding component:
- Mineral is available in the form of a dry mixture with special additives. Thanks to this, you can achieve a textured and elastic surface;
- Acrylic contains acrylic resin. Does not require additional dilution, is available in ready-to-use form, which facilitates the application process;
- Polymer contains silicone resins, which impart a high coefficient of plasticity. Equally applicable for interior decoration and facades;
- The silicate base contains liquid glass. Easily applied to any type of surface, resistant to moisture and temperature fluctuations;
- Bark beetle plaster has a rich variety of colors . Its advantage is that there is no need for additional processing.
Before you start finishing the walls with Venetian putty with your own hands, you need to know that the result obtained depends on the application technique. Only an experienced specialist can determine the expected pattern.
Advantages
The original properties are preserved for a long time, the paints do not fade, the coating is not afraid of mechanical damage, serious effort must be made to damage it. The elements included in the composition have good adhesion, so they do not peel off or crack, unless this is done specifically (craquelure).
The composition of natural ingredients is environmentally friendly, and in its finished form it resists the external aggressive environment well, for example, when cleaning using modern chemicals. This finish requires minimal maintenance, washes well, does not absorb odors, and is resistant to dampness, so it can be safely used for decorating rooms with high humidity.
A very wide color palette, layer-by-layer application can create unique special effects on the surface. The pattern is unique and inimitable, even if you keep the proportions and take similar components, it will not be possible to repeat it due to the specifics of the application technology. The ability to create a textured finish that gives the walls or ceiling a noble and solemn character.