Restoring old furniture is an interesting option to update interior elements and show your creativity. It is not necessary to go to a furniture store or factory and buy new furniture. By showing your imagination, you can give tables, chairs, and shelves an attractive look and a special twist. The simplest and most economical option for updating an old cabinet is to paint the furniture using decorative paints and varnishes.
You can also use wallpaper, decoupage, photo printing, photo wallpaper and decorative plaster for restoration. But which method should you choose?
Budget restoration of products
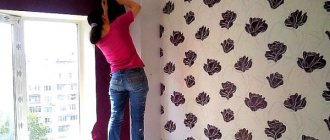
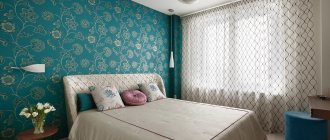
The easiest and most inexpensive way to update a cabinet that has lost its attractiveness is to cover it with wallpaper or photo wallpaper. This decoration is suitable for the restoration of a wardrobe, wardrobe, chest of drawers and bedside tables, which are installed in dry rooms.
The most suitable are non-woven and vinyl wallpapers or photo wallpapers, which are sold in construction stores.
Pasting is performed partially or completely. How to update old furniture:
- The wallpaper used for restoration should differ in pattern from those that cover the walls in the room, but have a common style and color scheme;
- If the walls of the room are covered with light-colored canvases, choose bright wallpaper to update the old cabinet. When the interior has wallpaper with a pattern or design, the furniture is covered with plain wallpaper;
- Internal shelves and external facades can be decorated in different combinations. Additionally, new fittings are used. It is convenient to decorate furniture with self-adhesive wallpaper;
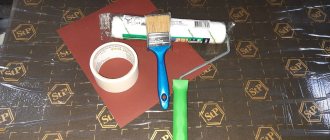
- To work you will need a brush, PVA glue, a construction knife, and decorative wallpaper. It is easier to glue paper sheets, but vinyl and non-woven fabrics are more durable;
- The product is measured, the wallpaper is cut into strips of the required length, the glue is evenly distributed over the surface, the wallpaper is glued, and the coating is carefully smoothed.
It is recommended to use wallpaper to treat old cabinets made of natural wood without polished elements or to finish the interior of a cabinet that does not have a varnished coating.
Before wallpapering, degrease the surfaces with alcohol, acetone or gasoline. Self-adhesive is applied to the cabinet elements and smoothed so that air bubbles do not form.
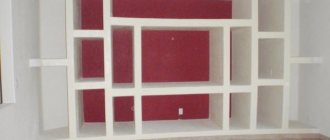
Application of three-dimensional drawings
Decorative plaster and stencil painting are an interesting way to restore an old cabinet. This design will elevate the furniture and give the surfaces a voluminous decor.
Suitable for decorating not only wardrobes and chests of drawers, but also for restoring kitchen furniture (sideboard, cupboard).
The paint will reliably protect the products from temperature changes and moisture. For work, use decorative plaster, acrylic paint, varnish, a stencil with the desired pattern, a spatula, masking tape, sandpaper, and brushes. Painting a cabinet with your own hands requires following a precise work algorithm:
- The fittings are removed from the furniture.
- Remove the layer of old coating.
- Treat with sandpaper.
- Cracks and chips are repaired with putty.
- The stencil is secured with masking tape.
- Prepare the plaster according to the instructions.
- Apply the material with a flat spatula.
- The stencil is removed and the pattern is corrected with a knife.
- After drying, the drawing is sanded with sandpaper.
- Paint is applied to the renewed base.
- To consolidate the effect, coat with varnish.
The same method is used to paint an old cabinet using a stencil, but without decorative plaster. Against the background of patterns, fittings painted in gold or silver look impressive.
To obtain a contrasting pattern, the product is coated with white paint. After the layer has dried, attach a stencil and spray it with spray paint (shake first) of the desired shade - the decorative coating is ready, and the furniture takes on an interesting appearance.
To ensure that the paint evenly covers the furniture and does not peel off, cabinets, bedside tables, chests of drawers, and wardrobes are prepared for painting by removing dust, dirt, and greasy stains.
Any shade can be used as a base background, but the design looks most expressive when the stenciled cabinet is painted white.
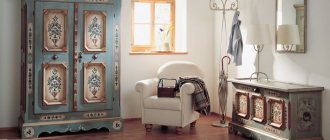
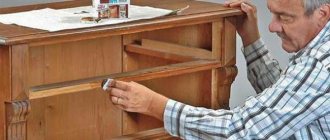
Painting polished furniture
Interior items made from natural wood and coated with a polished layer can be given an unusual look using cabinet paint. An old product, refined in a modern design, will become the central element of the room and give the room a special charm.
How to paint a cabinet or decorate a wardrobe:
- For work use acrylic paint with a matte effect.
- To degrease the base, use acetone or white spirit.
- To apply paint you need brushes, and for decoration you need new pens.
- Old fittings are removed from the cabinet, shelves and drawers are taken out.
- All surfaces are treated with a sanding machine.
- Coarse and fine-grained sandpaper is selected for the tool.
- If there are large chips on the surface, they need to be puttied.
- Treat the furniture with white spirit or acetone and dry it.
- How to paint a cabinet - Apply a thin base coat of paint.
- After drying, rub over with fine-grained paper.
- Remove dust with a dry cloth, apply the next layer and dry.
- Rub again and apply another layer until the desired effect is achieved.
Using this method, you can transform an old polished cabinet into original vintage furniture that will decorate a classic interior. The fittings are screwed into their original places.
For exclusive work, you can use not full painting, but dot painting - a pattern is applied to the furniture facades with a marker and the design is drawn with acrylic paint.
Methods and options for applying varnish to wooden bases
Once the composition of the varnish has been selected and the material has been purchased in the required volume, the work can begin. However, before this you need to decide on the application methods that will be used. Varnish can be applied to the surface using the following tools:
- Brush. Application with a brush is the most common method and allows you to apply the composition in hard-to-reach areas. Using a brush, you can apply a layer of varnish to areas with depressions and irregularities. Particular attention should be paid to the choice of brush regarding the bristles, which should be of medium length, made from fibers of natural origin when processing with alkyd varnishes and from fibers of artificial origin when working with acrylic varnishes. There is no need to rush; note that the final result will depend on the quality of the chosen brush. Experts recommend choosing flat-shaped options with a width of 5-7 cm. During the working process, you need to ensure that the varnish does not drip from the pile; the layer must be applied evenly.
- Roller. This tool is designed for use when applying varnish to smooth wooden surfaces. The advantage of a roller is that it allows you to quickly process large areas by applying an even layer of material. In addition to the roller, you will need a special plastic tray.
- Spray gun. This method of applying varnish is used by professionals in cases where large surfaces need to be treated. Using a tool allows you to apply the composition in an even layer, eliminating the possibility of drips. It is important to take safety precautions when working with a spray gun. The assigned tasks are performed in a protective suit, goggles, and mask.
When processing wooden surfaces with varnish, especially for large volumes, it is important to organize ventilation of the object, but the possibility of direct sunlight hitting the treated surfaces should be excluded. The surface to be varnished must be at room temperature.
- Send topic by email
- print version
Updating chipboard cabinets
Furniture made from particle boards loses its attractiveness over time, no matter how carefully it is used. You can return your products to their beautiful appearance and add fresh colors to the interior by painting old chipboard cabinets.
It should be taken into account that chipboard does not absorb paint well, since the furniture is covered with a moisture-repellent laminated layer.
In addition, if the condition of the cabinet fastening elements is unsatisfactory, it is recommended to replace the fittings and further strengthen them. How to paint an old chipboard cabinet:
- All removable elements are removed from the furniture so that an empty frame is left for painting.
- Using coarse sandpaper, remove the layer of old paint (if any) and varnish.
- The surfaces must be rubbed carefully so as not to damage the base. The cabinet is swept with a dry rag to remove dust.
- Corners, edges, joints and protruding elements are treated with fine-grained sandpaper.
- Water-based acrylic paint is a better option than painting chipboard. The color scheme is chosen according to your taste.
- Before painting, a chipboard cabinet must be primed so that the paint is less absorbed into the material.
- The primer is applied in a thin, even layer and the composition is allowed to dry - usually acrylic primers dry in no more than 12 hours.
- Apply several layers of paint with a roller or brush (preferably a brush), each time drying the coating before painting.
- When the furniture is painted to securely fix the coating, after complete drying, the chipboard cabinet is treated with varnish, and the product is assembled using new fittings.
When painting furniture, choose only high-quality tools that do not leave lint on the painted surface. The more layers of paint are applied, the richer the color of the decorative coating will be. You need to repaint with a brush in one direction - from top to bottom, apply the paint with a roller in a cross-shaped motion.
On video: detailed instructions for updating an old chipboard cabinet.
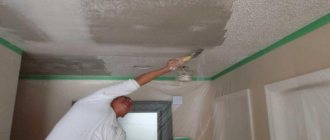
When the varnish is dry
After applying the final coat of varnish, there are a few more steps required to achieve a professional result. Allow the coating to dry under normal conditions for at least two weeks and then polish it. This removes all minor imperfections and evens out the gloss. It is even possible to change the gloss level of a semi-matte or gloss varnish, resulting in a matte or silky surface (it is very difficult to achieve a mirror gloss with most oil-based varnishes).
Particularly thorough polishing requires table tops and other horizontal surfaces that are most visible and often touched. Other parts, such as the legs, require only light sanding or fine steel wool.
Three polishing steps for a professional result
When the finish is completely cured, sand it as you would for intercoat sanding, using only 320-grit stearate sandpaper or waterproof paper and mineral spirits as a lubricant. In this case, it is enough just to level out minor unevenness and then wipe the surface with a soft cloth.
After sanding, use fine steel wool (#0000) to create a soft, silky shine. Press the thick piece of steel wool with your palm and make long, straight strokes along the grain. Then wipe the surface with a cloth dampened with white spirit.
To enhance shine, apply polishing paste to the surface, which can be purchased at an auto store. The sheep wool pillow is comfortable to hold with both hands to ensure even pressure.
Additional Information:
- If you don’t have a spray gun, apply varnish only with a brush. Never use a roller; it distributes the varnish very unevenly and creates a lot of bubbles.
- Before coating, the brush must be checked for the possibility of loose hairs and removed immediately.
- When varnishing, the first layer should be made as thin as possible.
- The varnish should be applied in even, long strokes, trying to distribute it as evenly as possible over the surface.
- If the can of varnish was stirred before starting work, you should wait until the bubbles come out of the varnish. How to properly apply putty on a wall before painting video? And only after that start working.
- At the end of the work, remove the varnish from the brush and smooth the surface of the applied varnish with an almost dry brush.
Antique furniture covered with modern materials does not look very natural. Therefore, it is better to choose a matte craquelure varnish for it, which can create an imitation of an aged surface. This effect is achieved due to its ability to dehydrate the paint applied on top.
The dyeing technology includes two stages. First, craquelure varnish is applied, and after it dries only slightly, it is coated with paint.
Apply varnish to the table top or other horizontal plane in overlapping stripes running along the entire length of the part. Start the strip about 75mm from the edge and move the brush all the way to the edge. Then return to the starting point and advance the tool to the opposite edge.
The surface of old furniture should be thoroughly cleaned and dried before starting work. Then sand it, holding the sandpaper in the direction of the wood grain. furniture previously varnished or painted, then you need to strip it before the wood appears. You can use paint and varnish removers or a scraper.
A hot air gun can also become your helper.
To coat furniture with pentaphthalic varnish, you do not need to have special tools or follow special techniques. This makes this product optimal for use at home. The minimum number of layers is four.
To obtain a semi-matte surface, use a tampon. The glossy effect is achieved using a brush and finishing sanding.
How to Update Kitchen Cabinets
The kitchen is a wet and frequently used room. The furniture in this room is exposed to temperature, steam, moisture and mechanical influence, so kitchen cabinets are more likely to lose their original appearance than furniture for the living room or bedroom. You can restore an old cabinet in the kitchen by painting or finishing the products with rattan fabric.
What paint to paint? Acrylic moisture-resistant composition or alkyd enamel are suitable. An updated cabinet with a glossy shine looks impressive.
The procedure for painting kitchen cabinets is as follows:
- Preparing furniture - the doors are removed from their hinges, thoroughly cleaned of dirt, degreased, washed with soda to remove all dirt;
- Removing the old coating - all surfaces of the kitchen cabinet are treated first with coarse-grained sandpaper, and then with fine-grained sandpaper, and wiped off dust with a dry cloth;
- An acrylic or alkyd primer is applied with a roller or brush - depending on the chosen paint material. The primer is allowed to dry;
- How to repaint a closet? Apply the first layer of paint thinly using brushes or rollers. After drying, apply a second layer with a paint pad using longitudinal and transverse strokes;
- When the front side is dry, you can paint the edges of the furniture parts and the inside. When working, do not press on the pad to avoid drips;
If the resulting color does not match the desired shade in terms of saturation and brightness, the product is painted again. The use of white color is suitable for any kitchen interior. The furniture is assembled using new fasteners and decorative fittings (handles, rails, moldings).
If, when disassembling the cabinet, you have difficulty unscrewing the fasteners, you can drop a little oil on the screws. You can also lubricate the doors so they don’t squeak.
Dressers, chests of drawers, and bedside tables are painted in the same way, but it is not necessary to use water-repellent paint for them - you can use oil, acrylic and alkyd compositions for interior work.
Main varieties depending on the effect
Furniture varnish for wood is classified according to a number of characteristics. The first of these is the effect imparted to the treated surface. According to this criterion, glossy, matte, colored and transparent varieties of material can be distinguished.
A feature of a glossy or semi-gloss finish is its special shine and highlighting of the wood structure. This finish lasts a very long time, but does not mask flaws in the base well. Recommended for use in gloomy, shaded rooms to optimize the atmosphere.
If the purpose of finishing is to create an emphasis on the naturalness of wooden furniture, it is recommended to use matte or semi-matte varnish. Before varnishing, the base must be thoroughly sanded. This type of finish hides surface defects well and is easy to maintain.
The most common type of varnish for wooden furniture is a transparent substance. Most often it is used for processing valuable wood species (protection from moisture and other harmful influences).
The colored composition is used for varnishing inexpensive types of wood (pine, linden, birch), helping to increase the contrast of their structure. An excellent option for those cases when it is necessary to update furniture by creating a protective film on its surface. Colored varnishes are available for sale in a wide range of colors, so there are usually no problems with choosing the appropriate shade.
Craquelure varnish helps to simulate decorative aging with the appearance of cracks. Furniture items with a craquelure effect look best in retro and Provence interior styles.
Recommendations for furniture restoration
To give an old cabinet an unusual look, they use not only painting, but also fabric upholstery, decoupage, vinyl stickers, stained glass film and other decorating techniques. In what cases can they be used to restore an old cabinet with your own hands:
- Closet. It usually has mirrored or glass doors. You can decorate furniture using stained glass film or vinyl stickers. The decor is glued to the doors of the wardrobe.
- Chiffonier. Old wooden furniture made of plywood and fiberboard will be transformed if you use decoupage or artificial aging to update it, decorating the furniture in a retro style.
- Sideboard. An antique china cabinet can be improved by applying decorative plaster techniques or by repainting the furniture completely white using bleaching paste.
- Wardrobe for children's room. A child will like “cheerful”, bright furniture, which is repainted independently using dot painting with children’s scenes.
- Wardrobe in the living room. Furniture decorated with a collage of photographs looks unique. Beautiful photographs are pasted onto the cabinet completely or in some places and covered with colorless varnish.
Using your own imagination and creativity, you can update an old cabinet and make it the highlight of your interior. The furniture will sparkle with new colors and become the central element of the room. The most unusual techniques are used for decoration, the choice of which will satisfy any artistic taste.