Peculiarities
The need to update the appearance of a painted ceiling arises quite often. This is the least expensive process in terms of effort and time. Many property owners choose it precisely because of these advantages, but they also face the question of how to reapply the paint so that the surface is painted as evenly as possible and there are no streaks left on it.
This type of finishing work is easy to do with your own hands, the main thing is to know some of the features of such work.
- If the old coating layer is in good condition, has no chips, cracks, is not flaking, is not flaking, has simply faded and lost its attractiveness, then painting can be done over the old coating. This process will not require a lot of money and time, since no preparatory work is needed. There is also no need to putty the surface before painting it.
- If the ceiling has already been coated with paint, and the surface has small fragments of peeling material, do not despair; the layer of water-dispersion paint does not require complete removal. In such a situation, it is enough to clean the exfoliated areas and apply the coloring composition over the old coating.
- If there are severe finishing defects, additional work cannot be avoided. Painting agents cannot repair cracks, irregularities and wrinkles; such defects require the consumption of additional building materials.
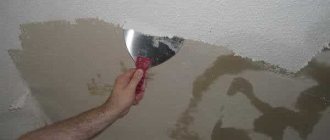
The old paint layer should be completely removed. This can be done with a spatula, thoroughly cleaning the entire surface. Using a brush and a special product, you need to start priming the ceiling. After the primer layer has dried, the surface must be well puttied, correcting all irregularities and defects. A special base for water-based paint should be applied to the dried surface; this layer precedes painting.
How to tint water-based paint to paint a ceiling
There are two options for tinting the mixture. Firstly, water-based material can be tinted using special equipment upon purchase. In this case, dry fillers are used that are highly stable, color stable, and do not wash out or settle to the bottom of the container.
If you tint the material yourself, you will need to buy a toner in liquid form, always from the same manufacturer as the water-based emulsion. In addition, you need to take into account that the real color of the ceiling will be slightly different from what happened in the container. The evaporation of water during the drying process makes the coating less bright and rich. Therefore, many craftsmen take control measurements in the process of preparing for painting. To do this, a small amount of the finished material is applied to ordinary glass. After the water-based emulsion has dried, from the back through the glass surface you can see the approximate shade of the ceiling after drying.
Process Features
Painting the ceiling is not as difficult as it seems at first glance. As a rule, before this process, workers remove the old layer of finish. The fact is that a thick layer of old paint can show through and spoil the appearance of the surface. If cracks appear on the ceiling, then the matter is completely hopeless - no matter how you paint them, they will still be visible. If repairs have not been carried out for a long time, then under a layer of old paint you may even find mold, which will negate all your attempts to update the surface.
If there are no such serious problems, then you can safely apply a new layer of water-based emulsion or acrylic to the old paint. Take a close look at your ceiling. If you are satisfied with its appearance, and pieces of paint do not fall off, you can leave everything as it is.
Professionals also advise paying attention to the following: if you have previously painted the ceiling with water-based paint, then you are in luck. It's better than whitewash. Even if this type of paint begins to flake off and fall off in pieces, it may not be completely removed. You can easily limit yourself to superficial cleaning by removing loose pieces and cleaning the area around them. After this short work, you can safely apply a new coat of paint.
Characteristics of water-based paints
Water-based emulsion is a higher quality and more practical dye than ordinary lime, which crumbles and is harmful during the dyeing process. This material is odorless, easily diluted with water, and tools can be quickly washed after it.
The water-based emulsion is tinted well. The surface color is even and dense, even if it is re-painted with water-based paint.
Before starting work, it is important to consider in which room you plan to finish the ceiling surface. A moisture-resistant water emulsion is suitable for the kitchen and bathroom.
Popular types of water-based paints:
- Latex Its advantage is that it has good coverage and density. For some surfaces, only one coat is sufficient. After drying, such surfaces can be subjected to wet cleaning.
- Silicate It is used mainly for exterior decoration. It is made on the basis of liquid glass. Thanks to this, it can be easily applied to stone or concrete bases. It can be used to paint a garage, garden house, work shop inside or outside.
- Acrylic This coating can hide gaps up to 1 mm. Pure acrylic is used for painting surfaces in dry rooms; it is sensitive to moisture.
- Silicone Has self-cleaning properties. It can be washed. Suitable for rooms with sudden temperature changes and high humidity.
Water-based paint for the ceiling has been selected, let’s figure out how to re-paint the ceiling surface and whether it’s worth doing it without washing off the old coating.
Paint selection
If you decide to paint the ceiling over the old layer of material, then you will have to face the question of choosing the appropriate option. For such work, different paints are used. Each type has its own advantages and a number of disadvantages.
Acrylic
Perhaps this type of paint is the most popular. It is good because it is highly resistant to all kinds of dirt and dries quickly. So you can safely use this material, for example, in the kitchen, where working with food is not always neat.
This paint also withstands high humidity well. If there is any contamination on the painted surface, it can be easily removed with a damp cloth or napkin without fear of the paint cracking.
Acrylic paint can be easily applied to a variety of surfaces. It fits well on metal, wood, plastic, and even on already plastered substrates.
Painting with acrylic is also good because it perfectly hides minor surface imperfections. Textured paint can mask small cracks or places where pieces of the coating have already fallen off.
Silicone paints
If we talk about silicone-based paints, they have increased water-resistant properties and are more impenetrable. Therefore, their use is ideal on surfaces in rooms where there is a lot of dampness and moisture. So, if you need to paint the ceiling in the bathroom, it will be the best option.
Thanks to silicone resins, which are the basis in this type of water-based paint, such characteristics are ensured. Cracks that can be hidden with this paint can be about 2 mm. The price segment of silicone paints is higher than the previous option.
How to paint a ceiling with water-based paint over old paint
Only owners of tension systems do not have to wonder about updating the paint on the ceiling. In all other cases, sooner or later you need to refresh the ceiling covering. As a rule, this requires a lot of dirty work that requires a lot of time and effort. First, all layers of the old coating are removed, the surface is primed, puttied and sanded. After this, re-priming is carried out and, finally, a new layer of paint mixture is applied.
Not everyone wants to spend so much time, so some apply water-based emulsion directly on top of the old paint layer. Can such a coating last long or is there no point in such treatment?
Recommendations for ideal ceiling painting
Professional craftsmen share with beginners the following tricks for painting a ceiling with a roller:
- It is better to apply the last layer of paint from the window, then the joints will remain invisible, since the light will fall along the stripes;
- If even a small area remains unpainted, it will not be possible to correct the defect. You will have to apply a new layer of emulsion to the ceiling;
- Evaluate the results periodically. To do this, look at the painted ceiling from different corners of the room;
- Prime the ceiling surface before painting. The primer will improve the adhesion properties of the dye, the composition will lie more evenly;
- work quickly to ensure a streak-free surface.
Painting the ceiling with a roller will be easy and quick if you carefully prepare the ceiling for work, purchase high-quality tools and paint, and also follow the sequence when applying the composition.
Is it worth applying new paint over old?
There is no clear opinion on this matter. If you ask a specialist, he will say that there must be good adhesion between the two materials, which can only be achieved if the surface is first cleaned of the old coating.
But, in practice, many people carry out such cosmetic repairs and forget about problems with the ceiling for a long time. However, in this case it is necessary to take into account several important aspects:
- It is recommended to apply a composition to the ceiling that will be similar to the one that was used previously.
- If there are already many layers of paint on the ceiling and serious defects are visible, then in this case it is still worth dismantling the old coating. If part of it is already falling off, then a fresh layer will only be able to contain it for a very short period.
- If lime whitewash was previously applied to the ceiling, then in this case there is only one option - remove the old coating and process it according to the standard scheme.
It is worth paying attention to the fact that water-based emulsion and water-based emulsion are different. Gone are the days when there was only one type of mixture available. Today there are paints on sale that are not resistant to water and compositions that, on the contrary, cannot be washed off so easily. If the old coat is water-based and you plan to use the same type of paint, then it is better to remove the old coating. The fact is that while you are applying new paint, the old one will begin to be damaged. This will cause peeling.
Materials and tools
Putting the ceiling with your own hands involves preparing the appropriate materials:
Primer
A special deep-penetrating emulsion will be very appropriate here, acting as a connecting layer between the ceiling and the finishing material. In addition, the absorbency of the working base is reduced, its resistance to pathogenic microorganisms (mold, mildew) is increased, and the paint is applied more smoothly and efficiently. If the primer is used to treat concrete floors, then it is necessary to choose a solution with a penetration depth of up to 5 mm. Universal mixtures give a good effect.
For information! It often happens that when painting a ceiling, the putty falls off. To avoid such negative consequences, it is recommended to use a primer and putty from the same manufacturer.
The emulsion should be used after cleaning the ceiling from the old coating, twice - the first time before the initial leveling of the uneven surface, the second time before the final puttying. The average drying time for the ceiling after applying the primer mixture is a day.
Putty composition
Necessary for leveling a crooked ceiling. At the initial stage, it is necessary to use a starting putty that can fill existing cracks and crevices well, as well as achieve the most even plane possible. There are many putties on the market (adhesive, oil-adhesive, latex, acrylic, PVA-based), the choice should be based on the characteristics of the working substrate. It is recommended to take into account the specific conditions of the room. If the room has a high degree of humidity, then it is more rational to use water-repellent compounds to prevent peeling.
If it is necessary to repair large differences in the ceiling, the solution is applied repeatedly, allowing time between drying each one. It is good to use a reinforcing mesh for such work, which prevents the formation of cracks.
The final putty of the ceiling for painting is carried out after the starting and priming. Due to the presence of small particles in the composition, the finishing putty allows you to achieve the ideal condition of the ceiling surface. It must be applied in a thin layer.
Suitable tools for applying putty:
- An electric drill equipped with a mixer attachment will allow you to prepare a working mixture efficiently.
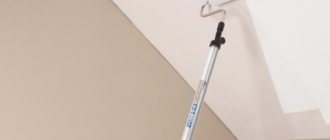
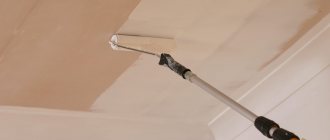
- A roller equipped with a long handle for comfortable use will be needed for priming and painting
- Metal spatulas
- Rubber spatula, trowel
- A grater for leveling the base, abrasive mesh, sandpaper (preferably of different grain sizes)
- Building level
- Nylon cord with a colored tint, you can use it to create straight lines
- Containers for preparing the mixture, for working with primer solutions, paint
- Grinding machine for cleaning the ceiling and widening cracks
- Brushes of different sizes
- Respirator, protective mask necessary to protect air channels during construction and finishing work
Types of water emulsion
All paints belonging to this category are water emulsions, which consist of pigment particles and binding components. Today you can find many varieties of such compositions on sale:
- Acrylic. This is the most popular option, which is used for residential premises. It is easy to guess that acrylic resins are present in such mixtures. This water emulsion also contains latex additives. All this makes acrylic paint durable and resistant to moisture. Due to its high elasticity, it hides unevenness of the old coating well and penetrates into cracks no more than 1 mm wide.
- Silicone. These are waterproof and resistant water-dispersed compositions, which are essentially an intermediate form of chemically pure organics and substances of inorganic origin. As a rule, they are used for bathrooms and other rooms with high humidity. Silicone resins make it possible to create a reliable coating, but it should be noted that such water-based emulsions are not suitable for ceilings if there are large defects on it. This paint is used if there are cracks on the surface of the spruce tree no more than 2 mm wide.
- Silicate. These compounds resemble silicone ones. Only in this case the basis is liquid glass. Additionally, the composition may contain silicon-organic resin. However, they are very expensive, and their characteristics are more than enough for a residential area, so they are most often used in the industrial sector.
The advantage of ceilings painted with water-based emulsion
Ceilings and walls treated with water-based paint have several advantages:
- This coating does not contain harmful components and even when the temperature in the living room increases, it does not emit harmful toxins.
- The water-based solution is easy to apply to the prepared surface of walls and ceilings.
- The surface painted in this way is resistant to high humidity.
- This paint will cost less than suspended ceilings, but it looks no worse.
- With minimal skills, staining can be done independently, without involving workers.
- A wide palette of water-based paint allows you to choose the color and tone to suit any interior.
- This paint can be used on ceiling tiles and is also used on multi-level surfaces.
The coating is resistant to high humidity conditions.
In other rooms, painted surfaces do not need to be washed frequently. But in the kitchen, the walls and ceiling get dirty faster and require special care. When choosing a water-based composition, preference should be given to those types to which acrylic or silicone is added.
Painting the ceiling
If it was decided not to remove the old coating, then some work will still have to be done.
Preparatory work
At this stage, it is recommended to carefully inspect the ceiling covering and assess its condition. Experts recommend using special lighting “at an angle”, this will reveal all the flaws. If there are serious defects on the ceiling, then it is necessary to remove the exfoliated elements, apply putty to those places where there are deep potholes and treat everything with a primer.
Important! If you find mold on the ceiling, you must get rid of it and treat the area with a special impregnation that will prevent the spread of spores.
The prepared ceiling dries quite quickly. For example, if you applied primer in the morning, then after lunch you can start painting. The second layer of water-based emulsion (if necessary) is usually applied the next day.
Painting
The work of applying a fresh layer of water-based paint over the old layer looks like this:
- We prepare the necessary tools. To work, you will need a brush 3-4 cm wide, a roller, a paint tray (cuvette), a rag and a telescopic handle. You also need masking tape and polyethylene (or you can buy a special covering material with adhesive strips).
- We cover the furniture and floor with polyethylene.
- We study the instructions for the selected paint. Some formulations are sold ready-made, others require dilution with water. In addition, you may need to add pigment (color) if you plan to create a colored ceiling covering. It is also important to adhere to exact proportions, as they may differ depending on the manufacturer of the coloring composition.
- Pour the required amount of paint into the cuvette. We dip the brush into the composition, blot it so that the paint does not run off and thoroughly treat all the corners and joints. Also, using a brush, decorative elements made of plaster, if any, are processed.
- We take a roller and begin processing the ceiling. In the wide part of the cuvette, the roller is wetted, and in the narrow part it is blotted and rolled several times so that the paint is evenly distributed over it.
- Moving the roller in parallel movements, we begin to apply the composition. It is necessary that each subsequent strip overlaps the previous one by half.
- If you need to add another layer, then this should be done the next day. Experts recommend applying the finishing layer parallel to the window or other light source. To do this, you should use a new, soft and better quality roller attachment. This will give you a smoother finish.
If the previous coating is damaged or is a whitewash, then it is better to remove it.
Painting
Finishing the ceiling over old paint is not particularly difficult and does not require any special skills. Thus, you can carry out all the work yourself, without turning to a specialist.
The most effective option is to paint in 3 layers. This method will avoid divorces. To avoid smudges, you must carefully roll out the paint with a roller before applying the layer and only then begin painting. Layers 1 and 3 are applied perpendicular to the window openings, and layer 2 parallel.
Painting should be carried out with smooth movements, and care must be taken not to leave unpainted areas.
Each layer should be applied only to a naturally dry surface. It is important to prevent direct sunlight from coming into contact with the painted surface until it dries, and to avoid drafts in the room; this will eliminate paint peeling. When planning to refresh the ceiling, it is better to use paint of the same shade or a similar color, otherwise a positive result can only be achieved by increasing the number of layers.
The most effective option is to paint in 3 layers.
Features of dismantling the old coating
If lime whitewash was previously used on the ceiling, the easiest way to get rid of it is to thoroughly wet the ceiling surface. Lime has excellent absorption, so it is best to apply water several times. The thicker the whitewash layer, the more moisture will be required.
After this, you need to open the windows in the room. In draft conditions, the lime will begin to bubble and quickly peel off. After this, it can be easily removed with a regular spatula. You need to wear safety glasses when working, after which it is recommended to rinse the surface again with water.
If you need to dismantle a layer of old water-based paint that is badly damaged, then of course you can try to wash it off or get rid of it with a spatula. But this is a very long and tedious process. Therefore, it is best to use a special chemical composition that will quickly corrode the old paint. However, before using it, you need to carefully study the instructions. Work is carried out in a respirator, safety glasses and rubber gloves. Additionally, you need to take care of good ventilation of the room. The water-based emulsion quickly reacts with the chemicals and begins to bubble, after which it is easily and quickly removed with sandpaper and a spatula. At the final stage, it is enough to rinse the surface with water.
If there are large cracks and potholes in the ceiling, they need to be filled. After this, the irregularities are erased with fine-grained sandpaper.
Repair of suspended ceilings
It also happens that the suspended ceiling is flooded by neighbors, and something needs to be done about it. Stretch ceilings, although considered one of the most leak-resistant, are still susceptible to water. Even if the volume of water was not very large, and all the consequences of flooding have long been eliminated, yellow spots on the stretch ceiling may still appear. The fact is that water marks do not appear immediately, but gradually appear on the canvas.
The most common conditions look like this: a special elastic film is used as a canvas, and the cause of the appearance of red spots is water entering from above the apartment. The simplest option for eliminating damage would be a suitable means for cleaning a stretch ceiling. Such products are available in a variety of formats - gels, sprays, various solutions, etc. The cleaning product must be used strictly in accordance with the instructions.
If there is no opportunity to use such means, then you will need to think about how to bleach the ceiling using improvised means. For example, you can make a tampon from gauze and cotton wool. Such a swab is moistened in a 10% solution of ammonia, after which they need to wipe the stain, going into clean areas. To complete the work, you will need to wash the entire ceiling with ordinary detergents - then the ceiling surface will look uniform.
Another good option is soda ash. It is diluted with water to a 5% solution, after which the resulting composition is applied to the contaminated areas of the ceiling. The dried solution is washed off from the ceiling surface with warm, clean water. However, if we are talking about using a film ceiling for cleaning, then most suitable products will do - unless you use aggressive compounds. It's all about the smooth surface of the stretch ceiling, which is quite easy to clean.
If fabric was used to decorate the ceiling, the process of removing stains may take longer. The list of acceptable products is the same as in the case of film materials - but they can only be applied and washed off with soft bristled tampons. Detergents must be designed for delicate work. To get rid of very strong stains, it would be better to replace the canvas or contact a specialist.
Painting the ceiling with water-based paint over old paint
The advantages of water-based coating - the absence of a strong odor and toxic properties, the formation of a durable layer that allows cleaning, wiping and washing, the possibility of tinting - have made it a popular material for decorating ceilings.
However, such painting, especially over a layer of old paint, has a number of features and mandatory preliminary operations.
Painting the ceiling with water-based paint over old paint
All about ceiling paints
The widespread use of water-based paint for painting is easily explained by the special characteristics of the product:
- the product is absolutely non-toxic;
- does not have a pronounced unpleasant odor;
- the texture allows this coating to be applied on top of old paint;
- the paint is easy and convenient to work with;
- the paint is unpretentious in use.
An undeniable advantage is the ease of application. So even a beginner in this matter can easily paint the ceiling or wall surface. The workflow tools are basic and very easy to clean when finished.
If you are not satisfied with the consistency of the product, you can add a little water to bring it to the desired state. You can also use special specialized tinting pigments. With their help, the necessary shade is given, which is needed for coloring.
Another advantage is the availability of this material. The cost of paint is affordable for everyone, which makes it even more popular. So beautiful decoration can be in every home, especially useful when renovating the kitchen.
Tools and materials - a complete list for all occasions
To carry out the necessary preparatory work and high-quality painting of the ceiling with any composition of the previous coating and surface condition, you will need:
- wide, durable plastic film or oilcloth to cover the floor and furniture that could not be removed;
- sponge for soaking and washing off old coating;
- steel spatula for removing the previous layer of paint (whitewash) and applying putty when leveling the surface for painting;
- serpyanka mesh for gluing the joints of ceiling tiles;
- main and finishing putty;
- penetrating primer;
- mesh graters for leveling the putty surface - larger preliminary and fine finishing;
- special solutions for eliminating yellow streaks, rust stains, and mold;
- water-based paint of suitable quality in the required quantity;
- a medium-width brush with a fluffy edge for painting corners, joints with walls, areas around ceiling lamps; before use, it is soaked in water; the swollen wood of the handle will tightly hold the bristle hairs, so they will not remain on the surface covered with the coloring composition;
- a narrow brush for eliminating minor paint defects;
- a paint roller in a fur coat with medium-length pile and a handle with a telescopic extension; the width of the roller depends on the area of painting - the larger it is, the wider the roller;
- a rectangular tray with a corrugated inclined surface on which a roller is rolled to remove excess paint.
Necessary tools and materials: 1. Film. 2. Sponge. 3. Spatula. 4. Serpyanka mesh. 5. Putty. 6. Primer. 7. Grater nets. 8. Cleaning products. 9. Paint. 10. Medium brush. 11. Narrow brush. 12. Roller. 13. Special bath.
Key Features
It is important to familiarize yourself with the main features of this material. More and more people are abandoning the usual whitewash and decorating their ceilings with water-based emulsion. This is due to the fact that it gives the effect of pure whiteness. At the same time, it does not have the disadvantages that are characteristic of lime and chalk. It contains not only pigments, but also polymer particles, which are necessary to increase wear resistance.
After applying the coloring composition to the ceiling, the water base will evaporate. In this case, the polymers form a thin film that will not be susceptible to moisture. This composition does not crumble and washes well. In addition, it does not deform from moisture and is able to retain its original appearance for a long time. In terms of price, it suits most buyers. Its undeniable advantage is its high environmental safety. It does not have any pungent odors.
Surface preparation
The even, monochromatic coating provided by water-based paint compositions does not hide, but, on the contrary, makes all surface defects, irregularities and stains more noticeable. Therefore, the ceiling must be carefully prepared before painting.
Prices for water-based paint
Removing the previous coating
First of all, you need to cover the floor and the remaining furniture in the room.
Then, if the ceiling was whitewashed, you should:
- Gradually, in squares, moisten the old whitewash with a sponge and warm soapy water;
- remove the soaked layer with a spatula, placing a tray in order to stain the floor less;
- finally wash off the previous coating with a sponge.
If there is old water-based paint on the ceiling, it will not be possible to wash it off . You should at least remove this coating where it has peeled off.
To identify and eliminate all such areas, you need to:
- moisten the ceiling generously with a roller;
- let the water soak in thoroughly;
- open the windows and doors and create a draft in the room;
- Use a spatula to remove the old water-based coating from all areas where it has peeled off as a result of this procedure.
Removing old peeling paint
Special processing
If there are rusty spots or dark streaks, they are covered with one of the following compounds:
- 3% hydrochloric acid;
- thick lime “milk” with 50 ml of denatured alcohol;
- 5% copper sulfate;
- 20 parts crushed lime with one part drying oil.
If there is black mold (a common occurrence in kitchens and bathrooms, and other damp areas), you need to follow these steps.
- Strip the plaster down to the concrete. To reduce dust, it should be moistened first.
- Treat the concrete surface with an antiseptic primer. A budget alternative is a detergent containing chlorine, for example, “Belizna”.
- Cover the problem area with a penetrating primer and re-plaster it.
Special ceiling treatment: 1. Stripping down to concrete. 2. Applying an antiseptic primer. 3. Plastering.
Preparatory work
In order for the ceiling to look good at the end of the work, it is necessary to properly prepare it for painting. This will protect the coating from cracks, fungus, stains, stains and other nuances that spoil the appearance of the repair. Depending on the type of ceiling (plasterboard, plaster, concrete), the specifics of preparing the coating may vary, but the principle of their implementation remains the same.
Preparing the finishing surface
In order for the paint to lay down in an even layer without streaks or blotches, it must be applied to a perfectly flat, clean ceiling. This can be achieved by puttying, sanding and priming. Let's consider the algorithm of actions for a plasterboard surface:
- We are priming the ceiling.
- We seal the seams between the sheets with a special mesh (serpyanka), and then cover them with starting putty.
- We apply the first layer of thick-walled gypsum plaster (starting putty) to the entire ceiling.
- We prime the ceiling, after a while apply glue to its entire surface, and then glue a fiberglass canvas (this will protect the surface from cracking in the future, which is unacceptable for ceilings to be painted).
- Apply a layer of finishing putty over the reinforcing fabric.
- If necessary, use sanding paper to remove sagging and achieve a perfect plane.
- Using a slightly damp cloth, remove dust and shavings from the ceiling.
- We carry out the final primer of the ceiling before painting.
Before painting, the plasterboard ceiling must be properly puttied.
If the ceiling in a house or apartment is made of concrete floors, then the procedure for preparatory actions before painting it is as follows:
- We prime the surface.
- We close the seams between the plates with reinforcing tape.
- Apply the first layer of gypsum plaster to remove large depressions.
- Apply a second layer of finishing putty.
- Using sanding paper, remove any unevenness.
- We prime the ceiling before painting it.
To ensure that the paint on the concrete ceiling does not crack over time, the seams of the slabs must be covered with reinforcing tape
Preparing the painted surface
If there is already paint on the ceiling and there is a need to simply renew it, the algorithm for preparatory actions before painting has a different character. It all depends on what kind of paint was applied initially; if it is good, expensive water-based paint, then there is no difficulty in preparing such a ceiling. In this situation, you will need to prime the ceiling well in two layers, after which you can apply a new coat of paint. If the paint was originally cheap (acrylic water-based emulsion, lime, whitewash), then it will have to be removed, for this you can use the following instructions:
- Pour hot water (60-70o) into a basin and use a roller, like a primer, to apply the water to the painted ceiling.
- After 15 minutes, repeat the procedure, soaking the old paint with a layer of hot water.
- After another 10–20 minutes, use a spatula to remove the old water-based emulsion, which peels off in rags after getting wet.
- After the ceiling has completely dried, we prime it.
- In the process of removing old paint with a spatula, the layer of putty is damaged, so a new layer of finishing putty must be applied to the ceiling.
- We apply primer to the ceiling, after which it can be painted again.
- This surface is painted in the same way as the finishing surface.
If the ceiling is already painted with an inexpensive water-based emulsion, then it will have to be removed before applying a new one.
How to choose a primer
A primer is a colorless or slightly transparent material in liquid form that is designed to improve the adhesion (gluing) of materials. Most primers have additional antiseptic properties that protect surfaces and materials from the appearance of fungus. There are a huge number of types of material, but if we are talking about painting the ceiling with water-based paint, then the selection will not be difficult. To ensure the paint adheres well, you can use a universal or strengthening primer. It has a milky color, does not smell, does not leave a film, it can be used not only to prepare the ceiling for painting, but also to improve the adhesive properties of two layers of putty (finish and start).
Some builders use the “old-fashioned method” and replace the primer with PVA glue diluted with water. This is a good product that provides excellent adhesion of putty to paint, does not have an unpleasant odor and does not harm the health of people living in the room during repairs. To prepare a homemade primer, pour PVA glue into a container and mix it with water, quickly stirring the composition. During mixing, it is necessary to achieve the consistency and color of milk so that the soil is not too thick or too thin.
How to prepare a room for painting
Before you start painting the ceiling, it is necessary to carry out a number of preparatory measures:
- Remove foreign objects from the room. If there is furniture and tools left in the room that were used at the previous stage of repair, they should be removed or covered with a protective cloth or film.
- Cover the flooring. The floor is covered with rolled paper; you can use old wallpaper or film. The junctions of the two canvases are glued with adhesive tape, and the protective coating is also fixed to the baseboards or the bottom of the wall.
- Protect the walls. Even if the walls are plastered and prepared for painting, they should be protected so that there are no difficulties with finishing in the future. The walls are covered with a special film, which is glued under the ceiling plinth and pulled down, forming a solid protective layer.
- Protect windows and doors. Window and door openings are also covered with film, sheets or any other materials that can hide them from paint.
Before painting the ceiling, you need to protect the finished walls with a special film.
Necessary tool
To perform all types of repair work, you need specialized tools, including painting the ceiling. First of all, you should take care of personal protective equipment:
- glasses that protect the mucous membranes of the eyes from paint;
- a disposable film hoodie with a hood that covers the entire body and protects clothes from paint. You can use a raincoat and a disposable medical hair cap;
- rubber or rubberized cloth gloves;
- a respirator that protects the respiratory system from paint fumes and construction dust.
The following tools may be helpful when painting the ceiling:
- a thin brush for working on difficult to paint areas;
- roller with telescopic or long handle;
- special tray for paint;
- container with clean water;
- an object for mixing paint (it can be a stick, a spoon, a long brush);
- paint removal rags;
- sponge for shading;
- the paint itself.
Which roller to choose
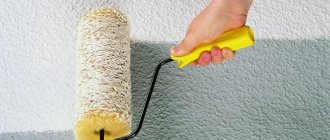
All rollers for painting work differ significantly from each other in the material of the tube coat and its width. For painting the ceiling with water-based emulsion, medium-sized rollers (10–20 centimeters) are best suited. As for a fur coat, you should give preference to fleecy rollers (made of microfiber, wool or polyamide), which are made from natural and synthetic materials. They allow you to add texture to the paint and paint over uneven surfaces. The main criterion for a good fluffy roller is the material’s resistance to paint and the density of the filling. Hairs should not fall out of the tool, even if you pull them with force, otherwise the ceiling after painting will look like a carpet. Short pile is suitable for paints of light shades, and long for bright and dark colors. For ease of use, you should take care of the handle; when working with the ceiling, you should additionally purchase a telescopic handle, which allows you to paint the ceiling while standing on the floor.
A high-quality fleecy roller allows you to apply textured paint to the ceiling, painting even uneven surfaces
Leveling the ceiling surface and priming it
If the ceiling is fairly level and even with side lighting there are no significant surface defects, the steps below are necessary.
- Coat the ceiling with a penetrating primer. In this case, it is better to use a brush so as not to miss a single depression or irregularity.
- After the primer has dried, remove any unevenness with finishing gypsum putty.
- After 5-8 hours, level the putty areas, first with a coarse and then with a fine mesh grout.
- Prime the leveled putty areas.
Primer of leveled putty areas
If cracks have formed at the joints of the slabs , and the old plaster is crumbling, then the algorithm will be slightly different.
Prices for putty
- Clean down to concrete using a spatula or hammer drill. There will be less dust if the surface is pre-moistened.
- Coat with penetrating primer.
- Re-plaster, checking the quality of work with a level and a steel meter. Cover the filled cracks in the joints with reinforcing mesh.
- After a day, putty and finally level the surface with trowel mesh.
Gluing serpyanka mesh to the ceiling
After leveling is completed, the surface is primed with water-based paint diluted with water.
Stains and stains on the ceiling after painting: how to fix?
So, we figured out the reasons. In the future, this will help us not repeat mistakes. But what to do now, when the ceiling is already painted, and there are terrible stripes, stains, and smudges on it? How to bring it to mind?
The only sure way is to sand (sand) the entire ceiling until the surface becomes uniform and rough. Don’t worry, there won’t be a lot of dust and dirt, because only a layer of paint is removed. The skin should be relatively fine. You need to work quite carefully so as not to touch the putty layer.
Then you need to wipe the ceiling with a damp cloth and inspect the surface in bright daylight. If the ceiling has become smooth and uniform, you can start priming. If the surface does not inspire confidence, you should use finishing putty, applying it in a thin layer. After drying, light sanding again.
The next stage is priming. It is important to buy a quality primer for painting. It is better to prime several times - at least twice. Each time you need to let the surface dry completely.
When the ceiling looks perfectly even and smooth, like a mirror, you can begin painting.
Remember: if the base has streaks, spots and unevenness, all this will be noticeable even after painting! Therefore, before you take up the roller and paint, make sure that the ceiling is in perfect order. If in doubt, prime again.
How to deal with stains from old leaks on the ceiling? These areas require special treatment.
First you need to thoroughly clean and wash them, wait until dry. Then treat with a biocidal solution (for example, Fongimur). Do not wash off the product! After this, use a universal blocking primer. It blocks stains from appearing through putty and paint.
Coloring
When purchasing a water-based paint composition for the ceiling, it is especially important to have a good understanding of the assortment.
Currently it is represented by five main types of products:
- with acrylic;
- with latex and acrylic;
- with silicone;
- with polyvinyl acetate;
- with silicates;
- with mineral supplements.
The cheapest water-based mixtures are with polyvinyl acetate, but the surface painted with them cannot be washed. The most expensive compositions are those containing silicone - they adhere well to plaster even without a primer, and the coating they form can withstand wet cleaning with detergents. Due to their good permeability to water vapor, they are ideal for kitchen and bathroom ceilings. Medium-priced and durable coatings are acrylic and latex-acrylic paints; They are also the most in demand. Silicate compositions are intended for painting the surface of concrete and brickwork; they are durable, but not moisture resistant.
Acrylic paints
The most popular and popular are acrylic-based paints. As the name suggests, it contains acrylic resins, which provide affordable pricing and high quality. And the admixture of latex elements gives the product the necessary elasticity. Thanks to this, you can close and disguise small cracks on the work surface. The parameters of cracks, which can easily disappear under a layer of water-based emulsion, should be within 1 mm. If the composition contains latex impurities, then the price for this type of paint will be slightly more expensive. But, at the same time, painting an imperfect surface will be much easier, and the result will please you.
What causes a ceiling to fail?
Is your ceiling cracked? Are there any stains on it? Did it sag and holes appeared? Why is this happening? Here are some reasons:
A ceiling that requires repairs;
during installation of the frame, gypsum board sheathing and finishing, the work technology was violated;- high humidity and incorrect choice of material;
- sudden temperature fluctuations during installation;
- flooding by neighbors above if you live in an apartment;
- building shrinkage;
- poorly sealed joints between sheets;
- no primer was applied before puttying;
- constant vibration caused by the movement of equipment;
- weak dowels were used.
All this leads to the fact that your ceiling needs repair.
Why should you use plasterboard for the ceiling?
If the ceiling is uneven and has many noticeable flaws and defects, then plaster will not be able to solve this problem. It is not recommended by experts to apply plaster in multilayers, especially in the ceiling area, otherwise it may cause it to fall off and fall on the heads of the residents. So the use of drywall in this case can be called the safest method to make the ceiling even.
Before attaching the HA sheets, craftsmen first install guides, which are connected with crabs and special devices for this purpose. During the process, it is advisable to use a level, which will help make all the work as accurate as possible. To process the seams, reinforcing tape and putty are used. Then acrylic paint is applied to the finished ceiling. In some cases, a single-level structure is lined with molding around the perimeter for decoration.
Chalk painting
It is not difficult to prepare a chalk solution for painting the ceiling; for this:
- For 10 liters of water you need to take 5 kg of chalk and 50 g of wood glue;
- the consistency of the solution should be such that it does not flow from the knife; if the mixture flows from the blade, you need to add more chalk;
- You can add blue to the composition, in which case the ceiling will be snow-white, without a yellow tint.
Preparation of chalk solution for whitewashing the ceiling
The technology of painting with chalk is fundamentally no different from the technology of applying water-based emulsion . First, choose one of the options - application with a brush, roller or spray gun. Then, during the painting process, take your time and carefully ensure that the composition is applied in an even layer. In this case, the new look of your ceiling will definitely please you.
How to whitewash a ceiling correctly?
To find out, we recommend that you read this article. You will probably also be interested in learning how to paint a ceiling with water-based paint.
Video “How to remove water-based coating from the ceiling”
Use this video and you will learn how to easily remove old water-based coating from a ceiling surface for subsequent painting.
Find out the cost of construction Photos Reviews
- about the project
- home
- Construction Bath
- Cottage
- Pool
- Veranda
- Foundation
- Fence
- Gates
- Roof
- Roof
- Insulation
- Gazebos
- Priming
- Garage
- Brick construction
- Construction of a frame house
- Construction of a bathhouse
- Wooden houses
- SRO
- Warm floor
- Plasterboard ceilings
Partitions
Repairing plasterboard ceiling
- Sagging plasterboard ceiling. This occurs due to the movement of the soil under the building. And also poor quality ceiling installation.
- Blotting gypsum boards. Mostly the upstairs neighbors forgot to turn off the tap. Sometimes in private houses the roof may become leaky, and then precipitation will fall on the ceiling. In this case, repair work will be carried out based on the established wetness assessment.
- Cracks in plasterboard ceiling. This defect can appear if the soil moves, and low-quality putty materials were used.
Remove the sagging sheet from the ceiling and lay it on a perfectly flat plane. After this, wet the drywall and leave to dry. He must correct himself and become even. When it is transformed into its shape, you can mount it back on the ceiling.
But this requires adding wooden slats to the frame to strengthen the frame.
- The surface is completely cleaned and screw locations are located.
- The screws are unscrewed and the frame casing is removed.
- If the screws are not found, there is only one option left - breaking the sheets. This creates a huge amount of dust.
- After removing the drywall, you should check the frame very carefully. If wood is used, the slats should be treated with drying oil.
To begin repairing a plasterboard ceiling with your own hands, you need to assess how damaged the surface is. This will give you a properly structured job and the availability of all the necessary tools. The plasterboard from which the ceiling is made is a fragile material. The ceiling can last 10 years, but there are influencing factors that render the cladding materials unusable. When the soil moves, the ceiling may burst or it may be flooded by neighbors.
On New Year's Day, a hole in the ceiling may appear from a cork from a champagne bottle. This is not critical; repairing the ceiling with plasterboard will help.
Dyeing technique
The staining technique includes two important stages:
- choosing a tool for painting work;
- painting a previously prepared surface.
Let's look at each stage in more detail.
Painting ceilings always begins with choosing a tool. Painting can be carried out with the following tools:
- Tassels. In order to effectively paint any surface, you need to use brushes of different sizes. It is worth noting that brushes are not very effective for large areas of work. However, they do not allow you to apply the coloring composition in an even and thin layer. They can be used to qualitatively paint various decorative convex finishing elements, as well as the junction of walls and ceilings.
- Roller. It is considered the most effective tool, but only if selected correctly. The dimensions of the selected roller directly depend on the area to be painted. The larger the area, the thicker and longer the roller should be. In this case, you need to pay attention to the material from which the roller skin is made. Different skins are suitable for different paints. To work with water-based compositions, you should choose velor skins and those that have a long pile. Also, for working with the ceiling, you need to choose products with a long handle. It will allow you to effectively carry out painting work while on the floor without using a ladder.
- Professional spray gun. This tool is much more expensive than a roller and brush. Moreover, not everyone can cope with it.
Experts recommend using a roller for painting, since it can be used to quickly and efficiently apply an even coating to fairly large areas. But in this situation, brushes will still be needed to paint the corners. Please note that the paint tray should be selected depending on the size of the roller purchased.
Do not forget that you need to apply the water-based emulsion only when the base is completely dry after priming.
Painting the ceiling with water-based paint is carried out according to the following algorithm:
- Open the can of paint and mix it well, touching the lower layers. This must be done in order to obtain a uniform color of the composition.
- Next, pour the paint into the tray.
- First you should paint the corners and all places that are inaccessible to a roller. To do this we use a brush.
- After this, dip the roller into the poured composition.
- On the raised area of the tray, squeeze the roller so that paint does not drip from it. As a result, the composition will be evenly distributed over the surface of the roller.
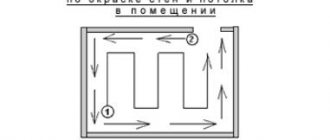
- The first layer should be applied parallel to the direction of the natural light available in the room. One area should be covered with a roller several times to avoid dark spots and sagging. Painting is done with an overlap on the previous strip. Moreover, the entry should be half the size of the roller. It is best to make W-shaped movements.
Scheme of applying layers of paint on the ceiling
To achieve an excellent aesthetic result, three layers of paint must be applied. Before applying the next layer, you must wait until the previous one has completely dried. This usually takes about 12 hours. Therefore, to obtain a significantly better result, the subsequent layer must be applied the next day. If after the second layer has dried, dark spots appear on the surface, they can be sanded and a third layer applied.
To apply water-based paint in the presence of outdated painting, high-quality surface preparation is required, as well as strict adherence to painting technology. This is the only way you can get a high-quality finish that will last you a long time.
How to repaint a plasterboard ceiling with your own hands
Today I will tell you about how to paint a plasterboard ceiling. We will figure out how to cope on our own and get a result that will not be inferior to the work of professionals. There is nothing complicated in the process, the main thing is to choose a high-quality composition, stock up on the necessary tools, and also make the right preparation before applying paint.
In the photo: a perfectly painted ceiling looks just great
We will analyze the process in detail so that you can not only carry out the work, but also choose high-quality paint and a good tool. There are no small details in the work, every nuance has an impact on the final result, so mistakes and miscalculations are unacceptable.
When it comes to painting work, the question that comes to the fore is which paint is best to paint the surface. Let's look at the most popular and popular options; for clarity, we present the information in table form.
Acrylic emulsion is the most universal solution for plasterboard ceilings
If you need to paint a large area and want to use colored paint, then it is better to buy a ready-made composition. The fact is that it is almost impossible to make a perfectly matching shade by hand, but in a store they will prepare the required volume of the desired color using special equipment.
In the store you can choose not only the color, but also the intensity of the shade
You yourself must decide what paint to paint the ceiling, but I still advise you not to save money and choose a better option. From my experience I can say with confidence that more expensive compounds have higher coverage and apply much better. The golden mean is acrylic compositions, and if you need to wipe the ceiling with a damp cloth, you can even use silicone paints.
Before painting a plasterboard ceiling, it must be prepared very carefully. The appearance of the structure directly depends on this, so this part of the work must be treated responsibly.
To work you need the following set of materials:
- Leveling the plane is done using finishing plaster, I use Vetonit brand products, for dry rooms the KR mixture is excellent, which costs about 450 rubles per 20 kg, and for wet rooms it is better to use the VH option, it costs a little more 500 rubles. There are other compositions, you need to choose only high-quality mixtures with good reviews from experts;
"Vetonit" is a solution tested by thousands of finishers
- To strengthen the seams, it is better to fill them with a special compound “Knauf Fugen”; it firmly holds the sheets together and prevents the formation of cracks. I always recommend using this mixture for drywall joints, as these are the areas where problems most often arise, and a little extra security would be nice. A bag weighing 25 kg costs about 400 rubles;
"Fugen" can be used both as a putty and as an adhesive composition
- In order for the joints to maintain their integrity even when the building structure moves, it is necessary to reinforce them; for this, a special fiberglass mesh is used, called serpyanka. The most commonly used option is 45 mm wide, the material is self-adhesive. This simplifies the process of using it and allows you to place the mesh evenly and securely;
Serpyanka mesh is a mandatory attribute of a reliable ceiling
- To strengthen the base, improve paint adhesion and increase the covering power of the surface, deep penetration primer is used. You can purchase either a composition completely ready for use or a concentrate, which before use must be diluted with clean warm water in the proportions prescribed by the instructions on the package.
Acrylic primer is ideal for drywall
Now let's figure out what devices you need to have on hand if you do the work yourself. The quality of work directly depends on the tool, so its choice should be taken responsibly.
Never skimp on tools, as cheap brushes, spatulas, etc. will ruin your work. The price difference is small, so it's better to spend a couple of extra hundred and get good tools for the job.
Let's figure out what we need for work:
- The paint is applied with a roller; you should choose a tool with thick, medium-length bristles; it should adhere well to the roller. It is best to consult with specialists to know which of the options on sale are the most popular; builders are guided by experience, not advertising, so their opinion is much more reliable;
The quality of paint application to the surface depends on the roller
- You cannot paint over the entire surface with a roller; in any case, there will be spaces near the junctions with the walls and in difficult areas. Therefore, you should definitely have a brush with a width of 5 to 10 cm with thick bristles on hand. ;
- To distribute the paint evenly over the roller and remove excess paint, you need to have a paint tray on hand; it is made in such a way as to ensure maximum convenience for painting work. The tray must match the width of the roller roller, so it is worth buying it after choosing a painting tool;
With a bath, the work process will be much easier
- Applying and leveling the putty is done using a spatula; for inexperienced craftsmen, I advise taking a device no wider than 30 cm, it is convenient to work with. A narrow spatula is needed to distribute the composition on the main tool, as well as for finishing difficult areas, sealing seams and fastening points. When purchasing, pay attention to the working part: it must be perfectly flat, otherwise it will not be possible to do the job efficiently;
Without such a kit, it will not be possible to prepare the ceiling for painting.
- Leveling the surface to perfection is done using a sanding block, onto which an abrasive mesh or sandpaper is placed. The grain size of the materials should not be less than P100, and it is better to use P120 or even P150; good putty rubs off very easily, so there is no point in treating it first with coarse and then fine abrasive.
I have already written detailed reviews of the process of preparing a ceiling for painting, so here I will tell you everything in general detail, and if you need to understand even better, then read a separate article. As a starting point, we will take a plasterboard ceiling, which is already fixed, but not yet finished.
Let's look at step-by-step instructions on how to prepare a plasterboard ceiling for painting:
Preparing the ceiling takes much longer than painting itself
- First, you need to check the screws on the surface: they should be recessed below the level of the drywall, to do this, take a screwdriver and walk across the entire ceiling, checking the plane with your hand: where the fasteners protrude, they need to be tightened. After this, the ceiling is wiped with a damp cloth or cleaned with a vacuum cleaner, since during operation dust inevitably settles on the surface;
- If you have joints between cut ends of drywall, then they need to be prepared for puttying. This is done simply: using a construction knife, cut a chamfer 5 mm deep at an angle of 45 degrees , this will allow the composition to fill the joint and make it much stronger. After this, it is necessary to apply the primer with a brush along all joints at a distance of about 5 cm on both sides of the joint;
Joining the seams allows you to make them much stronger later
- When the primer dries, which usually takes 1-2 hours, you can begin gluing the sickle mesh. The process is quite simple: the mesh is unrolled from the roll a little at a time and glued to the seam so that it is located in the middle. It is important to place it carefully and carefully press it so that it sticks to the surface and does not stick out in certain areas; it is cut with a construction knife;
When gluing the mesh, the main thing is to do everything neatly and evenly.
- Next, the Knauf Fugen mixture is prepared, since its base is gypsum, it hardens very quickly, so you need to prepare it in small portions. The composition is mixed in a suitable container, after which it is applied to the joints using a spatula. On standard sheet joints, the recesses must be filled, and on cut sheets, the composition should be distributed so as to cover the mesh and level the plane. The screws in the middle are sealed with a narrow spatula;
The composition is applied so that no excess remains on the surface.
- After the composition has dried, which takes about an hour, you can begin sanding the finished areas; you don’t need to try too hard, the main thing is to remove all significant irregularities. After this, you need to prime the entire surface, this will further strengthen the joints and create a solid base for the putty with uniform absorption over the entire area. It is important to process the entire ceiling without missing a single section;
- Solid putty is made using the Vetonit composition; it is not only elastic and fits well on the surface, but also retains its properties throughout the day . That is, you don’t need to rush - carefully distribute the putty in a thin layer over the surface. The work requires accuracy, it is important to apply the mixture evenly, do not pay attention to small sagging, then they will be removed without problems;
The spatula should be held at an angle of 15 degrees to the surface and not pressed too hard
- The putty dries within about a day to a day and a half; while the surface is damp, there is no need to carry out further work. When the ceiling is dry, you can start sanding; for this, a mesh or sandpaper is fixed on a grater and the surface is carefully processed in a circular motion over the entire plane. It is important to achieve an ideal result, since the paint will highlight all flaws if they exist;
Sanding allows you to give the ceiling a perfect smoothness
- Sometimes the finishing of a plasterboard ceiling for painting after sanding has flaws, this is not a big deal, you should putty all the problem areas again and, after drying, level the surface. That is why, if after work you still have ready-made putty, it is better to put it in a closed container, where it will retain its plasticity for 3 days.
In order to check the plane and immediately see all the problems, the easiest way is to use a regular light bulb or a small spotlight. Place the light source against the plane of the ceiling - and it will show all the irregularities, if any.
A light bulb is the simplest secret to an ideal ceiling plane
- After finishing sanding, you need to remove dust, of which there will be a lot on the surface; if you do not have the opportunity to do the work with a vacuum cleaner, then the easiest way is to use a broom and a slightly damp cloth. After this, you need to apply the primer again to strengthen the putty layer and reduce paint absorption. On this basis, the composition will fit much better.
Let me make a reservation right away - if you don’t have a very good painting tool, then even a perfectly flat surface and expensive paint do not guarantee a good result.
I have more than once encountered situations where people use a roller that has already been used and has been in the closet for a couple of years, even if it looks good in appearance, the fur has already lost its softness and it is very difficult to ensure uniform application. Do not spare money on a roller and brush, especially since the costs are generally small - only a couple of hundred rubles.
Now let’s figure out how to paint a plasterboard ceiling with your own hands:
- First, I’ll tell you about such an important aspect as correct application of paint; the last layer should always lie along the direction of natural light. But at the same time, it is not worth applying all the layers in this way; it is better to alternate the direction, then the surface will be covered much better and much faster. To make it clearer, below is a diagram in which everything is shown clearly;
This option allows you to best hide all minor flaws.
- First you need to prepare the paint; during storage, individual components tend to settle to the bottom, so the first step is to mix the composition as thoroughly as possible. If necessary, you can add a little water, since it is the basis of most modern paints. All recommendations are indicated on the packaging, so be sure to read the information on the label;
- If you have not initially decided what color to paint the ceiling and will add pigment before applying the composition, then it is important to remember a simple rule: the entire volume of paint is prepared at one time, making the same shade twice is almost impossible. The process of adding color is simple: a certain amount of colorant is poured into the paint, after which you need to thoroughly mix the composition, preferably using a drill and mixer;
It is important to mix the paint and pigment well, otherwise there will be stains on the ceiling later
- The work begins with painting all the junctions between the ceiling and the walls, the space around the chandelier and other difficult areas. The work is carried out using a brush; it is important to carefully apply the composition; if the walls are already finished, then you can apply a sheet of cardboard to the surface at the junction for protection;
Joints are painted at least 5 cm
- The bulk of the work is done using a roller; if you apply paint in two layers (which happens most often), then the first of them lies perpendicular to the natural light, and the second along the lighting . The composition is poured into the bath, distributed over the roller, then the excess is removed on the grid and work can be done. The paint is applied back and forth with slight overlap of the previous strip;
For convenience, you can purchase a handle extension for the roller
- Before applying the second and each subsequent layer, the previous coating must be completely dry. You should look at the situation to determine how many layers will be required; if you have puttyed the ceiling well, then the surface will be perfectly covered in two passes.
Another aspect that I would like to touch on is how to paint over stains on the ceiling. There are situations when water leaks occur in certain areas, which leads to the formation of brown stains.
If you just paint over them, then ten layers may not be enough, especially if the ceiling is light, to cope with such troubles, you need to use a special composition - “Dulux Trade Stain Block Plus”, this is a special primer that is very easy to use:
This primer is specifically designed to remove stains.
- The pre-leveled ceiling must be treated with primer; it will not only strengthen the base, but also prevent stains from moisture, soot, grease, ink, etc. The composition is applied like a regular primer, it is important not to miss a single area;
It is impossible to eliminate such problems without a special composition.
- After the primer has dried, paint is applied on top; usually two layers are enough to cover the stains. In the future, nothing will come through from within, and this is the main advantage of the composition we considered.
It is possible to paint a plasterboard ceiling with high quality only if it is properly prepared. The process takes quite a lot of time, but there is nothing complicated about it, I can tell you this with complete confidence; once upon a time, without any experience, I was able to perfectly paint the ceiling. Of course, it takes more time due to inexperience, but you are acquiring a useful skill, and in the future the work will go much faster.
The video in this article will help you understand the important nuances of the technological process even better, and if you still don’t understand something, then write your questions in the comments under this review.
Painting a gypsum plasterboard ceiling affects the appearance of the room, so this work must be approached responsibly: follow the steps of surface preparation, choose paintwork materials and apply them correctly.
Before painting the gypsum board ceiling, make sure that it is even and smooth. To do this, it is puttied, after the putty has dried (12-24 hours) it is treated with the finest-grained sandpaper and, if necessary, further puttyed and rubbed.
It is imperative to putty the drywall; if this is not done, stains may form after painting, since drywall absorbs moisture well. Remove the dust with a brush or broom and start priming; if you skip this step, the paint may peel off in the future.
Since plasterboard sheets are large, in a new house, which will shrink for some time, even very well-treated joints move apart and cracks appear at the joints of the plasterboard. Therefore, many craftsmen recommend, before painting a plasterboard ceiling, to cover it with simple non-woven wallpaper 1 m wide, which can stretch.
High-quality coating is impossible in poor lighting. When working in the evening, use energy-saving 15 W cool glow lamps that do not overheat the socket. In daylight, the quality of the work performed is checked.
Most often, for painting gypsum boards in apartments, they use a water-based emulsion, which contains resins or mineral compounds that leave a film on the painted surface after the moisture evaporates.
Water-based paint is not recommended for use in very dry rooms or with air temperatures below 5 °C.
If you have prepared the ceiling perfectly, painting will not be difficult. The following tools are required for painting work:
Before starting, cover the floor, window sill and other objects in the room with plastic film, and cover the gutters with masking tape. The bath with a ribbed platform for rolling out and uniformly impregnating the roller coat should not be large, since the composition dries quickly.
Typically, plasterboard ceilings are treated with a roller. The spray gun is heavier, it splashes everything around, and you need skills to handle it.
It is not recommended to paint the ceiling with rollers made of foam rubber (leaves bubbles and stains) and velor, as it absorbs a lot of material and becomes heavy.
If the roller is attached to a telescopic extension, the rod of which extends up to 3 m, this will allow you to work while standing on the floor, and painting the suspended ceiling will be completed faster. Lightweight tools such as aluminum are easier to handle. New brushes and rollers are washed in warm water, and when finished, they are cleaned.
To paint the ceiling molding (cornice), gypsum or polyurethane stucco, use soft flat brushes. To avoid leaving streaks, work with light intermittent movements. The tool corresponds to the width of the baguette.
How to paint it correctly? First it is primed. Then a small amount of paintwork is diluted with water and the surface is covered with a thin layer, repeating the procedure after the first application has dried.
When performing painting work, be sure to wear goggles and gloves.
How to cover a gypsum board ceiling? Increasingly, latex-based water-based emulsions are used for interior work. They form a washable layer, are odorless, and dry quickly (up to 2 hours). Coating plasterboard ceilings with latex paint pays off, since its elastic components can heal microcracks.
All paintwork materials are divided according to the degree of gloss. This is the main selection criterion. The higher the gloss, the more expensive and durable the paint. It comes in the following types:
- Matte. Capable of hiding minor imperfections in putty and visually raising the ceiling. It is applied to the surface with a roller with a pile height of at least 1 cm.
- Semi-matte. The shine is weak. Suitable for paintable wallpaper.
- Semi-gloss. The surface can be washed with a brush.
- Glossy is the most waterproof and durable. If you cover the ceiling of a small room with such a light-colored material, the sun's rays reflected from it will make the room visually more spacious. All irregularities are visible on such a surface, so it is not recommended for beginners. To work, you need a roller with a pile of less than 0.5 cm.
The purpose of the room, its area and your preferences determine what material to cover the surfaces with. You cannot use one thick layer of paint; there are special compositions that apply exactly 3-4 times.
Before you start working, pay attention to the date of manufacture: produced in autumn or winter, it can freeze repeatedly in storage areas, which often leads to the formation of lumps in it. White paint for a plasterboard ceiling can reveal defects, and many people consider white to be boring, so you can paint your ceiling in any desired color, adding pigment, making the room stylish.
Before covering a plasterboard ceiling, make sure it is level, clean and dry. The paint must be thoroughly mixed, if necessary, diluted with water according to the instructions and filtered.
How to cover a ceiling without flaws? The first step is to eliminate drafts, since they contribute to the rapid drying of the treated surface and the formation of rolls.
First, use a paint brush to go over corners and joints, hard-to-reach places near pipes, and carefully shade the paint.
The ceiling is completely treated with one layer at a time; you cannot take smoke breaks or be distracted by conversations. Do not squeeze the roller too hard and ensure that its coat is evenly impregnated, otherwise you will end up with poor-quality areas.
If you do not use a ceiling molding, the joint with the wall, as well as the stucco molding, are processed first with a brush, then with a small roller.
Let's look at how to properly paint a plasterboard ceiling, taking into account the direction of the light. Regardless of the material chosen, the coating is done 3 times. The first layer is applied parallel to the light incident from the window. The ceiling must dry well, after which the quality is checked in daylight and illuminated by a lamp. If bumps and depressions are found, they are cleaned out. Matte paint is easier to sand than others. The second layer is made perpendicular to the first. Also, after drying, the ceiling is inspected. The last application is made along the light falling from the window.
It is important to carefully roll out the boundaries between areas while they are still wet. You cannot return to a drying place. The material is applied to the ceiling with a roller in zigzags in the shape of the letter W or in strips 0.5-1 m wide. This is done with an overlap of 10-15 cm. Why is it important to carefully and evenly paint the entire surface? Even a small unpainted area on a dry ceiling will form a stain that will then be impossible to get rid of.
How to refresh a ceiling if it is made of plasterboard
- For the required penetration of the putty mixture into the gypsum board, the crack is slightly deepened and widened. The edges are trimmed evenly with a sharp stationery knife;
- joint putty or universal putty is used as a repair composition;
- each dried layer (even rough) must be carefully processed with a grater with a fine metal mesh;
Advice: even if the paint color matches completely, it is not recommended to paint only the areas being repaired. Fresh paint will stand out against the general background.
- protrusions at the joints of sheets. They also appear when the base to which the sheathing is attached is deformed;
- mechanical damage. Not uncommon if there are children at home. It is enough to throw a heavy or sharp-edged object at the ceiling to leave a dent on its surface.
- After installation, it is recommended to deepen the joints a little to make them easier to putty in the future (like the beveled edges of plasterboard boards).
- Then all work is carried out as usual: putty in several layers with serpyanka and further sanding.
- Wall sheets with a thickness of 12.5 mm are not suitable for the ceiling; their maximum thickness should not exceed 9 mm to reduce weight. In addition, it is better to choose a moisture-resistant gypsum board with a green front side. It is optimal not only for wet conditions, but also for possible temperature changes. Thus, ordinary drywall absorbs a lot of moisture, which freezes at subzero temperatures and can cause deformation of the sheets. Which will be a possible reason for the ceiling to bend down.
Everything about installing and repairing ceilings with your own hands
Attention! This method can only be used if the leak is located at the junction of the floors. If the leak is located at electrical outlets, and this is not uncommon, the room must be completely de-energized before cleaning.
When cleaning is completed, drying occurs naturally in the absence of power.
- firstly, the primer allows you to get rid of individual dust particles that cannot be removed either with a vacuum cleaner or, especially, with a brush.
- secondly, we will achieve a significant improvement in the adhesion of the putty layer to the surface.
- thirdly, this strengthens the load-bearing coating that has been damaged by water.
Painting won't be too difficult. Use a roller for this, but first apply one coat of paint to the putty surface.
- The damaged area must be cut to the nearest supporting profile.
- In this case, the main sheet remains in place.
- The only thing required is to cut a new piece to size and install it in place.
- The junction of the new sheet with the old one must be embroidered using a painting knife.
- The seam must be filled with putty.
And then it happened - you come home and water is flowing from the ceiling. This usually happens in two cases: it’s raining outside and your roof is leaking, or the upstairs neighbors forgot to turn off the tap, or their pipe burst. If you do not live in a private house or on the top floor, all the blame falls on the neighbors above.
Preparation
If you decide to refresh your ceiling with a new paint composition, then for the success of the painting work you should carry out high-quality preparation. Even if the surface is finished with water-based paint, the old finish, whatever it may be, must be cleaned off. This is due to the following reasons:
- the layer of paint has already lost its former attractiveness;
- cracks have appeared on the ceiling, due to which a collapse is possible after applying a new layer of finishing to the surface;
- Mold may well develop under the old layer of finishing, which will lead to the fragility of the repair.
Removing the old layer of water-based paint from the ceiling surface is carried out as follows:
- We wet the old coating generously with water. You can use a hand sprayer or roller for this.
- Next, leave the surface for some time for better soaking.
- After 20 minutes, repeat the wetting procedure. In this case, windows and doors must be open.
- After about 30 minutes, bubbles will appear on the ceiling. Take an iron spatula and scrape off the old coating.
After removing any finishing residue, rinse the surface thoroughly with clean water. To do this you need to use a foam sponge. If there are defects in the starting surface (cracks, potholes, etc.), they should be covered with putty. When it dries, use sandpaper or sandpaper to level the surface.
For putty, many experts advise choosing universal polymer compounds. They are, of course, more expensive than cement or gypsum, but it will be much easier for beginners to work with them.
Please note that if there are strong differences in the surface, it is not recommended to fix this kind of defect with your own hands. To do this, it is better to call an experienced plasterer or install suspended ceiling structures.
If the differences are no more than 3 mm, then there are two alignment options:
- Applying plaster in the right places. For these purposes it is necessary to constantly use a level.
- Use of ceiling tiles. It can be painted very easily and quickly with water-based paint. At the same time, you can choose various decorative patterns using such slabs.
After all the manipulations described above, in order for the painting to be successful, the prepared surface must be primed. The priming process itself is not complicated. But if this is not done, the final finish may become stained in the future, which will ruin its aesthetic appearance.
For priming, you should use professional solutions that have deep penetration. In this case, for greater effect, apply the primer in several layers. It will be enough to prime twice.
Some people, in order not to spend money on buying a primer, prepare it themselves. For these purposes, purchased water-based paint is suitable, which is simply diluted with water. By the way, any composition fits perfectly on itself, even in diluted form.
It is also worth noting that after removing the unusable finish, mold may be exposed. To combat it, special antiseptics should be used. They not only destroy existing mold, but also prevent its reappearance in the future.
Instead of expensive antiseptics, you can use self-prepared solutions (for example, a five percent solution of copper sulfate). The treatment should be done after removing the old finish and before applying putty or primer.
By correctly and consistently performing the above-described manipulations, you will be properly prepared for painting.