- Posted by Svetlana Grishkina
- Date: March 4, 2016
Finishing the ceiling, including painting it, is perhaps the most time-consuming part of the renovation. Modern technologies greatly facilitate this process. Water-based paints have been especially popular lately - high-quality materials that are quite easy to use. But painting the ceiling with water-based emulsion also has its own secrets and features that must be taken into account when working.
- 2 Preliminary preparation and treatment of the ceiling
- 3 The process of painting the ceiling with water-based paint
3.1 Roller painting
3.1.1 Video about the correct painting of the ceiling with water-based emulsion using a roller
- 3.2.1 How to paint a ceiling using a spray gun - video
- 4.1 Errors when working with a spray gun
Advantages and disadvantages of painting
Water-based paint is an inexpensive and practical paint. The advantages of the material include:
- no unpleasant odor;
- high level of environmental safety - the composition does not contain toxic components;
- the ability to do the work yourself, since the painting technology is simple;
- low cost,
- versatility (this finishing method is suitable for any interior style).
To obtain a shade, tinting is done and pigment is added to the mixture. In this case, the splashes can be easily washed off from clothes and the floor.
Water-based paint has disadvantages:
- it does not tolerate low temperatures well, under their influence the layer may crack;
- the painted surface is difficult to clean from dirt, so it quickly loses its appearance;
- the use of the material involves labor-intensive preparation of the ceiling for whitewashing.
Technology of painting the ceiling with water-based paint
The procedure for applying water-based emulsion to the ceiling surface is practically no different from working with other types of paints. However, before painting, you will need to do a preliminary test of the coverability of the material on a small piece of concrete or plywood somewhere in the utility room.
It is best to whiten the ceiling with a thread roller; there should be at least two of them in stock, one with a nozzle width of at least 20 cm, the second, 5-7 cm, is used for tinting corner areas.
How to properly apply water-based paint to whiten a ceiling
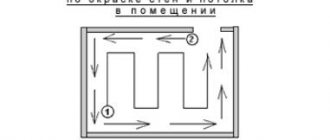
The painting procedure involves laying at least two layers of material. In this case, the direction of movement of the working tool when moving to a new layer should change to perpendicular to the previous one.
Traditionally, the first layer of water-based emulsion is laid with movements parallel to the plane of the window opening in the room. The second layer of painting is accordingly performed perpendicular to the window. In this case, the flow of light falling through the window onto the ceiling will be directed parallel to the lines of application of the water-based mixture. Even if there are risks from the roller somewhere, they will be invisible in natural light.
How to whitewash a ceiling with water-based paint without streaks
In order to obtain high quality painting of the ceiling surface without marks, marks and streaks, you must follow several basic rules:
- Before applying paint to a roller or brush, it is necessary to remove lumps of mixed dust and water-based emulsion;
- The water-based paint applied to the working surface of the tool must be rolled in a tray so that it is evenly absorbed throughout the entire nozzle;
- When painting, the roller is pressed against the ceiling surface with approximately the same force. There is no need to rush or try to squeeze the water emulsion out of the nozzle;
- Rolling out the paint and varnish material is done in strips with slight overlap at the joints. In this case, the ends of the soft roller attachment must be rounded; this is the only way to avoid the appearance of splashes and marks on the ceiling.
After painting, the layer must be thoroughly dried before repainting. Painting over a damp or insufficiently dried layer is not allowed.
Advice! Experts also recommend installing an additional light source in the room, a lantern or spotlight aimed at the ceiling. This illumination allows you to see painting defects even at the stage of applying water-based paint.
In corners and areas adjacent to walls, the water-based emulsion must be applied with a small roller, and in some cases it is necessary to use a brush to touch up or level the layer. The process of painting ceilings with water-based paint with your own hands is described in more detail in the video.
How to properly paint a ceiling with water-based paint to avoid stains
In order to avoid the appearance of stains or stains during the painting process, it is necessary to carefully prepare the ceiling surface. Even if the surface has been primed and thoroughly dried, immediately before painting the ceiling, the surface must be thoroughly wiped with a slightly damp sponge and allowed to dry for 10-15 minutes.
Use a thread version of the nozzle with bevels
The second problem is related to the incorrect use of the paint itself. Stains and stains appear on the ceiling due to uneven application of the material. After applying a fresh portion of water-based emulsion, the roller, as a rule, is pressed against the surface with great force; accordingly, at the beginning of the movement, a larger amount of paint is squeezed out. As you move away from the starting point, the amount decreases, the paint layer becomes thinner and more transparent. Therefore, it is better to roll several times with little force than to make a stain.
How to quickly whitewash a ceiling with water-based paint
There is only one way to quickly and efficiently paint a ceiling with water-based paint - using a pneumatic spray gun. It will take about an hour and a half to cover the walls and furniture in the room with plastic wrap. The same amount will be required to paint the ceiling in two layers.
The sprayer is convenient for applying water-based composition to complex surfaces.
With the traditional method using a roller or brush, the process of painting the ceiling surface takes 2-2.5 times longer.
Preparing for painting
It is necessary for the paint to adhere well, for this you need to prepare the surface well.
Painting the ceiling with your own hands begins with preparing the surface. Many people believe that in such cases it is possible to apply the composition over old paint or even wallpaper, but this is not the best option, since the difference in the structures of the applied composition and the base will quickly appear.
The process can be represented step by step as follows:
- cover window glass, frames, floors, walls from splashes and dirt with plastic film;
- remove old coating (paint, tiles, etc.);
- eliminate defects from the surface of the ceiling, and, if necessary, reinforce with fiberglass.
Afterwards, the ceiling surface must be treated with putty and primer.
Tools for whitewashing the ceiling with your own hands using water-based paint
To paint the ceiling yourself with water-based paint, you can use a traditional set of painting tools. The main kit will include:
- Painting brush with a feather width of 70-80 mm. Separately, you will need to buy a couple of narrow brushes for painting the ceiling in hard-to-reach places;
- Paint roller; the dimensions and material of the soft nozzle are selected depending on the condition of the surface;
- A tray for collecting water-based emulsion with a roller and a container for preparing the material;
- Clean rags and sponge for cleaning windows.
In addition to the sponge, you will need to stock up on plastic film, self-adhesive masking tape, a scraper, a stirrer attachment, an electric drill and a telescopic extension handle for the roller.
One roller and water-based paint is clearly not enough
For your information! You can, of course, simplify the process and use a pneumatic spray gun to paint the ceiling with water-based paint yourself. The material is water-based and does not contain toxic solvents or varnishes, so from a safety point of view this is a good option.
In practice, painting with a pneumatic spray is recommended for new buildings and major renovations, when the room is completely free of furniture. Otherwise, at least another 2-3 days can be spent on laundering. Manually painting the ceiling with water-based paint with your own hands looks like a complex and time-consuming process, but with the correct selection of the painting mode, the quality will be even higher than when using technology. And even more so, there will be no gaps or dark spots in the corners.
Tools and materials
Before starting work, you need to purchase tools and materials. In addition to paint, you need primer. Consumption is calculated in accordance with the manufacturer's instructions. You will need masking tape to protect the surfaces. To apply the mixture manually, you need a paint roller and a narrow brush to paint corners and joints.
If we are talking about painting a large surface, then it is recommended to purchase a spray gun (it is equipped with a compressor) or a less powerful spray gun with a paint sprayer.
For stirring you need to select an appropriate container. It is recommended to carry out such work using a construction mixer, but you can use a screwdriver. You should also take care of protective clothing, glasses, and gloves.
Pay attention to: Why, what and how is liquid wallpaper painted?
Types of water-based compositions
Now there are several varieties of such paints, their composition and application characteristics are distinguished. Water-based mixture is water containing minerals or polymer particles, pigments, additives that give the paint certain characteristics. As the composition dries, the water evaporates, leaving a film of minerals/polymers on the surface. The quality of the painted surface depends on the latter substances.
Acrylic
These are the most common compositions. Here, acrylic resins act as the second component of water-based paint; latex is added to them for elasticity and water resistance. This coating can be washed without worrying about its condition. This quality allows this type of paint to be used even in rooms with high humidity.
The advantages of such compositions are ease of application, excellent covering ability, making it possible to successfully camouflage not too large defects: for example, cracks whose width does not exceed 1 mm. There is one drawback: the high price.
Mineral
In these compositions, which can rightfully be called “old friends,” polymers replace lime or cement. Mineral water-based paints have fairly good adhesion to the surface, but their big disadvantage is that they wash off quickly. This drawback leads to a logical result - a gradual loss of former popularity. Another advantage of this type is its low cost.
Silicate
Here the composition is based on liquid glass. It provides the following qualities of such water-based paints: resistance to precipitation, air tightness, long service life, if the painting technology is followed. These advantages are the reason why these materials are also used for outdoor work.
Silicone
In such paints, silicone resins play a major role. These substances guarantee vapor permeability, so the compositions can be used in conditions of high humidity. Another advantage of silicone paint is the ability to camouflage cracks up to 2 mm wide. They have one drawback, the same as that of acrylic materials - high cost.
It is necessary to mention one more important characteristic of paints - the degree of gloss. The compositions are:
- glossy, all imperfections are clearly visible on them;
- matte, unforgiving of even the smallest defects;
- semi-gloss;
- semi-matte.
It becomes clear that it is better to choose one of the latter options: either a semi-gloss material or a semi-matte composition.
Latex can be added to all types of water-based emulsions, which allows the material to be used in wet areas. Knowing the main advantages and disadvantages of water-based paints is a chance to find your own, almost perfect, option.
Selection and preparation of water-based paint
The desired paint color is obtained by tinting. Any water-based paint is a dispersed emulsion based on water, pigments and small insoluble polymer particles, which, after the water evaporates, form a film on the painted surface.
The composition may include special additives that make it possible to obtain mixtures for dry rooms and rooms with high humidity levels. This information must be indicated on the packaging.
Also, water-based paints differ in the degree of gloss. For example, there are matte, semi-matte, glossy compositions .
The latter wash well, but surface defects are clearly visible on them. Semi-matte compositions are considered the best option.
How long does it take for water-based paint to dry on a ceiling?
On average, the water-based emulsion on the ceiling dries in 2.5-3 hours at room temperature. The drying speed largely depends on the temperature and humidity of the air. Typically, the manufacturer indicates the average for standard conditions on the packaging.
You should not try to speed up the drying process of the ceiling using drafts, hair dryers or the heating system turned on at full power. The layer must dry naturally, this is the only way to achieve good quality coating.
Which roller to paint with?
Construction stores offer different rollers. They are made from faux fur (and the pile can be either short or long), velor or foam rubber. Choosing the right tool is important because the quality of the painting depends on it.
Thus, velor rollers are not used for water-based paint, since they do not absorb the composition well and the work will proceed slowly. Foam rubber may leave small bubbles on the surface.
There are matte, semi-matte, glossy compositions. Semi-matte compositions are considered the best option.
Faux fur is good, but it is better to go with long or medium pile, since short piles contribute to the appearance of splashes.
Secrets and features of work: how to avoid mistakes and correct shortcomings on the go
If during the painting process you violated the technology and applied the water-based paint unevenly, areas with different shades may form (the light from them is reflected in different degrees of intensity), to avoid this, follow the direction of painting.
Do not try to correct such irregularities until the surface is dry - this will make the problem worse. Wait until it dries completely and apply another layer to hide the imperfections. If this does not help, remove the layer with sandpaper and apply again.
When painting a plasterboard ceiling, do not use paint that is too diluted with water. It can soak the paper layer of the finishing material so much that the surface becomes covered with bubbles and begins to peel. And since the ceiling is not your walls, heartless gravity will do its job to the point that the surface will have to be completely repaired. We don't pursue such goals, right?
It is better to paint a plastered ceiling with a water-based emulsion using a spray gun. This device will distribute the paint on the ceiling much more evenly than a roller. But don't forget to apply primer first.
If the ceiling was previously whitewashed, it is better to wash off the old layer. Water-based paint applied to lime or whitewash will not only lie unevenly, but will also begin to peel. The same applies to old paint: if it has slight damage, remove the layer.
Small mistakes and errors in painting the ceiling can be easily corrected with a roller and brush
To avoid streaks on the ceiling during painting, first apply a layer of diluted water-based paint with a wide roller. After drying, you can easily see all the flaws. When you carry out the main painting, pay special attention to these areas and treat them more thoroughly.
Be sure to follow the direction of the layers: the penultimate layer should be perpendicular to the window, and the last one should be parallel. Don't rush - wait until the layers are completely dry.
Excess applied paint can be removed in the following way: walk a roller with no paint left on it over the surface, and its pile will absorb all the excess.
Surface priming
Surface priming is a mandatory stage of preparatory work. Some craftsmen believe that you can skip it and apply a layer of paint directly to the putty or prepared base. But painting the ceiling this way does not give a neat and attractive result.
Application of primer is necessary to improve adhesion between the rough ceiling and the paint composition. The primer also helps strengthen the surface, reduce paint consumption and increase the service life of the coating. In addition, it protects the surface from the appearance of fungus and mold.
The primer composition is selected in accordance with the paint. So, for acrylic paint you need acrylic primer, and for water-based paint you need a water-based composition. The primer is applied to the putty in 2-3 layers. You can use a roller for these purposes.
How to protect the ceiling from absorption of water-based paint before whitening
In the process of painting the ceiling surface, problems may arise due to uneven absorption of liquid by the concrete, plasterboard or wooden base. The best way to avoid stains is to pre-prime the surface. The acrylic primer can be diluted with a small amount of water and rolled with a foam roller in two layers, according to the scheme used when painting with water-based emulsion.
Advice! It is best to prime with a hard brush - a brush, the quality of the surface is beyond praise.
Sometimes it happens that it is not possible to buy primer, but you need to paint the ceiling now and then. As a primer, you can use a water-based emulsion diluted with water twice. The material will need to be applied to the concrete surface of the ceiling with a brush, intensively rubbing the liquid until bubbles form.
On concrete, it is better to prime with paint brush.
Coloring instructions
Regardless of what tool you use, you need to wait until the primer is completely dry before you start painting the ceiling, otherwise the paint won't stick.
Typically, paint is applied in 2-3 layers, each of them must dry. This requires at least 12 hours.
Each new layer must be applied using a new roller. Trying to clean it by simply washing it under running water will not give the desired result. But a roller can be used for oil paint, so there’s no need to throw it away.
Pay attention to: How to choose the right color for paint and work with it
It is best to carry out painting work in the evenings, as ultraviolet rays can leave dark spots on the whitewash. If work is carried out during the daytime, then the windows should be covered with fabric.
It is best to carry out painting work in the evenings, as ultraviolet rays can leave dark spots on the whitewash.
Using a roller
Even when using a roller, you will need a brush - with its help you can paint over the joints between the walls and the ceiling, which he cannot reach.
The roller is dipped into a tray or cuvette of sufficient diameter so that it can be moistened with paint along its entire circumference. When applying paint, press the roller lightly, but so that the pile fits tightly to the surface to be painted. The pressure increases only as paint is consumed.
The composition is applied in strips no more than 50 cm wide. It is advisable to start from the corner of the room. All stripes go in the same direction, in the direction of movement of the roller. Its handle should have an angle of 45° so that the pile fits tightly to the ceiling. The stripes should be overlapped (with an intersection of 5-10 cm). Paint deposits are removed with an old used roller.
Spray painting
When painting the ceiling using a spray gun, the algorithm of actions will be as follows:
- Dilution of water-based paint. You need to get a more liquid composition than using a roller or brush.
- Strain the mixture so that small particles do not clog the nozzle. If the master cleans it, the painted areas dry out and fresh paint is laid on top of the dried one. Those. pronounced stripes will appear on the ceiling, which can only be removed after the layer has completely dried. Visible boundaries will have to be sanded using sandpaper. The second layer will completely hide the mistakes made.
- Regulating paint supply. To do this, you need to paint an unnecessary object, such as drywall scraps, within 30 seconds. This is important to do so that the spray gun stops throwing out a large amount of the composition.
- Painting, which is started only after the paint flow has stabilized.
When painting, the spray gun nozzle should be at a distance of 50 cm from the ceiling. You need to move it slowly and smoothly, about 1 m in 5 seconds. It is important to maintain a constant nozzle angle while the painter is whitewashing the ceiling. It is desirable that the angle of inclination be straight.
You should paint in sections. It is believed that the best option is to apply 3 layers. First, movements are made in one direction, then paint is applied in the transverse direction. The pace should be even, since delays in 1 section lead to the formation of a thick layer. It is better to apply less mixture, since insufficient thickness of the composition is easier to correct by applying the next layer.
Please note: Features of painting the ceiling with acrylic composition
Painting with a brush
You can repaint the ceiling using a brush. This option is recommended where there is a small amount of work to be done.
When using a brush, it is difficult to apply the composition evenly - individual strokes appear, and for beginners, streaks may appear. In addition, the time required to complete the work increases several times, as does the material consumption.
Therefore, brush painting is usually practiced in small utility or utility rooms, where a streak-free ceiling is not so important. But you still need to follow the manufacturer's instructions and carry out work without interruption to obtain a uniform surface.
How to choose and prepare water-based paint to paint the ceiling
There are a huge number of water-based materials on sale from a variety of manufacturers, from domestic chemical plants to foreign brand companies. For a person unfamiliar with the process of painting with water-based paints, selecting a material can be a real problem. It’s not enough to be able to properly whitewash the ceiling with water-based paint; you also need to choose the material wisely. The easiest and worst way to learn more about paint is to listen to the manager - the salesperson in the salon. If you have patience, then it’s better to read the instructions on the can, the manufacturer’s recommendations, or talk to professional painters.
What are the differences between water-based paints?
You can go the simplest route, for example, buy a good water-based emulsion with acrylic filler. It is in demand, is inexpensive and at the same time gives good results. Approximately 80% of all water-based paints purchased for home painting are acrylic resin materials.
Pure ceiling ceiling paints include:
- Water-based emulsions based on polyvinyl acetate. Suitable for painting the ceiling in any room. It is inexpensive, so it is possible to make a supply and periodically update the layer of decorative coating;
- Silicone paints are used primarily for painting ceilings in kitchens or bathrooms; they have good vapor permeability and are resistant to fungus and detergents. The cost of water emulsion is noticeably higher than all other brands;
- Water-based emulsions with latex polymers. They are expensive, but at the same time they provide the highest possible quality of coating; they are used for painting ceilings and walls in residential premises.
Water-based paints can be sold both in the form of concentrates and in a ready-made diluted state. It is best to purchase a concentrate and, as necessary, dilute the paint to the required state. Usually, when carrying out repairs and planned painting of ceilings and walls, material is purchased in 5-10 liter containers, which are then tinted, diluted and used for painting walls and ceilings inside an apartment, house, cottage or summer kitchen.
How to dilute water-based ceiling paint
Properly diluted water-based paint should have a consistency similar to fresh kefir. This means that if you put water-based emulsion on a roller or brush, the viscous liquid will remain on the working surface of the tool in the form of a thin layer and will slowly drip into the tray.
Properly diluted water-based paint flows in small drops
Important! The volume of added water does not exceed 20%; if it is not possible to bring the paint into working condition in this proportion, the liquid quickly drains or collects in lumps, then something is clearly wrong with the material, and it is better to refuse to paint the ceiling with such materials.
Technologically, the dilution process is as follows:
- We open the package with water-based paint; there should be no pungent or sour smell;
- Using a spatula, carefully mix the material without adding water; this is necessary in order to lift the denser layers of filler that have settled to the bottom of the container;
- Using a nozzle and an electric drill at low speeds, mix the water-based emulsion to make it more plastic. After five minutes, add clean water in small portions.
Experts advise that before applying the water-based emulsion to the ceiling, mix it again using a mixer attachment and a drill. This improves the plasticity of the paint, making it softer and adhering well to the concrete surface of the ceiling.
How to tint water-based paint to paint a ceiling
There are two options for tinting the mixture. Firstly, water-based material can be tinted using special equipment upon purchase. In this case, dry fillers are used that are highly stable, color stable, and do not wash out or settle to the bottom of the container.
If you tint the material yourself, you will need to buy a toner in liquid form, always from the same manufacturer as the water-based emulsion. In addition, you need to take into account that the real color of the ceiling will be slightly different from what happened in the container. The evaporation of water during the drying process makes the coating less bright and rich. Therefore, many craftsmen take control measurements in the process of preparing for painting. To do this, a small amount of the finished material is applied to ordinary glass. After the water-based emulsion has dried, from the back through the glass surface you can see the approximate shade of the ceiling after drying.
How to add decor to water-based paint to paint a ceiling
The process of tinting the material is carried out in several stages:
- The water-based paint in the container must first be refreshed and mixed again with a mixer attachment and an electric drill. A large number of air bubbles are formed in the liquid, which significantly improves the process of mixing with liquid colorant;
- We fill the syringe with toner and add it in small portions, literally drop by drop, to the water-based paint. After each addition of color, mix the material until the liquid in the container acquires a uniform shade.
The tinting procedure is carried out immediately before starting to paint the ceiling; the entire container needs to be tinted. You cannot tint in parts; during the painting process, you can tint the material for the first layers in a separate container.
Strengths of the method
The popularity of water-based paint is explained by the presence of a number of advantages in this material:
- Easy to apply. Do-it-yourself whitewashing of the ceiling with water-based paint is done with a regular fabric roller.
- After applying the finish there is no sharp unpleasant odor, which often accompanies the use of other types of paints.
- High drying speed. As a rule, this takes 2-3 hours, after which the ceiling surface can be used.
- Environmentally friendly. Water-based paint contains no toxins harmful to humans. This makes it possible to use this material in places where people live.
- Significant consumer parameters and design characteristics. You can add color to the material to convey any desired shade. The substance has good adhesion to any substrate (except metal).
- Easy care. The painted surface can be easily wiped with a damp cloth. In case of accidental contact with the skin, the material is easily washed off with plain water. Washing the instrument also takes place without any problems.
Expert advice
Now about how to properly paint the ceiling with water-based paint, according to experts:
- If the order of applying the stripes was disturbed during work, the light will be reflected differently from different parts of the surface, resulting in dark spots being visible. In this case, it is necessary to wait until the ceiling is completely dry, and then apply a new layer of material, taking into account the direction of the sun's rays. If this does not help, you will have to remove the coating and do everything again.
- When finishing plasterboard ceilings, do not dilute the paint with water. A large concentration of liquid can cause the paper layer of the material to become wet, resulting in the surface becoming unusable. If the surface has previously been plastered, it is better to use a spray gun, but only with prior priming. In some cases, the old paint coating does not need to be removed; it is enough to simply rub it with fine-grain sandpaper.
When working on drywall, it is advisable to use only high-quality factory paints, acrylic or latex based. - After each layer has dried, it is necessary to inspect the surface. Immediately after painting, smudges and stains are not visible, so you need to wait. The following layers must be applied especially carefully in areas where defects appear. Excess paint on the coating can be removed by rolling the entire area with a dry roller, but this can be done before the material dries.
You can paint ceilings with water-based compositions yourself, even if you have no experience in painting work. It is important to follow the above recommendations and take your time. It’s better to let the finishing work take longer, but the result will be of high quality. Also, do not forget about the recommendations of the material manufacturers.
Additionally, we suggest watching a video where beginners can learn a lot of useful information.
Preparatory work
Before painting the ceiling with your own hands, you need to remove the old coating from it. The easiest way is to get rid of whitewash. To do this, you need to moisten the ceiling with water from a spray bottle, leave for half an hour and repeat the procedure. Then take a spatula and scrape off the whitewash. At the end, you just need to wash the ceiling with a sponge and let it dry.
Removing a layer of paint
Things are more complicated with paint. To do this, you must first treat the surface with a spatula or sandpaper to remove exfoliated fragments, then moisten the ceiling generously with water and leave it for a while. As a result, the paint will swell and swell, after which it can be easily removed with a regular spatula. Most often it is necessary to repeat the procedure several times.
The old coating is washed off or scraped off with a spatula
Removing stains
To remove smudges and rust, use a 5% solution of copper sulfate. To do this, apply the liquid to a rag and wipe the surface. If traces remain, you need to use one of the following options:
- a two percent solution of hydrochloric acid (when working with this product it is important to use personal protective equipment);
- a solution of 1 part drying oil and 20 parts lime;
- a thick lime-based product with the addition of water and denatured alcohol.
These compounds must be applied to the ceiling and left for 15 minutes, then rinsed off with water. In most cases, it is enough to repeat the procedure twice.
Not all stains are washed off the first time, so the attempt should be repeated at least a couple of times
Ceiling leveling
After removing all the stains, you need to sand the ceiling again to remove any unevenness, and then brush off the dust. After this, you need to wait 1–2 days for the surface to completely dry. This is to check if the stains will appear again. If the coating is ready, you can start puttingtying.
Plastering a ceiling without experience is quite a difficult task, so it is advisable to invite professionals for such work.
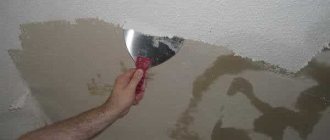
Typically, standard finishing putty is used for interior work. The material is sold ready-made, so you just need to unpack the container and scoop some material onto a spatula. Use a tool to stretch the composition over the surface so that the layer is uniform. In this way, you need to finish the entire ceiling and let it dry again (the drying time is indicated by the manufacturer on the packaging).
A little less often, oil-based and glue-based materials are used for leveling. This putty is applied with a roller or brush. Before working with it, it is important to repair all large defects with cement-sand mortar.
Padding
This procedure is necessary so that the paint is better absorbed into the ceiling. The material is applied with a roller or brush. During work, it is important to ensure that the primer covers the entire surface. The first layer is left to dry, then the second is applied.
When selecting a primer, you should take into account the type of paint, as rejection may occur.
Preparing the ceiling surface
To repair the ceiling, you first need to clean it of all types of dirt, remove the old coating, and the surface must be smooth. The presence of flaws, pieces of old finishing, or various types of stains is checked.
The previous finish must be removed using a spatula. If it was whitewash, then first wet the surface in sections, wait for it to swell, then work with a spatula or a metal brush. You should not wet the entire ceiling at once; it is better to carry out the process in stages.
If wallpaper was used as a ceiling covering, then they are also pre-moistened. Remove the old water emulsion by thoroughly wetting the entire surface. The second time, twenty minutes later, the ceiling is wetted again. Open windows and doors in the room to get a draft. After the coating has swollen, you can try to remove the water-based paint with a spatula.
Even if there are small areas of old coating on the surface, they need to be eliminated. You can only leave freshly applied material when it holds securely.
Reliability is checked by tapping these areas; if the sound is dull, then the clutch is bad, and these defects must be removed.
The previous finish must be removed using a spatula.
Preparing the plane
The first thing you should do before you start working with the emulsion is to prepare the room. You will need to remove all unnecessary pieces of furniture that interfere with work and cover the floor, as well as all remaining furnishings, with plastic wrap.
Next is processing the entire floor plane. Existing layers or remnants of previous finishes and peeling areas must be removed. This can be done using various spatula, solvents and chemical compounds that are specifically designed for this.
After the surface has been cleaned and dried, you need to repair all major floor defects, such as cracks, connecting seams between slabs and other similar things. When this is done, the ceiling must be primed so that the new layer of finish will lay down more evenly.
Choosing paint and tools
Water-based paint has replaced chalk and lime, which until recently were used to whitewash all ceilings in apartments. This finishing material is good because
- dries quickly;
- produces little splash;
- practically no smell;
- absolutely safe, does not poison the air with toxins and other harmful substances;
- Suitable for all types of surfaces.
You won’t find a better material for finishing the ceiling and walls with your own hands. It is easy and pleasant to work with him both for a professional and for an ordinary person.
Manufacturers of these paints produce compositions with different quality characteristics. There are several types of water emulsions: silicone, silicate, acrylic and latex. They all create excellent whiteness, but differ in hiding power, abrasion ability, moisture resistance and price. For kitchens, bathrooms and rooms where surfaces require frequent wet cleaning, it is recommended to choose washable compounds with a dirt-repellent effect.
Before painting the ceiling with water-based paint, you need to make the necessary calculations to buy the required amount of material. Since the color may vary slightly in different containers, it is recommended to purchase a jar that is slightly larger than required. The remaining paint can be used to decorate the walls.
In some cases, creating perfectly white ceilings is not necessary. Then a certain color (usually blue) is added to the paint and the desired shade is obtained.
In addition to the main material, you need to stock up on tools and improvised means with which it will be convenient to carry out painting. For finishing work you will definitely need the following tools:
- brush, thin, fluted, no more than 10 cm wide;
- roller with medium pile 18-25 cm wide;
- tray with ribbed insert;
- telescopic handle;
- ladder.
When carrying out repairs with your own hands, pay special attention to the roller, as this is the main tool for the job. On the market they are sold assembled and in separate parts, of which there are two: the roller itself with a textile or foam coat and a clasp or handle.
If the bristles are too long, the tool will be heavy. If it’s short, you’ll have to go over the same spot several times before it gets painted over. The foam nozzle will quickly wear out and require replacement.
The handle, clasp, must be stable, not dangle, and move freely. A rubber insert must be attached to it so that the tool is held firmly in the hand.
Which roller to paint with?
Do-it-yourself painting is mostly done with paint rollers - purchasing a spray gun or compressor for small areas to be painted is not practical from an economic point of view.
On the shelves of construction stores you can find a variety of rollers:
- faux fur with short, medium and long pile;
- foam rubber;
- velor
Many inexperienced repairmen do not pay attention to which roller to paint the ceiling with water-based paint, and buy the cheapest kits. But there are some secrets here:
- a velor roller does not absorb water-based paint well - finishing work will take time due to slow painting;
- foam rubber leaves small bubbles on the ceiling;
- short-pile faux fur gets splashed heavily with very fine paint particles.
Therefore, the ceiling should be painted with a medium to long pile roller made from faux fur. In this case, the fibers should fit well (not come out of the base when twitching), the seam should run diagonally and not stand out.
Ceiling spray gun
Painting ceilings of a large area or at a great height is a rather difficult task. In such cases, a spray gun comes to the rescue. Its main advantage is the high speed of work. By working with a spray gun, you can avoid paint smudges on the surface. For a good result you need to follow simple rules:
- Wear protective clothing, glasses and a hat;
- Thin the paint in strict accordance with the manufacturer's recommendations;
- When painting, do not hold the spray gun in one area, but move it smoothly and evenly over the surface;
- Keep the sprayer at a distance of about 70 cm from the surface (use a stepladder).
Painting with a brush
Those nostalgic for the old days paint the ceiling with a brush. Here, no matter how hard you try, the finishing result will be much worse: strokes and stains are visible. At the same time, paint consumption increases: something will drip onto the floor, something will remain in a thicker layer of paint.
The technology is applicable in utility rooms, garages, and workshops. When agreeing to use a brush, you need to take into account the working time - it will be 3-4 times longer.
How to dilute and calculate the quantity?
Attention: If the solution turns out to be too thick, you can dilute it to the desired consistency. Water-based coatings are diluted with water; alkyd and oil-based coatings require the addition of solvents. There are state standards regulating the standard consumption of each type of coating per square meter of surface. Corresponding indicators depending on the base material:
- water emulsion – 150 ml;
- acrylic – 250 ml;
- silicone – 300 ml;
- silicate – 400 ml;
- polyvinyl acetate – 550 ml;
- latex – 600 ml.
To obtain a high-quality coating, painting can be done in two or even three stages. The formation of each subsequent layer requires 30% less composition than the previous one. This is taken into account when calculating the material.
Prices for water-based paint
water-based paint
Water-based acrylic paint for ceilings “Stroitel”
Silicone paints have virtually no disadvantages. The only disadvantage may be vapor and gas permeability if reinforced concrete is painted. After some time, the metal will begin to rust, and rust spots will appear on the ceiling. Before painting reinforced concrete with silicone paint, the metal must be protected.
Reference! Today, silicone water-based emulsions with anti-corrosion additives have appeared on the market.
If your budget allows, choose silicone water-based emulsion. Otherwise, use it only in the toilet and bathroom. And remember: after drying, silicone paints give a glossy surface.
Interior water-based silicone paint
Silicate paints are inexpensive, but are not suitable for baths or kitchens. For such rooms it is better to stick to acrylic paints. However, due to vapor and gas impermeability, they cannot be applied to fresh plaster until it is completely dry. Suitable paint for ceilings in living rooms.
A ceiling coated with acrylic water-based emulsion can be washed, but not often and carefully. If latex is added to the paint, the ceiling can be washed many times, even using a brush. The paint is ideal for painting the ceiling in the kitchen.
Decoding GOST parameters
- The mass fraction of non-volatile substances characterizes the residual mass of paint substances after drying and volatilization of evaporating components. The higher this indicator, the better the paint adheres and the fewer layers need to be applied. The quality paint parameter cannot be less than 40%.
- Frost resistance is the resistance of paint to low temperatures without changing the quality properties of the painted surface.
- Constant water resistance refers to how many hours a painted surface can remain undamaged by constant exposure to water.
The parameter is studied at a temperature of 18-22 °C. How to choose water-based paint - The degree of grinding is the maximum particle size of the substances included in the water emulsion. The lower the number, the smaller the particles. Paint with small particles lies on the surface as a smooth film.
- Covering power is the paint consumption in grams per square meter required for even painting of the surface without obvious defects.
Consumption of water-based paint