Range of primers
Before applying water-based paint compositions, water-based polymer primers are used.
They, like paints, have a number of qualities:
- No unpleasant or pungent odors
. The fact is that such a primer for ceilings for painting does not contain solvents. Instead, use water that has no odors. - Quick drying
. This indicator directly depends on the rate of water evaporation. This means that under normal conditions primers dry in just a few hours.
It should be noted that there are no compositions that can be used in any case for painting, so in most cases the following types of primer for water-based paint are used:
- adhesive;
- universal.
In addition, manufacturers of building materials produce water-based deep penetration soil. But such a composition is used extremely rarely for painting, since it is intended exclusively for crumbling surfaces of a loose structure, and the paint is usually applied to a carefully prepared putty ceiling surface.
Before using a primer for painting with water-based emulsion, you need to figure out which one should be used and in what case.
Getting rid of possible problems
Before priming the ceiling with your own hands, you need to carefully study the composition of the paint and make sure that this product is compatible.
The ideal option is to use paint and primer mixture from the same manufacturer. This allows you to be sure that the products are compatible and will not conflict with each other.
If the painter does not have the skills to paint the ceiling with water-based paint, “striations” may appear—spots will be visible in certain places on the surface. There may be several reasons for this:
- The paint was too thick - streaks could have appeared due to excess that was on the roller during the painting process. To avoid this phenomenon, you need to dilute the paint to a consistency that is ideal for your ceiling. The proportions are usually indicated on the can of the product.
- Uneven layer - each time after dipping the paint you need to remove the excess from the roller.
When choosing a primer, you should make sure that it fully matches the type of paint with which it will be used.
One of the most common problems is peeling and discoloration of the paint. The main reason for this phenomenon is a poorly prepared surface. If priming was not carried out correctly or all dust and dirt was not removed from the ceiling, then over time the paint will begin to peel off and crumble. This is why it is important to pay close attention to the primer.
Do-it-yourself ceiling priming should be carried out taking into account all the requirements and rules - only then will it be effective and be able to provide adequate protection for the surface. The primer for the ceiling should be selected taking into account the characteristics of the paint, its composition and other aspects that may affect the action of the building mixture.
Adhesive compounds
This type of primer is also called a primer; it is intended to improve the adhesion of paint to the ceiling on which the paint is applied. The adhesive composition is used to treat smooth substrates coated with oil paint, plastic or similar surfaces.
Improved adhesion is ensured by the presence of small abrasive particles in the primer. In most cases, needle quartz is added for this purpose. As a result of applying this composition, the treated surface becomes rough, similar to sandpaper.
Of course, after such preparation of the ceiling, the paint covers it firmly and does not peel off after drying. In addition, like all primers, the adhesive composition ensures uniform absorption of paint and varnish products.
When the ceiling surface is uneven in color, it is recommended to treat it with primer paint. After this, the base becomes white and a coloring composition can be applied to it. It turns out to be a uniform color.
Preparing the work surface
After a positive decision on the question of whether it is necessary to prime the ceiling before painting, a number of preparatory measures should be carried out that determine the service life of water-based paint.
Direct preparation is carried out in the following order:
- First of all, it is necessary to clean the surface of the old coating. Whitewashing with chalk solution can be washed off with plain water, lime is also washed off with warm water, more complex compositions can be removed using special solvents.
- Particular attention should be paid to existing grease stains, traces of dirt and dust. High-quality cleaning of the surface and a positive solution to the problem of whether it is necessary to prime the ceiling before painting largely determines the degree of adhesion of the paint to the base.
Universal primers for painting with water-based paint
As a rule, a universal primer is used for the ceiling before painting with water-based paint. It can be applied to different types of putty materials. These compositions were called universal because of their versatility.
They differ in the following characteristics:
- Primers are able to be absorbed into the pores of the base and further glue individual particles together, resulting in the strengthening of loose surfaces.
- Improves the adhesion of water-based paint to the ceiling surface.
- They create a film that helps reduce the consumption of the coloring composition and ensure its uniform absorption.
- Due to the presence of antiseptics in them, they prevent the formation and spread of mold fungi on the walls and ceiling.
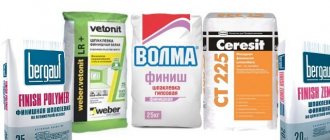
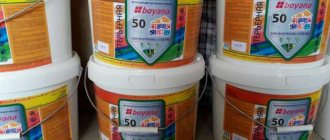
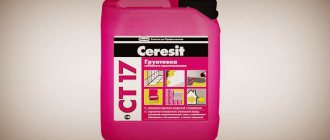
The most popular universal primers are Ceresit CT17, Knauf-Tiefengrund and Dufa Putzgrund. The last composition on the list is the most expensive. All of the listed soils differ in their principle of action and purpose.
They come in facade types - for exterior work and for interior decoration. Some types of universal primers can be used in all cases.
Primer selection
During repair work, most often the ceiling made of the following materials needs to be painted:
- plaster (involves a simple type of finishing if the rough work is done efficiently);
- wallpaper for painting (the primer will help hide existing cracks and surface unevenness);
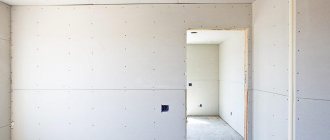
- drywall (if there is such a suspended structure, painting after priming will give the surface a beautiful color and protect the drywall from changes in humidity levels);
- paint (previously painted surface).
When choosing the type of primer to apply to the ceiling surface and ceiling plinth, you need to take into account the scope of its application and the characteristics of the composition.
The following types of soils are known:
- alkyd;
- acrylic;
- shellac;
- aluminum;
- polyvinyl acetate;
- epoxy;
- silicate.
An alkyd mixture is indispensable when treating surfaces made of wood or metal.
Acrylic primer must be purchased if the surface is made of materials such as brick, concrete, or drywall. This type of primer tends to penetrate 10 cm into the surface layer, which allows for deep impregnation and enhanced adhesion.
Shellac mixture should be used if the ceiling is made of coniferous wood. This type of primer prevents the release of resin. If knots or cracks are found on the surface, shellac primer will prevent unpleasant dark spots from appearing in these places.
Aluminum primer has the properties to reliably protect wood from fungus and mold, as it has moisture-resistant characteristics.
A polyvinyl acetate mixture will be required for metal, concrete, wood, and plastered surfaces. It should only be used in combination with special paint.
Epoxy primer is perfectly applied to concrete (creates reliable adhesion to the coating) and metal (creates good waterproofing and prevents corrosion).
A silicate type of soil should be chosen when a ceiling made of plaster, concrete, or brick is to be treated. Its advantages include resistance to precipitation. Silicate primer can be used when performing finishing work outdoors. Since manufacturers have included alkalis in such soil, harmful microorganisms will not multiply on the surface treated with it and harm its integrity.
Compositions suitable for application to ceilings and ceiling plinths include deep-penetrating primers (such as ProfiGrunt), colorless compositions (such as SuperGrunt), those with antifungal properties (for example, CT 99), adhesive ones (for example, Betonkontakt) and other.
To carry out ceiling repairs according to all the rules, additional lighting should be installed. The time for complete drying of the primer on the surface is 8 – 12 hours.
Technology for applying primer mixtures
In order for the result to be of high quality, you need to know how to properly apply a primer for the ceiling before painting with water-based paint with your own hands.
This type of work consists of three main stages:
- Surface cleaning.
- Preparation of the primer composition.
- Treating the ceiling base with primer.
To prime the ceiling and walls, you will need the following tools:
- brush;
- paint roller;
- cuvette or tray.
Details
How to choose what to prime?
How to prime the walls if you haven’t decided on the composition yet? There are the following:
- For metal and wood - aluminum and alkyd primers are used, they have anti-corrosion properties and ensure strong adhesion of the finish and the base.
- For concrete, epoxy primers are ideal because they are resistant to cracks and chips due to their high resin content. They are used for further painting, laying tiles, as well as linoleum flooring.
- For bricks, you should choose a silicate primer, because it is the most resistant to natural influences and is suitable for treating a facade, balcony or even a bathroom.
- For polyvinyl acetate type paint. A primer of the same type has a narrow specialization and allows the paint to dry faster and adhere better to the surface.
You can strengthen and protect surfaces made of concrete, wood, ceramics, putty and plaster with a universal type of primer, which is made on an acrylic base.
How to do the work correctly?
The application process can be divided into preparatory and main stages:
- When preparing, you should sand the surface, remove dirt, dust and mold from it. If necessary, which may be dictated by the instructions for the primer composition, the wall should be degreased - for this use acetone or other solvents. During preparatory work, proper ventilation of the premises and temperature conditions should be observed in the range from +5 to +25 degrees.
- The main stage of the primer will consist of diluting the required amount of the composition and applying it to the surface of the walls.
Sequencing
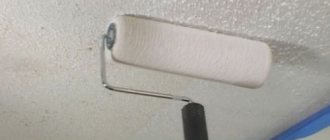
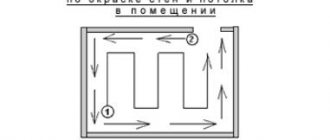
Experts advise using a roller with a fine pile, for example, velor, since such a tool does not splash liquid and does not form smudges.
Sequence of actions when applying the primer:
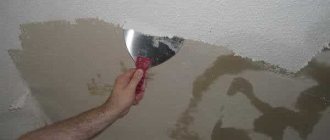
- Cleaning the ceiling surface
. Before applying the primer, the floor must already be puttied and sanded. For this reason, preparation involves removing the dust that is generated during the sanding process. It will be enough to vacuum the surface or wipe the ceiling with a slightly damp sponge. - Preparation of the primer composition
. Many soils are sold in concentrated form, so they should be diluted with clean water before use. Information about its volume can be read on the packaging of the building material. Regardless of the type of primer, whether it is dilutable or not, it must be thoroughly shaken before use. The prepared composition is poured into a flat container, such as a tray. - Priming
. The roller is dipped into a tray and rolled out a little on an inclined platform in order to get rid of excess liquid. Next, they treat the ceiling with it, trying to distribute the composition evenly and obtain an even layer. The roller is periodically moistened with primer. If there are areas that are difficult to access, they are treated with a brush. You need to make sure that there are no missing places.
Then you need to wait for the treated surface to dry completely, which usually takes from 2 to 12 hours. Finally, a primer is applied a second time for painting with water-based paint in accordance with the scheme described above.
Experts do not recommend adding primers directly to the water-based emulsion. The resulting result will not be positive, but negative.
This paint can only be diluted with a certain amount of clean water. After completing all the above steps, the ceiling surface will be prepared for painting.
Features of ceiling priming
Do-it-yourself ceiling priming requires strict adherence to the rules and advice in order to get an effective result. If everything is done correctly, the base of the ceiling will adhere more easily to the water-based paint. Primer is much cheaper than paint materials, so its use allows you to reduce costs. In addition, primer mixtures create a supporting layer that protects the surface from damage.
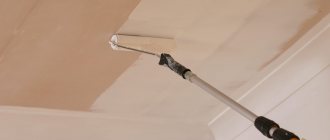
Priming the ceiling using a roller
The priming process is as follows:
- the diluted primer is poured into a special tray, from where it can be conveniently removed using a roller;
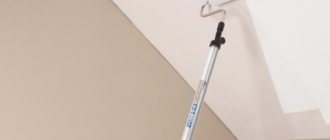
- Considering that the ceiling will be processed, the roller should have a fairly long handle that will allow you to easily reach it without using a ladder;
- after the roller has been soaked in the solution, it needs to be rolled along the ribbed surface of the container to get rid of excess;
- Subsequent layers of primer can be applied only after the previous layer has dried. The manufacturer indicates the drying time on the packaging.
After the last layer has dried, you can begin preparing the surface for further processing - putty or painting. First, you will need to carefully cover up all the unevenness so that the ceiling turns out perfectly smooth and beautiful. If you have a multi-tiered ceiling, you will have to treat all parts of the surface.
Types of primers
Water-based polymer primers are used for water-based paints. Like the paints themselves, they have the following qualities:
- No smell. This property is due to the absence of solvents in the composition. Instead, as I said above, water is used, which is odorless;
- Quick drying . This indicator depends on the rate of water evaporation. That is, under normal conditions the primer dries in a few hours.
I’ll say right away that there is no absolutely universal composition that could be used for painting in any case. Therefore, the following types of soils are most often used:
Types of primers used for water-based paint
It must be said that there is also a water-based soil with deep penetration. But it is rarely used for painting, since it is intended for loose, crumbling surfaces, and the paint is most often applied to carefully prepared putty walls or bases covered with decorative plaster.
Next, we will take a closer look at which primer for painting with water-based paint and in what cases is used.
How the primer works
Adhesive (primer)
The name of this primer speaks for itself - its main task is to improve the adhesion of paint to the base. Accordingly, this composition is applied to smooth surfaces, for example, if you are going to paint over oil paint, plastic or other similar surfaces.
Improving the adhesive properties of the base is achieved through the use of fine abrasive in the soil composition. Most often, needle quartz is used for these purposes. As a result, the treated base becomes rough, similar to the touch of sandpaper.
Accordingly, the paint adheres well to such a base and does not peel off after hardening. In addition, like any other primer, these compositions ensure uniform absorption of paints and varnishes.
Knauf-Betokontakt - high-quality primer from a German manufacturer
Price:
| Brand | Price in rubles |
| Knauf-Betokontakt 5l | 600 |
| VGT 8 kg | 800 |
| Perfecta 10l | 620 |
If the surface has an uneven color, it is advisable to prime it with primer paint. This will pre-create a white base and thus achieve a uniform paint color.
All prices in the article are current in the summer of 2021.
Universal
Most often, a universal primer is used under water-based paint. It can be applied to any type of putty.
In the photo - Dufa Putzgrund universal primer for interior and exterior work
Universal primers are called because of their versatility. They have the following properties:
- They are absorbed into the pores of the base and glue individual particles together. In this way, loose surfaces are strengthened;
- Improves paint adhesion to the base;
- They form a film that reduces paint consumption and ensures uniform absorption;
- Thanks to the presence of an antiseptic in the composition, it prevents the formation of fungus on the surface of walls and ceilings.
Popular universal primer from the German manufacturer - Ceresit CT-17
Price:
| Brand | Price in rubles |
| Ceresit CT17 10l | 620 |
| Dufa Putzgrund 10l | 940 |
| Knauf-Tiefengrund 10l | 630 |
The soils under consideration differ not only in their operating principle, but also in their purpose. They can be façade, i.e. for external and internal work. Some brands can be used for both indoor and outdoor use.
Priming technology
So, we found out what types of primers should be used for painting. Now let's look at how to properly do priming yourself.
This work includes three main stages:
The main stages of priming walls and ceilings
The priming instructions look like this:
| Illustrations | Description of actions |
Necessary equipment. To prime walls or ceilings, you will need:
| |
| Surface preparation. Priming for painting implies that the ceiling or walls have already been puttied and sanded. Therefore, preparation consists only of removing dust formed after sanding. To do this, the surface can be vacuumed or wiped with a damp sponge. | |
Soil preparation:
| |
Padding:
|
On the network forums you can find advice that you need to add a primer to water-based paint, as this allows you to improve certain of its qualities. In reality, this is fundamentally wrong; accordingly, the result will be negative, not positive. This paint can only be diluted with clean water.
After completing all these steps, the surface will be ready to apply water-based paint.