Features and types of material
Few renovations take place without the use of decorative plaster - the high versatility combined with the modern appearance of this material expands the scope of its use.
It is customary to distinguish two main types of decorative concrete:
- Microconcrete is a cement mixture enriched with quartz chips, as well as various polymer additives and dyes. This composition is characterized by increased plasticity, is resistant to elevated temperatures, does not absorb odors, however, microconcrete is quite hygroscopic.
- Microcement. Its composition is a cement-polymer mixture. The fundamental difference is the absence of quartz chips. It is ideal for finishing surfaces made of metal, wood, plastic, and also for applying to ceramic tiles.
Advantages and disadvantages of the material
Plaster for concrete in the interior has a number of its own characteristics - both advantages and disadvantages.
The most significant “advantages” of this material are the following:
- Ease of operation. To apply such plaster, you will not need to involve specialists with specialized skills - you can easily do without outside help. Having familiarized yourself with the basic recommendations for work, it is not difficult to create a suitable surface relief.
- The work can be done quickly - the raw material is flexible and dries in the shortest possible time. Do-it-yourself decorative plaster for concrete can be installed faster than many other materials, even if the room has high humidity.
- Heat resistance. The coating can be used in rooms where temperature changes are not uncommon.
- Moisture resistance (does not apply to all materials). If there is consistently high humidity in the room, then a coating of this type would not be a bad solution. Why is that? Its hygroscopicity plays a decisive role - the porous structure makes it possible to absorb excess moisture.
The statement about moisture resistance is true only for individual types of mixture; in all other cases, a protective coating must be applied.
- Versatility - the material is suitable for different styles. A beautiful texture will add exclusivity to any room - it can be not only a home, but also an office.
- The textured coating not only has an inimitable appearance, but also has significant technical characteristics - it effectively absorbs sound, which is why it often decorates audio studios.
- Non-flammable, resistant to fungi.
- It does not require special care. The finishing appeals to practical people who do not tolerate great frills.
But there are also disadvantages of such compositions as loft concrete - you need to remember them:
- High price. Loft decorative plaster (even domestically produced) looks expensive but is also worth it.
- If decorative plaster for concrete is installed with your own hands, then when working with the material you need to remember the importance of following the application technology.
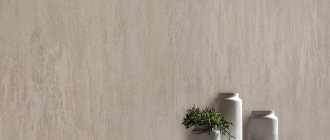
Concrete wall in apartment interior
It is quite difficult to use pure concrete during repairs. Beginners should not get involved in this matter and use other materials for decoration.
Concrete itself is a rather dark material (due to its color). To reduce darkness, use a large number of light sources in the room. Artificial lighting can well emphasize the texture of walls.
The concrete wall is gray, but its shades can vary from dark gray to white. Painting can be done at the concrete production stage, or after construction. Also, this material can subsequently be decorated in any way the owner wishes - you can hang some paintings, mirrors or panels.
Artificial lighting can well emphasize the texture of walls.
Pros and cons of this design solution
Pouring walls with concrete has the following advantages:
- The service life of such walls is more than a century;
- Withstands loads of up to one ton;
- Virtually immune to rust, ultraviolet rays, heat, cold and water, not afraid of parasites, chemicals and even radiation;
- The cost of this material is low.
Concrete also has disadvantages:
- Cracks spoil the finished product due to its insensitivity to traction and breaking loads;
- Low sound insulation, does not allow air and moisture to pass through;
- Portland cement is used for production;
- To obtain concrete of certain properties, various additives can be used.
The service life of such walls is more than a century.
Features of application
To achieve the desired effect when using this material, you should know its features. Do-it-yourself decorative plaster for concrete has several significant qualities:
- The porosity of the coating is ensured due to the presence in its composition of all kinds of small particles - sand, stone chips;
- Relief is ensured by layer-by-layer application;
- It is important to clean the walls of the old coating before you begin to apply the new one;
- Work only with gloves and a respirator.
This coating is most often used indoors with a minimalist design. Such rooms are characterized by a certain asceticism, straight lines, one might even say austerity, but they are not devoid of comfort.
Special plaster compositions with polymer filler can be used to decorate bathrooms and kitchens - they are not afraid of moisture.
Work technology
Before starting repairs, the old coating is removed from the walls. Plaster that has begun to crumble is removed using a spatula. To do this, it is recommended to wet the surface with water and wait a little. After this, the plaster will come off the walls much easier. The same steps are performed if the wall was covered with wallpaper. In addition, water will help clean the walls from construction dust. All irregularities and protrusions are removed to create a smooth surface. Difficulties will arise if old paint remains on the walls. To solve this problem, a special compound is purchased from a hardware store at a hardware store. With its help, the paint will dissolve and can be easily removed. If there are cracks in the wall, they are deepened, cleaned of dust, and then filled with mortar.
If mold is found on the walls, treatment with an antifungal agent is required. By the way, many construction companies sell plaster with antibacterial properties.
Primer
After the surfaces are cleaned of old coatings, the walls are primed. This step is required. The soil mixture promotes good adhesion of the material to the wall and will also reduce the likelihood of mold. The primer composition is not diluted with water. To apply to the surface, it is better to use a wide brush - it will be easier than with a narrow brush, from which everything will flow. After applying the first layer, you need to wait until it dries completely. Then the next layer is applied.
Preparation of material and preparation of solution
The next stage of work is preparing the working staff. The mixture is mixed with water. It can be either purchased or prepared independently. To make the mixture yourself, mix cement plaster, dyes and putty mixture. The ratio of materials is selected by eye. Water is added until it reaches the desired consistency. If the mixture was purchased in a store, when diluting it, follow the instructions.
Plastering
Now the diluted mixture is applied to the surface. The plastering stage begins. Using a spatula, finished material up to 2 mm thick is applied to the wall. This way the first base coat is applied. After it dries, it needs to be smoothed out. Only after this the next one is applied. The laying of the second layer is completed, and now it’s time to start forming the texture. The plaster should be a little damp. Patterns are made with a grid, stencil, spatula, or roller. Then you need to wait until the plaster dries. After this, unevenness and roughness on the surface are removed. As a rule, the drying period lasts at least an hour. Sandpaper is used to give the walls a smooth surface.
To prevent the plaster from collapsing, the surfaces are treated with varnish or wax. To add shine, special paints are used.
How to apply decorative plaster-concrete
Application does not require a large amount of tools, you just have to pay attention - take a high-quality specialized tool. This will help you avoid mistakes and disappointment. For example, a low-quality metal spatula can “give” rusty stains that appear through all layers.
To work with this material the following is used:
- Trowel with rounded edges - a tool used for layer-by-layer coating;
- Plastic trowel - for smoothing the surface;
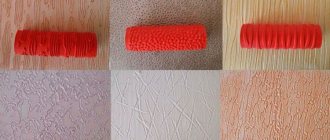
- A stamp with the desired pattern - it is used to apply an asymmetrical relief;
- Sponge - use it to shade the surface layer of wax. This is necessary to highlight the pattern;
- Spatula - for mixing the solution and making it easier to work with the main tool;
- Bucket for the mixture and its coloring
- Electric drill with mixer attachment
The following may also be useful for preparing the surface:
- Graters - for removing old coating
- Chisel, hammer
- Grinding machine
- Spatulas
- Rule - for leveling walls
- Reinforcing mesh
- Sandpaper for sanding
Don't forget about personal protective equipment:
- Gloves
- Respirator
- Glasses
- Workwear
- Covering material
Preparing the surface for plastering
Before you begin applying the coating to the surface, you will need to prepare the walls.
- Remove the old coating - unevenness on the surface will cause difficulties during application. Carefully wet the walls with water - this will not only moisten them, but also remove construction dust.
- Repair defects (cracks, chips, pits) if they are found.
- To level the walls, concrete plaster is not as demanding on the plane as, for example, Venetian, but too crooked walls will spoil the final appearance
- Priming the walls is one of the most important stages here. Before applying ,
Please note that the primer for microcement and microconcrete is different. Follow the manufacturer's recommendations. But in any case, its essence is to create a rough surface with good adhesion.
Application technology
When the preliminary preparation of the wall is completed, you can begin to carry out the main part of the work.
The classic application technique involves the following steps:
- Prepare the plaster mixture. There is nothing complicated here, just follow everything written on the container with the mixture.
- Use a trowel to lay the base layer, maintaining the required thickness approximately equal to the grain size of the mixture. You wait until it dries and only then apply the second layer.
- Sand the surface with foam sandpaper, grain size 120-240.
- Leave the second layer damp - this need is explained by the ability of a damp surface to better form texture.
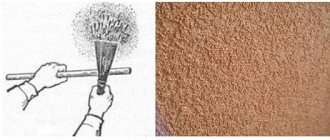
- Formation of invoice. The easiest way to do design work is with a broom or brush. The brush is applied to the surface perpendicularly, and then comes off leaving marks. After 10 - 15 minutes, smooth the surface with a plastic trowel. You can also add scratches to the surface with the angle of a trowel or other tool.
- The next stage is ironing and polishing. If necessary, a special impregnation is used to protect the coating from moisture. The final stage is treating the surface with wax and polishing with a sander with a wool attachment.
- Correction of the relief is possible only after the coating has completely dried. To ensure the desired effect, it is enough to plaster the surface with sandpaper.
- Coloring is optional. It depends on what effect you want to get in the end - concrete-look walls in the interior open up opportunities for realizing your wildest fantasies.
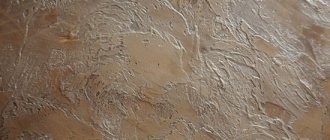
Unusual design of “white” concrete.
If you want something more, use various stencils, rollers with a relief nozzle, spatulas, and polyurethane stamps. The technology of “smooth concrete” is quite in demand. The first layer, the thickness of which is 0.5 mm, is applied in different directions, in strokes, with slight sagging. After half a day, the formed pattern is adjusted with the sharp part of a trowel. The surface is sanded again. To apply the finishing layer, a composition diluted with water is used. The drying process is accompanied by ironing the wall with a trowel and a moistened sponge.
The coating can also be used for facades - the material will perfectly decorate the appearance of a residential building or commercial building.
Another technology worth considering is the “safari” effect:
- Applying and smoothing the first layer.
- After 10 minutes, an asymmetrical relief is created using a stamp with the desired pattern . Movements are performed in different directions, the stamp is wiped with a damp sponge. After 24 hours, ironing is performed and the dust is washed off.
- Wax is applied. The wax layer is shaded with a sponge - this way you can highlight the pattern. Afterwards, polishing is carried out using a wool nozzle. You can use a wire brush.
How to create the effect of clean concrete
You can create the effect of concrete on a wall using many finishing materials that are tinted with appropriate coatings, but there are specially developed compositions for plastering under concrete. The Concret Art mixture from San Marco creates the effect of a concrete surface. It can be used for both ceilings and walls. Surface drying time is about half an hour; application of the second layer is possible after 6 hours after the first coating of the walls. The amount of time for complete drying may vary depending on the thickness of the coating layer applied.
Tips for using Concret Art decorative plaster:
- easy to apply with a spatula; for leveling it is better to use a steel trowel;
- consumption per square meter is 0.8-1.2 kg;
- after grinding, a smooth surface with the effect of concrete is obtained;
- If desired, protective paint or glazing compounds can be applied to the plaster, but after this the surface will shine. If you are still trying to create the effect of rough concrete, it is better to leave the wall a matte color.
San Marco concrete plaster is strong, durable, moisture resistant, and is well suited for finishing curved surfaces. The paste composition is already ready for use. It is enough to prepare the necessary tools and surface for applying the composition. Thanks to this type of material, you can achieve the effect of pure concrete. To do this, you need to master a special technique for applying the composition.
Using a steel trowel, you need to apply strokes on the wall, directed in different directions. Thus, it is necessary to cover the entire wall or the entire ceiling with a uniform layer of about 0.5 millimeters. During the drying process, it is better to smooth the surface with a wet sponge so that after drying a characteristic pattern appears. If in some places the mass does not lie flat enough, this can be corrected using fine-grained sandpaper.
Material consumption
Indicator of the need for decorative plaster for concrete when decorating a loft-style room per 1 sq. meter with a coating of 1 cm (layer thickness) is calculated as follows:
- cement-sand - 14-16 kg;
- gypsum - 9-11 kg.
The above calculation is approximate - the consumption of decorative plaster (art concrete) also depends on the application technique. Yes, texture matters. H2 - Manufacturers and their specifics
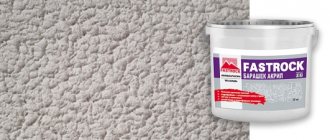
The most commonly used products are the following brands:
- Prof Decor - a wide range of colors is offered, a large number of different types are presented.
- San Marco – the company supplies the market with materials whose base is of a polymeric nature.
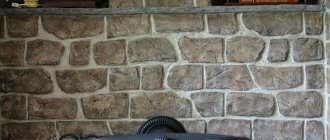
- Flex Beton System - their products make it possible to imitate natural surfaces (wood, stone).
- "Asti Hi-Tech". Buyers note the favorable price-quality ratio. In Russia, decorative plaster “imitation concrete” from this particular manufacturer has become most widespread.
- RustOnu Ironic - the most famous product of this company is Animamundi. The coating allows you to create the effect of matte pearls. If you want something exclusive, Animamundi decorative plaster for interior wall decoration to look like concrete is perfect.
Professional advice. If you adhere to the loft style, then you should not skimp on materials - it is difficult to make decorative concrete-like plaster with your own hands from ordinary putty
Using a Loft style coating
Decorative plaster in the loft style is almost the cornerstone, because without the use of this material it is not possible to create the strict and even somewhat brutal atmosphere that this style implies. Decorative plaster designed to look like concrete will look amazing in the interior.
A living room designed in a loft style will acquire indescribable attractiveness. Here's a design option for you - an authentic wall will be an excellent backdrop for a large-diagonal TV or strict classical paintings. This surface will go perfectly with the kitchen set - a worthy alternative to ordinary tiles. An appropriate addition would be a tabletop that imitates a concrete surface - it will fit perfectly with the walls. A strict interior does not prevent you from diluting it with elements of tenderness - the basics with white flowers and stylish dishes will do just fine .
Due to its high resistance to adverse factors, decorative plaster art concrete is ideally suited as a material intended for finishing a bathroom. Just imagine how the white glossy surface will look! Decorative concrete for walls can also be used in the bedroom. Natural wood furniture will harmonize perfectly with such an interior.
Application of spatula mass
This building composition is well suited for simulating concrete in rooms with high humidity: bathrooms, kitchens and showers. The composition of the mass may include various natural components: marble, cement, alabaster and lime. Thanks to the content of natural resins, such a coating has the necessary strength, elasticity and the ability to withstand frequent changes in humidity levels.
Treating the surface with a spatula is carried out similarly to plastering walls. Some compositions can be applied directly to the old coating: wallpaper, tiles. This makes the spatula mass an excellent material for quickly updating the interior.
The texture of the spatula mass can differ in the size and nature of the inclusions, in different shades - fine-grained, coarse-grained, with a shimmering effect and a wide range of colors imitating concrete.