It is difficult to avoid repairs in a house or apartment, and the very desire to change something in the interior is natural, which is why almost every property owner has been faced with the choice of wallpaper. The variety of types of wallpaper coverings today makes it possible to choose the appropriate option for any design. But at the same time you need to select a suitable adhesive composition for it. Vinyl and non-woven types of wallpaper are popular. And some people may have a question: is it possible to glue vinyl wallpaper with non-woven glue? The answer to this question will be given below.
Features of vinyl wallpaper
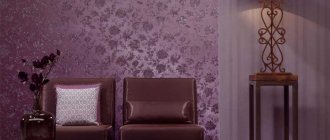
The peculiarity of vinyl wallpaper lies in its structure, it consists of two layers, the top one is made of polyvinyl chloride film, and the bottom can be used either with a base made of non-woven material or paper. The first layer helps protect the surface from moisture and other damage.
If you care for this coating correctly, then its appearance will please the owners for a long time, they can be cleaned, and they cover small defects on the wall. To prevent mold from forming under the wallpaper, the walls are impregnated with a special antiseptic solution.
But this type of wallpaper also has a minus. They do not allow air to pass through well; the air permeability of the non-woven base is even worse than that of the paper type. This disadvantage is due to the fact that polyvinyl chloride film is used here. Because of this feature, they should not be glued in rooms with high humidity, because with such a coating mold and fungi can form on the wall.
New vinyl wallpapers have recently appeared on the market, which have special small pores that allow air to easily pass through the coating.
If you care for this coating correctly, its appearance will please its owners for a long time.
Properties of vinyl sheets
Vinyl coating is a polymer layer that is applied to a base made of paper or non-woven fabric. The main advantage of this material is its long service life. In addition, vinyl does not fade under the influence of ultraviolet rays, as happens with other wallpapers, so you can safely choose canvases with bright patterns. In addition, the coating does not deform under the influence of moisture, so the linens are even used for toilets and bathrooms.
However, the polymer coating does not withstand temperature fluctuations the best, so it is not recommended to glue the sheets near the stove or other heat sources.
This material does not allow oxygen to pass through. This problem can be corrected by purchasing special cloths with microscopic holes. Only in this case will the wallpaper be breathable, but at the same time maintain protection from moisture.
Vinyl coating is wear-resistant
Some people are inclined to believe that polymer coating can harm the well-being of residents. This belief arose for a reason, but only low-quality materials have such properties, so it is recommended to avoid products from dubious manufacturers. While high-quality vinyl sheets do not pose harm to households, because they are produced in accordance with safety standards.
The positive aspects of vinyl covering include the following:
- Possibility to apply wallpaper to any type of surface (wood, plaster, concrete).
- The canvases have a significant thickness, due to which they hide damage to floors and sagging plaster (to hide defects, you need to use canvases with maximum density).
- A choice of colors allows you to find the best option for each design.
- If necessary, you can choose both standard rolls and those with a width of 100 centimeters.
Vinyl sheets are designed for surfaces of any type
This is interesting: Insulation for indoor house walls and features of choice: we present them in order
What is the difference between non-woven and vinyl wallpaper
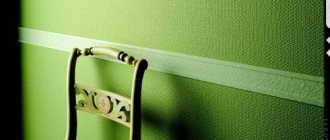
Non-woven wallpaper is made from cellulose, additional components are added to it to improve quality, this combination allows air to flow through it calmly, and is an environmentally friendly material. They are very suitable for finishing recently built premises, and when the shrinkage process has not yet been completed. They are also quite dense and durable, and gluing them is not difficult at all.
Many people ask whether it is necessary to apply glue to non-woven wallpaper, the answer is negative; when working with them, the adhesive composition is applied only to the surface of the wall. But due to the high price, their use is not always possible.
Non-woven wallpaper is very suitable for finishing recently built premises.
This way you can understand that vinyl and non-woven wallpaper differ in their composition and breathability. In addition, the gluing method is different; when work is carried out with vinyl, the glue must be applied to the canvases themselves, which is more difficult.
The advantage of vinyl wallpaper over non-woven wallpaper is the ability to clean its surface with a damp cloth; non-woven wallpaper cannot be cleaned so easily.
The advantage of vinyl wallpaper over non-woven wallpaper is the ability to clean its surface with a damp cloth.
Advantages
An important difference between this type is the presence of two layers: polyvinyl chloride; paper or non-woven. The first layer is made to protect the surface from mechanical stress and protect from the negative effects of moisture. Although this ability, on the other hand, is also a disadvantage, because there is practically no air circulation due to the presence of the film, which can lead to the appearance of mold and fungi on the wall; with such a coating, the wall “does not breathe.” Manufacturers have come up with a new type of vinyl wallpaper, creating micropores in them to allow air to pass through, but their presence does not completely eliminate the problem.
However, many people prefer this wallpaper because they are easy to care for; they can be wiped clean with a damp sponge, which significantly prolongs the preservation of the pleasant appearance of the wallpaper. It should be noted that the finish has a long service life, with proper use and care. Two layers create a coating that can hide minor surface defects.
Treating the wall surface before wallpapering will help protect it from fungal attack for longer.
It should be noted that the finish has a long service life, with proper use and care.
Preparing floors before gluing
In order for the walls to look neat after wallpapering, it is recommended to level them first. This problem is often encountered by residents of apartments built in older years, where the floors are not uniform. The alignment method must be chosen depending on the complexity of the problem. If the deviation from the norm is no more than 8 millimeters, then you will have to use only putty.
Table 3. Methods for leveling walls.
| Method, illustration | Description |
| putty | Rough putty is usually laid in two layers, between which a grating is located - this is necessary in order to prevent cracking of the surface. In this case, the wall must be leveled on all sides. The finishing putty is also applied in two layers, after which the surface is treated with fine sandpaper. |
| Plaster | It is necessary to plaster the walls if they are so crooked that the defect is noticeable to others. For such purposes, a ready-made composition of cement and polymers is used, which makes it possible to abandon the use of a reinforcing mesh. Before you start plastering, you need to prepare the walls, clean them of dirt and apply a primer. Otherwise, leveling involves the following steps: 1. Treatment with a liquid solution of 4 millimeters. This is necessary for better adhesion to subsequent layers. 2. Primer 6 millimeters. 3. Finish coating. |
| Gypsum boards | An effective way to level floors is to use plasterboard panels. If the curvature is less than 8 millimeters, then they can be secured with a special solution. In other cases, you will need to install a metal frame, which complicates the task. Upon completion of the work, it will be necessary to putty the plasterboard panels in accordance with the rules. The advantage of the method is not only smooth walls, but also sound and heat insulation. |
Differences
The main difference is considered to be their component: the vinyl type contains 2 layers, which make it possible to obtain a moisture-resistant surface and can withstand external influences, while non-woven ones are made of cellulose, the advantage of this composition is air permeability. Mold and fungi will not be affected by a wall with such a coating, unlike a vinyl coating.
This difference determines the possibility of using a vinyl covering option for rooms with high humidity, which is not recommended for the second type under consideration. The ability to clean vinyl allows you to stick them in rooms where frequent dirt is the norm (hallways, corridors).
The advantage of the non-woven option is that one of its subtypes (which has a non-woven surface) can be painted several times; this option is suitable for people who like to frequently refresh the interior. After all, the process of updating the coating will take less time; there will simply be no stage of removing the old one.
The advantage of the non-woven version is the ability to apply paint several times to one of its subtypes (which has a non-woven surface).
The second subtype with a non-woven base serves as a regular type of wallpaper that cannot be painted. But both types have a smooth or corrugated surface. It becomes possible to choose a more diverse range of coatings.
How should you apply glue to a wall or wallpaper when working with the materials in question? Non-woven wallpaper can be glued by applying glue only to the wall; for the second material, on the contrary, it is necessary to apply glue to the wall and to the canvas.
Taking into account this difference in gluing techniques, different adhesive solutions have been developed for each material. But is it still possible to glue vinyl wallpaper with non-woven glue? This will be discussed below.
Non-woven wallpaper can be glued by applying glue only to the wall.
Painting process
Many people prefer to entrust painting of walls to specialists because they do not know how to properly paint wallpaper before painting. In fact, this process does not require special skills or knowledge: it is enough to do everything carefully and in the right sequence. First, prepare all the materials and equipment that you may need in the process of decorating the walls.
In particular, for uniform painting without errors you will need:
- roller, brush or spray – for applying paint to wallpaper;
- paint tray - for even distribution over a brush or roller;
- masking tape - to create borders or protect parts that do not need to be painted.
The choice of roller is extremely important when painting wallpaper. If smooth wallpaper can be easily painted with the most standard rollers, then coatings with a relief texture require a more detailed selection of auxiliary devices.
Foam-based rollers will not ensure uniform distribution of shade on the wallpaper: air bubbles will form on the surface. Velor rollers will not work either: they will only paint the outer layer of wallpaper.
Tip: for painting embossed wallpaper, rollers with soft and long pile are considered the best option.
Use brushes to decorate corners or create smooth patterns and borders. They may also differ in composition and size, but the process of use is the same for each option.
Before brushing corners, wall joints and areas around baseboards and sockets, take care to protect them and cover all unnecessary parts with wide tape.
It is quite possible that during the painting process you will not be able to do without additional equipment: for example, an ordinary sponge will allow you to create stylish decorative prints on the walls, and with the help of stencils you will create a design on a specific theme.
Another useful device is a sprayer: it allows you to evenly distribute the paint over the entire surface of the walls, so the finished wallpaper will not contain inharmonious stains.
The process of painting wallpaper consists of several successive stages:
- The surface of the wallpaper is checked for dryness. If you have just pasted the wallpaper, wait until the glue has completely dried;
- if necessary, some parts of the wallpaper are covered with masking tape;
- paint already diluted in the required proportions is poured into the tray. A fleecy roller is dipped in the finished mixture;
- The painting process starts from the top of the wallpaper. It is advisable to start from the center, smoothly moving to the side parts of the canvas. Using movements from top to bottom, the paint is evenly distributed over the surface of the walls;
- use a brush to paint complex areas of wallpaper;
- After the paint has completely dried, you can remove the masking tape or begin creating another layer.
How to glue wallpaper for painting on walls is written in detail here.
Remember! The coloring process should be carried out gradually. You don’t need to tackle the entire wall at once: gradually move on to the next sections of wallpaper. This work must be done carefully and quickly, since a long dyeing procedure increases the risk of stains and stains.
Pay attention to the possibilities of coloring non-woven wallpaper. If they have a uniform structure, uniform coloring can be achieved by treating the outside of the fabric
If you choose wallpaper with a complex relief texture, it will be more difficult to distribute the paint over the canvas.
Experts recommend painting such wallpaper from the inside out: once saturated, the paint will provide a lasting shade. The protruding parts of the relief pattern will remain white, so your wall will look impressive and stylish.
You can also create transitions between shades on such wallpaper using external painting. After painting, the embossed parts are cleaned with a damp sponge: you may not be able to achieve a snow-white effect, but by creating a lighter pattern you will provide a harmonious contrast.
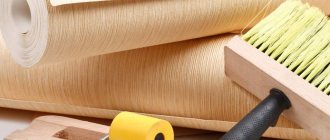
Which glue to choose
Adhesive compositions for different wallpapers naturally differ somewhat. Non-woven fabrics require modified starch in their composition; the composition is sold dry in paper boxes. Before pasting, you need to prepare it by mixing it with water, the process takes 6-10 minutes, you should get a thick solution, the consistency of sour cream. It is important that there are no lumps left in it; by spreading it on the wall, you get an even layer.
It is necessary to ensure that no paint gets on the adhesive solution, because there are subtypes intended for painting. It should be noted that the consumption of such glue for gluing is several times lower than for gluing paper wallpaper.
Non-woven fabrics require modified starch in their composition; the composition is sold dry in paper boxes.
For vinyl material, a special adhesive solution is used, which can also be used for gluing foam, embossed, and fabric materials. It has an even, smooth texture, and the work of gluing the joints is much easier. Its consumption is two times less than the previous type.
When choosing wallpaper glue, it is recommended to contact the store salesperson; he will help you choose the best option.
For vinyl material, a special adhesive solution is used, which can also be used for gluing foam, embossed, and fabric materials.
Wallpapering process: step-by-step instructions
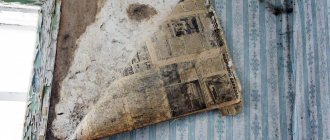
Step one: First you need to prepare the walls. If they have fresh plaster, the surface should dry out.
It is necessary to press a piece of film against the wall, and if drops appear on it within a few hours, then you need to wait before gluing it
Step two: primer must be applied to dry floors. This can be either a special composition or wallpaper glue.
The primer allows you to hide cracks and scratches on the surface
Step three: dilute the glue in the container according to the instructions on the package.
The glue should be mixed for at least ten minutes, otherwise lumps will form.
Step four: now, using a building level and a pencil, you need to make marks on the wall where the first canvas will be located.
Markings will allow you to quickly navigate during the gluing process
Step five: the room should be de-energized.
It is necessary to unscrew all sockets and switches so that openings can be made for them
Step six: now you need to cut the rolls into strips of the required length.
It is recommended to leave an allowance of 8 centimeters
Step seven: the adhesive composition must be applied to the prepared canvas in any way.
Each area must be thoroughly soaked
Step eight: next, glue is applied to the wall (if you are using rolls 100 centimeters wide, you should skip this step), and then the canvas is applied to it.
Gluing the canvases to the wall must be butt to the previous ones.
Step nine: after gluing, you need to cut off the remaining pieces.
This can be done with a stationery knife.
Subtleties of wallpapering the ceiling
It is necessary to glue wallpaper on the ceiling before you move on to the ceilings. In this case, it is recommended to opt for lightweight vinyl options, because the heavy material may not be available.
Otherwise, the process is no different. It will be more difficult to fit the strips end-to-end and smooth out unevenness, so it is better to involve an assistant in the work. In addition, when pasting the ceiling, it is better to take the furniture out of the room, otherwise the surface will become dirty with drops of glue.
Wallpapering the ceiling
Rules for gluing canvases in corners
It doesn’t matter from which corner you start gluing the wallpaper, the main thing is that the corners are even. If there are defects, it is better to pre-align them using the methods discussed above.
In this case, the strip is cut through at the joints. This means that if there is less space left to the corner than the width of the canvas, then you need to measure this distance and make a cut with an allowance of 3.5 centimeters. After which another strip is glued overlapping. Then both strips are cut at the junction. In this way you can get an even joint.
The easiest way to paste over smooth, geometric corners
Is it necessary to apply glue to non-woven vinyl wallpaper?
Since there is no need to coat non-woven fabrics with glue for gluing, the process is limited to applying the composition only to the wall. The question logically arises: is it then necessary to smear the non-woven base of vinyl wallpaper?
Before you answer, you need to say that the wall must be properly prepared. The surface must absorb moisture normally, because wallpaper has a lot of weight, if the absorption is poor, then the composition will not support their weight and they will fall. And if they absorb too quickly, then the surface will take moisture from the adhesive solution, and adhesion will be poor.
To understand which wall you will have to work with, simply spray water on it. The drops were absorbed quickly and did not roll off, which means the absorbency is increased; if they are not soaked at all, then it is reduced. It is optimal when the drops roll off slowly and leave a mark. In case of rapid absorption, regular paper wallpaper should be glued to the surface; for reduced absorption, use a deep penetration primer or apply a layer of glue 60 minutes before gluing.
If the surface preparation has been done correctly, then glue can only be applied to the wall itself; however, if the gluing is incorrect, it is permissible to remove and re-glue it; the density of the wallpaper allows such manipulations.
If the surface preparation has been done correctly, then glue can only be applied to the wall itself.
Compatibility of adhesives for different types of wallpaper: non-woven and vinyl
So, is it possible to glue vinyl wallpaper with non-woven adhesive? Yes, this is acceptable. There is no fundamental difference between the compositions of the solutions; they differ in additives and the amount required for reliable adhesion. Of course, the best option would be to choose a special type, but in this case you can use a different type.
Paper-based canvases should be covered with a similar product, diluting it to a more liquid state than usual.
Paper-based canvases should be covered with a similar product, diluting it to a more liquid state than usual.
The article examined in detail two types of wallpaper that are currently popular for wall decoration. Both types have pros and cons, so the choice should be based on the type of room where they will be glued. By choosing the right option, you can get a beautiful finish that will last longer. In this case, it is possible to replace the special glue with another one. You just need to dilute it in a different proportion, getting a more liquid consistency for vinyl wallpaper.