Not a single renovation in the USSR was complete without newspapers. They were not laid on the floor, but glued directly to the walls. Why were the walls covered with printed publications, and how difficult was it for ordinary Soviet citizens to glue wallpaper?
Newspapers were used in many ways in the USSR. They replaced clothes, rugs and curtains. Sometimes Soviet people found completely unexpected uses for thick printed paper.
Difficulties of Soviet repair
Today, before wallpapering, the walls are primed. Construction compounds perfectly hide unevenness. In the Soviet Union there was no such luxury. Wallpaper pasted directly onto the wall only emphasized the ugly relief. Another factor is the quality of the wallpaper itself. In the USSR there was no non-woven or vinyl wallpaper - only paper. The paper tore from any sudden movement. The renovation was turning into a disaster.
Thick newspaper sheets lined the walls well. It is for this reason that “wallpaper” artifacts are sometimes discovered in old apartments: several layers of paper on the walls. Wallpaper pasted on newspaper was less likely to tear. Thick paper was also often used due to poor-quality glue.
How to glue backing paper under wallpaper
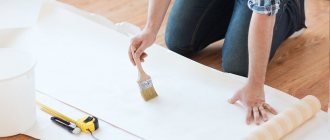
To paste walls with a waste paper backing, you will need a special adhesive designed for paper wallpaper. The paper web is cut to length, the adhesive solution is applied to the wall, and then to the substrate itself. In order to save glue, it is recommended to pre-wet the dense substrate with water.
The peculiarity of pasting walls with paper (waste paper) backing is that the canvas must be pasted horizontally from bottom to top. This is the basic rule that must be followed when carrying out work.
If the waste paper base is glued correctly, the joints of the decorative wallpaper will not coincide with the joints of the backing. A thin substrate should be glued with an overlap, a denser type should be glued end-to-end.
Second point! You can start pasting decorative wallpaper only after 2-3 days. During this time, the glued substrate will dry completely.
Before gluing waste paper, the walls should be cleaned of the previous coating, primer layer and putty. If necessary, the walls are leveled and the recesses are sealed. It is important to do the preparatory work well before wallpapering, then the result will be good.
Repair in the USSR: glue on the slab
Wallpaper glue was literally cooked. The compounds could not simply be bought in a store. To make a paste, starch was diluted in water. This solution was then boiled down. Sometimes starch was replaced with flour. This “glue” glued the paper to the wall well, but took a very long time to dry. Thin and damp paper wallpaper often took on an unpresentable appearance.
The wallpaper set faster with newspaper. The result was fewer cracks, defects and bubbles. After drying, the glue lasted a long time. There was, however, a significant drawback. Cockroaches and bugs infested houses, for which dry paste was a real delicacy.
What helped in the past when gluing wallpaper onto newspapers?
Glue on the stove is another brilliant invention of the Soviet people. This remedy was actually brewed at home. The paste was based on water and starch (or flour), because there were no special solutions in stores.
This glue did its job perfectly, but took a very long time to dry. Without a newspaper layer, the wallpaper, smeared with paste, looked completely unpresentable. But there was another side effect: starch glue often harbored living creatures such as bugs and cockroaches.
Repairing ceilings also caused difficulties in Soviet times, because there was no special paint for the ceiling either. At first, people had to remove the crumbling whitewash; to do this, they had to wash it for a long time, and then apply a new one with a brush.
In any case, now for many people memories of Soviet renovation evoke nostalgia. The process was a team effort and often felt like an exciting adventure. And for those who had “golden hands”, the repair did not seem something terrifying at all. Although now people are unlikely to exchange modern comfort for Soviet romance.
Why else do they glue newspaper under wallpaper?
Several layers of newspaper hid the defects. In addition, the glue dried faster between the newspaper and the wallpaper. However, these are not all the advantages of such a “primer”.
Oddly enough, newspapers increased the life of plaster. Walls without a printed layer crumbled faster. Along with the plaster, the new wallpaper came off. But even on strong walls, the wallpaper did not fit properly. Without impregnation and a durable backing, sooner or later the wallpaper began to “slip.” The room took on an unkempt and uncomfortable appearance.
Not just a wall covered with newspapers
Newspapers in general were quite popular material in the USSR. They were used to make hats, packaging for anything, and “garbage bags.” Books were often wrapped in newspaper. This cover not only preserved the appearance of the publication. It allowed forbidden literature to be read incognito.
Sometimes newspapers were used in unconventional ways. Windows covered with newspaper are a common option for temporary curtains. Pots wrapped in thick paper lost heat more slowly. Newspaper was stuffed into shoes for drying: the paper absorbed moisture well. They even filled fur hats and fur coats with the press: the specific smell of the paint repelled moths.
Why is this necessary?
The main question that everyone who sees such a process asks is why do this. There may be several reasons for such non-standard use of periodicals:
- If you are going to decorate a room in which the walls are covered with lime plaster or other similar material, the adhesion of the wallpaper to the surface will not be very good. If you first cover the surface with paper, the base will better hold the wallpaper.
- In some cases, the base could crumble and was unstable. The pasted sheets of periodicals significantly strengthened the surface and subsequent finishing was much easier, without the risk of the plaster falling off and the panels peeling off.
- If there are small irregularities or scratches, glued pages will level out these shortcomings. When wet, the paper will swell and shrink after drying, forming a more even surface.
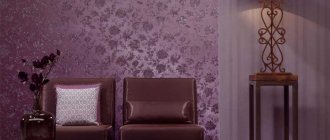
- This material can act as a topcoat rather than a base. In this case, you will get a very original interior design.
The main reason for using such techniques in finishing was the banal impossibility of buying a good primer or ordinary putty. We had to look for ways to strengthen and level the plane before finishing. At the same time, the pasting technology will be slightly different from working with traditional coatings, and a few tips below will help you figure out how to glue newspapers to the wall.
Pasting technology
Fundamentally, the process of gluing this mole material will differ from working with standard wallpaper. However, when gluing rooms with crumbling walls or covered with lime, the work will proceed a little differently.
- First, you need to clean the entire surface of dirt and inspect any crumbling or peeling areas. Having identified such defects, you need to get rid of them - remove the peelings and level the surface using plaster or putty compounds, not forgetting to first prime the areas to be repaired.
- When the putty dries, the entire surface needs to be primed again. You can apply a special base-strengthening composition - there is a large selection of suitable mixtures in stores.
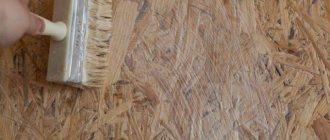
- Further, much will depend on how the newspaper sheets are intended to be used - as a base or a finishing coating. If this is a base, then the surface of the wall is covered with glue and allowed to dry completely. After this, glue is again applied to the wall and the paper is glued to it.
Important: do not try to spread glue on the paper itself - it tears easily when wet and you won’t be able to transfer the soaked sheet onto a flat surface.
- If you want to get an original wall finish, then newspapers can be pasted after preliminary preparation. It involves cutting off the edges of the pages to get rid of uneven edges. In addition, after such pruning, the sheets look better and the design is more interesting. The rest of the technology is similar to the previous point.
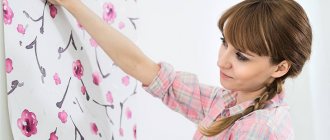
Wallpapering - rules and instructions
Probably of all types of repair work, gluing wallpaper on walls is the most common, which almost everyone has done at least once. Despite the general simplicity of the process, there are nevertheless some features and tricks that you need to know before starting work.
Preparing the base
The first step is to prepare the walls for wallpapering. They must be clean, leveled and uniformly plastered. The surface must be primed with one or two layers, such as acrylic primer, to strengthen the base and improve the wettability of the wall with glue. But don't overdo it with priming! Unlike preparing the surface for a self-leveling floor, where it is important that moisture is not absorbed into the thickness of the base at all, the walls should moderately absorb wallpaper glue. If the wall stops absorbing moisture, or, on the contrary, absorbs too much, then this equally leads to poor adhesion of the wallpaper to the wall and, in the best case, bubbles and peeling will appear after drying, and in the worst case, the wallpaper will simply fall off even at the drying stage.
If thin paper or non-woven wallpaper is chosen, then the base should be painted in a uniform (preferably white) color. That is, if the wall, for example, is concrete and some irregularities on it are covered with plaster or putty, then after wallpapering these places will show through the wallpaper in spots. Therefore, when carrying out plastering work, it is necessary to bring the color of the walls to a uniform appearance. Read more about preparing walls for applying the finishing coating in the material “Preparation of walls and ceilings before applying the finishing coating.”
Until recently, it was customary to glue a rough layer of old newspapers under the wallpaper. This was done, firstly, to level the walls, which in Soviet-built houses were far from perfect, and secondly, newspapers acted as a primer, because priming the walls with starch glue alone was insufficient and without a layer of newspapers the wallpaper simply fell off.
When purchasing rolls, you should choose from one batch (the number is indicated on each package), since even with very perfect printing in different batches, rolls may differ slightly in saturation and color, and this difference will be noticeable.
Further actions are directly dependent on the selected type of wallpaper. Instructions for gluing are included in each roll.
Wallpaper is glued either end-to-end or overlapping. The glue is applied either to the wallpaper or to the wall, or both are spread.
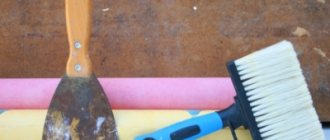
The work will require a special plastic spatula for smoothing the wallpaper on the wall and a roller for tightly rolling the edges. But you can do it the old fashioned way with a foam sponge or rag.
If the wallpaper is not glued end-to-end to the ceiling, but some kind of edging is implied, then it is necessary to first apply markings along the perimeter under the ceiling. For marking, it is best to use a water level (two flasks connected by a long hose) and a marking cord. Then, from this strictly horizontal line, you need to use a plumb line or square to draw a vertical guide along which the first sheet of wallpaper will be pasted.
The wallpaper is cut so that it starts at the top of the prepared line and goes underneath the baseboard. The excess can be cut off immediately after gluing or after drying with a sharp knife along a ruler.
If glue is applied to wallpaper, then after application the wallpaper should be allowed to lightly soak in the glue. To do this, if space allows, the wallpaper is folded in half with the adhesive layer inward, and if there is a problem with free space, then the spread sheet should be folded like an accordion, without making sharp bends.
While the smeared sheet is being impregnated, it makes sense to spread the next one, and while it is being impregnated, the previous sheet can already be pasted. It is best to work together - one person levels the sheet from above, and the other from below, glues the middle part to the wall, after which it is rolled out and smoothed simultaneously up and down until it is completely glued. It is best to start gluing from the corner.
The glue must be for the selected type of wallpaper - paper, vinyl or non-woven. The thicker and heavier the wallpaper, the thicker the adhesive layer should be. Excess glue is carefully removed with a sponge or rag, and it is important to do this immediately without allowing the glue to dry.
The next sheet of wallpaper is applied end-to-end or overlapped depending on the type of wallpaper. If the wallpaper has a pronounced periodic pattern, then even at the cutting stage it is necessary to take this point into account and cut the fragments so that there is no displacement of the image. When purchasing wallpaper, you should also take into account the step of the pattern and buy the number of rolls with a margin for this adjustment.
After wallpapering the entire room, it is necessary to exclude drafts and direct sunlight on the walls until the glue dries completely.