Using a border for wallpaper will make the walls look more finished. Not very wide strips for decorating wallpaper are called borders. They often serve as a border for combining different types of wallpaper on one wall, in particular in a horizontal way. The border in this situation looks natural and laconic.
Decorative borders for wallpaper: what makes them special
Borders are most often glued to the upper segment of the wall. This does not mean that only this option is acceptable, but this can be called a typical case. Although, it would not be amiss to consider the option of having a border around the perimeter of the ceiling, or, which is also interesting, in the lower third of the wall.
Features of the location of the curb:
- At the top of the wall it plays the role of a decorative edging, which definitely makes the room more comfortable.
- Along the perimeter of the ceiling, the border serves as a separator and zoner.
- Edging a wall near the floor with a border is a way to hide unsuccessful wall hanging when you made a slight mistake with the height of the wallpaper.
The border can be the boundary between the panel and the main wall. In this case, it is located at a height of at least 80 cm from the floor level
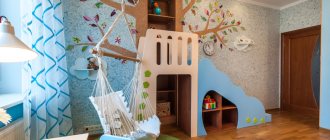
But the vertical use of borders is not uncommon. For example, if you need to visually divide a wall into two zones, this option is often chosen in the nursery. The border borders doors, mirrors, etc., in short, what you want to highlight.
Related article: Instructions for crimping an RJ-45 connector and connecting an Internet socket
Wallpaper does not fit together: a step-by-step guide to solving the problem
Before you begin repairing and decorating walls yourself, it is important to know and follow the correct technology for all of the above work. When cutting wallpaper, make sure that the individual parts of the design or pattern match; to do this, use a pencil and a well-cutting utility knife. Consider the distance to the ceiling from the top edge of the wallpaper. To avoid darkening and yellow spots on the wallpaper, try to use only high-quality glue. When gluing, also monitor the room temperature - avoid sudden changes and drafts.
In order to fix seams, a split joint between wallpaper, a dark and yellowed defect, wear or stain, the following tools are needed:
- A patch on which there is an element of the design that falls on the joint;
- Ribbon, cord, decorative edging or wallpaper border to radically eliminate an uneven joint or disguise it;
- Glue (even PVA will do);
- Scissors or stationery knife and pencil;
- Brush or sponge;
- Roller;
- Soft sandpaper;
- Water;
- Unnecessary wallpaper trimmings;
- Coloring paste.
Step 1. Moisten the edges of the wallpaper, leave for a few minutes so that they are saturated with moisture.
Step 2. Apply special joint glue to the edges of the wallpaper (PVA glue will also work). This is the kind of glue that will set immediately.
Step 3. Try to align the joints on the wallpaper with your hands, without overlapping on thick wallpaper (for example, vinyl). Roll along the edges, straighten the canvas and remove air bubbles, remove excess glue with a sponge.
Step 4. Remove the unsightly gap between the wallpaper sheets. To do this, wet the edges with a damp sponge and try to pull them together and place them on the glue. Unfortunately, it happens that this method does not produce results. In this case, craftsmen advise veiling the visible defect with a decorative edging or wallpaper border.
Step 5. This step must be applied if you still were not able to beautifully connect the joints between the wallpaper.
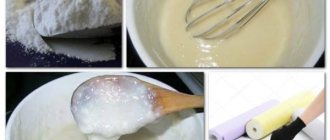
Rub the decorative side of the unwanted wallpaper scraps with sandpaper, then mix the resulting powder with glue and apply this mixture to an inconspicuous area of the wall. If the color of the mixture matches the tone of the wallpaper, then feel free to apply it to the gaps between the joints. Or use a special tinting paste.
Another option for masking a gap is to create an artificial joint using patches, which are carefully cut with a utility knife and placed between the wallpaper panels.
But still, the simplest and most effective method of correcting joints is the use of decorative braid, cord, piping to match the furniture or curtains. To harmoniously decorate your room interior, decorate the frames of photographs and paintings with the same border. All this will help hide the failures of your renovation work!
Thus, you see that uneven, unsightly joints between wallpapers do not yet provide a reason to completely re-glue the walls, and today there are simply an immeasurable number of ideas and options for eliminating this defect!
ogodom.ru
Paper borders for wallpaper in the nursery: specific application
Paper border is often used in the nursery. And this is a smart move.
The border will help in this case:
- Divide the room into a zone (work, play, neutral);
- Visually change the space, visually enlarge or expand it;
A border for wallpaper will help to separate the lower third of the wall, which in a nursery makes sense to cover with other wallpaper, denser, washable, and practical.
A clear mistake would be gluing a border in the middle of the wall. Not only does it not look very impressive, it cuts off a considerable part of the wall, visually, of course. But it is not forbidden to glue the border vertically in the middle of the wall.
Wallpaper tape
Hello, dear workers of your favorite newspaper! We would like to share the secret of gluing vinyl wallpaper at the joint. Maybe someone knows about such little things, but in our young family they became a small discovery.
Sincerely, Gladyrev family Rostov region,
Krasnosulinsky district
When gluing expensive wallpaper into a joint, you need to put a cash register tape (sold in bookstores and stationery stores) halfway under one edge of the glued canvas, and stick the next strip along the remaining part of the cash register tape. Then, after drying, the seam will not come apart. For example, vinyl wallpaper is more capricious when drying - it does not tolerate drafts and changes in humidity.
But before gluing the walls, you definitely need to prime them, or at least go over them with cheap wallpaper glue, diluting it thinner. You can add PVA construction glue to wallpaper glue, regardless of brand, at the rate of 250 grams per 12 liters of finished glue for greater strength.
Before cutting the rolls, you need to make sure that their series numbers match (even at first glance, identical wallpaper from different series may have slight shades of color). The length of the strip is equal to the height of the room plus “spare” 10-15 cm. We remind you: save glue, do not stretch the panels and use a roller! The remaining principles do not differ from the usual ones.
25.02.: 6513
housing.hozvo.ru
How to glue a border to wallpaper: step-by-step instructions
The gluing process is simple, your main task is to make the walls perfectly even, where the border will be fixed.
You will need a building level and a lead pencil.
Proceed like this:
- Measure the required height from the floor in several places (of course, the same everywhere);
- Place dots in these places and connect the lines to each other;
- The place has been determined, which means half the work is done;
- Roll out a small roll on the wall and cut it in the right places;
- Place the pieces with the pattern down, and apply special glue to the back side of the border;
- You can fold the canvas like an accordion so that the side with glue is inside;
- Take the canvas in your left hand, straighten the first fold and apply it to the wall;
- Smoothing the border from the middle, move towards the edges;
- Apply the canvas until it is completely glued to the wall.
Each new part must be combined with the previous one. At the corners, borders are glued like wallpaper, that is, overlapping. The allowance will be approximately one and a half centimeters
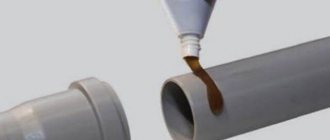
It’s great if you purchased self-adhesive borders, this will speed up the process. If you have an ordinary border, the question arises of what glue to use to fix it. Paper borders are glued with glue for the appropriate type of wallpaper; denser ones can be glued with liquid nails or Titanium glue.
Related article: What does a toilet flush tank consist of?
Border for wallpaper (video)
How to hide joints between wallpaper + photo
Many fans of wallpaper decor are well aware of the situation - the craftsmen seem to be very good, and the wallpaper is expensive, and after hanging the wallpaper on the walls, seams between the panels clearly appeared. Unofficially, every third case of renovation with walls decorated with trellises is faced with the problem of how to hide the joints between the wallpaper. It is almost impossible to disguise the stripes by changing the lighting, and re-pasting the entire room is expensive, so before taking radical measures, you can try to eliminate the problem using simpler means.
Defect options
Most often, owners blame both the craftsmen and the quality of the wallpaper. But if the craftsmen are professionals, and before this room they managed to glue kilometers of canvases with high quality without any comments, why did they not take into account the peculiarities of the brand of trellis when gluing. Indirect confirmation is the fact that the same problem occurs with both cheap paper and expensive non-woven wallpaper.
The answer to the question of how to make wallpaper joints invisible does not have a clear answer, since the defect itself at the joints can manifest itself in different ways:
- The neighboring canvases have separated, and a thin gap has formed through which the wall is visible;
- A lighter or darker uneven strip of glue residue appeared along the joint;
- The joints at the border of the wallpaper have risen like a “house”;
- At the joints, the difference in shades of the two canvases is clearly visible.
The last point is the most unpleasant. It often happens that when buying wallpaper in a company store, you can purchase rolls from the same manufacturer, the same brand, but belonging to different batches. To sell mismatched items and make the product attractive, salons collect leftover rolls from different batches into one and sell them at a slightly reduced price.
For your information! Even within the same batch, wallpaper may differ in shades.
Many manufacturers, due to the peculiarities of the technology for applying paints to the panel, are not able to ensure ideal distribution of the toner; as a result, one edge turns out to be slightly darker and more saturated than the other. It is impossible to hide such a defect, so an icon with two vertical arrows directed in different directions is placed on the roll. This means "reverse sticker sequence". To hide uneven coloring, each subsequent roll must be turned 180° before cutting and gluing. If you do not pay attention in time to the icon hidden in the text of the marking, the discrepancy in shades at the joints can only be corrected by painting the trellises.
Five ways to hide joints
Correctly hiding a defect at a joint is often even more difficult than gluing wallpaper correctly. You can learn how to work with trellises from the instructions, while you have to come up with and look for ways to hide defects on your own.
You can hide joints using one of the following methods:
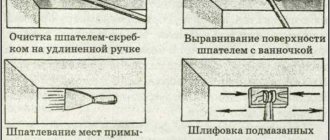
- Clean the edges of the wallpaper from any remaining glue;
- Shade or paint the walls to hide the background, revealing the gap between the joints;
- Try to flatten the wallpaper panels after first slightly moistening the trellis material;
- Paint the wallpaper or hide the joint using a special tinting paste.
Advice!
Before trying to hide joints with paint or tinting compound, you will need to practice in a closed area, for example, behind a closet, where the furniture is covered by wallpaper. The easiest way to hide revealing light spots is to try to paint over them with special paint or pencil. To do this, you will need to buy a special coloring composition.
To hide the white stripe between the panels, just apply a tinting color to the seam using a brush or ear stick. Wipe off excess paint with a clean napkin.
Unfortunately, hiding the joints in such a simple way is only possible with plain wallpaper, if you can choose the composition of a suitable color.
The riskiest way to hide seam problems is to use tinting paste. To prepare it, you will need to trim the wallpaper, from which the surfaces with paint are removed with a sharp knife or sandpaper. Colored paper dust is mixed with glue and the joint is rubbed. In this way, restorers restore old books and paper products; the method is complex, so it is not always possible to hide the problem.
In particularly difficult cases, owners decide to use polyurethane decorative strips that are glued to the joints. In this way, you can hide any defects, even if the shade of the panels is different.
How to hide a joint contaminated with glue
Excess glue at a joint is the simplest case, but only under one condition, if you pay attention to the problem in time. If the wallpaper is glued by hired craftsmen, you will need to check the quality of the work in the first hours, while the glue is still wet.
On vinyl or non-woven wallpaper, it is enough to simply wipe the glue with a dry and clean napkin; on paper, excess adhesive material is blotted, like an ink stain, without rubbing on the canvas. After the wallpaper has dried, the joints must be checked again, since over time, glue stains tend to turn yellow and appear in the picture, after which it will be impossible to hide them.
On dark wallpaper, residual glue at the joints can be hidden using a retouching pencil. Before decorating the seams on the wallpaper in the photo, the marks are wiped off with a paper eraser.
The most difficult case
It is most difficult to hide joints with a gap when the edges of the panels have diverged so much that the wall is visible. To hide the unmasking seam, you need to try to move the edges and fix the canvas using proven glue. Many two-layer wallpapers react differently to moisture. Most trellises swell and become plastic when liquid glue is applied. After gluing to the wall and smoothing, the width of the canvas can increase by several millimeters, and after drying the reverse process occurs.
To hide the resulting gap, you first need to moisten the edges of the canvas using a spray bottle or spray bottle. After 10-15 minutes, the wallpaper will become soft, and you can lightly press the canvas with your hands and try to connect the edges of the panels. The seams are glued with PVA glue and rolled with a rubber roller.
If it is not possible to hide the joint in this way, for example, joints on paper wallpaper are very difficult to hide in this way, you can try to decorate the seams, as in the photo.
Colored stripes and individual fragments are suitable for decorating joints; you just need to stick them on the panel so as to hide the defect and at the same time distract attention from the problem area. Wallpapers of different patterns will help to ideally hide a frayed seam, since a brighter color always attracts the eye. Before you make a joint from different wallpapers, you need to plan an overlap transition. The glued new trellis does not even need to be cut.
Fighting the edges that have risen up like a house
Not the most difficult, but quite common case when joints rise and twist, photo. Usually craftsmen in such a situation, in order to hide their imperfections, blame the quality of the wallpaper and poor glue. In fact, the problem lies precisely in the lack of professionalism of the workers. In the process of coating the cloth, experienced craftsmen apply glue to the edges twice, because the adhesive mass dries much faster along the edge of the cloth. To hide the raised joints, just apply an additional layer of adhesive under the seam line and roll the trellis with a rubber roller.
It is much more difficult to hide a defect at the joints in a situation where the seams have risen along with pieces of soil and whitewash. This means that the preparation of the wall surface was carried out extremely carelessly, and when shrinking, the wallpaper tore off the adhesive seam at the joint. In this case, you have to spend a lot of time soaking and removing the old glue from under the joint, and only then gluing and rolling the fabric. If you try to re-glue the seams as they are, the remnants of the old glue and whitewash will make the seam stand out, and under certain lighting the defect will appear in a new way.
Conclusion
A good way to hide joints involves using thin strips of paper or wallpaper of the same color as the main fabric. This will ensure normal adhesion strength, the absence of raised seams and unmasking light spots between the panels. To do this, you will need to moisten the edges of the panel, and after the glue has soaked, carefully lift the seam and glue in an additional strip. The method works with any wallpaper.
2proraba.com
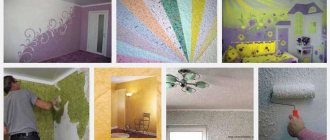
DIY wallpaper border: making the decor yourself
If you decide to make a wallpaper border yourself, the most obvious way is to cut a strip from another type of wallpaper. Of course, you need to cut carefully and strictly along the pre-marked line. Any unevenness will be noticeable.
But there are more creative options for making borders. If its length is short, you can build a border from children's photographs. For a child’s or teenager’s room, this is a very original and touching option.
You need to make a strip of a certain width on which children's photos will be pasted. To make the border look aesthetically pleasing, print the photos in decorative frames so that they don’t just stick tightly to each other.
As an alternative, you can use decorative plaster or piece decor for the wallpaper border.
You can make a border for wallpaper with your own hands from:
- Fragments of designer cardboard;
- Postcards;
- Textile fragments;
- Self-adhesive film;
- Colored fluorescent paper.
And here the most daring ideas can be taken - the border can be laid out from the covers of old records, magazines, posters.
Varieties: what kind of edging can be
The edging that is glued on top of the wallpaper or on the ceiling can be different. There are paper, wood, plastic. If you are choosing a edging for a child’s room, it can have an interesting image. In the kitchen or hallway you can paste interesting and beautiful options - two-level ones. One strip is glued from above - at the beginning of the wall, under the ceiling, the second - in the middle of the room.
This braid looks good at the junction of two types of wallpaper or when combining two types of materials. But, it is better not to glue paper edgings to these rooms.
The wall border can be:
- Made from various materials;
- Embossed;
- With pictures or patterns;
- Wide or thin;
- Look like a cord;
- There are openwork options similar to stucco.
To decorate the bathroom and hallway, it is better to choose wooden or plastic panels. A paper panel will not work, as it will get wet and deteriorate.
For example, in the interior of a children's room you can use wallpaper borders that have the same pictures as on the wall. To save time on installation, you can purchase a self-adhesive edging instead of the usual option. This sticker is very easy to install.
Wallpaper with a border in the interior: important points
There are a few other helpful tips that may come in handy before you get started.
Tips to note:
- You shouldn’t stick a border on newly pasted wallpaper; wait a couple of days to avoid unexpected troubles;
- Special glue dries quickly, so glue the border in stages;
- When cutting, make the pieces a little longer so that the pattern can be compared.
A wide, dark-colored border distracts attention from the dirt that often occurs at the bottom of the wall.
The border serves as a stylish addition to the interior. It seems like a small detail, but the room becomes more elegant.
The delimiter border eliminates the need to use furniture as a zoner. One glued strip visually divides the room into zones, and it usually looks convincing.
It is important not to make a mistake in the palette. Do not confuse cold and warm color schemes; such a substitution will literally hurt the eye.
Related article: What types of curtain clips are there and how to make them yourself?
Specifics of gluing borders for wallpaper (video)
The border is not a new solution, sophisticated, interesting, classic. Modern standard apartments often lack the laconicism, rigor, and sophistication that the border brings to the interior.
Happy interior design!
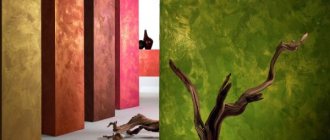
What it is
A decorative frieze for wallpaper is a strip of natural or artificial material ranging from a few centimeters to a meter wide. The roll is usually up to 10 meters long. Modern wallpaper edging is a distant descendant of stucco friezes of ancient aristocratic interiors. Stucco molding is not a cheap pleasure, and it is not appropriate everywhere. Anyone can afford a decorative tape on wallpaper, and fitting it into a given design is not too difficult.
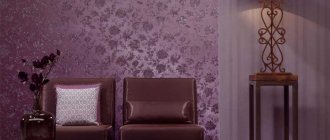
Thin ribbons of contrasting color will emphasize the elegance of the decor. A wide edging will hide the joint of wallpaper of different designs and mask finishing imperfections. Borders with funny designs will refresh the nursery, discreet options with elegant patterns will turn the living room into an aristocratic salon, borders depicting fruits, vegetables or entire still lifes are indispensable for the dining room.
The border attracts attention and emphasizes the geometry of the room. The wrong choice of material, color, texture or errors in the sticker will spoil the impression of the interior.
Border for wallpaper in the interior (photo)
Wall placement options
The standard option - edging along the upper edge of the wall - is safe from an aesthetic point of view, but this is not the only possibility of using a border. The tape can be glued at different heights, placed horizontally or vertically.
Wall decoration with wallpaper of different textures, colors or patterns will be harmoniously complemented by a horizontal frieze strip located at the border of different finishing materials. Vertically pasted wallpaper edging will delimit zones in open-plan rooms. It can also be used as a frame for photo wallpaper or a mirror. Sometimes doorways or windows are covered with frieze.
If, after gluing, defects are discovered along the bottom of the wallpaper (too short or damaged), you can place a wide border along the floor. The same option will hide stains on light walls or the “creativity” of a little artist in the nursery.
How to position the edge
Sooner or later, everyone who makes renovations to their own living space thinks about this. The location of the tape determines how the space will visually change. Dividing a wall into upper and lower parts, masking the joints between wallpaper, zoning - all this is possible if you stick the border in the right place. However, it is worth noting that not every tape can be placed in all of the above ways.
Sometimes, for decorative purposes, the edging can be glued in several lines. It is not always possible to find such a wide border for wallpaper, which is necessary for finishing, so you have to place them in several rows or at some distance from each other.
Texture and materials
The article presents a photo of a wallpaper border, where you can see that the border can be smooth or embossed. Since it is a fairly important element of decor, there are quite a lot of options for its execution. In addition to edgings with a regular pattern, there are also gold-plated, holographic and even coated with a fluorescent composition that glow in the dark. Lace borders look especially elegant. When choosing a finish for a room, you should take into account the style of the interior and its compatibility with other types of decor.
In addition to traditional paper borders for wallpaper, there are also acrylic, wooden, velor, plastic, plaster, textile, and also made of fiberglass. To attach textured and heavy tapes, you need to use only a special adhesive, sold in all hardware stores, since the usual one intended for wallpaper will not be able to withstand such a decent weight.
Advantages of non-woven wallpaper
Meter-long non-woven wallpaper is valued for its good performance characteristics and ease of use. The vinyl layer can be painted and washed, but is less environmentally friendly. Let's look at the structure:
Wallpaper of this type is suitable for kitchen surfaces, hallways and living rooms. For bedrooms and children's rooms it is better to use ordinary non-woven wallpaper.
Advantages of the material:
- Does not get wet or deform when drying.
- It is not picky about the surface, it is able to hide minor flaws in the wall plane.
- Increased fire resistance.
- Wear-resistant and maintainable, the wallpaper is easy to repaint and dismantle if necessary.
- There is no need to apply glue to non-woven wallpaper; just coat the wall with the compound.
- Manufacturers offer a wide selection of designs and textures.
Modern wallpaper with a decorative vinyl layer on a non-woven base has special pores for air circulation.
The wallpaper came apart when glued end to end
A trivial problem typical of paper-based canvases. The gluing of such canvases is carried out by applying glue twice: on the wall and on the canvas. When coating wallpaper, the paper becomes saturated with moisture and swells. In this case, the width of the canvas lengthens by about 0.5-2 mm. After gluing to the wall, the glue dries, and the reverse process occurs with the material - shrinkage. The wallpaper pulls together and forms a sad gap.
There is only one conclusion - do not glue paper-backed wallpaper end-to-end unless the manufacturer specifies this in the instructions. Rolled panels on a paper basis are made with an overlap. However, if you make it large, then after drying the seams will be visible on the wall. To avoid this result, keep the overlap to a minimum of 1-1.5 mm.
Selection of drawing
You can handle this on your own if you know some of the nuances, which we’ll talk about later. Usually, either a neutral image or one that corresponds to the purpose of a particular room is selected. For example, for the kitchen you can use ribbons with pictures of fruits and vegetables, kitchen utensils and dishes, with beautifully decorated dishes and excerpts from recipes.
A children's room can be decorated with a wallpaper border depicting adapted figures of animals and birds, as well as fairy tale heroes, animated characters, etc. For other rooms, visual abstraction or traditional floral patterns are suitable.
Sometimes the image on the wallpaper can be repeated on the border. In this case, it will differ in concentration or size. A similar combination is done as follows: a large pattern on the wallpaper should match the same, but smaller one on the edging. In this case, the elements are dispersed over the entire surface of the canvas, while on the border they are located more closely, and vice versa.
Recommendations for use
Gluing wallpaper joints is best done from a small stepladder that can be easily rearranged. In addition, the following tools will be needed for the job:
- construction knife;
- narrow metal spatula;
- thin brush;
- a spray bottle with water and a damp cloth;
- a piece of hard material measuring 20x30 cm (cardboard or other);
- special roller for rolling wallpaper;
- construction hairdryer.
The joints are glued, sequentially moving from one section to another. If the wallpaper has already been glued before, the damaged area is first moistened with water from a spray bottle and given time to soak a little. Then the edge of the canvas is separated from the wall with a metal spatula and then proceed according to the standard scheme.
How to use glue for wallpaper joints?
- Carefully coat the inside edges of the panels with glue. It is best to use a thin paint or art brush for this purpose.
- Place cardboard or another hard sheet over the coated area so that it overlaps both sheets.
- Press the cardboard firmly and smoothly move the turned on heat gun towards the joint. Warm up the treated area for 20 seconds.
- Remove the cardboard before it sticks and roll the surface with a roller.
- Wipe the treated area with a damp, soft cloth to remove any remaining adhesive. Do not press on the wallpaper to avoid damaging the pattern or design.
- Treat all problem areas in the room in a similar manner.
So, glue for gluing wallpaper joints is very helpful when using heavy panels, uneven walls or a draft in the room. It allows you to glue delicate wallpaper that stretches when wet. It can be used to eliminate defects in the form of loose pieces. All types of joint adhesives are suitable for non-woven, vinyl, fabric and paper wallpapers. This line of products is produced by many companies. But it is better to give preference to well-known manufacturers: Metylan, Kleo, Moment. The choice between them is a matter of taste and material capabilities.