–Tags
– Quote book
Crochet Now No. 49 2021 Publisher: Inspire Imagine Create Language: English Magazine on the.
Burda Special. Knitting No. 9 2021 Publisher: Burda Publishing House Language: Russian Burda Magazine &mdas.
If you wake up at night at this time, then you may have problems - this is serious.
Beneficial properties of the exotic feijoa fruit Nowadays, fortunately, there is a shortage of food.
-Always at hand
– Regular readers
-Statistics
Tuesday, December 09, 2014 20:14 + to quote book
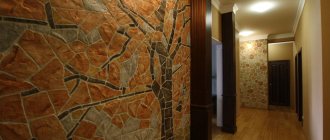
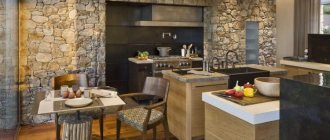
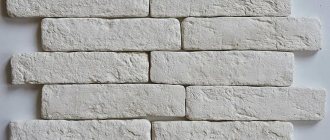
Imitation of decorative brickwork in a modern interior - photo
In modern design you can often find interiors with brickwork inside the room. This effect creates coziness and makes the room “warmer”. But for the sake of such an element, it is completely inappropriate to make a real brick wall where there is none according to the construction plan. This is expensive, reduces the area of the room, and also creates additional load on the foundation.
Just for such cases, there are decorative panels with imitation brickwork. And if for some reason the store option does not suit you, and there can be a lot of them: price, quality, color scheme, shape, size, etc., then we can offer you a simple and inexpensive way to imitate brickwork with your own hands . And the greatest advantage of this method is that it does not require special skills, for example, working with putty and other building mixtures.
Let's start simple
To realize our idea of making stones on paper, we will need:
- cardboard, you can use regular boxes;
- paper trays for eggs;
- napkins, toilet paper or A4 sheets;
- knife, scissors, pencil, ruler;
- titanium glue, PVA;
- wood putty;
- acrylic paint and tint to give the color the desired shade;
- varnish for final coating.
First, take cardboard and cut it into strips. The width of our strip will be the width of the brick. You can install it whichever you prefer.
Then we tear the trays into pieces, leaving bulges.
We begin to glue the strip of cardboard into pieces, slightly collecting them into a pile, imitating a stone. We simply press the protruding edges.
If there are any excess pieces left, we can easily trim them off later.
Everything is pasted over, but the gaps between the paper remain; you can seal them on top.
This is what happens. You can make the strip multi-layered. The edges of torn pieces can also be sealed with napkins.
We conducted an experiment by covering a strip with three types of paper: A4, napkins and toilet paper. Whichever material you like best, choose that one.
Read this: DIY hair clip: a stylish decoration for every day
The difference is in the adhesive. Apply PVA glue to the base.
You need to be more careful with toilet paper, because it is very thin, quickly gets wet and breaks. It’s easier with napkins, they can withstand everything, but A4 still needs to be coated with glue.
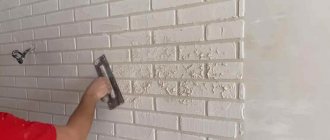
Next, we cover the entire strip with putty; it must be diluted with water until it becomes thick sour cream. We pick up the color with a roller and start painting. It is important to know that the first layer is the darkest and then lightens. We dry and varnish, you can use glossy or matte varnish. We paste everything we made onto the marked place, leaving gaps for the putty solution. To make everything neat, squeeze it out of a bag with a cut off corner or a pastry syringe.
The end result should please you.
The process of decorating a wall with paper stone.
The process of decorating a wall with paper stone. A wonderful master class on decorating a fireplace using bricks made from paper egg trays, which are very reminiscent of the texture of stone. A great idea if you don’t have enough money for natural stone, which is not that cheap) Soak egg cartons (paper) in water, let them sit and get wet. Optimally, tear the packages into pieces so that they soak better. The packaging shown in the photo is the best, to my taste, for making paper pulp. More dense pressings are less likely to get wet, but they are still good. Yes, everything is fine, it’s made of porous paper, if you think about it. Toilet paper will be fine, the grain will be finer. But to buy it...and the egg packaging is free. My idea was to make everything from waste material with a minimum of costs and maximum effect. I really wanted to support in every possible way those whose renovation work was unexpectedly delayed or delayed due to finances singing romances. You can let it soak for 1-3 days, or after a few hours, prepare paper pulp. I added 1 drop of aroma oil to the mixture for a pleasant smell. It's not obligatory. Grind the soaked paper with a blender until smooth. Squeeze out excess moisture from the mixture using a mesh cloth or gauze. The squeezed mass should not be wet, but the consistency is not that of liquid, dense homemade cottage cheese. The mass for making the “stone” was prepared in small portions: Thick PVA (about 70 g and 1 tablespoon of alabaster (gypsum) is poured into the squeezed mass that is obtained (liquid according to the volume of a 1-liter basin, example in the photo) for better hardening and fixing the shape. Alabaster was added to the PVA, mixed thoroughly and only then the squeezed paper pulp was added, then everything was kneaded. Without bothering myself, I kneaded it with a fork. But you can do it with your hands in gloves. Wear gloves, otherwise your hands will turn white from alabaster. Crushed paper pulp (well wrung out), PVA, alabaster, thoroughly kneaded until a homogeneous structure. But I did not achieve the effect of complete homogeneity, understanding that I was doing an imitation of natural, uneven stone. Take a randomly rectangular box, the way you would like the bricks to look like and the size you like. First, a plastic bag is placed in the mold for better removal of the “brick” from the mold. The appearance of the “bricks” is formed with natural stone. In the first photo, the stones used to make the impressions, for the natural appearance of the “bricks.” Impressing structure of the stone, it is worth compacting the mass in the mold. After the brick is made, then carefully pulling the plastic bag, we remove the “brick” and it remains lying on the bag. Then, as soon as the brick has “set”, carefully remove it from the bag and lay it out to dry. I took a box 6 cm by 15 cm, one of these came to hand, but the “brick” seemed too wide to me, and later I divided the box in half and immediately made 2 “bricks” 3 cm by 15 cm, the thickness of the box was 1.2 cm , such “bricks” came out, with a thickness of 1.2 cm to 1.5 cm. The weight of the finished “brick” is on average 17 grams, very light. Box - cardboard packaging from a gift keychain... It is good to place it on a sheet of absorbent paper to dry, since the “bricks” are wet and they have to dry. The “bricks” dry for at least a day. When dried, they shrink slightly. Then, the dried “bricks” can be stored horizontally. After complete drying, they can be folded into a stack to save space. Dried bricks are not plastic, hard and can be ground to the desired size.
For decorations or accessories
You can take a stone as a sample and try to replicate its structure.
We will need:
- polymer clay of the colors you want;
- ink for coloring clay;
- liquid gel;
- acrylic, brushes;
- pasta machine;
- plastic blades and toothpicks;
First we need to mix the main colors from the polymer clay. When baked, the color changes greatly.
Then we flatten the clay and let it cool for about 15 minutes and tear it into pieces. There is no need to smooth out the corners, and there is no need to roll the balls either.
Read this: DIY cat house: photos of the best options for a pet
Mix the colors of acrylic we have chosen to get the desired one.
And we smear each torn piece in acrylic.
Let's put them all back into one piece.
Roll out a thin layer of another selected color on the surface.
We cut the previous piece into very thin pieces and place them on a layer coated with gel so that they stick better. The pieces can be torn even smaller and placed in the gaps.
You should wait until the gel sets and does not slip, and then roll the sections with a rolling pin. There is no need to press hard.
We make whatever we want from the block. We bake and finalize the product. And here’s what, for example, can be made from plastic.
And you can also add an epoxy resin lens.
Decorative wild stone
Materials:
- foam sheet;
- soldering iron;
- marker;
- acrylic paints;
- roller or sponge, brushes;
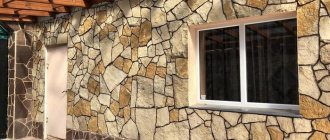
Wild stone can be made from foam, and it will be almost identical to what you buy. We draw stonework in such a way that when they are connected, others are formed. Then use a soldering iron to burn out the seams and then create the texture of the stone. Place the slabs next to each other and make sure that their lines match. We begin to apply paint, colors of your choice. First, it is better to apply black paint and roll it over; it should remain only in the recesses. We apply other colors and glue the slabs.
Read this: DIY mobile for a newborn baby
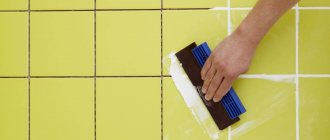
To imitate stone from gypsum, you need to purchase a mold for pouring, a means for lubricating it, a thickener and color pigments. You can lubricate plaster in different ways, by adding pigment to its liquid state, or by lubricating the mold in advance.
We dilute the mixture with water in a large container, coat the silicone with a brush, add dye and pour the building mixture inside. Excess solution is removed. Decorative elements will dry out quickly due to the thickener they contain. And the end result will amaze you.
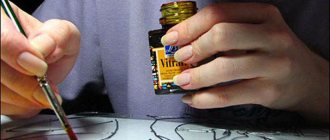
We paint the product “to look like stone”
A short lesson in painting like a stone.
We are not interested in painting to look like brick or just rubble stone. The question is how to paint specifically for decorative stone, marble, jasper, malachite, and so on. This algorithm and sequence is the basis of the direction. By understanding and trying, you can learn to imitate different options and textures.
What we need for painting: 1) Brushes 001, 1,2 2) A sponge, or a piece of foam rubber, or a toothbrush 3) Acrylic or oil paints, whichever you prefer. Oil paints allow for deep, layered textures and require more experience working with paints. For a beginner, you can start with acrylic or practice on paper with simple watercolors. 4) Well, actually, what are we going to describe? 
1) Step one
We apply matte white primer to the product we need. Then we apply the first primary color, which we will use for painting. In our case it is black.
2) Step two
Using a sponge, a piece of foam rubber or a toothbrush, apply the first texture. The color of the texture depends on what we want to get in the end. To imitate jasper, you can use white, gray and purple colors, applying them one after another. In our case, we will use two colors: light green (pale green) and light green (variations and color shades of green can be any, do not be afraid to experiment with color). Apply the first layer and let it dry. When using acrylic paints, this will take 10-15 minutes.
3) Step three
After the prepared base has dried, we begin to draw lines. It is advisable to draw lines with brushes of varying fineness from 001 to 2 (brush size). Direction, discontinuity, thickness of lines - it all depends on your imagination. To make it easier, imagine that you are drawing lightning breaks
The color of the lines also depends on what stone you are imitating. In our case, we mix a little green into the white color and draw lightning.
After complete drying, we apply a layer of glossy varnish.
An example of painting under “gray marble”.
A small, as they say now, life hack
If you have no desire to paint the surface like a stone, then you can create an imitation of the structure of an ornamental stone by simply mixing two different colors of polymer clay . The main thing is to stop in time and not knead the clay to the end, then you will get a very interesting design.
I hope the lesson was interesting and instructive. I invite you to visit my page and see my work.
Imitation in marble
To imitate marble in decoupage you will need:
- Prime the surface and sand it.
- Apply the main selected color.
- We make stains with any colors.
- Add white paint and draw thin lines.
- The rest of the paint can be diluted with water and applied with your fingers.
- Add the colors you chose to the lines. You can blow them up through a straw, creating the illusion of spreading.
- We draw crack lines.
- The surface is covered with dark paint and varnished in several layers. Then we sand and varnish again.