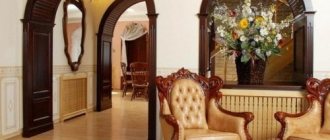
A plasterboard arch is an architectural element that allows you to create an arched ceiling in a wall, doorway or partition. Most often, arches are door arches, because they are the easiest to make. However, if partitions are created, then they often use curved ceilings for a decorative effect.
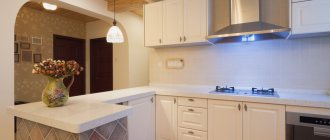
Such designs are created to bring some kind of novelty to a boring interior. Therefore, you can see them in various rooms of the apartment. In some cases they are of an applied nature. For example, plasterboard arches in the kitchen allow you to throw out unnecessary doors and not steal space from yourself.
Types of arches and their design
The most popular types of plasterboard arches
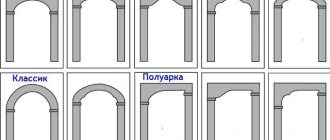
It would seem that we are talking about a simple arched structure, so talking about types and design makes no sense. However, the opposite is true, and there are different types of plasterboard arches. GCR is very easy to work with, and the metal profile bends well. Therefore, there are a lot of variations on the theme of the doorway. Before you make a plasterboard arch with your own hands, you need to decide what shape it will be. Let's look at the most popular types of this design.
- The classic version assumes the presence of a regular circle at the top of the structure. To be more precise, there should be a semicircle. For the option to be considered classic, the diameter of this circle must be the width of the doorway. This option looks great in apartments with high ceilings or in large rooms. Such decorative arches made of plasterboard in the hallway are not uncommon.
Classics are not so often used in apartments due to their small area
- Semi-arches are very often used in interior partitions. Such structures have only one rounded corner. Increasingly, semi-arches are beginning to appear in modern interiors, but they are extremely rarely created during renovations in old doorways.
Half-arches are often used as a decorative element
- Interior plasterboard arches in an apartment can have the shape of an “ellipse”. This form is used in cases where the opening is small. This option looks beautiful when the doorway is either 60 cm wide (instead of the usual 80 cm), or, conversely, is very wide, as in the hall. In both cases, the elliptical shape does not look bulky.
Arches in the shape of an ellipse belong to the “Romantic” style
- Figured arches have a non-standard shape. The most bizarre arched structures can be created from profiles. Most often, figured plasterboard arches are installed in the hall, because they must be large in size so that you can realize all your fantasies. Such designs are the most difficult to create. Often the arch in a plasterboard niche is shaped.
It is almost impossible to create curly arches without the help of a professional
- Portal. Typically, this design is used in old doorways, when they want to do with a minimum of effort without hiding the free space. In fact, for such a design you only need to slightly round the corners of the doorway. Sometimes it is not the corners themselves that are rounded, but only the upper part of the portal. This design is as close in shape as possible to a regular doorway. Quite often, such a door arch is made from plasterboard with your own hands in the kitchen.
The portal is an opening with slight roundings of its corners or upper part
- The design of a plasterboard arch can be made in the Modern style. An opening of this type is characterized by a sharp transition at the junction of the vertical and horizontal parts. Also, the radius of curvature should not be very large. The resulting design is considered quite ordinary and looks good if there are no more elaborate interior elements. Such openings in the hall look very good.
The Modern style is good for a wide and low arched opening
- "Trapezoid" is an arch for the lazy. There are no arcs in this design, but only broken lines. This means it will be much easier to create. This option is suitable for those who do not dare to create round openings. Installing plasterboard arches with your own hands is a difficult task, but in the case of “Trapezium” everything is greatly simplified. This type is used extremely rarely, because few people see the point in making a trapezoidal one from a rectangular opening.
If making the corners round doesn’t work out, then you can change everything to a “trapezoid”
Wooden arch
Working with wood requires the most special attention. In this case, no error should be allowed. Various species are suitable for production, but pine is most often used as a fairly durable and cheap material.
Need to know! Before working with wood, you need to make sure it is well dried. Otherwise, no instructions will help, drying out and warping will begin. It will be impossible to correct the situation.
Not everyone likes pine as a finishing material, but this is easy to fix. For finishing work, you can use valuable wood species (oak, beech, mahogany) or cheaper veneer.
Manufacturing process
In general, any work with natural wood, if there is no experience, is better to entrust to specialists. When creating an interior opening in a house or apartment, you need to proceed from real possibilities.
There are several design options for this material:
- Stacked wooden arches An arched opening is made by assembling different fragments (small parts). That is, using the pressing method, rounded elements are created, which are then joined together (gluing, twisting). This is a rather painstaking process that requires many tools. Allows you to avoid the occurrence of deformations.
Making a wooden arch - Solid structures Made literally from a single piece of wood (timber). Preferably made of hard wood. Often, such a structure serves as an “internal” frame, which is subjected to external processing.
Solid wooden arch
Installation
To install an arched structure, you must adhere to the following rules:
- The installation site is carefully prepared, all excess is removed, and the surface is puttied.
- Prepare the necessary tools in advance - each case is individual.
- Mounting takes place in several stages: • a supporting frame is created; • elements are laid and connected; • external cladding is being done.
- After this, they begin finishing: varnish or paint.
- Defects lead to the formation of empty spaces - they are puttied or foamed, but this will be an obvious defect.
We prepare materials and tools
Making plasterboard arches with your own hands is impossible without certain tools and materials. During work you simply cannot do without the following tools:
- The profile will be trimmed using metal scissors. After this, it can be given any desired shape;
- A screwdriver with a bat speeds up and simplifies installation using self-tapping screws. You can do everything with a shaped screwdriver, but with a screwdriver it’s much faster and easier. It also doesn’t hurt to get a special bit that will allow you to drive the screws to the required depth in order to “drown” the caps. The device will especially appeal to beginners who find it difficult to apply the correct force when working with self-tapping screws;
- a hammer drill or a drill will be needed to attach the frame to the walls;
- a level, tape measure and pencil are used to correctly mark the future arch and apply guidelines for work on the wall;
- A wallpaper knife is needed to cut plasterboard. It’s a good idea to make a gypsum board arch with your own hands using a jigsaw. But the tool may not be accessible to most, so you will have to cut the sheets with a regular knife.
To fasten profiles and drywall, you will need dowels with self-tapping screws. As for the profiles themselves, a rack profile of 60*27mm and a guide of 28*27mm are usually used (other profiles can be used). You also cannot do without a perforated reinforcing corner. Instead, you can use fiberglass mesh. You will also need finishing materials and the plasterboard itself. I would like to talk about it and its flexibility in more detail.
Form
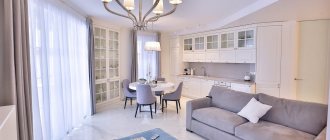
Interior arches are used to create the effect of a seamless space - this is a current trend in modern interior design.
Note ! Arched vaults are used in small apartments: they visually make the room more spacious and freer.
The most popular are plasterboard arches:
- The material allows you to realize any, even complex and asymmetrical, shape.
- Drywall can be handled by a person who does not have a narrow knowledge of construction - the material is easy to process.
- Drywall does not create additional load on the structure of the house.
- Such an arch can be decorated with all kinds of decorative elements: shelves, niches, spotlights.
- Drywall is an environmentally friendly, safe material. You can even use it in children's rooms.
- Compared to other materials for installing arches, plasterboard is the most affordable.
Attention ! To install an arched vault, you need to buy special drywall. It is distinguished by its smaller thickness, the presence of special reinforcing fibers, and high quality. For ease of installation, it is recommended to buy ready-made sets of arched frames. Lighting must be done at the stage of frame installation.
Which drywall to choose and how to bend it
There is a special arched plasterboard 6 mm thick. It is quite possible and even necessary to use it to create arches. However, there are several points that may prompt the use of conventional wall gypsum board 12.5 mm thick. Although arched material is twice as thin as wall material, it is twice as expensive. If only one or two arches are made, then very little wall gypsum board will be required, and you will have to buy a whole sheet.
Arched drywall is easy to bend with your own hands
At the same time, wall plasterboard is probably already used in apartment renovations, since the question of making an arch has arisen. Therefore, this material is at hand. But it is too thick to bend properly. There is a way to bend drywall for an arch.
If, while bending a sheet of arched gypsum plasterboard, it begins to crack slightly, then this is a signal that it is time to stop. A little more effort and it will simply crack.
The dry method involves bending the plasterboard with your own hands to the desired radius. If this is an arched gypsum plaster, then it easily gives in and bends. The wall sheet does not lend itself to this procedure at all, so it is bent using a wet method.
| Table of bending radii of drywall | ||
| Sheet thickness | Minimum dry bend radius | Minimum wet bend radius |
| 6.5 mm | 100 cm | 30 cm |
| 8 mm | 155 cm | 38 cm |
| 9.5 mm | 200 cm | 50 cm |
| 12.5 mm | 275 cm | 100 cm |
To create beautiful arches from plasterboard, you need to bend it correctly. To do this, a frame is created for the entire sheet. It should be a curved frame with the same radius as the arch. A sheet of wall plasterboard is placed on the floor and many holes are made on its back side with a needle roller. Then it is moistened for ten minutes with a wet roller. Then the sheet is transferred to the frame and carefully bent on both sides. You need to moisten it carefully so that the sheet does not become completely soaked.
A wet sheet gives in easily, but there is no need to rush. When the gypsum board completely rests on the frame, you will need to fix it in this position overnight. During this time it will dry and take a new shape. More details about this process and other subtleties of bending gypsum boards can be seen in the video.
You don't have to bother with the whole sheet. If there are one or two arches, then you just need to cut the gypsum board strips to the specified size and bend only them. This is much simpler, and the frame for bending will then be used for work on the same sheet.
Selection of materials
After determining the type of opening, you need to select the appropriate material. At the same time, it is worth taking into account the decoration of the walls of adjacent rooms. The most common options:
- Drywall . Available option for self-installation. Resistant to steam, moisture and sunlight. The sheets bend perfectly, due to which you can give them the most simple shape using liquid. A completely dry product maintains its desired shape. Installed on a previously assembled galvanized profile frame. The joint is puttied and primed, after which the finishing can be applied.
- Natural wood . Ready-made options are not distinguished by their pretentious design and richness of colors; their maximum is relief carving on the surface. However, a wooden arch can be made on your own. At the same time, it can be done in the desired form, having previously decided on the decorative finish.
- Brick . Creates a feeling of massiveness, in no way inferior to the previous version. It can be erected at the time of installation of the internal partition or load-bearing wall.
- Chipboard and fibreboard . Budget materials that become a good option for an arch in an apartment. The raw materials are flexible, bend well, undergo manual correction of the form factor and do not lose their attractiveness after several years of use.
Simple and accessible step-by-step instructions
Before you make your own plasterboard arch, you need to prepare. Everything that may be required for this has been described above. The design has been chosen, the tools and materials have been sorted out. Therefore, you can proceed directly to the process itself. There are several ways to create an arched opening from plasterboard. Now we will consider the simplest and most accessible of them.
Do-it-yourself plasterboard arch: step-by-step instructions.
- We attach a U-shaped profile to the doorway. You should get two letters P. The profile is attached inside the opening to the walls (to the height of the arch) and to its upper part. A drill and dowels will help with this process.
- We cut the sheet of drywall into rectangles according to the size of the opening and profile. We fasten it to the profile with screws, closing the upper part of the passage. You just need to attach it for a while.
With a gypsum board thickness of 12.5 mm, we deepen the profile into the opening by this thickness during fastening. Then the drywall attached to it will be flush with the wall.
- Draw an arc on the attached rectangle. This will then serve as a guide for the arch. How to draw an arch on drywall? Very simple. You need to measure the center of the sheet horizontally and attach a small piece of profile to it so that it dangles freely. So we will get some kind of compass with which we can draw a semicircle.
- When the outline is drawn, it's time to cut out the arc. A jigsaw is ideal for this purpose. But you can also use various saws and a hacksaw. This kind of interior arch is made with your own hands from plasterboard, also using a knife. But the procedure is difficult and there will be many defects. In any case, the sheet will have to be removed to cut the arc. Then you can use sandpaper to smooth out the edges.
The profile must be completely hidden behind the drywall
- We do the same for the second side of the doorway. In this case, the second sheet can already be made according to the first, which will greatly simplify drawing the arc. When the two sheets are attached to the frame, you will need to check them for evenness so that there are no height differences. You may have to raise and lower these sheets a little to even out the height. Let's make a plasterboard arch with our own hands next.
- Now you need to take the guide profile and cut its sides perpendicular to the back in increments of 5 cm. Only the base of the profile (its back), along which it will bend, remains untouched. The profile is bent in an arc and attached to both sheets of drywall from the inside. You will have to wear gloves to avoid cutting your hands. You also need to be careful not to hit your finger with a self-tapping screw when making a plasterboard arch. The cut profile will bend greatly during installation. It is advisable to deepen the back of the profile by a centimeter so that further fastening of the gypsum board to it is flush.
- To make the structure more rigid, jumpers need to be inserted into it. After this step, the frame for the plasterboard arch will be ready. For jumpers, a rack profile is used, from which stiffeners are made. They are attached to the overall structure with metal screws.
Stiffening ribs can be installed every 20-30 cm
- Now all that remains is to secure the drywall along the arch to completely cover the structure. Previously, we discussed how to bend gypsum boards. Door arches made of plasterboard using this method are made quite quickly.
We level the opening with plaster and metal corners with our own hands
Let's finally look at how to level an opening with plaster and met. corners.
Mix a small portion of the solution for one long corner (along the edge of the opening). Next, measure and cut the corner according to the height of the opening using metal scissors. You need to cut carefully so that there are no protruding pieces of metal; if they form, bend them slightly inside the corner or make the corner even.
Having prepared a solution with the consistency of sour cream, apply the solution to the trowel with a small spatula, and from the trowel apply it to the corner, the one on which we are going to glue the corner.
Apply the solution to the corner
Having applied the solution along the entire length of the corner, glue the corner onto it, pressing it into the solution, pressing it closer to the opening. We set the corner exactly, without deviations along the axis and vertical. We check the vertical with a rule, pressing the corner with it. We also check that there are no gaps between the rule and the angle along the length of the angle. We set the corner, correcting it with your hands; work with gloves.
Remove the “extra” solution with a spatula. We place the second corner on the other side of the wall on the same side of the opening. We fill the gap between them with a solution. We position the corners as close to the wall surface as possible, especially on the wall side. Next, we reduce the surface of the walls with the corners with the same plaster so that they do not protrude beyond its plane.
Align the corners to the plane of the wall
For better alignment, take a construction square and check with it whether the opening is formed evenly.
Let's check with a square whether the corners are aligned correctly.
If necessary, we will adjust the corners. Fill the holes in the corners as completely as possible with plaster - this is best done when the solution has set a little.
We do the same with the other sides of the opening. As a result, we get an even rectangular opening.
Forming the upper edge of the opening
The opening is leveled and ready for further finishing
We leveled the opening with our own hands, wait until the plaster dries and begin finishing it. I will tell you the simplest and most inexpensive method, but you can choose another one to suit your taste.
Other methods
The above method may not be to everyone's liking. There are other options for making an arch from plasterboard. Many will not want to work locally, because they prefer to carry out preparatory work. There are advantages to cutting an arch from plasterboard and making the frame in advance.
With this method, arches are marked and cut out on sheets of drywall before attaching them to the frame. You need to calculate the width of the arch, and then the center on the sheet of drywall prepared for it. You can draw a semicircle using a regular cord, one end of which is held in the center of the sheet, and a loop is made on the other. A pencil is inserted into this loop, the lace is pulled tight and an arc is drawn.
Another way to properly make a plasterboard arch is to use a plastic strip. It bends and creates an arc. The arch on the gypsum board is drawn along this arc. But this method requires two people to work together. If you use your imagination, you can easily figure out how to cut an arch from drywall. Some even take a sheet of drywall, make many cuts on it and break it in all these places. As a result, the arc is not straight, but broken.
When there are two pieces of drywall for the outer parts of the arch, and they have already been cut along the contour, then you can proceed to creating the frame. All the necessary sizes are already available. It is created according to the same principle as described in the step-by-step instructions, but now we can use an arched profile for drywall. There is no need to cut it, because it bends as you like.
Using an arched profile greatly simplifies and speeds up work
The creation of the frame has already been written earlier. It is attached to a U-shaped base, and jumpers are inserted into it. Then the entire structure is sheathed with prepared gypsum board. If the profile is arched, then inserting the lintels into it is very simple.
Why is it better to use drywall for the kitchen?
The appearance of this material greatly facilitated the work of builders. Now, to build an interior wall, you do not need to construct it from brick and cinder block. It is enough just to make a frame from a profile to which to attach sheets of drywall. This material has many advantages. Let's look at them in more detail:
- Ease of installation and processing. Drywall is a sheet material that consists of two layers of thick cardboard, between which there is a layer of gypsum. Thanks to this structure, drywall can be processed very well. To cut a piece from a sheet, just use a knife to make an incision on one side, break off a piece, and cut off the cardboard on the other. This feature makes it possible to cut any, even the most complex, shapes from the material. Installation of plasterboard structures is quite simple. Special steel profiles are sold for them, thanks to which you can easily build a structure of any complexity.
- Minimum weight of structures. The drywall itself, as well as the profiles for its installation, are lightweight. Thanks to this, the wall can be placed anywhere without the need to build an additional foundation.
- Low cost and high installation cost. Unlike brickwork, the cost of constructing plasterboard structures is quite low. Its production is not very labor intensive. A plasterboard partition can be constructed independently in less than four hours. Unlike a brick tub, which requires several layers of plaster, the surface of plasterboard is smooth. It is enough to apply a thin layer of finishing putty on it, which significantly reduces the cost of the repair process.
Stacked arch without profile
How to make a plasterboard arch into a doorway without a profile? Is this even possible? Yes, it's real. And we are not talking about some wooden blocks to which gypsum boards are hemmed. The essence of the typesetting method is that with the help of pieces of plasterboard, the necessary curvature is created in the doorway.
In the selected corner, the longest piece of plasterboard is attached to the putty. Then a shorter piece is attached to it. Then even shorter and even shorter and so on. For greater reliability, PVA is added to the putty and diluted with water as needed. To know how long the pieces should be, lay them out on the table and see if the desired curvature is achieved. Here's how to assemble a plasterboard arch without the help of a profile. If you just need to round the corners a little, then this method is ideal. It is not suitable for more complex designs.
Excess putty is removed immediately, otherwise when it dries, it will be difficult to remove. Also, for better adhesion, it is advisable to prime all pieces of drywall.
You will need to place washers under the heads of the screws to prevent the drywall from breaking through.
To ensure that the plates do not fall off, they are periodically attached with self-tapping screws. There can be more than ten such pieces at each corner. When the entire structure is dry, it is puttied in such a way as to smooth out all the corners from the plates. Now you know how to make an arch from gypsum board without a profile.
Assembling the frame for the arch
Secure the guides at the end of the opening according to the markings made. Lay Dichtungsband sealing tape between the profiles and the wall.
After securing the guides along the perimeter of the arch, we assemble the arch frame in the following sequence.
- In the center of the arch, on both sides, insert a short post from a rack profile into the guide profile and secure it with metal-to-metal screws.
- Attach the bent guides, the main arcs of the arch. When fastening, make sure that both arcs are in the same plane. To do this, use a long construction angle;
- Attach four more short posts from the rack profile. Trim the edges of the racks in contact with the bent profile in an arc. Do not forget to monitor the level of the main arcs;
- From the rack profiles, cut out the transverse strips that will connect the main arcs;
- Attach the cross profiles to the arches.
To secure the transverse profiles, you need to cut out a simple structure from the profiles. Cut off the flanges at both ends of the crossbars, but leave only the back of the profile. This design of the crossbars will allow you to easily attach them to the arches. All fastenings of frame profiles are made using metal-to-metal drilling self-tapping screws (type LB).
Finishing an arched doorway
Regardless of the chosen method for creating an arched opening, the arch on the plasterboard wall must be brought into divine form. To do this, the screw heads and existing joints between the sheets are puttied. A special corner must be attached to the joints of the corner sheets. It will make the structure more reliable and the corner edge itself more durable. Usually such reinforcing corners are attached to putty, but not in this case.
The corner can be plastic or metal
For greater reliability, the corner is attached to the opening using a stapler or small screws. Then this corner will be plastered. Here's how to make a drywall archway stronger so the corners never get chipped. Instead of a corner, a fiberglass reinforcing mesh can be used. It can be used to cover not only joints, but also the transition points from gypsum plasterboard to the wall.
The entire arch is puttied together with the corners. For this purpose, ordinary gypsum putty is used. You can choose acrylic putty. It is sold ready-made, but gypsum will have to be diluted with water. The procedure will need to be repeated 2-3 times to get the most smooth and even surface possible. The first layer roughly evens everything out, and the second layer completely levels it out. A beginner may not be able to create a smooth surface and will need to putty everything a third time. Nothing wrong with that.
No one should have any problems with how to putty a plasterboard arch. If the surface comes out rough and with tubercles, then you can take sandpaper and sand it. Then you will definitely be able to achieve a smooth base for further finishing.
You will need several spatulas for finishing.
How to finish a plasterboard arch? Typically, traditional wallpaper and paint are used for finishing. If you choose wallpaper, you will need to cut a strip for the inside of the arch and stick it on, protruding slightly beyond the edges. Then this protrusion is carefully cut off with a knife. The front parts of the opening are also covered with wallpaper that protrudes beyond the plane. Then they are also carefully cut with a knife. With this option, it will seem that the wallpaper was glued overlapping.
There shouldn’t be any difficulties with how to paint a plasterboard arch. Brush, roller, paint and off you go. It is extremely rare that finishing is done using tiles. Sometimes, for greater decorativeness, arches are trimmed with wood.
Operating procedure
- Removing the door frame. The opening must be completely cleaned; not only from the frame with the sash, but also from sealing/insulation materials.
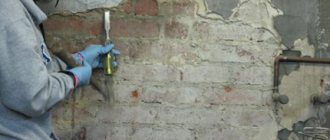
- Definition of parameters. As a rule, to make an arch in an apartment with your own hands, the opening will have to be slightly widened. In most standard buildings, the internal walls are made of bricks, blocks or simply frame partitions, and therefore increasing their height or width is not so difficult. Moreover, you won’t have to do any special leveling - the defects will be hidden under the lining of the arch.
- Marking. One nuance should be noted on this point; The ends of the wall must be strong. Therefore, if it does not meet this requirement in a separate area, you will have to think about either strengthening it (for example, with a corner), or additionally removing part of the material and then leveling it. But in the latter case, the size of the opening will increase. This is typical for houses made of wood if it is discovered that rot has developed on the timber (log).
Adviсe:
- Dimensions should be taken at several levels. Even if the distortion is visually unnoticeable, difficulties may arise when installing the door arch with your own hands.
- There are many discrepancies in the question of what to do first - draw up a drawing of the arch or determine the dimensions of the opening. Here it is worth focusing on local specifics. If the wall material is easy to process, then widening the opening is not difficult. Otherwise, the design parameters will have to be “adjusted” to it.
- Fastening the supporting frame. It is installed in several stages.
- Arrangement of the main circuit. In accordance with the drawing, all external vertical installation slats are “fastened” to the wall.
- Fastening the "vault". Additionally, the upper part of the arch is fixed with hangers, which are located symmetrically across the entire width of the opening.
- Strengthening the frame. For this purpose, transverse elements are used, installed along the arch along its entire profile. Approximately - 50±10 cm from each other. For gypsum boards, the maximum is sufficient (about 55 - 60), but if the cladding is done with boards, then the interval should be reduced to 45 - 50.
- Sealing gaps. In fact, this is one of the ways to insulate an opening. Depending on the material of the wall and frame, the appropriate means is selected - mortar, polyurethane foam, putty or other.
- Wiring. As a rule, all arched openings are illuminated. Therefore, the lines are installed before finishing the frame begins.
- Cladding of the structure. The specifics of fixing the cladding elements depend on their material. But they are attached to the metal profile slats with self-tapping screws; the easiest and most convenient way. You just need to mark the location of the holes and drill channels for the hardware.
Adviсe:
- The easiest way to make an arch instead of a door is from plasterboard. But not a traditional design, but a special one, designed specifically for such structures. It is reinforced with fiberglass (on both sides), and therefore does not break when bent. If the frame has a complex shape, then this is the best material for its cladding.
- Changing the geometry of conventional gypsum boards is done using different methods - “wet” or “dry”. This is a separate topic, and before starting work, this issue should be carefully studied. Each method has its own specifics, but one thing in common is increased sheet consumption. Without experience, you cannot do without damaging and discarding drywall.
- When cutting gypsum board or plywood, it is better to use a jigsaw. Precise cutting cannot be achieved with a conventional tool.
- Finishing the arch
- Applying putty. This is necessary to smooth out roughness.
- Primer treatment. Such products simultaneously increase the moisture-repellent properties of the base and the adhesion of the material.
- Strengthening the finish (if necessary). The edges of the gypsum board are reinforced with a small corner (made of plastic, with perforation), the surface itself is reinforced with a reinforcing mesh, which is glued.
- Re-application of putty composition and primer.
- Grinding.
- Finish coating. Possible options are paints and varnishes, decorative films, veneer, wallpaper, stucco, mirrors. There are no stereotypes - your own imagination will tell you what look to give to the opening.
In principle, the process of installing and finishing the arch does not present any difficulties for a business man. And if you take into account in advance such a point as the maintainability of the structure, then they will not arise in the future.