Frame houses built from OSB are reliable construction, made using Canadian technology. Thanks to the panels, the structure can be built extremely quickly, without loss of quality and aesthetic appeal.
Finishing the building with OSB boards will increase the service life of the building and maximize the service life of the building and create a pleasant microclimate in the room.
The materials have many advantages over other similar products, and therefore it is incredibly popular among users. Let's talk about installing OSB boards on walls.
Preparing OSB boards for finishing
Usually on sale there is OSB board for interior finishing of the OSB-3 class, from which sandwich panels are also made.
Such products resist moisture better due to coating with materials containing paraffin or wax. Because of this, conventional painting of slabs is impossible, since the surface will not be able to provide the necessary adhesion, which leads to paint dripping.
Therefore, you should first prepare it as follows:
Align it. Carefully inspect the outer layer and remove defects and irregularities with putty or sanding.
Process the edges. They absorb the largest amount of paint or varnish because they are porous. Also round all edges and corners to prevent the paint from cracking.
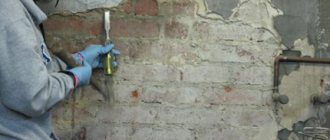
Finish the seams
Treating the gaps between the plates is of no small importance, so fill them with acrylic sealant. You should not use silicone filler, as it is less easy to paint.
At the seams after painting, you can attach protective decorative overlays with your own hands.
Prime the surface. The overwhelming number of varnish and paint manufacturers recommend this stage of surface treatment of OSB boards. It will help reduce the consumption of finishing materials, prevent stains from various components from the slab from appearing, and also make the paint layer smoother. The primer should be acrylic or gypsum based.
- Sand the surface before applying the coating to remove any layer of wax or varnish.
Coloring
In the production process of OSB boards, specially treated chips of different tree species (maple, aspen, pine or poplar) are used. Therefore, choose a paint designed for finishing wood products.
Instructions for their use are on the label; be sure to follow them strictly. This is especially true when it comes to material compatibility.
For surface treatment of OSB boards the following is used:
- A varnish that makes it possible to preserve the original texture of the material and its color, as well as reliably protect the surface from the environment. It is better to use it on sanded OSB-3 sheets or pre-treat them with P60 sandpaper.
- Paint for interior work. When choosing, base your choice on the previous varnish tips. If there are no high demands on appearance, use a water-based material.
The best results are shown by acrylic dyes, which can be used for ceiling surfaces, partitions, walls and other interior elements.
stain
To highlight the structure of the OSB board material, you can use stain. It can be diluted with a solvent or water, since the material is universal in itself.
But, it is better to use the first type for OSB, for example, acetone, which will not raise the pile and will make it possible to dry the material faster. The stain can be applied with a brush, roller or spray gun.
The second step is to apply a layer of polyurethane primer over the dried layer. It will protect the stain and prevent subsequent layers from affecting it.
If you want to use two colors or create an antique effect on the surface of the OSB board, use patina. To do this, apply it to the material, and after drying, wipe it off with a sponge, and then secure the layer with varnish.
Wallpaper
Wallpaper can be glued to OSB boards, but subject to certain conditions. It was said above that they have a layer containing paraffin or wax ().
Therefore, before gluing wallpaper, it must be removed with sandpaper, then primed and puttied twice. Don't forget to add PVA to the wallpaper glue for strength.
Technology of application and installation of the slab
The scope of application of oriented strand board is so wide that it is used in arranging floors, installing partitions and cladding facades. However, in the latter case, it will be necessary to carry out additional finishing to protect the canvases from precipitation.
When installing floors
Previously, floors were finished with boards that were simply painted. Today it is customary to equip this part of the room more technologically. To do this, OSB sheets are placed on the surface, which can be fixed in different ways. Their installation can be carried out on logs, old wooden coverings or on screeds. If we are talking about a high-rise building, most likely you will have to lay the sheets on a concrete base.
The working surface is well cleaned and then treated with a primer. At the next stage, you can begin laying the canvases, which are fixed with glue. The composition is distributed over the surface with a notched spatula. Additionally, you can use mechanical fasteners, such as dowels. This ensures safer and longer operation.
When installing internal partitions at home
The sheets are installed on a frame for which a metal profile under the gypsum board is used. After creating the frame base, electrical cables and other communications are laid inside. The slabs are installed on self-tapping screws, the distance between which must be maintained within 15 cm. After completing the installation work, you can begin the finishing cladding. If desired, the partitions are additionally soundproofed. This technology is good because there is practically no load on the profile, and the sheets are so rigid that additional elements can be attached to them.
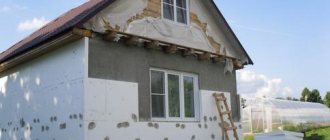
External facade works
Outside, the sheets are installed on the sheathing, but it is better to use a wooden block for this purpose. A metal profile is also suitable, but it must be treated against corrosion. The thickness of the block should be approximately 45 mm, then it will not turn out when drying, and the wall will remain flat.
In order to fix the block to the wall, hangers should be used. After this, thermal insulation is laid, which is covered with a membrane; it will protect the insulation from moisture. After this, the sheathing is installed. A vapor barrier from the outside is not needed, because the steam must escape freely from inside the room. Once the sheathing has been installed, installation of the slabs can begin. For outdoor work, a thickness of 9 to 12 mm is usually used. If a façade will not be installed on top, the slab must have the highest degree of moisture resistance.
Instructions for building a house from OSB boards
For the construction of a frame building, slabs are often ordered according to the dimensions of a pre-prepared project.
Construction of the foundation
OSB panels are a fairly lightweight material, so any type of foundation is suitable for building a house. Most often, a tape base is used, which is easy to make yourself:
- after leveling the construction area, carry out a complete marking of the site according to the planned layout;
- dig a trench at a depth that depends on the characteristics of the soil and the level of its freezing - from eighty centimeters to one and a half meters;
- compact the soil at the bottom of the depression;
- cover with two layers of waterproofing material;
- sprinkle the mixture on top - one bucket of sand and three identical containers of crushed stone;
- install formwork from OSB panels;
- install a reinforced frame in the trench;
- pour concrete on top and level it using a hydraulic level.
After the concrete solution has completely hardened, the foundation is covered with a film material for waterproofing.
After this, a wooden frame is built on top, which includes:
- tying the bottom with logs;
- installation of vertical supports for walls;
- securing floor boards and joists;
- construction of a roof truss system from beams.
The finished wooden frame is sheathed with high-quality oriented strand panels.
Floor covering
OSB panels are connected on joists with straight edges. There should be a three-millimeter gap around each particle board.
The sheets are laid with their central axis perpendicular to the bars on the floor. Each slab must be connected to the previous OSB panel on joists or have additional support at the ends with a special tongue-and-groove fastening.
The sheets are fastened with nails. For additional contraction strength, adhesive solutions are used.
Fastening OSB boards to walls
For finishing load-bearing structures, oriented strand material twelve millimeters thick is used. To improve thermal insulation, the openings are initially filled with mineral wool.
Installation of sheets on walls can be carried out both horizontally and vertically. In window and door openings, panels are connected with a gap of three millimeters.
The slabs are fastened using ring or spiral nails. At the connection of the chip sheets, they are driven in every fifteen centimeters, and towards the supports the distance between the nails is doubled.
Installation of OSB panels on the roof
The quality of the reinforcement of the sheathing depends on the evenness of the roof frame base. For installation, select strong, undamaged panels that have been properly stored and transported.
OSB roof panels
Short sections of sheets are connected on wall and ceiling supports. The remaining panels for fastening must have tongue and groove markings at the ends and rest on auxiliary supports. Each OSB sheet must rest on at least two wooden bases.
The sheathing is secured with spiral nails fifty-one millimeters long. On the rafter sheathing, the fastenings are mounted at a distance of thirty millimeters, and at the connection of the edges of the slabs, nails are driven in every fifteen centimeters.
A minimum gap of one centimeter must be maintained from the edge of the OSB panel to the screws or nails. When lining the chimney, the distance required by the construction safety rules is maintained.
Fastening the OSB material is carried out according to established rules:
- leave a ten-meter gap between the panels and the foundation to protect against moisture;
- maintain a distance between nails or screws of at least fifteen centimeters;
- when screwing in the fastener, retreat one centimeter from the edge of the sheet;
- Do not connect the panels tightly, leave a three-millimeter gap between them.
It is not difficult to build a frame house from OSB panels. The main thing is to pour a strong foundation, build the frame smoothly and sheath it with oriented strand sheets in accordance with all the rules for their installation.
Exterior decoration of the building
The external cladding of the walls of a frame house requires compliance with certain rules that follow from the characteristics of the products. For outdoor work, products with a thickness of at least 11 mm are used. The work process is divided into stages:
- The OSV slab is attached to the rack so that the joint is located in the middle.
- There must be a gap of at least 3 mm between the plates.
- The bottom trim must be covered with a sheet.
- In a two-story building, the sheet must extend onto the rack of two floors, this will give greater rigidity to the structure.
- The covering of window openings is carried out in a whole sheet, which allows all joints to be placed on adjacent racks. Window openings are simply carefully cut out.
- To perform fastening, it is best to use spiral-shaped nails or self-tapping screws.
It is worth noting that when covering the outside of a frame house, experts follow certain rules:
- fixation of slabs in intermediate areas is fixed at a distance of 300 mm; slab joints are fixed every 150 mm;
- For every 100 mm, the outer side is stitched;
- to prevent splitting of the material, fasteners must be placed at a distance of 1 cm from the edge of the product;
- The slab should be fastened both horizontally and vertically, this will give greater strength and reliability to the building.
How to plaster a slab outside the house?
The question of whether it is possible to putty the surface of OSB boards is controversial: some experts believe that this coating will not protect the product from the appearance of cracks on the surface of the facade. Others, on the contrary, recommend using an additional coating, because it will refresh gloomy wooden panels and serve as protection against moisture and dust.
Carrying out high-quality work on plastering the façade of a building can be performed subject to the following conditions:
- the surface must be coated with an adhesive compound before carrying out work;
- the solution applied to the surface with a spatula should not be thinner than three millimeters;
- use of reinforcing mesh after applying the first layer;
- covering the surface with an adhesive composition after the first layer has dried.
The surface of OSB slabs visually looks decent, and some home owners leave them at this stage and do not carry out additional work on cladding the building.
Many experts still recommend covering the slabs with plaster - this will not only give the house individual features, but also protect it from external damage. In order to perform plastering efficiently, you need to follow the sequence of work:
- When applying the first layer, you should try to run a wide spatula along the wall to fill all the recesses on the OSB. For proper application, you need to move the tool along the wall in an arcuate motion. Completion of the first layer should not be accompanied by streaks along the surface to be coated.
- After the first layer has completely dried, clean the wall with an abrasive mesh and repeat the application of putty.
- In order to achieve an ideal surface with a smooth shine, you need to apply at least five successive layers.
- After applying the putty, the surface must be dried, after which a layer of paint can be applied to it.
Even experienced craftsmen ask the question of what is the best way to carry out the work of filling panels. The work process can be complicated by the fact that most putty materials do not adhere well to wood surfaces.
Therefore, you need to choose those coating models that have the highest adhesion to a wooden surface.
In order for the work to be completed successfully, it is recommended to pay attention to the Rodband and Goldband mixtures. These mixtures are made on a gypsum basis with admixtures of polymer materials
If the owner of the premises wants to save on putty material, then it is better to purchase Rodband, its texture is more rigid than that of Goldband, and the price is much lower.
The selection of finishing is also important, and should be approached carefully. In order not to make a mistake with this choice, it is recommended to purchase the Vitonit KR mixture.
What kind of OSB boards are there for external walls?
OSB is made in 4 types:
- OSB-1 - used only in dry rooms for cladding.
- OSB-2 – used as a construction material in dry rooms.
- OSB-3 – can be used both indoors and outdoors. Can be used in conditions with high humidity. Strength allows the use of OSB-3 as a structural material.
- The most common class is OSB-4 - more durable and moisture resistant than OSB-3.
For cladding external walls, only classes 3 and 4 can be used.
Installation from outside: lathing
External wall cladding can be carried out in several cases:
- In order to level existing walls, hide defects (cracks, crumbling plaster, etc.) and simply as cladding.
- In frame construction - to protect the insulation from wind and precipitation, and also as an element of the supporting system.
- When insulating walls - to protect the insulation from atmospheric phenomena.
In all 3 cases, OSB sheets are attached to the sheathing. The sheathing is made from wooden lumber of various sections, depending on the task. Most often, unplaned coniferous timber with a cross section of 50*50 or 40*50 mm is used. OSB can be attached to a metal frame.
When insulating, the sheathing is performed in steps that are a multiple of the width of the insulation minus 20 mm, without insulation - the step is chosen so that the joints of the sheets fall on the beam; several additional racks are added between the joints with a distance between them of at least 600 mm.
When covering walls, use a moisture-proof film, following the recommendations of its manufacturer, in particular, the distance between the membrane and the OSB.
How to attach panels to the wall
OSB boards are usually attached to the wall through the sheathing using wood screws when using bars in the frame, or metal screws when attached to a metal profile frame. The length of the screw should be 25-45 mm.
It is allowed to mount OSB directly to the wall. To do this, holes are drilled in a sheet cut to size, the sheet is installed in place, the wall is drilled in the designated places with a hammer drill, dowels are inserted and screws are tightened. When attached to a wooden base, the hardware is screwed in without pre-drilling.
Fasten the screws in one selected direction, for example, from left to right, from bottom to top, otherwise the OSB sheet may bend.
How to decorate the outside beautifully from osb
OSB has a rather interesting texture, which leaves many finishing options. At the same time, you need to remember that OSB consists of 90% wood, so the material is subject to the same dangers as wood. Fungus and mold may appear on the slabs, they are to a small extent susceptible to rotting, the resin can be destroyed under the influence of sunlight, and the ends of the panels absorb moisture.
OSB boards are treated with wood compounds for outdoor use. The composition must provide UV protection. To preserve color and texture, the surface is coated with colorless varnish and antiseptic impregnations, to impart wood shades - with decorative antiseptics, for painting in various colors - with facade paints for wood.
To obtain a smooth surface, OSB walls are plastered and puttied. Before applying plaster, the surface of the slab must be protected from moisture with special primers or glassine, then a plaster mesh is attached and plastered. It is possible to apply decorative plaster or paint.
Also, OSB walls can be covered with any type of siding or facade panels, block house, clapboard, etc.
Decorative finishing options
For interior walls, OSB boards are ideally smooth, sufficiently durable and absolutely dry surfaces, ready for further puttying, painting, and wallpapering. Also, after plastering, you can apply relief plaster. Then the interior space will look original. This will require less effort.
For the outer surface of the walls, such panels also need to be plastered, and then they can be:
- paint;
- lay out with decorative facade panels;
- trim with clapboard or siding.
Other OSB features
In fact, all types of OSB are becoming increasingly popular. Therefore, the scope of their application is not limited only to finishing or construction activities. Several alternative uses:
- Manufacturing of interior items. In particular – furniture. For the most part, these are frames for sofas and armchairs. Although options for cabinet products are appearing.
- Various types of containers. This may be packaging for transportation.
- Vehicle finishing. Most often truck trailers.
A material such as OSB is the key to successful construction. But many people mistakenly believe that it becomes possible not to comply with the rules and technology. OSP makes the process easier, but does not make it less responsible.
The desire to get a home in the shortest possible time and at an affordable price will be the main factor when choosing this type of housing construction. In all countries of the world you can find houses made of OSB, because many people do not have enough money to build a mansion from other materials. Living in them is comfortable due to the fact that they have all the basic characteristics and are almost as good as houses built from, for example, brick or aerated concrete.
Advantages:
One of the disadvantages is the operating time. It is less than that of buildings made of strong materials. Housing will be of high quality for at least 50 years.
It is possible to use OSB boards in different versions. They can be partitions between rooms, main walls, or used when installing the roof. This is a virtually waste-free material, since after dismantling it can be used as formwork.
The slabs have a huge number of advantages: they are easy to drill, quickly sawed, quite durable, and moisture resistant. Various types of finishing materials are easy to apply and attach. Walls with a minimum thickness of 9 mm will be reliable and of high quality; it is recommended to install slabs of 12 mm or more on the floor.
Advantages and disadvantages of the product
The main advantages of the material include the following:
- High strength: modulus elasticity, resistance to bending ruptures.
- Moisture resistance due to special resin impregnation, which makes the slab resistant to rain and snow.
- They absorb noise well. Due to the chips and resin, a high density is formed, which eliminates extraneous sounds.
- Light weight. The product can weigh from 15 to 40 kg.
- Easy to install. The product is easily attached and cut with absolutely any tool.
- Environmentally friendly. The production technology uses a permissible amount of wax and resins, each product has a special “Eco” label.
Of the shortcomings, only one can be noted - the use of low-quality resins containing large amounts of formaldehyde, which can evaporate and harm human health. But using such slabs for the outer cladding of a building is absolutely safe.
Protection of OSB from insects, birds and mice
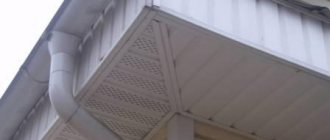
Almost any of the existing methods for installing OSB boards provides for the provision of a gap for ventilation. Thanks to a small air gap, an influx of air will be ensured, which will flow from the lower edge of the wall from the environment and flow through the top back into the atmosphere. It is unacceptable to make the gap blind, which will negate the efforts and costs. A closed air cavity will not perform its intended functions. Birds, mice and bees penetrate into such places, thereby reducing the original characteristics of the wall surface. Protection from such visitors is necessary and should be planned during the first stage of construction or renovation work.
Protection against rodents can be carried out in the following way:
- Application of perforated facade material at the top and bottom of the wall. This can be a soffit, which is used in combination with siding.
- Painting mesh. The cost of the material is reasonable, the strength indicator is low (rodents can handle it quickly).
- Installation of metal mesh based on sheet material, in which small holes are made in large quantities. Stainless steel is best suited as it will not corrode over time due to excessive moisture. Strips or a mesh of metal are attached to the upper and lower parts of the wall immediately behind the OSB sheets, which will not affect the appearance of the building in any way.
Video consultation on installation of OSB panels:
How to make a partition from OSB inside a house and what screws to use?
OSB is a completely suitable material for the construction of internal room partitions. The strength and light weight of the sheets are clear evidence in favor of this product. OSB boards can be mounted on a metal profile (like gypsum plasterboard) or on a wooden frame.
If the second option is used, the wood should be treated with protective materials against mold and mildew, as well as fire retardants.
Now regarding the installation diagram of the partition, which will be considered using the example of a wooden frame:
- Markings are made at the installation site of the structure. Lines are drawn along the floor and ceiling, which will serve as guidelines for installing horizontal guides.
- Beams with a cross section of 4x6 cm are attached along the marking lines. If the wall will be subjected to serious loads (for example, you plan to hang furniture on it), it is better to use thicker bars - 5-8 cm. The guides are attached using dowels.
- Vertical posts are installed, which are fixed to horizontal beams using metal corners and self-tapping screws.
The pitch between the racks depends on the width of the slab, which varies. So, if the transverse size of the OSB sheet is 125 cm (the value characteristic of European brands), then the optimal distance between the axes of the vertical beams is 62.5 cm. In this case, it will be possible to screw the edges and the middle of the slab to the frame.
After installing the racks, OSB panels are installed.
They are attached using self-tapping screws, the length of which depends on the thickness of the sheets and should be 45-50 mm greater than this value. For example, when using material with a thickness of 12 mm, the recommended length of screws will be 60-65 mm.
In the middle of the slab, screws are screwed in increments of 30 cm, along the edges - every 15 cm. The distance from the edge is 1 cm. A gap of 1 cm is left between the slabs and the floor. The same gap should remain between the OSB and the ceiling.
Also, the panels should not be installed closely, but at a distance of 3 mm from each other. This will protect the sheets from deformation due to changes in humidity.
Making a partition from bars and OSB - watch the video:
Sheathing materials
Materials for cladding can be very different: from solid inch boards to exotic MDVDs like Izoplat. When choosing, first of all, you must be guided by expediency, budget, and availability of labor. A lot has to be taken into account, even little things, since, for example, a sheet of DSP will be too heavy to lift and very cumbersome when working in pairs.
When building the house, we were guided by the directory “Individual house “Platform”. The main advantage of this construction method is the speed and simplicity of solutions for developers who do not have the proper experience. Therefore, the choice of material was predetermined by this construction method. was covered with OSB .
For this stage of construction, a Kronospan slab produced in Mogilev, Republic of Belarus was purchased. Unfortunately, it did not show its best side (as we were convinced of by comparing the products of two manufacturers), however, it was too late to change something and return the material for a complaint and, knowing how unscrupulous sellers can delay return periods and create obstacles, most likely impossible.
However, despite the poor quality, these slabs have not lost their main positive properties. They provided us with simplicity, ease of installation and cutting, and speed of installation.
OSB frame house cladding
To work with oriented strand board, you need the simplest and most accessible tool:
- screwdriver;
- jigsaw;
- level or spirit level;
- hand tool.
We fastened the slabs using black 3.5x45 screws and 3x50 nails.
Sheathing principles
The basic rules, the observance of which guarantees that the cladding of an OSB frame house will successfully perform its functions, can be presented in the form of several theses:
- Sheathing should start from any corner and fasten the sheets in a horizontal position.
- The joints of the sheets must land on the frame posts.
- Each subsequent row of sheets must be mounted with seams spaced at least on one rack.
- If the house has several floors or an attic floor, then they must be connected to each other by a common row of OSB. This is the only way to ensure spatial rigidity between floors.
- When installing in the cold season, it is necessary to provide expansion joints to compensate for the linear expansion of the slab material, and in the case of low-quality slabs, also swelling from moisture.
Operating procedure
Sheathing the frame house with OSB (OSB) on the outside began from the corner of the wall with the least glazing. Since the weight of the sheet did not reach 10 kilograms, it was quite comfortable for two people to work together.
In order to ensure the junction of the two slabs on the stand, some sheets had to be sawn crosswise. When performing this work, do not neglect eye protection, since when cutting, sharp pieces of wood chips fly in all directions, including getting into your eyes.
To ensure a compensation gap between the sheets, ordinary self-tapping screws were placed.
In general, the work took two days at a leisurely pace with the help of two people. The most difficult stage of covering the outside of a frame house with OSB was working at height when processing the gables.
Preparing OSB walls for wallpapering
Wallpaper is considered the most popular option for wall decoration, so it is used in rooms with walls finished with OSB boards. Sometimes such a need arises in the process of redevelopment of space. So, before making a partition, you should make sure that it is in harmony with the rest of the interior.
Wallpaper on OSB wall
If necessary, you can plaster OSB boards.
OSB wall putty can be used if there is a need for the finished wall to become universal for applying any type of decorative coating
With this type of wall treatment, you should pay attention to some features:
Putty is applied to a clean surface
The presence of dust, dirt or traces of other building materials on the wall can adversely affect the quality of the coating, so before applying the putty composition it is worth washing the wall well. It is worth paying attention that the heads of nails and screws are recessed as deeply as possible, and it is better to remove the top layer with sandpaper. The surface for putty should be slightly rough. It is better to treat the joints between the plates with nitro putty.
This will ensure evenness and strength. As an alternative, you can use body putty, since its properties are designed for moving objects. In this regard, the composition has not only lightness, but also great connecting properties, and it does not collapse on the wall for a long time. After completing the preparatory work, a layer of putty is applied. After applying the composition, you can begin priming the surface.
Processing wall joints before puttying
OSB boards are a universal material for cladding walls of a house or finishing rooms inside it. This raw material is used both to strengthen walls and create partitions. It is quite durable, lightweight and resistant to mechanical stress, humidity, fungus and insects.
In order for this coating to last as long as possible, it is worth considering several factors before attaching OSB. This is especially true for the distance between nails and screws, as well as the location of the joints. The appearance allows the use of OSB boards without any decorative treatment. However, they can be puttied, coated with paint, varnish, or prepared for wallpaper. If the technology is followed, the result will be smooth walls, which will be the basis for any interior and will delight its owner for many years.
Interior decoration of the building
Sheathing a frame house inside with OSB boards is practically no different from drywall. The only thing is that when attaching the slabs it is necessary to use strong fasteners, because... the board weighs more than drywall. For installation, a wooden frame and 50 mm self-tapping screws are used. After fixing the products, they can be sanded and primed.
For information! The slabs can be laid as flooring; to obtain a durable coating, the panels must be placed perpendicular to the joists.
In addition to priming and painting, products can be treated with absolutely any facing material.
- Varnish. The technology of use is the same as for installing floor coverings.
- Dye. Water-based paints and varnishes are ideal because... they are able to best pass steam and provide a good indoor microclimate. As a rule, paints are used for ordinary wood.
Important! The use of water-based paints and varnishes will lead to deformation of the slab.
- Wallpaper is glued only after thoroughly priming the surface, using wallpaper glue with the addition of PVA.
- Plaster. The sheets can be plastered; for this purpose, a mixture is used for interior work.
Sheathing a house with an OSB product is an optimal and inexpensive option for a building material that can improve performance and improve the appearance of a building.
Methods for plastering OSB boards
When applying the plaster layer, the following problems may occur:
- absorption of moisture from the solution by wood;
- the formation of cracks in the plaster coating due to the “play” of wood when moistened;
- difficulties in ensuring reliable adhesion.
These problems are solved in various ways. There are two main methods of plastering OSB:
- without insulation;
- with insulation.
In both cases, OSB boards must be firmly fixed to the wall to prevent significant movement during work and during shrinkage.
Traditional way
Information on how to plaster oriented strand sheet material without insulation is provided as an extreme option, which it is advisable to avoid. A plaster coating without insulation can cause a lot of trouble for the property owner during operation.
For plastering you will need:
- membrane vapor-permeable material, for example, Tyvek StuccoWap;
- broaching mesh for reinforcement;
- adhesive composition;
- plaster mixture.
Sequence of work:
- A membrane panel is attached to the surface of the OSB with a stapler. The panels are joined with an overlap (10 cm) using glue or double-sided tape.
- A reinforcing mesh is placed on top, attached to the OSB.
- Apply a layer of adhesive (to completely immerse the mesh in the composition, you need to apply two layers).
- A primer is applied to the dried glue to increase adhesion (preferably deep penetration).
- Plaster the dried surface.
Scheme of the standard method of plastering using OSB
For this method, it is especially important to use an elastic plaster composition from a trusted manufacturer, otherwise the plaster layer will crack due to the “movements” of the wood surface. Most often, cracks occur at the joints of OSB
Instead of a membrane, you can use roofing felt, kraft paper or bitumen cardboard.
Another way to protect OSB is to putty it under plaster. Putty is similar to plaster mortar, only its filler is a very fine fraction (practically, stone flour). Before puttying, the chip surface is sanded, cleaned of dust and primed. Not just any primer is suitable, but wood compositions that do not contain water. Then, applying the primer will not remove moisture from the slab.
puttying OSB under plaster
The primer mixture is applied with a roller twice, allowing each layer to dry. After applying the primer and drying it, a reinforcing mesh is stapled onto the surface of the OSB and puttyed. The mesh should be inside the putty. After the putty has dried, the chip surfaces are plastered with elastic, vapor-permeable, decorative compounds.
The most vulnerable areas of OSB to moisture penetration are the ends. They must be thoroughly primed before installing the sheets.
Insulation and plastering
Insulation is usually carried out outside the building. For example, to plaster OSB boards, sheet foam 40 mm thick is used as insulation.
Subsequence:
- Sheets of insulation are glued onto the prepared OSB surface. After the glue has dried, the sheets are fixed with mushroom dowels, recessing the caps into the foam. The joints between the sheets of foam plastic are foamed, the foam protruding above the surface is cut off.
- Apply the adhesive composition in a layer of 3 mm, apply the mesh, straighten it, smooth it with a wide spatula, immersing the mesh fabric in the solution. The solution that protrudes over the mesh is leveled.
- After the adhesive solution has dried, the prepared plaster mixture is applied.
The method resembles the Wet Facade technique. Therefore, the nuances of implementation can be found in the corresponding article.
Using drywall
Gypsum plasterboard sheets (GKL) are classified as dry plasters. Tandem plasterboard + OSB does not ignite and can significantly reduce noise than a separate OSB. You can attach drywall to OSB indoors directly (without a guide frame). In this case, the OSB is secured with self-tapping screws to the guides. The gypsum boards are secured with self-tapping screws through OSB to the same guides.
But the joints of OSB and gypsum board should not match. Drywall can even be glued to OSB and then secured with self-tapping screws. GK sheets are well puttied and plastered. Almost all types of plaster mixtures are suitable for plastering. There is no need to install a vapor barrier under the gypsum plasterboard in dry rooms.