Ceiling finishing with decorative plaster
If the finishing work is done correctly, the plaster will not crack or peel off from the ceiling in the future. It will cover all defects, including bulges and cavities. Before choosing a material, it is recommended to consider a number of circumstances. It will be a kitchen or a bathroom, a living room or a bedroom. If you have questions, professionals will answer them. It is possible that a suspended ceiling will also look good.
Finishing the ceiling with decorative plaster has pros and cons.
List of advantages:
- The material does not emit harmful substances.
- The coating is monolithic and will last a long time.
- Moisture resistance.
- Covering power of the mixture. Even small cracks and irregularities are reliably hidden.
- Apply to concrete, wood, metal base.
- Large selection of color shades.
- It is resistant to fungus.
- Fire safety.
- Different textures are given.
- Combination with other materials.
List of disadvantages:
- The work is carried out using strict technology.
- Heavy weight.
- Duration of work.
It is worth noting! Before applying the mixture to the ceiling, it is recommended to practice on the walls.
Expert advice
Decorative finishing is designed to make the ceiling surface a significant element of the room. Expert advice will save you from many mistakes made by beginners when carrying out work.
- Attempts to replace the recommended materials and equipment will not give the desired result.
- Preparing a small portion of a thick mixture is justified due to rapid hardening. They try to apply patterns no later than 30 minutes, since drying occurs.
- Relief compositions will shorten the preparation period. Remove dust and wash away dirt. After the primer has dried, the material is applied in broad strokes. A soft spatula is required; the relief is created immediately.
- For structural plaster you will need a stainless steel trowel. After spreading it on the ceiling, level it with a plastic trowel. Painting is postponed until a later date (1-2 weeks).
- Several spatulas and trowels will be required for Venetian plaster on the ceiling. We need broad, asymmetrical strokes and ironing. The thinness allows grinding with a metal device after drying. The glossy surface will sparkle due to the coating with colorless varnish.
- Sgraffito distinguishes colored solutions (yellow, red, brown, white, pink, blue). A set of cutters of various shapes is used. They will be needed for cutting, picking, and stripping. To create a stencil, cardboard with a printed pattern and soaked in drying oil is suitable.
The peculiarities of the decorative coating do not mean that it is impossible to change the ceiling beyond recognition on your own. Difficulties are attributed to Venetian or sgraffito processing. Textured and relief compositions do not cause problems during work.
One of the advantages of decorative plaster is the variety of textures
The ceiling base will turn into a real highlight, attracting attention. Durable plaster does not require special care. It will decorate the room without losing its attractive appearance.
Did you learn something new? Share it in the comments!
Types of decorative plaster finishing, which is better
Decorative plaster for finishing the ceiling is divided according to the type of binding ingredients:
- Acrylic. Supplied ready to use. The mixture consists of resin, mineral fillers and other components to impart properties. The solution is elastic, with low vapor permeability. To add color, tint is added to the composition.
- Mineral. Available in the form of a dry mixture. To prepare, add water in the proportion indicated on the package. The composition includes sand, cement and modifying additives. Resistance to temperature changes, high strength and vapor permeability are noted. Low price. After gaining strength, you can paint.
- Silicate. Sold ready-made. The material contains potassium glass, mineral additives and polymer resins. It has plasticity, strength and vapor resistance.
- Silicone. Supplied ready to use. The composition includes polymer binders. It has high plasticity, vapor permeability, low water absorption, and electrostatic properties. The price is high.
Plaster is divided according to the type of filler:
- Textured plaster for the ceiling. The coating turns out to be decorative with relief: in the form of a fur coat or traces of a bark beetle. These effects are obtained due to mineral additives, granite or marble chips. It is used for finishing interior spaces and facades.
- Structural. It is applied in a thin layer, a relief is created on the surface through stencils or rollers. The mixture has plasticity. The composition quickly sets and gains strength.
- Venetian. Dust from marble and other stones is added to the composition, so the surface looks like a monolithic stone. The solution is applied in several very layers. Consumption is economical, 200 grams per square meter is enough.
Before choosing a mixture, it is recommended to familiarize yourself with its characteristics, and also take into account what kind of interior the finish will be combined with.
Preparing for work
Before plastering, the ceiling must be primed.
The quality and durability of the decorative coating largely depends on the preparation. It is recommended to take the following steps:
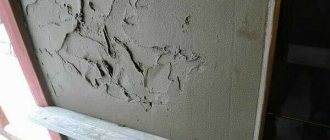
- Inspect the base to identify loose fragments, large depressions and protrusions, stains of grease, soot and rust.
- Grind off the sagging, fill the holes with putty, clean out the holes and cracks and seal them with sealant or tile adhesive. It is advisable to immediately resolve the issue with sealing in order to permanently get rid of the risk of flooding from above.
- Alternately treat the slab first with an antiseptic and then with a deep penetration primer.
This procedure is applied to a relatively flat base. If it has significant differences in height, a screed is made. To do this, the zero level is determined, beacons are placed and a layer of putty 2 cm thick is applied. Next, the dried screed is treated with an antiseptic and primer. The issue of removing the old finish is decided in each case individually based on its condition and composition.
Technology for working with decorative plaster on the ceiling
The technology for applying putty is different, as the ingredients are different. However, surface preparation is performed according to the same algorithm. Before applying Venetian plaster, you should especially carefully prepare the base. All work must be performed in a respirator and safety glasses.
Surface preparation
Surface preparation is carried out in the following sequence:
- Clean the base from old finishing materials.
- Remove dirt, dust, grease stains.
- Dry the ceiling.
- Cover the surface with a layer of primer.
- Putty over uneven areas.
The plaster marking is applied to a clean and dried base. If the ceiling is uneven, you will need a building level to level the surface.
It is worth noting! If moisture accumulates in the room, then it is necessary to treat it with an antiseptic composition.
Preparation of material
Before starting work, it is necessary to prepare all tools, materials and putty.
List of tools and materials used for cladding:
- Plaster mixture.
- Two containers: for diluting putty and color.
- Construction mixer.
- Spatulas.
- Master OK.
- Building level.
- For Venetian plaster - a trowel.
- Rollers for applying paint and primer.
- Rule.
- Painting tape.
- Rags.
It is imperative to prepare the soil for deep penetration, a mesh for reinforcing unevenness, a ladder - stepladder, other means of scaffolding, and personal protective equipment.
The preparation of the compositions is carried out using the following technologies:
- The plaster mixture is mixed if the composition is purchased ready-made.
- It is better to prepare coarse-textured plaster by hand so that the filler is not damaged.
- A power tool is used to mix fine-grained material. The work of mixing the mixture is performed at low mixer speeds.
Dry mixtures are diluted with water according to the attached instructions.
Step-by-step algorithm:
- The mixture is poured into a separate container.
- Add water at room temperature and mix with ingredients.
- The color is diluted in a separate container and gradually added to the solution.
- Leave the preparation for the time specified in the instructions, and then you can begin direct application to the surface.
Attention! The mixture for finishing the ceiling should not be too liquid.
Applying decorative plaster to the ceiling with your own hands
The plaster is applied smoothly to the surface. A little material is placed on the spatula, which is then applied in a layer of 0.5 to 2 cm. At the finishing stage, the desired texture or relief is given, different patterns or designs are made. For this, stencils, graters or rollers are used. The composition gains strength quickly, so small areas are treated.
Is it possible to do it yourself?
In recent years, active attention has been paid to the ceiling; the list of finishing materials has noticeably expanded. The usual whitewashing or wallpapering does not arouse interest. Installing suspended ceilings is expensive and expensive.
Design features will force the height to be reduced. You will need the help of craftsmen who use specialized equipment to avoid distortions. A worthy alternative would be a special mixture.
The selection includes dozens of items that have the desired characteristics. Apply decorative plaster for the ceiling with your own hands, following clear instructions. It is possible to immediately implement an unexpected design project and give the room a unique flavor. The variety of patterns and color shades is amazing.
To make the apartment unique, decorative plaster is used on the ceiling.
How to apply structural plaster
The material is picked up on a trowel or spatula, and smoothed using a plastic grater. This way the granules will be distributed evenly over the base.
To give the surface a relief in the form of a furrow, the following algorithm is proposed:
- The mixture is scooped onto a wide spatula.
- The tool is applied to the ceiling, the plaster layer is stretched over the base.
- Roll the surface of the ceiling with a smooth roller.
- Leave for 12 hours.
- Rub it with a float pressed tightly to the ceiling.
- All protruding elements are cut off with a narrow spatula.
- Apply a layer of primer and paint the base.
All actions must be performed in strict sequence. Compliance with safety precautions and the use of protective equipment is necessary for everyone.
Partial finishing of ceiling areas
When decorating spacious rooms, you can include division into zones in the ceiling design. A patterned rosette is made around the lamp in the center of the room using the stucco technique. The main area can be tinted around the perimeter using patterns, moldings, and stucco. The corner section of the ceiling can be tinted with a flat floral image or a molded one-color floral pattern. In large areas, patterns are applied using a stencil. The design solution is chosen taking into account the style of the room.
How to apply textured plaster
After applying the composition in the usual way, the surface is rolled with a special shaped roller or a pattern is applied with a brush. You can prime the ceiling within a day, and then paint it. Select the paint color to match the interior.
It is worth noting! To create a pattern with a brush or roller, you need to work with these tools until the solution becomes strong.
Required tools and materials
Tools for applying plaster
To make a decorative ceiling from plaster you will need a very small and inexpensive set of tools and materials.
To perform preparatory work and apply the composition, you will need the following equipment:
- wide, narrow and notched spatula;
- drill with mixer;
- Master OK;
- trowel;
- paint brush;
- roller;
- rolling figured roller;
- container for solution and for rinsing instruments;
- stepladder with top shelf;
- safety glasses and gloves;
- construction helmet.
Materials you need to purchase:
- selected type of plaster with a margin of up to 20%;
- primer for the base;
- additional filler;
- dyes;
- finishing lining (paint, varnish or wax);
- sponge
The frozen solution is very difficult to wash off. You should stock up on rags, mounting film, cellophane, cardboard, old wallpaper and newspapers.
Types of finishes with photos in the interior of the kitchen and other rooms
The variety of textures of decorative plaster is one of its main advantages. But when choosing a material, it is worth considering that the main stages of finishing work will directly depend on the texture of the putty. For example, finely textured plaster will not hide all the flaws and irregularities on the ceiling, but coarsely textured putty is quite difficult to work with without some experience.
As for the type of finishing of the ceiling surface, it all depends on the chosen composition. By type of filling it is divided into:
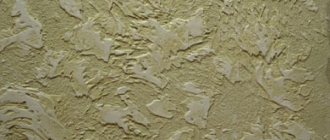
- Invoice. It is classified as embossed, as it forms a rough surface. Wood, mica, flax fibers, marble or granite chips are used as fillers. It is used for finishing brick, concrete, wood, and plastered surfaces.
The mixture hides minor defects on the ceiling well, so before working with it, the surfaces do not need to be prepared too carefully. It goes on sale in finished or dry form. When purchasing textured plaster, it is worth considering that the larger the filler, the greater its consumption. According to subtypes, textured plaster is divided into:- lamb;
fur coat;
- bark beetle
- Structural. It is made on an acrylic or silicate base. It uses marble chips and quartz elements as filler. The material is a granular heterogeneous mass.
When choosing a fine fraction, the ceiling surface looks almost flat and smooth. And the medium-textured material forms a small relief after drying. This material goes on sale ready-made, and there is no need to add color to it.To get the effect of waves on the surface, a coarse textured mixture is selected, which is applied to the ceiling with large movements using a spatula.
Important
When finishing residential premises, preference is given to water-based materials. Because it dries quickly and does not emit an unpleasant odor.
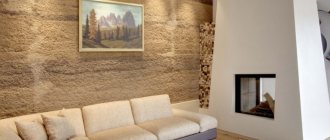
- Venetian. It is a multi-layer decorative coating. It contains marble chips and slaked lime. When applied to the surface it resembles natural marble or onyx. This material requires certain skills and experience for application.
To do this, use a flexible rubber spatula and apply the plaster with thin strokes in several layers (from 5 to 6). Moreover, before applying the next layer, the previous one must dry well. Despite the fact that this type of decorative finishing is quite expensive, it is fully justified by its impeccable appearance, practicality and durability.Depending on the application method, both matte and glossy surfaces are formed. This type of plaster imitates stone surfaces and precious metals (if it is painted with special pigments).
Their features include the fact that the relief on the ceiling appears immediately after applying the material.
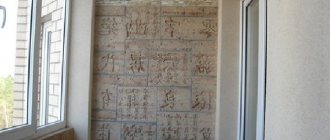
Textured:
Structural:
Venetian:
If you follow certain rules when choosing a finishing material, you can quickly and originally transform the ceiling surface in any interior.
Attention
Each individual type of decorative plaster involves the use of different application methods and techniques to give the ceiling surface expressiveness.
Principles of installing suspended ceilings
When deciding to install tension suspended structures, you need to have an idea of how this is done. First of all, the level of the future finishing coating is determined, taking into account the dimensions of various communications passing through the interceiling space. After this, baguettes (load-bearing profiles) are attached to the walls along the entire perimeter of the room. At the same time, the strength of the walls under the pull-off force must be high, taking into account that PVC film, for example, can stretch more than twice when heated and contract when cooling to its original state. Fabric panels that are installed without heating stretch only 40%.
If PVC film is chosen for installing a suspended ceiling, before starting work on its installation, it is necessary to remove all house plants from the room, remove animals and children. The temperature in the room can rise to +60 – 70 degrees. The walls are decorated after finishing work with the stretched fabric.
Installation of panels can be carried out using various methods:
- harpoon;
- clip-on;
- glazing bead.
Each of these methods involves the use of a specially designed baguette. Simultaneously with the installation of the stretch ceiling, a lighting system is being built. Typically, spotlights or LED strips are used, which are installed in a special profile.
Lamps can also be located behind the canvas if it is translucent. To hang traditional chandeliers, special additional elements - platforms - are attached to the base ceiling. In the same way, before stretching the covering, the installation of embedded elements is carried out for the subsequent installation of window cornices. The material is pushed into the baguette using a special flat spatula (spatula). After cooling, the PVC film contracts in size, stretches like skin on a drum, and the ceiling takes on a smooth appearance. If necessary, the final stage of installing a stretch ceiling will be attaching the ceiling plinths.
What should the plaster be like?
The plaster mortar, like any other mortar, if it is ready for use, must have a homogeneous state without lumps, optimal fat content, adhere well when applied to the work surface, and also not shrink too much when drying, that is, not become covered with cracks.
Plaster solutions are:
- skinny;
- normal fat content;
- fatty.
The first solutions have a liquid consistency, since too few binders are added to them. But the latter, on the contrary, contain an excess of such components, which is why during the drying process such plaster becomes covered with cracks and all work goes down the drain. The first type of solution, on the contrary, has a small amount of astringent components, but an excess of filler substances. Because of this, the layer of plaster applied to the wall will have low strength.
Plaster mortar
The best option is a solution of medium fat content. It is in it that the content of the components included in the composition is optimally balanced.
Determining the fat content of the mixture before applying it to the wall is quite simple - you just need to mix the solution and pay attention to its “behavior”. If the mixture sticks excessively to the paddle used to stir it, the solution is too greasy
If it does not stick at all, it will be considered skinny. In the first case, filler is added to correct the situation, in the second - a binder.
Preparation of plaster mortar
Negative sides of suspended ceilings
Among the disadvantages of tensile structures, consumers who have already installed them in their apartments note an increase in the noise level in the room.
If you have not provided for the installation of a frame base for hanging window cornices in advance, then it will be impossible to attach them after installing the tension covering without spoiling the entire structure.
When using film coating in an apartment, some consumers note an increased level of humidity. Any materials emit a peculiar odor during the initial period of operation, which should disappear after some time. However, if this does not happen, then the material was of poor quality and is most likely a counterfeit of a well-known brand.
Stretch ceilings hide the height of the room. And let this be a minimum value of 2-3 cm, but in small apartments of an old building this value plays an important role. To install suspended structures of complex shapes, a large room height is required.
How to plaster a ceiling surface
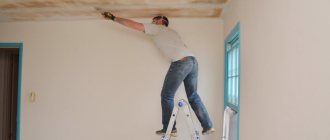
Before applying the cement-sand or gypsum mixture, the concrete floor is treated with a primer for better adhesion. This requires the construction of scaffolding, since it is simply inconvenient and unsafe to carry out such work from a stepladder.
First of all, the joints between the floor slabs, the so-called rusts, are treated with the solution. Next they move to the entire ceiling area. The mixture is thrown on with a trowel and leveled with a trowel or stretched over the ceiling surface with a wide spatula. If a gypsum mixture is used, you have to work quickly, using small portions of the mixture, taking into account that the alabaster solution (the so-called building gypsum) hardens quickly.
It is not recommended to decorate the ceiling with alabaster in rooms with high levels of humidity, for example, in bathrooms, baths and saunas.
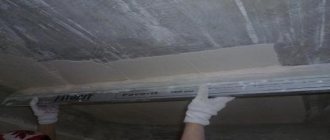
The plastered surface is checked for the presence of depressions and protrusions by applying a rule strip at least two meters long in different directions along the ceiling surface. Permissible deviations should not exceed 0.5 mm per meter of area. All irregularities with a depth greater than the permissible values are sealed with putty, but the previously plastered surface is primed again.
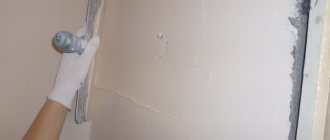
The putty is applied using a wide spatula in different directions. In this case, the spatula is held at an angle of 30 degrees relative to the ceiling surface. After the layer of putty has dried, the ceiling is sanded with sandpaper with the finest grain, the so-called “zero”.
The work is very dusty and unsafe for health, so it is necessary to use a respirator, safety glasses, and a head covering for the worker. Finally, the ceiling is primed again. Well-made plaster can last a long time without requiring repairs.