Cracks that appear on the plaster can upset anyone. Some make every effort to avoid them, others absolutely love decorative plaster with the effect of cracks, but an unexpected crack always causes irritation. Especially if you remember how much effort was required to apply the plaster.
Every professional knows that cracks are an obligatory phenomenon that is almost impossible to avoid.
A little-known fact: modern engineers can predict with 100% accuracy where cracks will appear and know why plaster cracks when it dries. How do they know this? The answer is simple, before work they are required to plan where cracks are allowed to appear.
It is currently impossible to avoid the occurrence of this phenomenon, but it is undoubtedly possible to control and eliminate them.
Cracks in plaster (reasons).
There are many reasons why plaster cracks when it dries.
We have already described the first and most important one, but we will consider the rest below. Knowledge will help you avoid cruel mistakes that can lead to complete falling off of the plaster. Let's start with aerated concrete. A mixture applied to aerated concrete without taking into account technology will definitely, simply certainly, crack. Don't go to a fortune teller here. Delving deeper into the physics of materials and processes, one can see that:
- Aerated concrete has an extremely useful property - excellent vapor permeability.
- However, this property sets important requirements for materials used in plastering aerated concrete walls, since they also need to possess it. The vapor permeability of materials must be at least at the same level as the vapor permeability of aerated concrete, but it is better that it be higher, otherwise the vapor passing through the first barrier will bury itself in the coating, begin to accumulate, creating unnecessary stress and someday will certainly affect the appearance of a crack . It will definitely have an impact!
- During the finishing process, a fundamental rule may be violated - finishing takes place within one day. We relaxed and decided “I’ll finish it tomorrow” or “it will do,” the result was that the plaster cracked again. During the wasted time, conditions will change several times, temperature, as well as humidity, will affect the solidifying mixture. Completely unnecessary stress will be created, which will certainly cover one half of the work with cracks, and the work that has been slightly deposited will become a victim after some time. You will have to do at least 2 repairs to one wall, which can hit your pocket, not to mention the time spent.
- Also, moisture that periodically gets onto and under the plaster will cause hairline cracks to appear in the plaster. After all, the “appearance-drying-appearance” cycle is capable of destroying centuries-old stones, and even more so plaster.
- There are cases when the solution is not able to resist cracks when under the influence of ordinary ultraviolet rays. In this case, the solution used is far from being a quality product or the conditions in which it is used are unsuitable.
We fight structural cracks
Well, now let's talk about the most “scary” jobs. I hope you don’t encounter them, because each of them is a huge blow to your pocket and a lot of time wasted. We will not consider all the details at this point, since if you have touched upon such serious problems, it would be better for you to read our article on the relevant topic. And here we will talk only in passing.
If it comes to a demolished seismic rib, then in this case only an engineering organization and careful calculations can help you, but you can think about restoring the foundation, since it can really be done on your own. To do this, you will need to go through the following algorithm of actions.
- Remove the blind area of the building, break it with a sledgehammer or hammer drill. Moreover, you will have to do this not only in the area of damage to the wall, but also along two adjacent walls.
- Start digging close to the existing foundation, about 30 cm away from it.
- Dig exactly to the place where you see the base, but under no circumstances dig into it, as many sites advise. You must understand that if you dig at least 10 cm, then remove the load from it. This, by the way, is 5, or even 10 tons. You will not be able to compact under this area, and the newly poured foundation will warp again.
- Start compacting the clay with a mallet weighing at least 20–30 kg.
- In the middle of the old foundation, make two perpendicular cuts to a depth of 10 cm using a grinder with a stone disc.
- Hollow out what you cut out with a hammer drill.
- Make holes across the entire area of the foundation with a drill with a diameter of 16 mm.
- Pour 5 cm of sand, moisten and compact it.
- Insert reinforcement into all these holes. It will connect the old and new foundations.
- Set the appropriate reinforcement.
- Prepare a strong solution with a 1:1 ratio. Or, maximum, 1:2, but in this case the grade of cement should be at least 300.
- Lay the waterproofing on the ground side and fill in the mortar.
Well, that’s all, dear readers, now you know enough to understand the cause of cracks and how to deal with them. And in conclusion, here’s what I want to remind you: our site does not publish technical literature, the articles are aimed only at introducing you to the topic.
Therefore, we do not bear any responsibility for your actions, and if you need more professional advice, it would be better for you to contact specialists or specialized educational institutions. Good luck!
How to stay safe?
A huge number of different rules have been invented, the strict implementation of which will lead to quality work done. It is important to give them due attention before applying the mixture:
- Before applying the mixture, wet the base with plain water. Use a spray bottle to make this task easier;
- The air temperature in the room where finishing takes place, allowing the work to be performed at the highest level, should be less than 24 degrees. If the conditions are met, the cement plaster will not crack, but just give it a reason;
- Such seemingly harmless little things as a draft and direct sunlight will certainly cause irreparable consequences that you will have to regret. Their access should be denied;
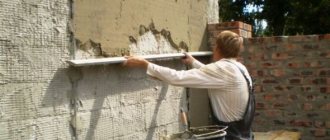
- A solution applied to a work surface with a thickness of more than 2 cm must be secured using beacons;
- Before applying a new layer of the mixture, you need to make sure that the plaster of the previous layer has not cracked and has firmly set;
- The gypsum mixture must be less than 1.5 centimeters thick, the cement mixture less than 2 cm;
- Everything matters in finishing. To the question: “Why does the plaster on the walls crack?” out of mind, the working surface and its features should be taken into account in the same way as the characteristics of the plaster. Therefore, it is necessary to remember that the solution is applied to brick, stone and concrete bases with a thickness of less than 0.5 cm, and on a wooden base - less than 0.9 cm;
- Be sure to pay attention to the recommendations indicated by the manufacturer on the bag of future plaster;
- It is important to create a solution of the correct consistency, so it is necessary to follow the order of mixing the components.
Compliance with these simple rules will have a positive effect on the work performed. Further sealing of cracks in the plaster may be necessary only in cases of subsidence of the house.
Why does plaster crack?
Plaster defects
Concrete is a common building material. Its properties are close to those of natural stone,
load-bearing capacity allows for use as a foundation for large buildings and structures.
The performance qualities of concrete are well known to builders, but non-specialists often make mistakes in the composition of the solution and miss a lot of important points during concrete crystallization. Ignorance of the specifics of the material results in operational problems and destruction of buildings and structures.
The most dangerous are cracks that appear in concrete due to errors made during pouring and curing.
Reasons for appearance
Cracking of a concrete foundation is a dangerous sign indicating improper pouring or exceeding the permissible load on the structure. The main reason for the appearance of cracks is insufficient professional training of builders, the use of unsuitable materials, and miscalculations during the creation of the project.
The reasons why concrete cracked during operation are technological and operational. They are caused by excessive load in the wrong direction. The specificity of the material is its high ability to resist pressure, but its weak ability to resist tensile forces.
In order to strengthen the structure, a reinforcement cage is used, which takes on most of the tensile stresses, but the reinforcement is not able to completely eliminate them. The issue is resolved during design by methods of strengthening critical areas.
There is another reason for the formation of cracks. It consists of incorrect technological support for the crystallization process of the material. As concrete dries, layers with varying degrees of moisture are formed.
Surface areas dry out faster, their volume decreases, and strong surface tensions arise. High drying rates caused by direct sunlight, heat, and other reasons cause the formation of cracks.
Building codes and regulations (SNiP) allow for the presence of small (0.1 mm) cracks formed under conditions of alternating freezing and thawing.
What are the types of cracks?
Based on the type of origin, the following types of cracks are distinguished:
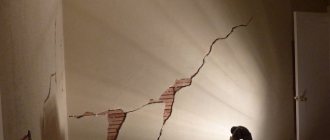
- Constructive. They arise from overloads due to design errors, improper operation of the building, and the use of inappropriate grades of cement.
- Unconstructive. They appear due to violations of drying technology and unfavorable conditions for crystallization of solid concrete.
- Created during a fire. Exposure to high temperatures contributes to the formation of delamination of the material due to the expansion of the reinforcement and the large temperature difference between the external and internal layers.
Non-structural cracks are divided into several types:
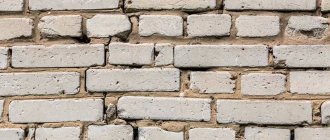
- Consequence of plastic shrinkage. Caused by the high drying rate of concrete. Outwardly, they look like barely noticeable cracks as thick as a human hair and up to 75 centimeters long.
- Consequences of temperature shrinkage. Crystallization under high temperature conditions causes the appearance of strong stresses that destroy the top layer. The direction of the rupture is from outside to inside. The width of the gaps ranges from tenths of a millimeter to several millimeters; there are cracks that are centimeters wide.
- Corrosion cracks.
Formed due to corrosion of reinforcing bars located close to the surface. Most often they are the result of a violation of pouring technology or improper assembly of reinforcement. They appear after several months of use.
Most of the resulting ruptures are of a non-structural nature and occur on almost all foundations.
The absence of cracks is characteristic of the foundations of special structures of high responsibility, created using special technologies from a specific material. The permissible values of deformations and breaks are clearly defined by SNiP, which regulate the size and depth of possible surface disturbances.
What to do to prevent concrete from cracking
It is impossible to avoid the occurrence of cracks once they have already appeared. It is necessary to understand the physical meaning of the appearance of discontinuities. The peculiarity of the phenomenon is the latent mode of crack formation.
Their occurrence can only be prevented in advance by using the correct technological methods, using appropriate materials, and carrying out work in favorable climatic and temperature conditions.
The technology for preparing the mortar requires the use of appropriate quantities of sand, cement and filler. Exceeding the concentration of the binder contributes to the formation of microcracks, which are dangerous due to their quantity and invisibility.
Crystallizing concrete must be moistened with water. The surface receives moisture, the volume of the outer layers is equalized relative to the inner ones, which did not have time to release water. The drying process is accompanied by the release of heat; on hot summer days, wetting should be done 2-3 hours after pouring.
You cannot spray water from a hose with a direct stream under pressure; you must use a watering can or sprinkler. The optimal watering regime in the first week after pouring is once every 3-4 hours, over the next week - 1-2 times a day. The wetted surface is covered with plastic film and rubberized cloth.
Pouring concrete must necessarily be accompanied by periodic bayoneting and compaction of the mass. Eliminating cavities and bubbles inside the solution will avoid the appearance of deformation stresses that cause rupture of the surface layers.
How to eliminate cracks that appear
Ruptures in the surface of a concrete casting are dangerous. They reduce strength and create pathways for large amounts of water to enter the mass, facilitating penetration into the reinforcing bars.
The possibility of frost expansion appears, “exploding” the concrete from the inside; metal elements begin to rust, destroying adjacent layers of material.
Options for repairing existing defects:
- Slit injection. The resulting cavities are filled under pressure with a special repair compound. The method is complicated and requires certain expenses. It is performed by specialists, as it requires the use of specific equipment.
- Sealing the crack. The fracture is opened to a width of 5 mm and crumbling and exfoliated areas are removed. The cleaned cavity is filled with a mixture of sand, cement, and polymer fillers. The composition seals the fracture, strengthens the deformed area, and protects against repeated cracking.
- There are different options for completing the seal, depending on the purpose of the concrete structure, the degree of responsibility, and the magnitude of the loads experienced.
It is necessary to use repair solutions that are as close as possible in composition to the base concrete. This will help to firmly connect the walls of the gaps and create a monolithic section of the structure.
The occurrence of cracks in solid concrete is an undesirable, but often encountered problem. Elimination requires a lot of labor and costs a lot.
Watch additional video:
You can avoid troubles by carefully following the technology of mixing mortar and pouring concrete, properly drying and curing the poured structure.
What to do if cracks appear?
Problems arose on aerated concrete:
Correction is useless when the cement plaster cracks, you have to remove it and start finishing work from the beginning. Now, knowing the basic rules, you will be able to do it correctly. It is important to use materials designed specifically for aerated concrete work.
Helpful advice! When performing the initial finishing of this material, it is advisable to first finish the finishing inside the room, and then take on the façade of the building. This mistake is extremely popular when hairline cracks in plaster behave strangely, constantly appearing and disappearing, but their size is quietly increasing.
Problems due to variable humidity:
- Cracks that appear due to constant changes in humidity levels require urgent identification of the cause of these jumps and its elimination. After closing the source of moisture, thorough drying is necessary so that the plaster does not crack again and the question disappears: “What to do?”
Poor quality or old mixture:
- The only correct solution would be to completely remove the finish and replace it with a new one.
Mechanical characteristics of the working surface:
- It is necessary to study this problem in more detail and pay special attention to the nuances. Perhaps the appearance of hairline cracks in the plaster was influenced by ordinary subsidence. Some impatient citizen was busy applying the solution, completely lost sight of the importance of waiting the required time, and this is the result. However, this case allows you to simply repair cracks in the plaster, this time withstanding the full subsidence time recommended by the manufacturer.
- A vertical deviation is an incredibly unpleasant and heavy thing, requiring strengthening of the structural parts itself. After which it is possible to seal cracks in the plaster.
Helpful advice! Use beacons made of ordinary paper tape so that mechanical changes in the design are always under control. This method is simple and reliable. You need to stick the tape on the problem area and wait. A torn tape will indicate that the structure is moving, which means that the destruction process could not be stopped. The only correct conclusion is that you will have to get to work to fix the problem. If the tape is in perfect order, then you can safely start covering thin cracks in the plaster so that they don’t warp.
Progress of work.
Sealing cracks in plaster has its own algorithm of actions, filled with some subtleties that require careful study.
Subtleties.
Let us immediately pay attention to the rules, the observance of which will simplify the solution of this issue literally several times:
- It is advisable to be clever and find a mixture whose brand has been used previously. If it works, it will be a huge plus.
- The vapor permeability of the plaster must have properties due to which the wall being finished will be free from hydroblocking.
- It is important to create conditions. All actions with cracking cement plaster must be performed simultaneously, allowing the external environment to equally influence all finishing areas.
- It is forbidden to carry out finishing at room temperatures below +5 degrees and at humidity more than 80%.
Quality of working solution
The basis of any plaster is cement, but its specific gravity can be different and determined by the volume of modifying and polymer ingredients present. It is the cement that provides the finished coating with the required strength and connects the other components together.
It would seem that based on what was written above, the working solution should consist of the maximum possible amount of cement. In practice, cement plaster will begin to crack if the cement share in it is more than 1/3 of the total mass of the finished substance.
How to repair a crack in plaster on a wall.
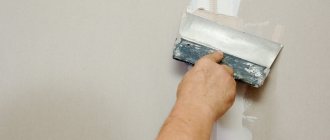
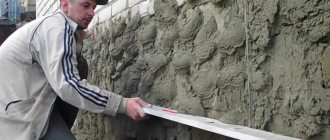
The key points of this point are as follows: Cracked cement plaster must be thoroughly cleaned, removing and discarding everything unnecessary. Antimony is not at all necessary; rather, you will have to perform hard physical labor, holding a hammer and chisel in your hands. We drive away pity, we unceremoniously remove the weak edges.
We destroy any area that seems unreliable, but it is important to control yourself so that in the heat of work you do not gouge the entrance to the neighboring apartment.
Afterwards, thoroughly wash the crack to remove any remaining wall debris and dust. Let it dry.
We use the resulting free time to make the solution. Before applying, we wet the crack from the inside again and cover it with a fresh solution. Glue reinforced paper tape onto the top of the set mixture and that’s it. We will continue to monitor changes in the future.
Afterwards, the tape can be plastered. The process must be completed by sanding, followed by finishing.
But:
- A gap less than 5 mm wide is filled with assembly adhesive before finishing plaster;
- How to repair cracks in plaster if the mechanical damage, or rather its cause, has been eliminated, but the entire wall is covered with small cracks? Simply, having sealed each of them, you need to secure a reinforced mesh on top;
- Modernity offers a good selection of tools that make life easier; for this case, for example, sealants have been invented. Anyone can use them, but first you need to carefully study the instructions. It is important that the sealant is suitable for application to lime structural parts;
- It’s great to add PVA glue to work with a crack that has appeared in concrete; first, as with conventional sealing of cracks in plaster, the internal cavity is lubricated, and then it is filled with a cement mixture.
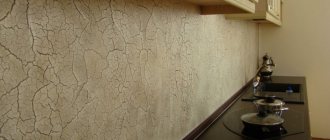
Methods to combat erosion cracks
There is nothing wrong with such cracks, and even if you tap the plaster and find some voids, it is better not to undertake repairs. You have two options: either just mess it up a little, or redo everything all over again, that is, knock down all the plaster, process everything and apply new one.
You will not be able to partially restore this, since by starting to knock off the already peeled off areas, you will break the adhesive bond on the rest of the wall area. And in the end, everything that you applied again will stick, and everything old will peel off. Right, Anka is at home, Vanka is not there. Vanka is at home, Anka is not there. Don’t try to experiment, everything has already been done and conclusions have been drawn.
If you don’t want to redo everything from scratch, treat the wall as follows.
- Remove any wallpaper or paint.
- Treat with an antifungal compound.
- Apply a strengthening primer compound, which can be easily purchased at any hardware store.
- Apply a deep penetration primer.
- Glue on reinforcing fiberglass mesh or fiberglass.
- Fill the wall with primary and then with secondary.
- Clean and re-treat with a strengthening compound and deep penetration primer.
Now, you will forget about these small cracks for another 5-7 years.