Columns in the interior of an apartment are considered an element of luxury and emphasize the status and taste of the owners of the house. However, in this topic we will talk about plasterboard columns, which are increasingly finding their purpose in modern design and fit perfectly into a classic and strict style, into Baroque and Provence decoration.
Design and decoration of plasterboard columns in the interior of an apartment
Types of plasterboard columns in the interior of an apartment
Plasterboard columns are divided into two main types:
- round;
- square.
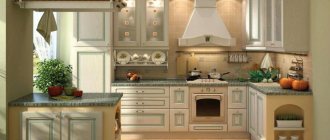
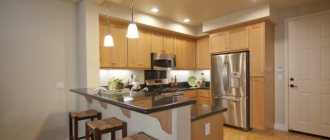
Round columns are usually installed in rooms decorated like Provence; they can be installed in plasterboard arches and complemented with marbled stucco, or simply painted to match the overall tone of the room. Decorative plasterboard columns not only emphasize the style of the arches, but also create the effect of larger space. Square columns are used in high-tech and modern style rooms. The structure of steel columns can be finished in wood or used as a niche.
An example of finishing columns with wood The result is a false column, which, at first glance, is difficult to distinguish from a wooden one, but it is much cheaper in cost and is not inferior in appearance.
Do-it-yourself decorative plasterboard columns: 3 stages of installation
Until recently, columns in interiors served as load-bearing supports. Now, in most cases, these elements play a decorative role in the design. False columns have become an integral part of both classical and modern stylistic trends. They can be square, rectangular or round in shape; triangular ones are less common. In addition to its main function - interior decoration, a column can serve as a decorative box for communications or the basis for a furniture structure, as well as a zoner for a fairly spacious room or a decoration for arches. How to make such an interior element with your own hands? Let's look at a simple example.
Purpose of the design
One of the main purposes of a plasterboard column is to decorate the interior and zone the space. Columns help distribute usable space in fashionable studio layouts. Columns can serve as a useful structure for hiding pipes and other communications and electrical wiring. Some column designs include built-in interior plasterboard shelves, which can provide additional storage space.
Required tools and materials
Drywall Tools:
Drawing with dimensions of plasterboard columns for installation
- Screwdriver - for screwing screws and self-tapping screws into plasterboard and metal profiles.
- A hammer drill is a tool for drilling holes of different diameters in concrete floors.
- Metal scissors – used for cutting metal profiles.
- Laser level – allows you to make markings for mounting the frame. Can be replaced with a hydraulic level with a painting cord.
- Building level - used for level installation of both horizontal and vertical parts.
- Drywall cutter - helps you cut sheets quickly and accurately. Alternatively, you can use a paint knife and ruler.
- Edge plane - chamfers the transverse edges of drywall, useful for square columns. Can be replaced with a painting knife.
An example of cutting a chamfer from the edge of a sheet of drywall - Tape measure - for cutting out the structure.
- Hammer – for driving in dowel nails and adjusting the profile.
- A set of crowns in case of need for large-diameter holes, for example, for sockets.
- Spatulas of several sizes - for finishing columns.
Stages of construction installation work
Do-it-yourself installation of a plasterboard column can be divided into stages, and in particular:
- preparatory work;
- design and layout;
- assembly and installation of a profile frame;
- plasterboard covering;
- decorative finishing.
Each of the above examples of work should be done on two types of columns, round and square. The installation principle of both types is quite similar, however, each type of design should be considered separately.
DIY column installation
Sheathing with plasterboard perfectly decorates the column and makes its surface smooth.
Previously, columns were built from stone, brick or concrete. Today you can build a beautiful and functional false column with your own hands from a metal guide profile and cover it with plasterboard.
Related article: Inexpensive DIY garden paths
If you plan to install columns in the room, then it is more correct to install them before installing the ceiling.
The fastest and easiest way to decorate columns with your own hands is to cover them with plasterboard. If water or sewer pipes are installed inside the columns, then it is necessary to fill them as much as possible with sound insulation, preferably mineral insulation.
Installation of a square column
First of all, you should prepare all the necessary materials and tools. You need to have a clear idea of the appearance of the structure and its location. Video review of the installation process of a square plasterboard column.
Design and layout
Marking the future structure begins from the ceiling, where you need to mark the base of the column. Two parallel strips should be drawn between the walls. The width of future columns will depend on the distance between parallel lines.
When marking each of the structures with lines that will connect parallel strips, you need to ensure that the angles correspond to 90 degrees.
Next, using a laser level, the markings are transferred to the floor. As an alternative to a laser level, you can use a plumb line attached to the corners of the marking. Important! The future appearance of the structure depends on the correctness of the drawing and markings! The markings should be treated with particular care.
Assembly and installation of a profile frame
Then you can begin installing the frame. Based on the patterns on the ceiling and floor, the profile is cut out and installed using dowels and nails.
The process of assembling the column frame A vertical profile is attached to the resulting frame base using metal screws.
Their number depends on the location of the column and its width. If it is installed at a certain distance from the wall with a width from corner to corner of 50-55 cm, then at least eight such parts will be needed. The vertical parts of the frame must be reinforced with horizontal profiles with an approximate step of 50 cm.
During installation of the frame, you must constantly monitor the evenness of the vertical. You can use a plumb line or a simple building level. In some types of frames, additional inserts made of metal profiles can be used, where sockets or side lamps will be installed in the future. All the details of the future column design should be calculated at the stage of installing the frame, including all communications.
Covering columns with plasterboard
Before covering the frame, the gypsum board sheets must be cut out using a pencil or marker. Cutting is done according to the dimensions of the frame. Drywall is cut into the required lengths with a paint knife or cutter. The prepared parts are fastened end-to-end using metal screws. If necessary, holes are cut on the sheathed column using a drill with an attachment.
Marking for a decorative column
The most important stage in the construction of many structures is marking. The decorative column is no exception here; although it is small in size, it still requires careful marking of the space. It's worth starting from the ceiling. Depending on the shape of the decorative column, you need to draw its boundaries on the surface. That is, if it is round, then you will need to use a compass. It will be easier with a square-shaped column, but not everyone likes this shape, it all depends on your choice.
The boundaries drawn on the ceiling must be exactly transferred to the floor. To do this, you can use a plumb line, but it is also possible to carry out this action with a laser level. Moreover, without yielding exactly to the plumb line. After this, you should have the outline of the future plasterboard column on the ceiling and floor.
Installation of a round column
Marking for the frame
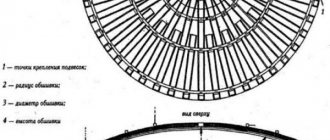
A round column, unlike a square one, does not have corners, so marking the structure is easier. First of all, you need to find a point that will serve as the center of the column. Next, you need to use a compass, which you can make yourself from a strip, a nail and a pencil. Using a compass, a circle is drawn from the center point.
Diagram with dimensions for installing a round plasterboard column. And in order to duplicate the size on the floor, a plumb line and again a compass are used.
Frame assembly
To make the frame round, you should cut several pieces of the profile, leaving one section intact. Attach to the ceiling and floor along the contour of the mark, bending the profile. It should be noted that the distance between the segments should not exceed 5 cm. After installing the base of the frame, vertical posts are inserted into it, preferably thick-walled ones and secured with self-tapping screws.
Frame covering
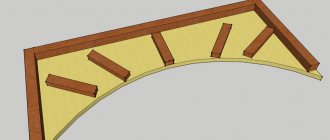
To cover a round column with plasterboard, you can use the dry folding option, however, it is only suitable for columns with a small diameter. In the case of a large diameter, a popular option is bending using a spiked roller.
Scheme of covering the column frame This roller should be driven along the surface of the sheet, making small punctures, then the gypsum board is moistened with water and bent along the required radius and fixed until completely dry. The finished material can be used to cover the profile.
On a note! You can see how to bend gypsum boards for a round plasterboard column in a thematic video or photo.
Column finishing
The decorative finish of a round column is not much different from a square one. The only difference is that there is no need to install a metal corner, and the drywall putty is done horizontally, and not from top to bottom.
Covering a column with plasterboard
A triangular or square column can simply be lined with sheets of plasterboard, without additional preparation. But when working with a round or semicircular object, you need several additional measures that will allow you to change the shape of the drywall sheet.
The easiest way to bend a sheet of this material is to make several cuts on it and bend the sheet along them. The distance between the cuts should be no more than five centimeters. They need to be done so that the second side of the sheet remains intact. It is worth noting that the number of folds should be equal to the number of guides in the frame, since each face of the KGL sheet is connected to the guide post.
You can use another method - wet. It lies in the fact that when wet, plaster becomes pliable. This can be done as follows:
- Take a spiked roller and run it over a sheet of drywall several times. This is necessary in order to allow water to seep deep into the leaf;
- Using a wet rag or sponge, soak the sheet, but keep in mind that if it is too wet, it may fall apart;
- While the material is still wet, start shaping it into a curved shape;
- Attach to the frame.
The advantage of this method is that it is somewhat faster. Also, if you use this method when covering columns with plasterboard, unlike the first, there will be no corners left on them, but only smooth transitions. But despite all the advantages, this method can be used with sufficiently large bending radii.
Video about bending gypsum board:
The first and second methods can be combined. A perforated sheet of plasterboard, with ready-made folds, can be slightly wetted, which will make it more flexible and easier to work with.
There are some points to consider before covering the frame. If you create a column with your own hands, then you will be very sorry to disassemble it in order to run wires for the lamps that you planned to install in it. Or you wanted to hide the pipes that come from the second floor. And when the stage of sheathing has arrived, you notice that they are leaking a little, but the metal frame prevents them from being repaired, and you did not buy moisture-resistant drywall.
Such moments should be thought through in advance, and if you feel sorry for the work of your hands, then you will plan the work process in detail, and will not ignore any little thing that may bother you.
When the column is covered with gypsum board sheets, it needs to be processed. If you want it to be perfectly round, then sand the corners (if any) with coarse sandpaper. The final stage will be puttying the object, which will make the column even and give it the necessary texture. Also, you can decorate it to your taste. After puttying, you can do whatever you want with it. You can place gypsum plasterboard structures nearby or add additional plasterboard elements to the product itself.