How to avoid mistakes during subfloor construction
The main advice is not to try to simplify existing technologies yourself. Only an amateur thinks that he is smarter than everyone else and can do the work faster and cheaper. All rules were developed taking into account many years of construction experience; each technological operation has its own specific purpose. An incorrectly laid subfloor causes sagging and squeaking.
- Before starting work, check the position of the joists. The distance between the lags should not exceed 58 cm, this will allow the insulation to be tightly laid.
- There is no need to skimp on the size of the beams. During the operation of the house, it becomes necessary to install heavy furniture; the likelihood of increased loads should be foreseen in advance.
- Where a brick kiln is laid, always reduce the distance between the joists or beams. During construction, use only healthy lumber without natural diseases or defects.
- Boards for making subfloors must have low relative humidity. If the subfloor is laid before the roof of the house is erected, then the work should only be done in good weather. Overmoistened boards not only quickly lose their original load-bearing characteristics, but also decrease in size during drying. As a result, the fastening is weakened, and the floor bends and creaks when walking. It is very difficult to fix the problems; often you have to completely dismantle the coating.
- If the subfloor is located between the floors of a wooden house, then the cranial bars should be placed along the beams. Packed across, they reduce the height of the room.
- When installing membrane vapor or waterproofing, carefully read the instructions. The material indicates which side it should face towards the insulation. The fact is that steam can only escape in one direction; if the fabric is laid incorrectly, then there will be no positive effect. As a result, the subfloor will be constantly wet, and the effectiveness of thermal insulation will noticeably deteriorate.
- Do not skimp on the vapor barrier, cover the joists as well; attempts to cut the roll into small pieces always give a negative result. In terms of footage, the savings are negligible, but the negative consequences are noticeable.
- Always leave a ventilation gap between the rough and finished flooring. At the same time, consider the location of the air outlets.
- Practitioners recommend covering the ground under the floor of the first floor with plastic film or roofing felt. Due to this, the amount of evaporated moisture is reduced, and the operating conditions of the building are significantly improved.
- It is recommended to install a warm subfloor only under the living quarters of the first floor. There is nothing to save in unheated ones; an expensive complex cake is not needed.
Unconditional compliance with building standards guarantees that no unpleasant situations will arise during the operation of wooden houses. In all cases, eliminating the consequences of technology violations is much more expensive than complying with the rules for constructing subfloors.
Subfloor for “soft” floor coverings
With its help, not only the loads are evenly distributed over the surface, but also the logs or concrete foundations are leveled. Such floors are used under laminate, block parquet and parquet boards or linoleum. The materials used are sheet plywood, OSB or fiberboard; all materials must be waterproof.
It is recommended to lay the subfloor on concrete bases using construction adhesive.
Installation of plywood with glue
The screed must be level, the difference in height cannot exceed ±2 mm.
There are two ways to lay a subfloor over a screed: on slats or directly on the base. The first method is used in cases where the base has significant unevenness, utility networks need to be laid under the floor or additional insulation needs to be done.
Scheme for laying plywood with a layer of insulation
Plywood floor on joists
Leveling a concrete surface using slats is much easier and faster than re-screeding using cement-sand mortars. Waterproofing must be placed between the slats and the screed; the height of the slats is leveled with various pads and fixed with dowels. The subfloor slabs are nailed down; the dimensions of the slabs must be adjusted to the distance between the slats. The side edges should be located in the middle of the rail; two plates are fixed on it at the same time. Make sure that the four corners do not meet in one place; this position of the sheets can cause swelling of the finishing floor covering.
Scheme of laying plywood on wooden logs
The second option for laying a subfloor over a screed is used on flat bases that do not require additional insulation. To achieve an ideal surface, construction adhesive can be used. It is spread with a comb under the slabs and eliminates even the slightest irregularities, the subfloor becomes a single monolith with the screed. Further, the algorithm for installing the floor depends on the materials used.
Plywood laid on the floor
The heads of the hardware must be completely recessed; for this purpose, special or homemade hammers are used. If you plan to lay linoleum on the subfloor, it is recommended to sand the entire surface with an electric machine.
Sanding plywood
Particular attention should be paid to the joints; sharp changes in height are not allowed here.
In the photo, checking the evenness of plywood laying
The holes from the dowel heads are filled with putty.
Putty plywood floor
Remember to always leave a gap of 1-2 centimeters between the subfloor and the wall. To prevent passage bridges from appearing in these places, place pieces of any heat insulators in them.
Subfloor on the attic floor
It has several options; for example, we will consider the most complex of them. It is better to file the ceiling before installing the subfloor, but this condition is not necessary. When working with mineral wool insulation, it is recommended to use a respirator or mask to protect the respiratory system, and wear rubberized gloves on your hands.
Installation of wooden interfloor slabs
Since there is no ceiling covering, nail a vapor barrier membrane underneath. Attach it securely; at first it will support the weight of the insulation.
For safer movement, you can build a small ladder from boards
Step 1: Begin laying insulation into the space between the attic floor joists
We have already mentioned that when calculating the distance between beams, you need to take into account the standard width of materials for thermal insulation. Lay as tightly as possible; if there are two layers, their joints should be offset
Laying insulation
The process of laying insulation
Another photo of the process
Step 2: Lay down a wind and vapor barrier membrane. Rolled mineral wool is easily blown through by drafts, and heat is removed along with the intake of fresh air. The membranes are fixed to the beams with a stapler. Professional builders do not recommend stretching the membranes too much; it is advisable that they lie loosely on top of the insulation. In case of leaks, water will not get onto the insulation through the holes made by the stapler staples.
When working, use a protective mask
Gloves will also be required
Laying moisture and wind protection
The membrane must lie freely
Step 3. Secure the membrane to the beams with thin slats. Lay subfloor boards on the slats. They can be screwed on with self-tapping screws or nailed.
Laying slats on joists
The boards are screwed to the joists through slats
Installation of OSB
Stages of flooring
The more carefully the preparatory measures are worked out, the higher the quality of the floors and the faster the construction process will be. You need to understand that the time spent on the preparatory period always pays off during construction work.
One of the principles for creating wooden floors in wooden houses
Design
- Before you start building a house, you need to find out all the issues related to the arrangement of floors. If the logs are located directly on a strip foundation, it is necessary to provide openings for ventilation of the underground space. If the logs are placed on a brick base, then such a structural element must be taken into account in the tape. There are house designs in which logs are installed on the lower crown of the house. Another nuance is the presence of basements.
An amateur photo showing the location of floor beams during the construction of a house
- Purchase of materials. All materials must be purchased before starting work. The quantity and nomenclature are selected taking into account the size of the building, the type of pilaf and insulation. It is strongly recommended to treat all wood with antiseptics. This is very important for insulated structures - mineral wool quickly absorbs and slowly removes moisture. In conditions of high humidity, the service life of wooden structures is significantly reduced.
High-quality impregnation not only protects the material from moisture, but also gives the material fire-resistant qualities
- Arrangement of the registry.
For logs, you can use boards, beams, stepped and linear dimensions; insulation parameters and maximum load should be taken into account. In addition, the width of the joist is lined in such a way that the insulation is placed in the niches. Experienced builders recommend choosing an insulation thickness of at least ten centimeters. Place of delay in the manufacture of timber structures - Rough floor.
The subfloor is designed to hold the insulation layer. For the subfloor, you can use pieces of used boards and other inexpensive materials. It is important to remember that the treatment of rough materials with antiseptics must be carried out very carefully; in winter, condensation may appear on their surface. Most often, a subfloor is made during the construction of walls, as it can serve as a support for craftsmen - To warm. It is recommended to use mineral wool; the material can be rolled out or pressed.
Mineral wool insulation is placed in areas between the logs
- Coating finish. For bar houses, architects recommend covering the floors with natural boards. All other materials look unnatural and degrade the interior.
Tongue boards for flooring production
If your experience is not enough, then it is better to seek help from professional builders. In any work, preventing marriage is much easier and more profitable than eliminating its negative consequences later.
The principle of creating dovetail locks, which is used when installing floor beams and logs
Installation of logs
After organizational problems have been resolved and material has been purchased, you can begin installing the delay. Delays allow temporary floors to be laid to facilitate the assembly of timber; craftsmen will walk on boards rather than on the ground. Another plus is that trestles are installed on such a temporary covering to assemble the upper rows of the log house.
Choose your delays carefully
Practical advice. The choice of deferment should be approached very carefully. On verandas, terraces, hallways, corridors and other rooms where there is not much load on the floor, discarded beams can be used for logs. The short length allows you to cut out areas with critical damage, and the rest of the material is excellent for floor construction.
Step 1. Take the dimensions of the room. Place the selected low-quality timber on the prepared area and make marks for the cut. Immediately carefully inspect the timber; problem areas must be removed.
Timber is laid on the prepared area
Wood cutting
Step 2. Place the logs in place, maintaining the distance between them.
Practical advice. There is no need to check the step of each delay with a tape measure; it is much easier to create a model and use it to check the distances. The model consists of a piece of lining or board.
Delays are ok
Delays need to be soaked with a modern antiseptic. If possible, after the wood has dried, it is recommended to cover the surface with remaining oil. Oil very reliably protects surfaces from moisture; modern chemical materials are significantly inferior to it in this regard. The downside of training is a specific smell, but it completely disappears after a few days.
Procrastination can be treated with antiseptic
Waste oil
Delays are handled by mining
Step 3. Secure the logs with perforated metal squares. They hold structures well and are easy and quick to work with. In addition, such angles make it easy to correct mistakes made during installation. The screws are unscrewed, the level delay is set and fixed again.
Various fasteners for wood
Important. Make sure you wet the ends well. In these places, moreover, water is mainly absorbed, but it penetrates deep into the wood. For example, in order for the side surfaces to get wet by about one centimeter, it is necessary to soak the logs in water for at least three days. Through the limbs he reaches the same distance in a few hours.
Logs are installed in all rooms
When installing the log, make sure that all upper surfaces are located strictly in a horizontal plane. Do not forget to install a layer of waterproofing between the concrete foundation strip and the joists; it is better to use two layers of roofing felt. It is also recommended to treat the bottom row of the house with any protective agent.
Making a subfloor
Due to the fact that the floor will be insulated, the subfloor is an indispensable element of its arrangement. As mentioned above, the distance between the lags takes into account the standard width of the insulation. This approach significantly reduces the amount of unproductive waste of expensive insulation materials, minimizes the risk of cold bridges and speeds up construction work.
The distance between the lags takes into account the standard width of the insulation
Important. Rodents quite often penetrate the insulation, make nests in it, make numerous passes, and turn mineral wool into powder. As a result, a very unpleasant odor appears in the room; it is impossible to remove it by ventilation; it is necessary to constantly use various deodorants, and this is dangerous to health. In addition, mice damage the insulation so much that it significantly loses its original properties. The floor cools down, living comfort decreases, and heating costs increase. To avoid unpleasant situations around the perimeter of the room, spread strips of wire mesh about 20 cm wide on the subfloor.
There are strips of metal mesh around the perimeter of the room.
Rodents did not like old glass wool. At that time, technology did not allow the production of insulators with a thin glass thread. This fact had both negative and positive consequences. The negatives include relatively high thermal conductivity and disadvantages during installation. The cotton wool irritated the skin of the builders; protective clothing and gloves helped little and only for a short time. The positive side of thick glass threads: rodents did not get into the insulation and pierced their mucous membranes, causing pain. Today's mineral wool is produced using the most modern technologies; the glass threads are so thin that they do not pierce the mucous membranes; mice can easily nest there. The positive side of thin fibers is reduced thermal conductivity.
Step 1. Bring subfloor boards into the room. If the room is longer than the existing timber, it is recommended to fasten the boards in a checkerboard pattern. Thanks to this technological technique, the holding power of the delay increases.
Boards for the subfloor are inserted
The boards will be displaced
Step 2. Take the dimensions of the boards and saw off the excess pieces. It works best with a portable electric circular saw.
Marking applied
Cutting tables
Practical advice. There are cases when the dimensions of a room do not match in length or width; this is a direct defect of the builders. To avoid confusion in the future when attaching the subfloor, it is recommended to put a mark on each of them. Some will focus on the right wall, while others will focus on the left. Tags do not take much time, but unpleasant situations will not happen in the future.
Step 3. Place all the boards against one wall, this is necessary to make it easier to lower them under the beams. The fact is that it is very difficult to push long materials under already secured logs. The distance between them is small; you need some free space to lower them at a slight angle.
The boards are stacked against the wall
Step 4. Once all the boards are lowered underground, stack them under the wall and clear the work area of any obstructions. You will have to work in a confined space; you should not create additional difficulties for yourself.
Having passed underground, the boards are bent under the wall
Step 5: Screw the subfloor to the floor logs below, keeping an eye on the passage at all times. Great precision is not required, but an approximate ratio is recommended.
Important. If you plan to use rolled mineral wool as insulation, the pitch of the subfloor boards should not exceed ten centimeters. The fact is that rolled cotton has very low physical strength and easily curls under its own weight. Pressed boards do not bend so much; for them, the pitch of the subfloor can be increased. If you have the desire, you can make a simple model from any section of the route.
Screw the subfloor
It is very difficult to drive nails from bottom to top; it is better to use self-tapping screws and a cordless screwdriver. Building codes and regulations recommend attaching two fittings to each board; this will prevent deformation of the material. But some builders install one screw at a time. This is not a wedding, there is nothing to worry about, if the subfloor boards are slightly bent, they are covered with insulation on top. The self-tapping screw perfectly withstands the weight of mineral wool, the base will never come off the trunk. And the added benefit of simplified installation is that it requires less effort and time.
Step 6. Once all the long boards are secured, install the short ones except one. This will be a temporary way out. Now think about where exactly the hatch to enter the basement will be. At the location where the hatch is installed, nail two slats of appropriate length to the rough boards and drill a hole. In the future, the linear parameters can be adjusted to specific hatch sizes.
He left a hole to get out
Door installation position
Hole cutting
Step 7: Go down to the basement and screw in the last short board.
The last board is screwed
Now you can start insulating the floor. Some craftsmen do not yet have insulation to prepare the lumber for the upper floor. In our case, it is advisable to use panels with a thickness of 40 mm; they can withstand significant bending forces and are excellent for living rooms. The boards do not need to be adjusted in length in advance. The final decision is made by the foreman, taking into account the features of the construction and the availability of timber.
It is recommended to use boards 40 cm thick
Boards can be adjusted in length in advance
Installation of insulation
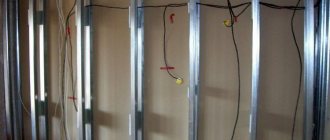
Before continuing paving work, all communications must be laid. These are heating tubes for batteries and electrical cables. If the house does not have central heating, but stove heating, then when building the foundation of the house, reinforced concrete platforms are poured under the stone stoves. Today, such heating options are very rare; Most log houses are built with central heating.
Practical advice. You can find tips for installing vapor barrier membranes on subfloors. The reason for this is that they will prevent moisture from the soil from getting into the mineral wool. Practice has shown that such work is a waste of effort, money and time. The soil is always dry, the relative humidity of the air inside it is much lower than indoors. The underlying film does not in any way affect the quality parameters of the insulated floor.
The total layer of insulation in the central regions of our country must be at least 15 cm. This requirement is very important; if you do not comply with it, in winter steam will condense in the cotton wool. Increasing the humidity of the insulation significantly increases thermal conductivity, and the effectiveness of floor insulation decreases. In addition, in places where wet mineral wool comes into contact with wooden structures, there is a high risk of putrefactive processes. Even the highest quality impregnation cannot protect the surface of wood from moisture penetration for decades, but houses are built for many years.
Insulated packaging
Experienced builders recommend buying glass wool instead of basalt. In terms of thermal conductivity parameters, these materials are practically the same, and the difference in cost is very large. In addition, we have already mentioned that rodents cannot penetrate glass wool.
Give preference to glass wool
Step 1. Cut the rolled bag and distribute it over two logs. If the insulation does not fit into the gap between the logs, it must be carefully cut into strips of the appropriate width. In this case, it is always necessary to leave a margin of about 5 cm wide for a narrow stop of the edges of the joists. Cut the material with a very sharp cutting knife.
The packaging is cut
Cut the insulation into strips
Step 2: Place the cotton pad in the niche, making sure there are no gaps anywhere. Even small cracks will lose a lot of heat. Using the same algorithm, lay the entire first layer of insulation.
The insulation is placed in a niche
The first layer of insulation has been installed
Step 3. The second and third layers can be made of pressed mineral wool. If the total thickness is 15 cm, the height of each layer must be at least 5 cm.
Important. Don't be fooled by some manufacturers' advertising that their insulation won't irritate your skin. Always wear protective gloves and clothing.
Apply the second layer
If the first row of pressed panels started as a full sheet, the second layer must be laid in half. This is done to ensure that the joints overlap and reduce heat loss.
All layers of insulation have been laid
Step 4. Cover the insulation with a vapor barrier. It must protect the material from moisture from the room. If it is impractical to use such a seal at the bottom, then at the top it is a mandatory requirement of the existing technology for installing insulated floors.
Installation of vapor barrier
For insulation, you can use any modern linings in the mid-price range; they all do an excellent job at home work.
Practical advice. If laminate is used as a final floor covering, it is permissible to purchase the cheapest vapor barrier products. The fact is that the technology of laying laminate requires the use of another layer, which acts as a soft pad and has protective aluminum foil on top. It does not allow moisture to pass through completely and reliably protects mineral wool from excessive moisture.
Make sure that the material is laid exactly according to the manufacturer's recommendations, never roll it upside down. If you choose the wrong position, the effect of using it will not be positive, but negative.
When making an overlap of at least ten centimeters wide, it is better to use a stapler for fastening. It is necessary to leave a gap of 2-3 cm between the vapor barrier and the finished floor covering, which is necessary for ventilation in case of water penetration under the floor. Such situations arise during accidents in the water heating system, when washing pilaf, etc. Lightly wrap the vapor barrier around the floor joists and press the insulation down lightly. As a result of such actions, a shallow ventilation niche is formed.
The rafters are lightly wrapped with a vapor barrier
The vapor barrier can be glued or stapled around the perimeter of the room.
Special tape is applied around the perimeter
The tape is glued
At this point, the preparatory work for installing the insulated floor is completed, and you can begin installing the finishing coating. As already mentioned, the best option is to use natural boards. A cheaper option is laminate. The final choice depends on the preferences and financial capabilities of the developer.
General rules for laying floorboards
Prices for floor boards
floorboards
Video - Do-it-yourself wooden floor in a timber house
Step-by-step installation technology for electric (IR) floors
Any construction work should begin with calculating the amount of material required. And when arranging an electrical system, it also involves calculating the costs of electrical energy.
Let's consider installing heated floors in a country house, using infrared film as an example, since this is the easiest and simplest option. Savings when installing such a structure can be achieved by purchasing a controlled IR system.
The sequence of work for installing infrared heated floors in a country house is as follows. You will need to purchase the necessary material and prepare the tool. We will need:
- film heating element;
- terminals and cable;
- special insulating material - bitumen tape;
- temperature sensor to control the heating level;
- control unit - thermostat, which can be electromechanical or electronic;
- Double-sided tape;
- foil backing;
- insulation;
- plywood.
For your information! The film material should be less than the area of the heated room, since it is not mounted under heavy furniture. And there should be enough plywood, thermal insulation and waterproofing material to cover the entire room.
You can buy a ready-made kit that contains everything you need to install an IR system, except for the sensor and thermostat.
In addition, during the work you will need: scissors, a knife, a screwdriver, and pliers.
Preparing the wooden base. Laying the film requires a flat and clean surface, so experts recommend laying the flooring on plywood boards. An excellent option is plywood with a snap mechanism, which results in a smooth and virtually seam-free surface. The plywood is fixed to the rough base using self-tapping screws, which should be slightly recessed. If desired, you can put insulation under the sheets, in the form of foamed polyethylene.
Laying thermal insulation. The thermal insulation material is placed on the plywood with the foil side up, end-to-end, and fixed with a stapler. And the joints of the product are taped with tape; you can use construction tape or foil tape.
- Drawing up a scheme for laying the film and determining the location for installing the thermostat. It is better to install the device near the exit and next to the switches.
- Preparing the film - cutting it to the required length. Cutting should be done strictly in places specially designated for this purpose.
Installation of the heating element - the sheets are laid parallel, with copper strips down.
Carrying out cable insulation work. It is necessary to insulate the film in the cut areas with bitumen, except for the areas where the connection will be made.
Fixing contacts. The clips are installed on copper busbars at the points of connection to the electrical circuit. One plate is inserted inside the film, and the other outside, onto copper strips. The clamp is fixed by squeezing it with pliers.
Securing the film. The strips are connected to each other using tape; for a stronger fixation, you can fasten them along the edge in increments of 500 mm.
Connecting the system. The connection of the terminals to the wire is done according to the diagram. To ensure high-quality contact, the connection points are clamped well with pliers.
Contact insulation. The terminals are treated with bitumen tape. One piece of insulator is glued to the bottom of the clamp, and the second to the top, after which they are glued together.
Installing a temperature sensor. It is installed under the film, on a special black strip. The distance from the edge of the canvas should be 150 mm. The device and the cable from it are laid in the grooves of the insulation, which must be made for this, otherwise the surface will not be smooth. The sensor and wires are fixed with mounting tape.
Installation of thermostat. The thermostat can be overhead or mounted in a socket in the wall. The cable from it can be fixed directly to the wall, or placed in specially made grooves.
Connecting the cable to the thermostat. The cable coming from the infrared floor, sensor and power source is connected to the thermostat according to the instructions.
Laying a waterproofing layer. The polyethylene film is laid out over the entire surface of the infrared floor, overlapping and secured with tape.
Installation of flooring. Plywood is used as the backing material and is placed on the heating elements.
Installation of finishing coating. The floor covering is installed on top of the flooring.
As you can see, installing an infrared heated floor in a dacha is easy to do with your own hands, the main thing is to strictly follow the technology.
Video instructions
Attachment to base
When the owners of a private house or apartment need to replace or install flooring from scratch, the shelving design will be universal for any type of foundation. Great for basic types such as:
- unpaved.
- specific;
- wood;
To choose one of the types, it is necessary to take into account the performance characteristics of the finished surface. The only thing that remains virtually unchanged is the installation principle. All technology adapts to any substrate.
Wooden base
You can lay logs under wooden floors in a variety of buildings. It can be a brick, wooden or reinforced concrete panel house. This type of foundation requires a competent approach and consideration of climatic characteristics.
You can use plywood or OSB panels as a basis. This configuration allows you to expand special insulation into the free space:
- mineral wool.
- fiberglass;
- polystyrene;
If there is insulating material, care must be taken to ensure waterproofing.
The first stage of installation is taking measurements and applying markings. Having prepared all the necessary tools, you can gradually install the logs. Pro Tip: As a beginner, you should never rush. Correcting errors will significantly prolong the process of laying the floor.
Installation begins from the edge of the room. Using metal squares, you can speed up work and make the structure as stable as possible. When adjusting one end of the log, you need to be guided by the marks on the wall. If you do not tighten the screws of the end strips, then they can be adjusted relative to the plane in the future.
After installing the finished products, tighten the cables or rope. The remaining bars are installed along them.
After fastening the products, it is necessary to lay out all the thermal insulation along with waterproofing materials.
Double floors
For better insulation in a wooden house, they often resort to a double floor system. The first layer in this case is the so-called subfloor - untreated boards attached to the floor beams, if we are talking about the second floor, or to the joists. Wood itself has low thermal conductivity. The top layer - the finished floor - is laid on the bottom, sometimes through joists with additional insulation. Next comes the installation of the decorative coating.
Double flooring is done as follows:
- timber logs are mounted on the provided mortgages;
- a subfloor is laid on the joists, most often from unedged boards;
- then thinner logs are laid, the space between them is insulated with the selected material;
- This is followed by a finishing floor made from edged boards or floor tongues and a finishing decorative coating.
If necessary, communications can be placed between the two layers - water pipes, electrical cables in corrugated pipes, etc.
It is important to carefully monitor the tight fit of the subfloor boards to each other; if there are gaps, they can be filled with polyurethane foam. If edged boards are used, cracks in the finished coating can be filled with special wood putty compounds.
When you need to treat subfloors and ceilings with fire-retardant compounds:
- It is better to treat subfloors and subfloors in the house from mold and mildew, treat the subfloor and subfloor boards with an antiseptic immediately immediately before installing the subfloor, or immediately after laying it, or during the installation process.
- It is necessary to protect floor beams from mold and bark beetles, protect joists and floor joists at the time of assembling your house or bathhouse.
- You can treat floor beams against fungus with a fire-retardant antiseptic or treat ceiling beams immediately after assembling a house from logs or timber on the customer’s site after its final installation “under the roof” for the entire period of “shrinkage” and “standing” of the log house until the start of finishing the log house or covering a timber house with siding. It is very important to protect the floor and ceiling beams as soon as possible after assembly, because The wood of a log house or bathhouse may have high humidity and is most susceptible to darkening and the negative effects of fungal and mold spores. The beams carry the main load of the floors and everything that you will load on them. When a floor joist rots, the cost to repair or replace it can be very expensive.
← Photo of how to properly treat subfloors and ceilings with a fire-resistant antiseptic
What protection is provided when treating sub-floors and sub-ceilings with fire-retardant impregnation if you choose an antiseptic to protect the sub-floor:
- protection of subfloor boards and subfloor boards from fire, protection of subfloors from fire,
- protection of the subfloor in the house from darkening, mold and mildew,
- protection of subfloors and ceilings in a log house from bark beetles, protection of the subfloor and its components from infection by woodworm larvae,
- protection of interfloor ceilings, subfloor boards and subfloors from wetness and moisture,
- reducing cracking of subfloor and ceiling boards from cracking.
BUY an antiseptic to protect the subfloor and subfloor:
| for wood, protection of the subfloor and ceiling from fire, fire, mold, bark beetle, fungus, woodworm, rotting. Comprehensive protection of floor and ceiling beams. | for wood. protection of the subfloor and ceiling, interfloor ceilings of the house and bathhouse from mold, bark beetle, fungus, woodworm, darkening, etc. |
| In the category, some antiseptics are selected and offered for fire protection of subfloors and subceilings, according to the criterion of MAXIMUM EFFICIENCY and QUALITY of protective impregnations at MINIMUM COSTS to the customer for the entire life of the composition. | |
| BUY a fire-bioprotective antiseptic at the ColorLak Trading House. Our RECOMMENDED formulations - a possible solution with free delivery | BUY a bioprotective antiseptic at the ColorLak Trading House. Our RECOMMENDED formulations - a possible solution with free delivery |
| More information about our recommended protective compounds |
| Calculator for calculating the required amount of antiseptic to protect the subfloor and ceiling |
Joists are important structural elements of a home that serve as support for the subfloor and flooring. The joists provide rigidity and strength to the entire floor structure. Therefore, it is very important to ensure their long-term operation, protecting them from rotting and insects. From the article you will learn how to treat floor joists in a wooden house, and we will also focus on means for treating other internal elements of a log house. Not only the external walls of a wooden building are exposed to adverse effects, but also inside the house the wood requires good protection from moisture and insects. The criteria for selecting drugs for internal processing are described below.
Primary processing of lumber is carried out even before the construction of the log house. At this stage, the logs are treated with preservative, hard-to-rinse antiseptic compounds, which protect the wood from moisture and other weather factors for two to eight months.
The second time antiseptic treatment of wood is performed immediately after construction. Then the log house undergoes a shrinkage process, which lasts about a year, and after grinding, the final comprehensive processing of the wooden house is carried out. First, the outer walls of the building are treated, and only after that the antiseptic is applied to the internal elements of the house.
The choice of antiseptic for treating interior spaces must be approached very responsibly. It is necessary to choose preparations intended for internal use that are safe for humans and animals.
Typically, water-based antiseptics are used for protection inside the house, which do not contain harmful components, do not emit toxins, do not have an unpleasant odor, are breathable and moisture-resistant.
If there is blue discoloration or dark spots on the wood, these areas are treated with an active oxygen-based bleach that does not contain chlorine.
After antiseptic treatment, fire-retardant impregnation of the internal walls of the house is performed. To protect against fire, you can use salt and non-salt fire retardants. Preparations of the first type are inexpensive, but they are not able to fully protect the house from fire.
Non-salt fire retardants are more preferable, as they provide a high degree of fire protection for the home. They penetrate deeply into the wood structure, protect the wood from fire and prevent the spread of flame.
Antiseptic treatment from the inside of the house begins with the treatment of joists, subfloors and other lower structural elements that are closest to the ground or in direct contact with it.
The logs do not have direct contact with the ground; they are laid on the foundation. However, the crawl space is the wettest place in the house. In addition, due to the temperature difference in the basement and room, condensation accumulates under the floor surface.
Thus, conditions are created that are favorable for the development of microorganisms and insects, the appearance of fungus and mold, which, in the absence of antiseptic treatment, will very quickly spread to the walls and other surfaces of the house.
The antiseptic is applied to a clean and dry surface. The wood is thoroughly prepared beforehand. To remove unevenness, the base is sanded, dust and other waste is removed from the surface after sanding, cracks and crevices are sealed with putty. After this, you can begin applying the antiseptic.
Three groups of products can be used to process lags:
- fire-bioprotective;
- bioprotective;
- leave-in antiseptics.
Preparations of the second group provide biological protection of the inside of a wooden house from beetles, microorganisms, mold, and rot. Bioprotective antiseptic for floors in the house is environmentally friendly, free of allergens, and has a slight odor. Products are usually sold in the form of concentrated solutions, which are diluted with water before application.
Leave-in antiseptics are intended for rooms with high humidity. They are often used to treat baths, saunas, and bathrooms. A lasting effect is achieved with 3-4 times application.
Wooden logs can also be treated with folk remedies: transformer or motor oil, resin, saline solution (100 g per liter of water).
It should be taken into account that when used oil and resin are used, the room is filled with a persistent odor that does not disappear for a very long time.
After treating all vulnerable areas inside the house, you can begin to antisepticize other internal elements of the room: walls, partitions, wooden floors. All these parts are usually impregnated with one layer of antiseptic. To treat a bathhouse, sauna or unheated garden house, a two-layer treatment is used.
Antiseptic for lining is applied with a brush, roller or spray. You can use several methods at once: treat complex areas with a brush, and the main area with a spray.
The water-soluble antiseptic dries completely in 10-20 days, after which you can proceed to the next stage of treatment.
Bleach is used to remove blue stains and dark stains from the surface of wood. The product is applied in a thin layer, pointwise only to the affected areas. To apply the composition, use a brush with natural bristles. The artificial material can react with the chemicals in the bleach and stain the walls.
The product forms a film on the surface that prevents fire. Wood impregnated with a fire retardant does not support combustion, and the fire does not spread to other parts of the house. To achieve maximum effect, it is necessary to process the log house at least 3-4 times.
After all stages of processing have been completed, you can begin finishing the wooden house. If you want to leave the walls unchanged, they can be coated with clear varnish, which will highlight the natural beauty of natural wood.
Today on the market you can find many high-quality covering paints that will completely paint the surface and give the wood any shade in accordance with the chosen dye.
Please note that any paint coating has its own service life and must be renewed every 3-7 years of service.
Installing joists for laying wooden floors from boards with your own hands.
The logs should be made of durable wood, but not poplar or linden. Under the logs, either 50x50 mm timber is used. or boards 50×100 or 50×150 mm.
The lags are laid on concrete floor slabs, brick or monolithic columns (columns) according to the level. If necessary, to maintain the level, planks and bars of the required thickness are placed under them for leveling. You can use the corners for leveling, attaching them on both sides to the joists in increments of no more than 50 cm. You will get a kind of adjustable floors.
The logs are attached in different ways, using special anchors measuring 8x200 or 10x250 mm, with corners, on threaded studs and nuts (adjustable floors). In some cases, the logs are not secured at all, they are simply placed on the base.
Laying the floor boards is done across the joists, so when installing the joists on the base, they need to be laid so that when laying the floor boards, they are long enough to cover the entire width of the room.
If the length of the flooring boards is not sufficient, then they are laid in a “running start”. First long, then short, the next one from the same edge short, then long. The logs are also laid with a “running start”
If the logs rest on pillars, then they must be laid on edge. This way they will hardly sag under heavy weight. When laying wooden logs on a flat concrete base without using leveling pads, you can lay them lying down or on their edges.
Before installing logs for a wooden floor made of boards with your own hands, it is recommended to apply a layer of waterproofing to a concrete or brick base; you can use roofing felt.
The distance between the lags is 50-60 cm - this is the best option, in this case the structure will not sag. If in the future it is planned to insulate wooden floors from planks, then the logs are usually installed to match the width of the insulation, for example mineral wool.
Folk remedies
Wooden floor joists can be treated not only with factory-made compounds, but also with all kinds of folk remedies.
When choosing a specific composition for protecting lags, you should be guided by your goals. Of all the options described above, the ideal choice is a fire-retardant substance that has the maximum spectrum of action.
- How to prepare joists for a subfloor?
- Classification of subfloors
- Rules for laying floorboards
- Insulation of floorboards
A subfloor is a structure that is most often used before laying parquet, laminate, or solid boards. This floor is a structure made of logs installed at different pitches. can be done in 1-2 days, it is important to maintain a horizontal surface, and install the logs themselves in increments of 60 cm to 120 cm - a lot depends on the material for the flooring. These can be boards, plywood panels, chipboards or OSB. The decking is fastened with ordinary nails; the joints should be on the surface of the joists.
The subfloor is a structure made of logs, which is intended for laying parquet or laminate flooring.
Tools needed for work:
- building level;
- hammer,
- electric plane;
- screwdriver;
- Ruler and pencil.
Preparing the foundation
If you decide to lay a wooden floor on the ground, be sure to securely fasten the wooden joists. Ensure thermal insulation and waterproofing of the entire space under the joists. To do this, it is necessary to carry out work to prepare the base. Remove a layer of soil to a level 25 centimeters lower than the ground level around the house. Make an embankment of expanded clay or crushed stone and cover it with a layer of river sand. We moisten all this generously with water and compact it well.
We place brick pillars on the sandy base on which the logs will be mounted. We make the width of the support pillars two bricks, and determine the height yourself based on the level of your floor. The bricks are laid on the mortar, and the height of each is brought to one level. We erect columns, taking into account two for each lag. If the width of the room is more than two meters, we place additional pillars in the center of the joists. We lay waterproofing in the form of a piece of roofing material on each column and begin installing the logs. If necessary, place wooden plates under the joists to bring the top edges to the same level. Otherwise, your floor will have dips.
Underneath the bottom, the logs are sheathed with a rough board and we have hollows in which we will lay the insulation. The choice of insulation should be based on its ability to transmit air and moisture. In these cases, basalt slabs or mineral wool are perfect. The logs must be installed at a distance of 60 centimeters from each other, since insulation boards are produced in the same size. When laying the insulation, make sure that it is tightly inserted between the joists and that there are no gaps.
Repairing the floor in an apartment: working with screed and joists
After laying the insulation, it is necessary to install a vapor barrier membrane. The material is rolled out around the entire perimeter with an overlap of at least 20 centimeters. All joints must be taped. We secure the vapor barrier material using a construction stapler and staples.
Subfloor support board. SUB-FLOOR CONSTRUCTION.
Subfloor installation methods (Fig.)
- into the groove of the beam
- in the shoulder (“skull”)
- onto the nailed cranial block.
In the photo, a 150x150 beam is chosen as a log and this is not a mistake, the main thing is that the span (along the length of the log) is no more than 4 m; if it is larger, then it is necessary to make a foundation under the logs.
The most common, easy and quick way to lay a subfloor on a nailed skull block. We will consider it. This is how the floors are arranged. First, level the joists using a level, or “level.” Then the cranial block (50x50, 50x40) is attached to the lower part of the working surface of the log (see photo). Lay the subfloor using a board (100.150x25) mm. nailing it to the cranial block. Then waterproofing and insulation are laid. Sometimes, for laying a subfloor, a board of other sections, for example 150x40.50 mm, is used, pulling it out from under the formwork. After first drying it and treating it with an antiseptic. It should be noted that using a board of greater thickness (40.50 mm) reduces the working surface of the joists and floor beams, and using insulation with a thickness of, say, 100 mm becomes problematic. It is for this purpose that some wealthy owners order logs with a cross section of 250x100.
In the photo there is a beam with a cross section of 250x100mm, next to it is a standard 200x100mm.
These are those who need a warm floor, that is, they will need a surface of 250 mm to lay 2 layers of thermal insulation, a thick rough board and waterproofing. Adhering to the opinion “do not skimp on materials and save on heating in the future!” There is considerable reason for this, since money spent on insulating floors and roofs will quickly be returned with money saved on heating. To ensure that the created space between the rough board and the finished floor is always dry, the floor must have several 10-15 mm ventilation holes in the corners, covered with gratings, as well as a “finish floor” - the tongue-and-groove floor board must have grooves for ventilation and air circulation.
Installing floor joists
Despite the fact that logs, most often, do not directly interact with the external environment, wood is a material that requires protection, therefore, before installation, the timber must undergo antiseptic and fire-resistant treatment.
Preliminary antiseptic treatment of timber
The best strength of the joist structure for all types of foundations is achieved by installing the beam on the edge.
Various methods of installing lags also have some peculiarities of performing this work.
Installation on wooden floors
The most common type of flooring in a home is the ceiling on load-bearing beams. The construction of wooden logs on such load-bearing elements is considered very reliable for the entire floor. The method of fastening the beams depends on the type of beams:
- Rectangular or square.
- Round.
The evenness of the floor is achieved by leveling the beams themselves or by using joists.
Attaching to beams
If it is not possible to align the beams exactly, the beam is attached to their side. This method provides the best leveling of the entire structure horizontally, without the use of adjusting supports or pads.
Lateral attachment to beams
1 - Bearing beam.
2 - Lags.
3 - Self-tapping screws.
The timber is attached to the beams with self-tapping screws, a length 2.5 times greater than its width.
Laying across beams
Good rigidity of the system is obtained by laying the logs across the wooden floor.
The sequence of laying such a base is:
- bars are laid on opposite sides of the ceiling;
- each of the bars is leveled horizontally;
- the bars are aligned with each other in the same plane by placing wooden wedges or metal plates under one of them;
- the remaining crossbars are laid along a cord stretched between the control logs.
This option makes it possible to use a bursa with a smaller cross-section.
Transverse installation of joists on beams
The beams are connected to the beams with self-tapping screws or using metal corners.
Depending on the type of wooden floor, there are different requirements for the use of insulating materials:
- On the interfloor structure separating residential areas, it is enough to lay sound-absorbing material (this can be a subfloor made of chipboard or OSB) and install a vapor barrier. As a vapor barrier membrane, you can use a polyethylene film, which is attached to the beams with an overlap of 15 cm.
- A “pie” is created on the wooden floor separating the living space from the basement or attic.
Its main function is to cut off the cold coming from unheated rooms or the basement.
Wooden floor pie
The thickness of the insulation layer and insulating materials are selected depending on the specific requirements for the floor covering.
Installation on concrete
When installing joists on a concrete screed, you must adhere to the following sequence:
- Prepare the base - clean it from dust, treat it with a primer.
- Place the waterproofing material with an overlap of at least 15 cm on the walls and between the rolled sheets, and connect the joints tightly with tape.
- Align the logs horizontally, secure them to bars against opposite walls, at a distance of 3-4 cm from the walls.
- Pull the beacon cord between the control logs.
- With a calculated step, lay other beams on the base.
- Drill holes in the concrete for dowels or anchor spacers, at a distance of no more than 70 cm from each other, fix the bars on the screed.
Achieving the correct level of the base along the beacons is done with wooden posts, plastic wedges or the use of bushings that regulate the height of the beams.
Adjustable lags on bushings
Installation on the ground
Before the finishing coating, insulation and vapor barrier material is laid between the joists.
As an option, the step-by-step technology for laying lags on a soil base looks like this:
- Compact the soil well and level the base.
- Fill and compact a drainage layer of sand, gravel or granite chips.
- Make a foundation for the support columns - fill the wooden formwork with a layer of concrete, with a reinforced mesh.
- Cover the hardened concrete with roofing felt and lay out support columns from bricks.
- For waterproofing, lay roofing felt (2-3 layers) on the posts and coat with bitumen.
- Place the logs on posts and secure them.
You can install skull blocks between the joists or make a bottom lining for laying the subfloor.
Column mounting
Waterproofing (roofing felt or film) is laid on the rough base and any type of thermal insulation material is laid. The insulation is separated from the finished floor by a vapor barrier membrane.
Branded formulations
They are divided into fire-protective and bioprotective agents, as well as non-washable antiseptics.
Fire-retardant substances
This method of protection is one of the most effective, since it allows you to protect wooden materials not only from microorganisms and putrefactive processes, but also protects against fire. The latter quality, due to the fire hazard of wood, is of considerable importance.
Fire-retardant substances preserve the structure of the logs for many years: fire protection is provided for 3 years, and biological protection of the material is provided for 25 years. Although, if a wooden product is not used under extreme conditions, the actual lifespan of the drugs will be longer.
Fire-retardant compounds are environmentally friendly, lack unpleasant odors and are completely safe to use. The environmental friendliness of the drugs is ensured by their composition: there are no components dangerous to humans, including allergens.
Any legally sold drug must have a conclusion from a sanitary-epidemiological station, fire regulations and a quality certificate.
Bioprotective compounds
Preparations in this group improve only the bioprotective qualities of wooden materials. Bioprotective compounds protect wood from blueing, mold, rotting, fungi and wood-boring beetles that destroy the material. The drugs provide bioprotection for 25-30 years.
Most often, antiseptic drugs are sold in the form of concentrates. In some cases, pigmenting substances are added to the formulations. The pigment allows you to visually control the quality of the coating on a wooden surface.
Bioprotective products have a low odor, are environmentally friendly, and do not contain allergens. They are easy to prepare - just dilute them in water. Surface treatment can be done in a variety of ways, including roller, brush, spray, and dipping.
Used to protect structures operated in conditions of high humidity. For example, non-washable antiseptics are relevant at high levels of precipitation, temperature changes, as well as in buildings where wood is often moistened due to operating conditions (baths, saunas).
Working with non-washable antiseptics is not difficult, but it is time consuming. The approximate consumption of the substance per square meter is 350-400 grams. Surface application is achieved after 3-4 layers. If we are talking about dipping, you will need to soak the material for 20-30 minutes.
This group of antiseptics gains adhesive properties after final drying. The color of the wood usually becomes pistachio due to pigments added to the composition.
Types of floors
Floors in wooden houses are made of wood or concrete - the most common building materials. The technology of installing a “warm floor system” can also be implemented.
Concrete floor
A popular way to obtain a level base in a relatively short time is to pour a concrete screed. While it may take a month for the screed to dry completely, installing a new wooden one will take longer.
Concrete screed
The advantages of concrete floors are as follows:
- A significant reduction in the cost of the finishing coating device.
- After the screed has dried, a flat base is obtained, but which can be laid with any finishing material.
- With an initially high-quality screed, additional leveling before the final stage of work may not be necessary, which will save time, physical effort and costs of materials.
- The screed can be installed independently, without the involvement of specialists.
Among the disadvantages, one can note the large weight of the monolithic floor structure and, as a result, an increase in the load on the foundation. Therefore, the necessary foundation calculations are performed at the house design stage. Another nuance is that when the walls vibrate, the screed may crack, which will lead to heat loss. Therefore, when installing a heated floor, it is necessary to perform high-quality thermal insulation of the base.
Installation of the "warm floor" system
Wooden floor
Another common material for flooring in a wooden house is natural wood. Its advantages include the following:
- Environmentally friendly material with a rich natural pattern.
- Wood is safe because it does not contain harmful additives, it is completely natural and does not release harmful toxins into the environment.
- An aesthetic appearance and an organic combination of wood with the rest of the surfaces of the building, while the concrete floor will not look natural.
- When installing a wooden floor, you can refuse other finishing materials. With the help of varnishes, oils, stains and other impregnations, a finished wooden base can become stronger, more durable and acquire an original, noble appearance.
- Wood is very durable and, depending on the species, you can choose a material with certain performance properties and texture.
Wooden flooring can even be used in the hallway
The undeniable quality of natural wood gives an atmosphere of warmth and comfort, creates an optimal microclimate and comfort in the home.
Replacing floorboards
Among the disadvantages of a wooden floor, the high cost of the material and the labor involved in its installation are noted. In addition, it can be quite difficult to obtain a perfectly level base.
What should the floor be like in rooms for different purposes?
Which flooring to choose for an apartment should be considered taking into account the purpose of the premises. The living room and bedroom have different requirements, which are reflected in the choice of material.
Bedroom floor
You need to choose a floor for the bedroom taking into account the fact that this room is the quietest in the apartment. The material must meet the following requirements:
- It is recommended to make a floor in the bedroom that absorbs noise when walking.
- The room should create an optimal microclimate for relaxation.
- The surface must be antistatic.
- The selected material must have high wear resistance.
Various types of floor coverings fit the criteria under consideration.
Children's room
Many people think about how to lay the floor in a nursery, since there are a large number of different materials on sale. The requirements for the floor in this room are as follows:
- High quality.
- Good sound insulation.
- The surface must be non-slip and hypoallergenic.
- Must withstand wet cleaning.
The materials used should be well cushioned, which will reduce the likelihood of injury if a child falls.
Living room floor
When considering what floors can be made in the living room, it is worth considering that in this room the material is exposed to high mechanical stress, so the coating must be wear-resistant.
Natural materials are often chosen for the living room, as they look more expensive than artificial ones. This category includes cork and parquet
Kitchen floor
The kitchen floor experiences the most wear and tear. The indoor microclimate is characterized by high humidity and constant temperature changes.
A combination of several materials is often used in the kitchen. They must have high moisture resistance and not absorb pollutants.
Hallway floor
This room can be finished inexpensively by using various materials. The following criteria are taken into account:
- Aesthetic appearance.
- High resistance to mechanical stress.
- Resistance to aggressive chemicals.
The high strength of the surface layer should protect the coating from impacts.
Bathroom floor
Materials for the bathroom floor are selected taking into account their resistance to high humidity and constant temperature changes characteristic of this room. In addition to moisture resistance, the main selection criteria are hygiene, mechanical strength and ease of maintenance. The surface should not be slippery, as this may result in a fall and injury.
Constructions
The construction of a wooden floor can consist of one or several layers. A single covering is installed without the use of joists and is not characterized by low thermal conductivity. To insulate a house, it is best to make several layers of boards, which will provide additional waterproofing.
Floorboards are always laid on joists, and they, in turn, are laid on a base of concrete or brick, metal pillars or on the ground. In rare cases, a technology is used that involves walling up logs into opposing walls. This leads to the formation of wide spans that are quite difficult to bridge.
The installation of a wooden floor on a concrete base looks the same as the installation of coatings in an apartment, which involves the use of floors made of reinforced concrete slabs. It is most difficult to install flooring on the ground floor, since the underground space must be well ventilated and dry. The reliability and durability of the floor surface depends on this, especially if the building is located in an area of high groundwater.
The floor in a wooden house consists of OSB boards, on which a layer of waterproofing and thermal insulation material is placed. The structure is secured by a vapor barrier film and finishing flooring. To ensure natural air circulation in the home, a distance of 2 cm should remain between the heat-insulating material and the finished surface. For the same purpose, holes of several centimeters are drilled in the corners of the rooms.
It is necessary to make an insulating layer on both wooden and concrete bases. For maximum insulation, thick insulating material is often used, which is placed between the first and second layers of double flooring.
Ventilation
When constructing the foundation, you should remember about the general ventilation of the structure. Experts recommend making small holes at the base. From the outside, the ventilation is covered with a steel mesh. If the house is located in a region with frequent natural precipitation in the form of heavy snowfalls and rains, ventilation of the room is done using special pipes that extend above the level of the possible precipitation layer.
Ventilation of the base plays a big role in the viability of the entire structure. Lack of air can lead to the formation of mold and destruction of the main components of the base in a wooden house. In this regard, ventilation of the base is mandatory. The ventilation scheme should be constructed at the very beginning, before laying the logs. After this, the main work begins - laying the base and the floor itself.
Making a rough coating with your own hands is not that difficult. The need for double sex is obvious. It will make the room warmer, more comfortable and cozy. A hand-made floor will provide warmth during the winter cold and help save the family budget. The presence of a rough foundation in a wooden house is mandatory; it strengthens the entire building structure and makes it reliable. Thus, the service life of the house will increase significantly.
Joists are one of the most important components of flooring in a home. According to their purpose, they are supporting elements on which floor boards are laid. Thanks to the joists, the rigidity of the entire floor structure is ensured. Therefore, it is important to ensure their resistance to decay and microorganisms. Moisture resistance can be achieved by special wood treatment. What and how to process lags will be discussed below.
Design parameters of the base
What the floor will be like in terms of functionality and visual perception is up to you, but in any case it should be:
- Smooth.
- Warm.
- Practical.
- Aesthetic.
- Durable.
What needs to be done to achieve these conditions - let's figure it out together.
In fact, installing a floor in a wooden house can be divided into three stages:
- Study of the general structural properties of the floor pie.
- Consideration of installation technology of its various types.
- Selection and implementation of an acceptable option.
Schematic diagram of a floor on joists - the most popular option
Frankly speaking, in terms of the most suitable materials for arranging floors in a house made of timber or a log house, only two materials can be considered: concrete and wood.
Concrete floor
Advantages: significantly less time is spent on completing all the work than when installing a full flooring made of lumber. The second indisputable advantage of a concrete floor is its cost-effectiveness - the cost of finishing is significantly reduced. Well, and finally, the process of pouring a concrete base itself does not require special construction skills, everything is quite simple: a screed purchased from a specialized store is poured according to the set levels. The result is a perfectly flat surface on which any floor covering can be laid.
Disadvantages: with minimal vibrations of load-bearing walls, cracking of the concrete base is possible, and this will at least lead to heat loss. Installing such a floor significantly increases the load on the foundation, so if the correct calculations are not made first, problems may arise with this part of the building structure.
Wooden floor
Advantages: undoubtedly environmentally friendly - no harmful substances are released during operation. Unique solutions in terms of interior design. If necessary, repairs can be performed using available materials and tools.
Disadvantages: relatively high cost and complexity of installation work. In addition, a lot of labor is required during installation, and it is very difficult to achieve ideal evenness of the coating.
This is what a subfloor in a wooden house looks like
If everything is more or less clear with a concrete floor, then it is worth dwelling on the wooden option in more detail, since laying the floor in a wooden house directly depends on the technical features of the cake. As a rule, we are talking about a multilayer structure consisting of the following elements:
- Rough floor.
- A layer of thermal and waterproofing.
- Finish floor.
- Flooring.
Wooden floors can be single or double layer. In the first case, installation can be performed without using logs. This mainly depends on the distance between the joists and the thickness of the floorboard.
It happens that the wall structures of a wooden building, under the influence of various circumstances, shift slightly, followed by the subfloor shifting. And it is the multilayer structure of the floor in a wooden house that ensures the strength and immobility of the upper floor covering.
Also, logs are extremely necessary when the flooring is carried out using support pillars and the step between them and the beams is 100 cm. The distance between the beams itself depends on the thickness of the board.
How to make a subfloor in a wooden house
Let's consider one of the most difficult options - installing subfloors on joists without floor beams. Such a floor is often found in small rooms of a private house or in cases of peculiarities of log house construction technology, when floor beams were not used.
Making a subfloor with your own hands
Important. Be sure to soak all lumber twice with an antiseptic and dry it well before doing this.
Step 1 . Marking. Make a zero mark around the perimeter of the room using a water or laser level. This will be the finished floor level. From this mark you need to minus the thickness of the final coating and the lag. Make a second mark; the supports for the joists should be located at this level. They can be made from concrete, blocks or bricks. There must be concrete in the ground; only the above-ground part is allowed to be laid with bricks.
Marking the zero level using a laser level
Scheme for finding the level of the future floor
Step 2. Make supports in any way; the distance between them should take into account the linear parameters of the log and the total load on the floor.
Adjustable screw supports
Adjustable screw supports for logs - photo
Columns for logs
Step 3 . Place all the logs under the rope, do not forget to insulate them with two layers of roofing felt.
Practical advice. If possible, nail long boards along the entire length of the log at the bottom; their width should be 6–8 cm greater than the width of the log. The subfloor will be laid on these projections. Doing this is much faster and easier than then fixing cranial bars on both sides of the lag in an awkward position and cramped conditions. Of course, the thickness of the boards should be taken into account when marking the position of the support posts.
Step 4 . Secure the joists. To do this, you can use metal corners and fix them to the walls of the log house.
Attaching the log
The photo shows how to attach the logs to the wall.
Example of waterproofing lag
Do not forget to leave a gap of approximately 1–2 cm between the walls and the ends of the joists; take metal corners with oblong slots to ensure free longitudinal sliding. Tighten the screws in such a way that the logs can move in the slots. For reliability, it is recommended to attach the logs with dowels through at least one post; the side of the corner fixed to the log must also be movable.
Step 5. Prepare the material for the subfloor.
Oriented Strand Boards
We have already mentioned that in our case all the scraps are suitable, some can be covered with plywood or OSB, and some with pieces of boards or unedged materials. It is desirable that the sheets of plywood and OSB be moisture-resistant; if they are not, then soak them with drying oil or an antiseptic.
Plywood FSF
Step 6 . Check the distance between the joists. If it is the same, then all the workpieces can be cut to a standard length.
Checking the distance between joists
Practical advice. It's much faster to work with a template. Cut one board to size; it should fit between the joists with a gap. With this template, go along the entire length of the joists. The dimensions are correct - use this piece as a template when cutting the rest of the pieces. Remember that measurements should only be taken from the template, and not from fresh cut boards. If you use a new piece each time, then errors will accumulate, and they will certainly occur, and the final boards may differ significantly from the required dimensions.
Step 7. Place the boards on the prepared shelves. We have already mentioned that these can be either wide boards nailed at the bottom of the joist or skull blocks installed later on both sides. You should not try to make the subfloor continuous; small gaps do not affect anything. In order to save materials, it is recommended to specifically leave a distance of 5–8 centimeters between individual boards. But this can only be done in cases where pressed mineral wool or foam boards are used as insulation.
Sub flooring
Arrangement of the subfloor
Step 8 . Steam and waterproofing. If you have extra money and time, you can install hydro- and vapor barriers in any case.
Vapor barrier layer on subfloor
Vapor barrier laid on the floor
If you don’t want to act rashly, then figure out why such protection is needed. Mineral wool has excellent heat saving properties, does not rot, and does not promote the proliferation of microorganisms, including fungi. This is great, but it has two very significant drawbacks. First, with increasing relative humidity, thermal conductivity increases sharply. Water conducts heat well; there is no need to talk about any heat-protective functions. Secondly, it takes a very long time to dry. This means that all adjacent wooden elements will constantly be exposed to high humidity. There is no need to explain what the result of such conditions is.
Laying vapor barrier on the floor
If you insulate the ground floor with mineral wool, then a vapor barrier is required. It will prevent moisture from the ground from penetrating into the thermal insulation. If foam-based materials are used as thermal insulation, then such vapor barrier is unnecessary, these materials do not absorb water.
Vapor barrier on the floor - photo
Now about waterproofing. In any case, the subfloor below does not need to be covered with such materials; there are no “gushing” sources in the underground. But after thermal insulation is laid on the subfloor, it is necessary to protect it from moisture penetration from the finished floor. This applies to all types of materials, mineral wool and foam. Waterproofing protects not only them from water, but also the subfloor boards and joists.
Materials for floor insulation in a wooden house
Floor insulation with mineral wool
Insulating layer over mineral wool
Features of laying a wooden floor
- A small gap (about 1.5 - 2 cm) is left between the walls and floorboards so that the flooring does not begin to warp when the wood expands due to temperature or gets wet. In addition, this installation scheme guarantees effective natural ventilation of the space under the floor. Consequently, the risk of mold and mildew appearing on the boards is minimized.
- The first board (from any edge) is rigidly attached to the joists; and self-tapping screws. If you use nails, then problems will arise in the future - individual floorboards will begin to “play”, and the creaking of the boards will constantly be heard in the house.
- Their adjustment is done using a hammer and a piece of board, carefully, so that the tenon fits tightly into the groove along the entire length of the sample. But this is the case with profile boards. If you buy a regular edged one, the technology changes.
First, the outer boards are fixed to the joists. All the others, in turn, are placed between them simultaneously from both directions. Naturally, difficulties will arise in the center of the room; The last floorboards won't fit exactly in place. They are placed in a “house”, and then pressed down, standing on its “ridge”.
The last stage is screwing all the boards to the joists at pre-designated points. A chamfer is first made in each of them so that the head of the fastener is completely “sunk” in the wood.
Adviсe:
- It has already been noted that self-tapping screws should be used as fasteners. The nuance is that you need to choose not ordinary products, but ones with anti-corrosion coating. Otherwise, rust spots will appear quite quickly in the places where the boards are fixed to the joists.
- It is advisable to “walk” along the joint lines of the floorboards with a sanding machine. If wooden floors are installed in a private house, then it is worth purchasing; it will be needed again, and more than once. Processing the seams will smooth out any existing unevenness between the boards. This is especially true for decking that is supposed to be varnished, which is most often done to preserve the wood texture.
Further finishing depends on the purpose of the room, the type of wood, its grade and the preferences of the owners. As a rule, skirting boards are installed in all rooms, but there are enough options for the “finish” design of floors. For example, aging wood, highlighting its texture, and so on. The methods used are described here.
It turns out that when installing a wooden floor in a private house, it is quite possible to do without the services of professionals. Following the recommendations given, all stages of the work can be easily completed with your own hands.
Logs and external environment
Theoretically, lags should not be directly affected by aggressive environmental factors. First of all, we are talking about dampness. The fact is that if the logs are laid on the foundation of a building, they do not have direct contact with the environment, since the material is vapor-proofed and waterproofed. However, due to temperature differences between the upper and lower levels, condensation still accumulates in the underground.
It should be understood that builders do not always strictly follow the technological process when laying floors, and if this was the case, then the wooden structure will also begin to rot.
Scheme of a wooden floor on joists
Another enemy of wood is harmful microorganisms. Due to natural factors, any unprotected wooden structure is susceptible to pests. Therefore, processing of any wooden structures is an urgent need.
There is no single correct way to handle lags. In each specific case, many circumstances must be taken into account, for example, the type of wood. After all, each type of wood reacts to humidity differently. However, a number of general recommendations can be given that will give you an idea of the correct approach to treating floor joists.
The main way to protect wood from rotting and microorganisms is treatment with chemicals.
Material selection
The reliability and durability of the floor directly depend on the quality of the material used. This primarily applies to beams. To make them, you will need a beam with a cross-section of 50 x 50 mm or a board with a thickness of at least 50 mm and a width of 150 mm. The exact parameters are selected individually for each specific project.
An important part of the floor on the joists are the cranial bars - small cross-section slats (approximately 20 x 30 mm), which are attached to the beam along its length and serve for laying the material that supports the thermal insulation. OSB boards or plywood are most often used as such.
Timber and boards for subfloors must have sufficient strength and be resistant to rotting. The structures are made of coniferous wood. Beams can be made from any available wood, the most common option being pine.
In addition to the timber, you will need sheet material to create a base for the floor covering, roll waterproofing, an antiseptic for impregnating the wood and a heat insulator (mineral wool).
Plate
If a wooden house stands on a slab (foundation or ceiling on a brick plinth), then the floor of the first floor is equipped with a screed. In this case, the same technologies are used as in stone houses.
On a solid base, logs can even be installed on point adjustable supports Source pinterest.it
Even for installing a wooden subfloor, there is a choice among a wider list of methods:
- installing joists on supports on a concrete base without fixing them to the base and load-bearing walls (floating floor);
- installation of logs on adjustable supports;
- installation of adjustable plywood.
What to make rough flooring from
As has already been said, the task of the subfloor is to support the insulation or serve as a basis for laying the finishing coating. Depends on the design. Depending on the tasks, materials are chosen.
For bottom hemming
So for the rough flooring, which supports the insulation underneath, you can take:
- Board. Dry (humidity not higher than 12-15%), but it can be substandard, it can be used, but without rot and signs of fungal attack. The thickness of the board for the rough flooring is small - an inch is enough. In any case, it must be treated with antiseptics. This is better for direct contact with the ground. There is a greater chance that she will live longer. The rough plank flooring can be continuous, but this is an unreasonable expense. It is quite enough to lay it with a gap between the boards approximately equal to its width.
What to make a subfloor from - Strips of plywood or OSB. The materials are sufficiently rigid and elastic to hold the insulation. But it is better not to make a continuous filing - they use moisture-resistant plywood, and OSB itself does not allow moisture to pass through, since the chips are glued together and the glue contains water-repellent additives. So the solid flooring will interfere with the removal of moisture, which will lead to the insulation getting wet.
- Solid OSB flooring can be made under polystyrene foam. You don’t have to make it under the EPPS at all - it can support itself, relying on the cranial bars.
- To maintain thermal insulation, you can use a mesh (metal or plastic), which is nailed to the joists from below. Another possible option is wire or twine, nailed with a “snake”. This is an economical option that works great.
As you can see, the material for the subfloor supporting the insulation can be different. When selecting material, it is important not to lose sight of the fact that moisture must be removed from the floor. Only under such conditions will it serve for a long time.
For the base for the finishing coat
If the rough flooring is the basis for laying the finishing floor covering, the approach to choosing materials is different. It should be sufficiently rigid and should not allow moisture to pass into the structure. Moisture resistance is an optional but desirable requirement. It can be reduced with the help of a vapor barrier film, which is placed on top of the joists under the subfloor. And toughness is what is needed. The flooring must also be level. Almost all sheet materials meet these requirements to varying degrees:
- Plywood. Tough, some are moisture resistant and some are not. It makes sense to use moisture-resistant ones in rooms with high humidity. In others, it will be possible to install a vapor barrier. In terms of price it is usually cheaper, but in terms of efficiency there is practically no difference.
- OSB. It is “by default” moisture resistant, but there are brands with increased moisture resistance. It also makes sense to use them in damp areas. The disadvantage is the release of formaldehyde, which must be controlled.
- GVL. The material has some properties closer to wood (thermal expansion), but it sag over time. Therefore, it is not suitable for laying directly on joists. But the second layer is an almost ideal option for laminate or parquet. GVL has intermediate thermal expansion (if you compare wooden rough flooring and tiles, for example), so it serves as a shock absorber in this case.
One of the materials for the base is GVL - Board. Can be used as rough flooring and be the basis for laying sheet material. But this option, at current prices for lumber, is unreasonably expensive. Unless there is a board left over from a construction site that needs to be used somewhere. The only time it can be justified is when installing plank floors. Then the rough flooring from the boards in a row is a means to reduce the cost. At the finishing stage, you will need a board of smaller thickness, which will save money.
In general, these are all the materials for this type of subflooring. When selecting materials, take into account the floor design and the type of insulation. And all will be well.
Some styling details
It is optimal to do the rough flooring in two layers. The two layers do not have to be of the same material. Arrange the fragments so that the second layer overlaps the seams of the first (staggered, as in masonry). This will reduce moisture penetration and reduce heat loss. The layers are fastened with self-tapping screws, and sometimes glue is added.
Features of laying rough flooring under the finishing coating
Also, do not forget that the sheets should not be fastened end-to-end, but leaving a few millimeters. These are compensation gaps. Their width is different for each material. The seams are then sealed with an elastic compound (sealant or putty). In a nutshell, that's all.
Insulation and design features: what films/membranes should be used, where and for what?
In the simplest floor design there are two floorings: rough and finishing. One is nailed to the bottom of the joist, the other to the top. There is no insulation between them. There are no other additional layers in between. With this arrangement, most of the moisture from the room and soil condenses on the subfloor. And he is the first to rot/sick. Therefore, it is very important to thoroughly treat the rough flooring with antiseptics.
The subfloor in this design serves to reduce drafts and save heat
A similar scheme works this way. Moisture from the room penetrates downwards through the finished floor. Since it is clearly colder in the underground, it condenses. This usually occurs on/in the subfloor. But if there is a wooden floor, the subfloor must be ventilated. So the moisture is carried away without interference and the wood dries out.
The same picture occurs with moisture from the soil. It is always there in the ground. As moisture evaporates, it rises, condenses in the flooring due to the temperature difference, and then is carried away by the draft. Although the floor underfoot cannot be called warm, the structure is durable (if the wood is well processed).
Kinds
The most common option for a subfloor in a frame or wooden house (or “black”) is to create a durable flooring supported by beams. But for the first floor it is also possible when the logs are installed on a reinforced concrete slab floor on a strip foundation, on a shallow foundation slab or on a concrete floor on the ground. The last three options are not fundamentally different from each other, although in all cases the methods of fastening and leveling the logs horizontally are different.
Since the concrete base itself is strong and reliable, it can be considered as the “underlying” part of the floor of the lower floor (according to the regulatory terminology SNiP 2.03.13-88). In this case, it remains to equip only the “leveling” part (wet, dry or prefabricated screed) and the “intermediate” part (heat, vapor and waterproofing). And lay the finishing coating over the leveling part.
Concrete floors laid on the ground are another common option Source remontik.org
The subfloor is only part of the wooden floor. It is made from edged boards and sheets of moisture-resistant wood materials. The thickness of the flooring (board or sheet) and the layout of the logs have a “direct” relationship: less thickness means less interval between runs.
Important! If we are talking about boards, then when laying diagonally (for example, in rooms with complex geometry), the pitch of the lag should be even smaller. Moreover, the angle between the board and the purlin must be greater than 45°.
Wood flooring is the top layer of the cake. Layer by layer the entire structure looks like this:
- Lining . It does not affect the load-bearing properties of the ceiling, but acts as a support for insulating materials.
The thickness of the lining must be sufficient to support the weight of the insulation Source doma-na-veka.ru
- Waterproofing . Membrane type materials are used. They do not allow water to pass through, but allow water vapor to erode from the insulation, which then exits through the vents in the basement (plinth) of the foundation.
- Thermal insulation . Usually these are mineral wool mats, which, unlike polystyrene foam, are non-flammable materials.
- Vapor barrier . There are three types in total. Films with limited vapor permeability that maintain a “balance” between moisture transfer from the room into the insulation and from the insulation to the outside. Vapor-tight films are a vapor barrier that almost completely excludes the penetration of warm air with water vapor into the insulation. Foil materials (reflex films) are a vapor barrier that returns some of the heat back into the room. All three types, as befits a vapor barrier, have waterproof properties that protect the insulation from above, from the side of the room, from water ingress.
- Flooring.
A multilayer sheet of plywood for the subfloor will withstand heavy loads Source yug-energo.ru
See also: Catalog of companies that specialize in the design and construction of turnkey country houses.
Material requirements
The following materials are usually chosen for flooring :
- edged board;
- waterproof plywood;
- Fiberboard or chipboard with waterproof treatment;
- OSB plate;
- cement particle board (CSB) or GVL.
Recommended ratio between board thickness and joist layout Source semanticscholar.org
Plywood is stronger due to its multi-layer structure, and it is much thinner for a subfloor.
How to reduce moisture from the soil in ground floors
As has already been said, in wooden floors the rough flooring is the first to suffer. But it is possible to reduce the amount of moisture that comes from the ground. To do this, stones, cuttings of boards and other construction debris are removed from the underground. The soil is leveled and covered with dense waterproofing. It could be roofing felt or other rolled material. But more often they use regular or reinforced polyethylene film.
We place the film on the walls of the subfloor and nail it with a pressure strip. The film should not be tight, but only slightly loose. We lay the panels with an overlap of 15-20 cm, taping the joints twice with double-sided tape. Pour sand onto the film and level it. If this is too expensive, sifted soil (must be good at absorbing water), dry leaves, pine needles, etc. will do.
Ways to protect subflooring from moisture
What does all this give? Because of the film, less moisture seeps out of the soil. It condenses on its lower side, and then goes back into the ground. The backfill absorbs drops that fall from the subfloor without creating puddles. Moisture is redistributed throughout the backfill and evaporates faster.
If mineral wool is used
Consider the option of using mineral wool as insulation. In general, there are two types of mineral wool - glass wool and stone (basalt). Stone is easier to work with (it doesn’t hurt so much, you can lay it by hand), but it is afraid of getting wet.
Mineral wool lies on the rough flooring. But for better heat retention, it should be pressed tightly against the joists. To do this, cut it several centimeters wider, then stand it apart
“Afraid” is an understatement. After several wetting/drying, it loses its properties by 50%. And if it freezes wet, it will immediately lose about 75% of its insulating properties. Therefore, in all structures using it, we make sure that as little moisture as possible gets inside, and that what does get in is removed as quickly as possible. Therefore, to the basic pie - subfloor, insulation, finishing flooring - at least one more layer is added - a vapor barrier on the side of the room.
How everything needs to work
How does this scheme of installing a wooden floor using joists work? The vapor barrier, which is placed on top of the mineral wool, protects it from moisture from the room. The moisture that does get inside gradually rolls down (under the influence of gravity) and condenses at the bottom. Since the subfloor must be ventilated, moisture is carried away by the wind. The rough flooring board is not a hindrance in this. It conducts both steam and water, and it itself absorbs it, then releases it.
One of the subfloor options with insulation
What is the design flaw? Drafts in the underground carry away a lot of heat. This time. Mineral wool particles are also carried away by the wind, which worsens the thermal insulation properties over time. That's two.
The problem of heat loss and weathering of insulation can be solved. To do this, a layer of wind insulation is laid underneath - between the sheathing and the insulation. Please note: it must allow moisture and steam to pass through. That is, it must be vapor permeable . Regular plastic film will not work. It will not allow moisture to be carried away. And a vapor barrier won't work either. Or rather, there may be a vapor barrier membrane with one-sided vapor permeability. In this case, the membrane is positioned so that moisture is introduced from the insulation, but cannot penetrate inside (from the ground). But more often, a vapor-permeable windproof membrane is used in this layer. It is simply much cheaper, and such a floor arrangement with insulation is quite workable. It retains heat and does not allow the insulation to erode.
What will happen if there is waterproofing underneath?
What will happen if a hydro/vapor barrier is lined from below - from the subfloor side (as in the picture below). This is often recommended. After all, with such a device, moisture from the soil will not get into the insulation. In theory, it will be drier.
One example of a scheme with waterproofing at the bottom of the insulation
In fact, it turns out completely differently. From below - from the soil - almost no moisture comes. Fine. But it comes from the side of the room. No matter how you fasten the vapor barrier, complete tightness cannot be achieved. All the same, some amount of steam gets into the floor structure. Due to temperature changes, it condenses, flows down the mineral wool, and collects in puddles on the film. If it finds a hole, it leaks out; if not, it fills in until it breaks the waterproofing. It is clear that mineral wool is clearly not dry.