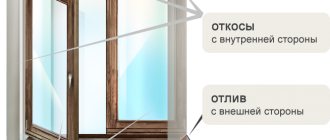
What should be the ceiling materials in wooden houses?
Ceiling systems in wooden buildings have structural specificity.
You need to choose in advance how to make the ceiling in the house, what materials to use. Most often we are talking about light beam floors and plank flooring. To fill the distance between the beams, special insulation is used. When choosing what can be used to sheathe the ceilings in a wooden house, you should take into account the following wishes for its characteristics:
- Light weight, good insulation and sound insulation characteristics.
- Safety. The ceiling finish must be durable, reliable and fire resistant. It should not contain harmful toxins.
- Durability. The long service life of the ceiling system will make it possible to forget about repairs for a long time.
- Aesthetics. It is recommended to select a finish that matches the design of the walls. In this case, you can achieve unity of style, which will help create comfort and attractiveness.
Most often, natural materials are used in wooden houses to promote good air circulation inside the ceiling finish.
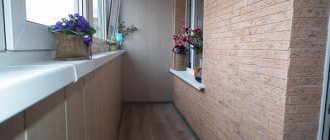
It is very important that the design fits well into the overall style of the room decoration
Plaster
Finishing the ceiling of a wooden house with plaster was previously very popular. Although today it is often found in modern cottages, it is still slowly becoming a thing of the past, because the range of materials has become much wider.
The plaster is applied to a mesh of shingles, previously stuffed between the beams. The durability and strength of the coating is ensured by reliable adhesion of the mortar to the shingles and relief mesh. It is impossible to plaster the ceiling yourself without certain skills and knowledge. This is a rather labor-intensive and complex process that requires the hands of a professional.
Advantages of plaster:
- attractiveness, rich colors and the ability to create a variety of relief on the surface;
- practicality and durability;
- affordable price of both the material itself and plastering services. Do-it-yourself work will also not require large financial outlays.
The only inconvenience of such finishing in a wooden house is the need for thermal insulation of the walls, which is carried out from inside the room. Thermal insulation boards are a good basis for further installation of reinforcing mesh. However, this technology hides valuable area, which is very undesirable if it is already not very large.
Material options for lining a rough ceiling with wooden beams
If you plan to frame the ceiling along wooden beams, then most often the owners use gypsum plasterboard sheets and lining. But if the rough covering is made of good quality boards, you can do without decorating the surface.
Wooden boards, plywood - the price of materials is affordable, you can choose plywood from $20 (RUR 1,300) per sheet, and solid boards from $85 (RUR 5,500) per m3
When choosing boards for hemming that you plan to leave without finishing, you should pay attention to the quality of the cut - cutting without falling out knots or black spots will look more aesthetically pleasing on the ceiling
Materials and tools
The materials you will need are a 25 mm thick board, screws or nails with a pin length of 45-55 mm, and skull blocks. But the insulation is selected according to the characteristics of the premises. Most often, mineral wool is used in wooden houses. The sheets are already sold with a foil insulating layer that reflects heat back into the room. Also, the elements have a stable shape and are convenient for display alone.
Set of tools:
- construction stapler and staples;
- screwdriver;
- hammer;
- saw;
- square and pencil.
Technology of hemming the ceiling with boards
To make a rough ceiling made of wood, you should choose a cladding option - below or above the beams. The algorithm is simple - first, boards are nailed, then layers of heat, hydro, and vapor barriers are laid.
And now in more detail how to fix the boards on the joists:
- It is easiest to sheathe the bottom side of the joist. The board covers the bottom surface of the beam, fastening it with nails or self-tapping screws. Thus, the beam structures are hidden behind the plank flooring, so if it is necessary to replace elements, the entire surface of the ceiling will have to be dismantled.
- Sheathing above the beams is a little more difficult. Moreover, the beams will remain open, which means they will require decoration so as not to spoil the aesthetics of the room.
How to make a rough ceiling higher than the beams:
- attach cranial bars to the side surface of the log - this is a bar with a cross-section of 40x40 mm;
- cut the boards for hemming according to the pitch of the beams;
- fasten the boards for the rough ceiling along the bottom of the skull beam so that the direction of the board is perpendicular to the location of the beams;
- fix the boards with nails or screws.
All that remains is to lay insulating materials on top of the boards and sew up the entire surface. You can consider an option in which the board is laid out on top of the cranial block. Here both the beams and the cranial block remain visible - it looks beautiful, but you will have to choose high-quality timber and decorate it with protective varnish.
Plywood ceiling lining technology
When considering how to line a ceiling over wooden beams, many owners prefer sheets of plywood. The material is durable, and if you need to clad ceilings in damp rooms, choose moisture-resistant plywood - it costs a little more, but can withstand significant changes in humidity. Before work, a frame is formed onto which sheets of plywood are fixed.
The work algorithm is as follows:
- Use a stapler to secure the waterproofing materials to the beams. Lay the film with the edges overlapping each other, seal the joint area with tape
- Now install the sheathing from timber with a section of 40x40 mm or 40x60 mm.
- The longitudinal lamellas of the frame are attached to the beams, the short ones - to the installed beam. The result is an even lattice structure that serves as a base for sheets of plywood and a grid for laying insulation. Sheets of insulation are laid between the beams on the other side of the floor.
- Plywood is hemmed onto the frame. Fixation with self-tapping screws to the timber.
- The joints of the sheets must be located strictly on the timber, installation of sheets with a gap of 1-2 mm.
After the ceiling is hemmed, a vapor barrier membrane can be laid on the top side of the ceilings on the thermal insulation, and then a subfloor.
Lining
Lining is a board processed in a special way with a tongue and groove to simplify installation. Eurolining, unlike regular lining, has a higher quality and lock design. The peculiarity of the lining is durability, strength, and good sound insulation. Due to its naturalness, the ceiling surface always “breathes,” and the attractive price of such material makes it accessible to everyone.
Design options may be as follows:
- clapboard cladding in one direction is best used for small rooms; in a large room it will look boring and monotonous;
- if the lining is laid between the beams, its shade and direction of cladding can be changed, thus dividing the space into zones;
- The continuous surface of the lining ceiling can be decorated with carvings or paintings. This solution looks very elegant and resembles colorful old houses.
Choosing a wood ceiling finishing material
Before buying materials, you need to decide on the functional purpose of the room. The methods of design and finishing depend on the same factor. Then calculate the practical qualities of using a particular material depending on the age of the house and shrinkage. It is better to choose natural materials that provide protection, ventilation, and maintain room humidity.
We advise you to study - Metal tiles or corrugated sheets - which is better to use as a roof
In addition, cladding made from environmentally friendly products creates a special atmosphere of peace, coziness and comfort. Let's consider popular materials for the ceiling in a wooden house.
Ceiling paneling
Rack and pinion products are presented in a wide range. Finished products can have different widths and be made of especially durable and high-quality wood. The price of cladding depends on many factors, the width ranges from 12-12.5 cm to the dimensions of a full-fledged cladding board. The model range offers traditional types of wood at economical prices (from $5-7) and expensive lamellas. By combining options, you can get an individual design of ceiling decor, but you should remember to select the thickness and density of the lamellas.
Before you start finishing, you need to check for impregnation from fire, protection from water, bugs, and rot. A smoothly polished strip costs a little more, but it looks aesthetically pleasing. Installation of the cladding is simple: the slats are attached to the sheathing with nails/screws or inserted into the grooves of the guide bars. Decoration of cladding: water-based paint, varnishes.
Cladding
The main feature of the material is naturalness. Such a ceiling in a wooden house made of timber will provide a normal microclimate, absorbing excess moisture and releasing it when there is a lack. Classic wooden lining is suitable for all surfaces, but has one drawback - it is a fire hazardous material. It is necessary to use antiprene impregnations and renewable protection from biological life forms.
Plastic lining is a budget cladding option. A characteristic difference is seamlessness. Pros: variety of textures, imitations, shades, water resistance, ease of installation. Cons: fragility, instability to mechanical and temperature influences.
We recommend reading: How to make a ceiling in a private wooden house and do-it-yourself finishing
The lining is mounted using screws, nails, self-tapping screws or laid along the sheathing guides. The most convenient option is to choose a wooden lining with a tongue-and-groove fastening; the cladding is assembled into a monolithic boardwalk that imitates natural solid wood.
Alfrey finish
The technology of work involves finishing with textured plaster and painting the ceiling space. But if the decoration requires some experience, a home craftsman can handle the application of textured plaster. Particularly convenient is the possibility of local application of decor. You can decorate the corner and central areas of the ceiling with painting or textured finishing, and visually zoning the space. The cost of cladding is minimal, and the effect exceeds all expectations.
Pros: variety of color and decorative solutions, ability to do the work yourself, budget cost. There is only one downside to finishing - materials for decoration need to be selected with special care.
Plasterboard finishing
When choosing what to cover a wooden ceiling in a private home, owners prefer materials that are inexpensive and easy to install. GKL sheets are lightweight, inexpensive and easy to lay out. Characterized by its resistance to temperature increases, the sheet can be used as additional protection from noise and cold, but gypsum boards are defenseless against water. Therefore, after installing the sheets on the ceiling, they must be further processed: painted, varnished, covered with film.
Pros: breathable, absorbs moisture, easy to decorate. Disadvantages: it is necessary to arrange lathing - gypsum plasterboard sheets cannot be nailed to a wooden ceiling, moreover, the material becomes deformed at high humidity levels and requires protection.
Finish options
A huge amount of materials are used to decorate the ceiling in a private house. Sheathing can be single-layer or multi-layer. Features of the first type:
- it is impossible to use recessed lamps;
- as a rule, it is necessary to carefully level the base, since the material will only highlight the imperfections of the ceiling or the adhesion to the surface will be poor, and the consumption of expensive raw materials will increase.
Multi-layer finishing includes suspended and tensioned structures. All types are characterized by:
- the formation of a ceiling space in which you can install built-in spots, hide communications, hide insulation, lighting;
- It is not necessary to perfectly level the base base.
Next are the TOP 20 common materials for ceiling repairs in a private home.
Painting
This is one of the most used DIY finishing methods in private homes due to its ease. The market offers a serious range of paints and varnishes. Several types of paints are used in interior work:
- Acrylic . They form a durable film that is not afraid of washing. Factory lines include a wide selection of bright, rich colors. The weak point is airtightness.
- Silicone . They allow air to pass through well. Thanks to its high hiding power, it is possible to mask minor defects and cracks. Wet cleaning is also acceptable.
- Silicate . The formula is based on liquid glass, which provides a durable coating. But these paints can only be used on mineral surfaces - plaster or putty. The product peels off from metal and wood.
- Water soluble . This is a large group of budget water-based products. Their disadvantage is their fragility and rapid abrasion during repeated wet cleaning.
- Latex . These are washable paints based on artificial latex. They form a wear-resistant film that can withstand use even in damp areas.
- Alkyd . Such paints are obtained by boiling vegetable oils with acids. The result is durable coatings that retain their appearance for several years. When applied, they release toxic substances that can cause poisoning.
Depending on the texture of the resulting paint surface, there are:
Painting is allowed in any room. But for the bathroom, veranda, kitchen you need to use paints and varnishes that are resistant to moisture and getting wet - latex, alkyd, silicate.
Care depends on the type of coating: most can only be wiped with a damp cloth.
Installation is carried out independently. The ceiling is first leveled with putty and primed. Then the finishing coat is applied using a brush, spray gun or roller.
- low cost of finishing;
- alkyd, latex, silicone products can withstand brushing;
- structural and dense paints eliminate minor defects in the base.
- opaque paints highlight the imperfections of the wood;
- frequent coverage updates.
Decorative plaster
There are several types of material:
- Textured . This is a viscous solution, which includes fibers, stone chips, mica, pebbles, glass, etc. The mixture is applied to brick, concrete, wood, and plaster. The most popular products of this type are bark beetle and lamb.
- Structural . The materials are made on the basis of acrylic or silicate with the addition of marble chips and quartz. They give a non-uniform granular surface, often resembling even and smooth plaster. Even gypsum plasterboard, chipboard, plywood and OSB are used as a base. This type of material is not suitable for wet areas.
- Venetian . This coverage is more expensive than the previous ones. After renovation, the ceiling looks as if it was lined with onyx, marble or precious metals. Venetian is applied in several stages.
You can get the relief from universal gypsum mixtures and a figured roller. Work on the surface when the solution sets slightly (the time is indicated on the packaging). You can imitate a wide variety of textures - from wood to crocodile skin.
Textured plasters are sometimes protected with varnish and interior paints. Venetian itself is a finishing coating.
Caring for decorative plaster is usually easy. You can often wipe it with a damp cloth and even wash it.
- not all mixtures are easy to apply; sometimes the help of specialists is needed - for example, for the Venetian;
- hides minor imperfections;
- many are subject to wet cleaning;
- most types can be used in the bathroom, kitchen;
- strength.
- difficult to remove;
- high cost of material;
- textured and structural coatings in the kitchen are difficult to clean;
- Be sure to repair large defects in the ceiling.
Roll wallpaper
They are also often used to decorate ceilings, especially in living rooms, bedrooms, hallways, and children's rooms. There are the following types of material:
- Paper . They come in simplex (single-layer) and duplex (two layers), with embossing, varnish coating (“washable”) and even paintable. But they have a lot of shortcomings. Single-layer canvases can come apart and stretch when gluing, and do not fit well on the wall. They cannot be glued where it is humid. The service life of coatings is up to 5 years.
- Vinyl . Available on paper or non-woven base. The front part of PVC can be foamed, smooth, hard, or silk-screened. If the manufacturer has provided micropores, the wallpaper “breathes.” The service life of the finish is 10–20 years. The disadvantage of coatings is the content of formaldehyde, DOP, DBP, so it is better to glue them in well-ventilated rooms. Many vinyl wallpapers are washable.
- Non-woven . It is a non-woven material made of cellulose and polyester. It is less sensitive to moisture than paper and is stronger than it. Such wallpapers are breathable, easy to glue, and some types can be repainted. They do not deform, mask small unevenness in the ceiling, and are often washable.
- Textile . Available on paper and non-woven fabric. Products of European brands are produced only in the second version. The front side is made of any fabric. Therefore, the texture can be smooth, rough, velvety. Another advantage is the presence of seamless coverings up to 3.2 m wide. The disadvantage of this wallpaper is its heavy weight. Care must be taken when caring for the material, since it does not tolerate moisture unless impregnated with water-repellent compounds.
- Acrylic . These are wear-resistant and abrasion-resistant coatings that can be cleaned even with detergents, but without abrasives. They are produced on a paper, non-woven basis.
- For painting . They come in vinyl, paper, non-woven, fiberglass. The pros and cons depend on the type of material. As for glass wallpaper, it is an environmentally friendly product, resistant to fire and superior in strength to analogues. Their service life reaches 30 years. But they are inelastic, so they stick only to a completely flat surface.
The most suitable material for the ceiling in a wooden house
A large number of materials are suitable for the inside of the ceiling. But there are also limitations. For example, it is not recommended to cover the inside of the ceiling with plastic material. Firstly, the natural atmosphere of the log house is lost, and secondly, the plastic can burn.
You can cover the ceiling:
- Natural wooden material;
- Tensile structure with non-flammable PVC film;
- Plasterboard;
- Veneered panels;
- MDF boards.
The design of the ceiling should be consistent with the overall interior of the house. Therefore, materials are selected taking into account the wall decoration and floor design. If the task is to make the cladding yourself, then the designs are selected based on the complexity of installation.
White color can increase space and raise the height of a room. Before painting, the entire plasterboard must be treated with putty, so that in the future it will be possible to change the color of the coating.
Preliminary calculations
The clapboard board has standard dimensions, which greatly simplifies the calculation of the required material. When making calculations, you should try to minimize the number of joints when laying the lining. In case of unexpected damage, it is necessary to purchase material with a small reserve. Correct calculations will make the task easier and eliminate unnecessary costs and labor.
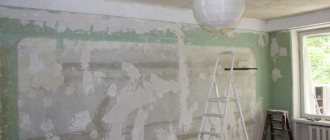
Before starting work, you need to calculate the amount of materials required
To finish the ceiling in a room measuring 2.5 by 3 m, lining plates 6 m long are usually purchased. They will need to be cut exactly in the middle. This will make it possible to use the material completely without waste. Additionally, you also need to purchase a support beam, preferably pine. The following table will help you correctly calculate the dimensions of the sheathing elements.
Table. The required dimensions of the ceilings to calculate the load are 0.4 tons per 1 m².
| Step width, m | Span m/beams, m | Log diameter, mm | Beam dimensions, |
| 2 | 1 | 130 | 12x8 |
| 2 | 0,6 | 110 | 10x7 |
| 2,5 | 1 | 150 | 14x10 |
| 2,5 | 0,6 | 140 | 14x9 |
| 3 | 1 | 170 | 16x11 |
| 3 | 0,6 | 140 | 14x9 |
| 3,5 | 1 | 190 | 18x12 |
| 3,5 | 0,6 | 160 | 15x10 |
| 4 | 1 | 190 | 18x12 |
| 4 | 0,6 | 160 | 15x10 |
| 4,5 | 1 | 220 | 22x14 |
| 4,5 | 0,6 | 190 | 18x12 |
| 5 | 1 | 250 | 24x16 |
| 5 | 0,6 | 200 | 18x14 |
| 5,5 | 1 | 240 | 22x16 |
| 5,5 | 0,6 | 200 | 18x14 |
| 6 | 1 | 270 | 25x18 |
| 6 | 0,6 | 230 | 22x14 |
| 6,5 | 1 | 290 | 25x20 |
| 6,5 | 0,6 | 250 | 23x15 |
| 7 | 1 | 310 | 27x20 |
| 7 | 0,6 | 270 | 26x15 |
| 7,5 | 1 | 330 | 30x27 |
| 7,5 | 0,6 | 290 | 28x16 |
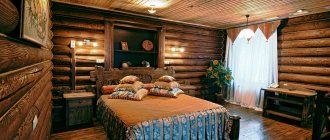
Wooden slats in the ceiling design of a private house
With a new suspended ceiling, you can not only cover the base ceiling, but also create virtually any design project.
So, in a private house, the force of the load on the ceiling surface is only their weight; both natural and artificial materials are used for decoration
Since in wooden houses special attention is paid to maintaining humidity and temperature conditions, wooden slats are still considered the optimal finishing option
We advise you to study - How and with what to drill porcelain stoneware - tools and drilling technology
Well, the finished batten is nailed to the sheathing in the usual way. Please note that the nail heads should be invisible. The ceiling finished in this way is first tinted and then varnished.
Modern types of suspended ceilings ↑
The problem of how best to hem the ceiling in a private house can be solved with the help of stretch ceilings. They come in film and fabric, look good, fit perfectly into a wooden interior, are easy to install and easy to maintain. In addition, the film and fabric are not deformable when the house shrinks. It is easy to hide communications above them, they are environmentally friendly, and the version with fabric has a “breathable” effect.
Practical film decor ↑
Installation of the tension film should begin with the installation of the fastening profile. To do this, use a level to apply markings around the entire perimeter of the room. The profile or baguette is glued along the marked line to the wall. When the glue hardens, it is recommended to additionally secure the fastening element with self-tapping screws. Immediately mark the locations of lamps and communications.
Installation of glossy film involves the use of a heat gun. At the initial stage, the canvas needs to be secured in the corners of the room, after which the temperature in the room should be raised to 40-50º with a cannon. After this, gradually moving across the entire material with a heat gun, place the edges of the film in the baguette and securely fix it. When the ceiling has already been stretched, it needs to be given time to cool and take shape, then cut off the excess corners.
The matte stretch ceiling is stretched manually and fixed in a baguette in the direction from the center of the walls to the corners. After this, excess material is removed. The final stage is the installation of lamps according to the previously marked markings.
Textile ceilings for the elite ↑
Textiles, unlike PVC film, have the inherent property of “breathing”. In addition, the fabrics are very durable and retain their shape well. Another advantage is the width of the fabric panels; they are much wider than their film competitors, which allows for seamless coverage in large rooms.
The installation process is similar to the method of installing matte film. The differences are that the fabric is initially secured in the baguette in the center and then towards the corners every 50-60 cm, after which, to avoid wrinkles, it is evenly stretched over the edges. The corners in the profile are fixed last.
Regardless of whether you choose a wooden ceiling or a ceiling made of another material, the main thing is that it fits harmoniously into the interior and becomes a real decoration of your home.
Planken
Planken is a wood material intended for cladding facades and frame structures. Planken means "planks" in German. So, there is nothing fundamentally new in this material.
The main differences between planken and ordinary boards are good drying, high-quality surface treatment and a special shape of the edges with corners rounded with a radius of 3 - 5 mm, due to which there are no edge chips and flakes on them.
The longitudinal ends of the planken can be straight or oblique. Slanting edges with a slope of 30–45° are good at removing moisture to the outside when cladding a façade with horizontal planks. When covering a ceiling, slanted edges can also be useful, since they mask through gaps.
Planken is sewn onto the sheathing, just like ordinary boards or lining. There is always a small gap left between the slats to compensate for seasonal changes in size. There are no locks to hide the gaps here. The fastening of the planks can be hidden, like lining, or through. In the latter case, the fastener heads can be masked or, conversely, used as additional decoration and highlighted with color.
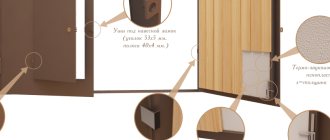
Materials
There are many suitable materials for cladding the ceiling in a wooden house. You can choose finishing materials to suit any budget. Mostly, owners of wooden houses prefer wood finishing, but other methods should not be excluded. The easiest option is to cover the ceiling with plaster and paint. You can choose white, which will go well with dark wood in the house, or warm pastel colors, which will go well with light wood.
Another inexpensive way to decorate the ceiling is to decorate it with plastic panels. This is a reliable, practical and cheap material, and it is quite possible to carry out such repairs on your own. In addition, the modern design of such panels is very diverse. You can choose white or colored options, glossy or matte panels, and even products that imitate wood.
If you have a house with low ceilings that you want to visually raise, tension and suspended structures will not suit you. If there is enough space, then it is worth considering this option. Stretch ceilings will allow you to hide all the flaws of the rough finish, apply any designs to the ceiling, and also create unusual lighting in the room - for example, you can build lamps under such a ceiling or even create images from colored LEDs.
Finally, it is quite possible to decorate such ceilings with wooden beams or make a coating that imitates wood.
If you decide to decorate the surface with wood, this can be done using timber - such a finish will create an authentic atmosphere of a country house. In addition, ceilings are often finished with clapboard - it is easy to install it yourself, since it has joints with recesses for your convenience.
If you are looking for a budget option, the ceilings can be sheathed with plywood or OSB boards: often such finishing can look no less good than solid wood. The surface can be decorated with carved patterns and beams of different heights.
MDF panels
When looking for how to decorate the ceiling in a wooden house, you should pay attention to MDF cladding panels. MDF is a good wood substitute. This material is made from finely ground wood waste, which is held together into a board by urea resins added to the mixture and lignin, which is released from the wood fibers during the heating that accompanies the molding of the material.
MDF successfully competes with natural wood due to its advantages:
- ease of use;
- dimensional stability;
- resistance to rot and insects;
- very wide design possibilities.
Cladding panels from it can be made of different sizes - from narrow strips, like lining, to large panels, the size of which is limited only by the convenience of their installation and the ability to provide slack, which is necessary in order to avoid warping of the skin.
MDF panels are decorated with painting or vinyl film, onto which any pattern is applied. The wood grain pattern is just one of many options. In addition to the pattern, a texture can be imprinted on the surface of the slabs, which also serves as decoration. Moreover, any relief can be created on the surface of this material using milling, which further expands the design possibilities.
Here we have significantly moved away from the priority of “wood” design in the interior. The dominance of wood in the interior decoration of a wooden house is very popular, but not mandatory. In addition, wood combines very well with modern materials, which can also be used when creating an interior.
Plaster
- inexpensive and accessible
- wide range of colors at your service
- practicality
It is difficult to discourage our people from using various types of plaster in their houses and apartments. It is also suitable for ceiling structures in private wooden houses as a finishing material. The general complexity of the plastering procedure does not scare off the owners, who are heart and soul for this option.
Drywall
- attractive with the possibility of individual design and two-level structures
- refresh the room and bring it as close as possible to modern design trends
In fact, plasterboard structures are a universal option for all occasions. Including for finishing the ceiling surface in a wooden house. However, they require good compatibility with the rest of the interior details, so if you have retained a slightly popular provincial style, then it is better to find a more friendly finishing material from those listed above. At the very least, they will definitely look much more organic.
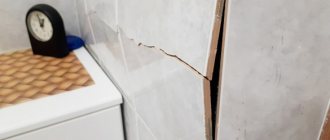
Stretch ceiling
- suitable for installation only after the building has settled
- seriously reduce the height of the room
It is difficult to find something more beautiful, varied and impressive than a stretched canvas with an original photo print and an intricate arrangement of lamps along the area of the ceiling structure (see examples of stretch ceilings with a 3D photo drawing). But there are several points that should not be missed in any case: since a constructed building subsides over time, suspended ceilings should be installed only a few years after construction, and the fact that polyvinyl chloride does not allow air to pass through well can contribute to the appearance of dampness and fungus in the room.
Plastic
- simple installation, accessible even to beginners
- nice surface design
Probably, although this option for finishing the ceiling has certain advantages, it can only be recommended to the enemy. The reason is still the same - the fact of the artificial origin of the finishing material entails poor air circulation between the layers and the rapid appearance of mold, bad odor and mildew. In addition, such plastic panels strongly emphasize geometric correctness, which may not fit well with the free interior of a wooden house.
Choosing material for lining a wooden ceiling
To know exactly what is better to hem the ceiling in a private house, you need to decide on the purpose of the room and the requirements for its finishing. It is also worth taking into account the peculiarities of the processes occurring in the room, temperature and humidity conditions, the seasonality of living in the house, the characteristics of its heating, as well as the base material.
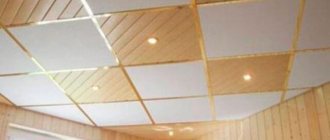
Sheathing the ceiling surface with a batten
The slatted ceiling finish indoors can be very different depending on the dimensions of the product and the type of wood from which the slatted is made. Elements made from coniferous species are the cheapest. The most expensive, beautiful and high-quality planks are made from expensive wood. The width of the slats ranges from 12 to 30 cm.
The choice of wood type, thickness and density of slats is directly related to the purpose of the room. If you decide to hem the ceiling in a room with wet processes, then it is better to choose products from larch and other species that are resistant to high humidity. To arrange the ceiling in a steam room, sauna or bathhouse, coniferous lamellas are not used, because when they are heated, resin appears on the surface.
Block-house type slats are most often used. The outer surface accurately imitates a rounded beam, and thanks to the interlocking connection, a monolithic surface without seams or cracks is obtained. Such products undergo special processing in the factory. They are impregnated with antiseptics and fire retardants, after which the wood is reliably protected from fire and damage by microorganisms.
Cladding
When deciding what is best to cover the ceiling in a wooden house, many owners give preference to lining.
This finish has many advantages:
- Wooden lining reduces heat loss in the room and protects from external noise.
- Different methods of clapboard finishing are ideal for a wooden house and harmoniously combine with the wall material.
- If frame installation technology is used, then foundation defects can be hidden behind the filing, thermal insulation materials and utilities can be laid, and built-in lighting can be installed.
- To install this finish, you do not need to prepare or level the base.
- The lining can be treated with impregnations to increase service life, tinted, painted and varnished to improve its appearance.
The disadvantages of using this material include the following:
- the product easily ignites and supports combustion, but this drawback can be mitigated by the use of fire retardants;
- boards need additional treatment with antiseptics to protect against rot and mold;
- Due to changes in humidity and temperature, the product is deformed.
We advise you to study - What the thickness of a parquet board can be in layers and in total and what it affects
Alfrey finish
To decorate the ceiling surface, you can use not only finishing materials for the ceiling in a wooden house, but also other methods of decoration, for example, painting. This decor is also called alfrey finishing. For work you will need only high-quality paints and brushes. Even if you do not have drawing skills, the ceiling surface can be decorated with ornaments or patterns using pre-prepared stencils.
It is not necessary to paint the entire ceiling. You can decorate individual sections of the ceiling surface or protruding beams with a pattern. The main condition is that the base must be smooth and even. Finishing with chipboard, plywood and wood panels is suitable for painting.
Finishing with plasterboard sheets
Drywall is very popular. It is used to level wall and ceiling surfaces in houses made of different materials. Moreover, using gypsum boards, you can create not only single-level ceilings, but also complex multi-level structures with lighting, built-in lamps and curved surfaces.
The advantages of using drywall include the following:
- GCRs do not interfere with natural air circulation. Due to the good vapor permeability of the material, the base under the finish is reliably protected from the accumulation of condensation and mold formation.
- Since gypsum boards are mounted using frame technology, this finish has all the advantages of suspended ceilings (it hides defects in the base and does not require careful preparation, communications are laid behind the filing, insulation is laid, and recessed lamps are installed in the ceiling).
- The material is easy to install with your own hands.
- Moisture-resistant gypsum board is suitable for installation in rooms with high humidity.
But it is worth remembering that if the gypsum board installation technology is violated, the ceiling surface may be deformed. In addition, plasterboard lining needs finishing. Before facing, the surface is carefully prepared (puttyed, sanded and primed).
Practical and quick plasterboard covering ↑
Plasterboard ceilings are most relevant when it is necessary to level a very uneven surface. There are two main ways to attach drywall in a wooden house: on a wooden base made of bars and on a traditional metal frame.
Features of installation on a wooden frame ↑
A wooden frame for plasterboard is more suitable if the task is to make a simple single-level ceiling. At the same time, various types of imperfections are perfectly hidden without losing the height of the room. But you need to remember that for such a frame you can only use well-dried, high-quality wood.
- First, you should determine the lowest point of the base, step back 5 cm from it and, using a level, draw a horizontal line around the perimeter of the room.
- After that, along this horizontal line in a circle, fasten the slats and bars along the length of the room in increments of 80 cm.
- Attach supporting strips perpendicularly to them in increments of 50 cm, which will become the basis for the drywall.
Sheathing technology on a metal frame ↑
A metal frame for attaching drywall is more reliable. Its design includes guide profiles that hold the ceiling frame, and rack profiles to which the plasterboard sheet is mounted.
- By analogy with a wooden frame, the ceiling level is set and guide profiles are attached around the perimeter using self-tapping screws or dowels.
- A guide profile is attached to them in increments of 40 cm.
- The entire structure is fastened with self-tapping screws.
- To increase rigidity you need to use suspensions.
- If you plan to install a chandelier or lampshade to illuminate a room in the future, it is advisable to install mortgages that will hold the lamp. For this purpose, several rack profiles need to be attached to the frame in place of the lighting fixture.
Installation of plasterboard sheets begins with marking the plasterboard according to the size of the room and cutting it out. The plates are attached to the frame with self-tapping screws every 25 cm. In this case, their heads are slightly recessed into the panels. A sickle mesh is glued to the joints between the sheets, after which the drywall is primed, puttyed and painted.
Plywood
When choosing a finishing material for a ceiling, plywood is usually not paid attention to. However, with the help of plywood you can create an original interior design and decorate your home without extra costs. In the photo, no one will understand that the ceiling is lined with plywood sheets. Plywood varies in the number of layers glued together, as well as in such parameters as:
- moisture resistance: this characteristic is especially important if the house is not heated. If the top layer of plywood is covered with laminate, this figure is even higher;
- grade: construction plywood of one of five grades is used for cladding;
- the type of wood used in production. The most popular top layers of plywood are alder, birch and maple, while the middle layers of plywood are usually made from softwood;
- processing method: for a country house you can use untreated plywood; for a cottage, preference should be given to plywood sanded on at least one side. There is no need for double-sided sanding;
- appearance of the cladding: the decorative layer of plywood can be made of plastic, asbestos paper, decorated with a pattern or a natural “wood” look.
To finish the ceiling using plywood, it is necessary to construct a sheathing, which can be made of aluminum profiles or wooden beams. Fastening plywood to beams is done using nails or self-tapping screws. The joints are sealed in two ways: with putty or a decorative strip. The corresponding photos, which show walls and ceilings lined with plywood, will help you create a unique design for an attic or any other room.
Requirements for materials for finishing ceilings
The ceiling surface is lined with materials that reduce heat loss and prevent the penetration of sounds from the street. The finishing should be light and not emit harmful substances. It is desirable that the cladding retains its attractive appearance for a long time and is easily cleaned of dust. Ideally, only wood materials are appropriate on the ceiling of a log house. They complement the walls and do not need frequent updating. Wood is easy to process and is suitable for creating protrusions, relief beams, and textured compositions. Wooden cladding protects against cold and absorbs sound. You can sheathe ceilings with wood materials in a children's room. Non-toxic water-soluble antiseptics, oil and wax do not violate the environmental friendliness of materials.
Advantages and disadvantages of wooden ceilings
The main advantage of finishing the ceiling with wood in an apartment is the environmental friendliness and naturalness of the material.
In addition, wood finishing boasts other advantages:
- Untreated wood is susceptible to damage by insects, quickly absorbs moisture, deforms and burns. Thanks to modern drying methods and special impregnations, the material is free of all these disadvantages, which extends its service life.
- The beauty of texture and color are also considered advantages of wood finishing.
- The material is easy to cut, install and can be processed in various ways.
- Natural wood regulates the microclimate in the room and maintains it at an optimal level for humans. This is ensured by the fact that wood absorbs moisture when the humidity in the room increases and releases it when it decreases.
- Wooden ceiling trim additionally protects the room from cold and external noise.
- Wood finishing can be used to decorate interiors in different styles.
- Some options for wooden ceiling cladding can be made with your own hands from budget materials.
Wood wallpaper
Depending on the composition, there are several wallpaper options:
- Natural wood panels
These are small boards that are assembled using special locks without the use of glue. This is very convenient because it allows designers to come up with different patterns from textures by laying panels from different types of wood in a certain order and mixing them together.
They are made by grinding cork oak and then pressing it. Such wallpaper is sometimes covered with veneer.
For the base of such wallpaper, cardboard is used, which is covered with veneer and rolled into a roll. In terms of quality and appearance, they are no worse than natural wood panels.
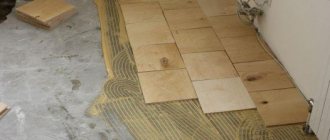
Rough plywood ceiling
Plywood is considered an ideal material for making a rough ceiling on beams. With its help, it will be easy to make a base for placing the cake from an insulating, waterproofing, vapor-permeable layer.
When the ceiling is hemmed with plywood along the beams, its sheets are exposed to a minimum of mechanical and thermal load. For such work, the dimensions of the material used must correspond to the interbeam distance.
The sequence of manufacturing this type of rough ceiling:
- if necessary, assemble a slatted frame and attach it to wooden beams from below;
- cut sheets of material 4-6 millimeters thick are hemmed to the sheathing;
- Sound-insulating and heat-protective mats and waterproofing films are placed on plywood.
The work on arranging the rough ceiling is carried out in such a way as to subsequently use the lattice frame and beams as the basis for installing finishing plasterboard panels.