What are string beacons for plaster, how to install them and how to make them yourself?
Leveling walls with plaster is carried out not only during construction, but also during repairs. Smooth plaster is the basis for any finishing. Beacons are used for alignment. Several types of them have been developed - mortar, profile metal, mobile, mortar with a gasket, sliding and string.
Purpose of string beacons
They use string beacons for plaster when performing leveling rough plastering work. If the base surfaces in a room or on a facade have large differences or you need to obtain a high-quality surface, you cannot do without auxiliary landmarks. Such landmarks are beacons - even strips or profiles, the surface of which forms an auxiliary plane, distinguished by its exact location in space. It turned out that plastering along beacons can be done using guidelines made of tensioned wire, based on which the applied mortar is usually leveled. These landmarks are called string beacons.
They are especially often used on long walls.
Purpose of lighthouses
When plastering any base, it is very important to obtain a perfectly flat surface. This will allow you to spend significantly less effort and time on finishing in the future, while getting an excellent result.
Painting, whitewashing, applying decorative plaster and gluing wallpaper should be done on a previously leveled surface that does not have any visible defects.
Use any suitable object for reference
To do this, for a long time, professional plasterers have been using various devices that serve as guidelines when applying and distributing the solution. These devices are called “beacons”.
Typically, any suitable material is used to make beacons: wooden strip, metal profile, small diameter pipe, etc.
The main condition is that this item is smooth, durable and easy to use. But perhaps the most technologically advanced and at the same time simple design is string beacons.
Types and design features
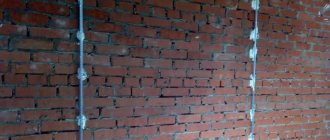
There is no classification of string beacons yet. This design in plastering appeared recently and became widely known thanks to the Internet. The main directions of design development are the development of convenient, reliable and easy-to-use stops and tensioners. The main working element of the string guide is a wire stretched between two fixing elements along the plastered base.
Of the two fixing elements, one is a kind of simple anchor, the second is more complicated, because it is used to tension the string. For tensioning, a bolted connection is used, which allows, when screwing or unscrewing, to change the length between the persistent elements fixing the string. The clamps are attached to the base using dowels or self-tapping screws, so they are reusable and removable. The design of the clamps also provides for adjusting the distance between the wire and the base.
string lighthouse base
stretched string
plaster roller under the lighthouse
The last (disposable) element of the string guide is a strip of hardened mortar - a kind of mortar beacon. It is designed to ensure that the tensioned wire does not change its configuration when a rule sliding along the top is supported on it. After tensioning the wire, apply a bead of mortar under it with a spatula, which quickly gains strength. The cross-section of the roller has the shape of a triangle, on one of the vertices of which a string rests.
How to make it yourself
The so-called inventory beacons, which are sold in construction stores, are inexpensive, but sometimes it is not possible to get out of the construction site. In this case, some people simply install self-tapping screws in the right places on the wall or floor and stretch the wire along them. But it is possible to make products that can be pulled on much more conveniently. For this:
- Let's prepare a coil of wire with a diameter of 0.3-0.5 mm (a coil of 5 kg will cost 200-300 rubles), self-tapping screws up to 10 cm long and 6 mm in diameter, two metal corners, pliers and a wrench.
- Drill one hole on each side of the corners. We will insert a bolt into the first, and a self-tapping screw into the second.
- Since the tool will be connected to the wall using a self-tapping screw, we apply the corner with the desired side perpendicular to the plane. We do this for two corners, which are installed on both sides of the wall and directed towards each other.
- We wrap the bolt head with several turns of wire.
- Screw the nut onto the bolt.
- We repeat for the second corner, securing the free end of the wire to it.
- We tighten the string using a wrench. At the same time, use pliers to fix the bolt head (this will prevent twisting).
Important! When tensioning the string you need to work very carefully. If it breaks, the wire can fly off into your face with force and cause injury. For the same reason, before starting work, it is worth checking the wire along its entire length and making sure that there is no manufacturing defect on it.
Working with homemade beacons is as easy as working with purchased ones.
Advantages and disadvantages of string lighthouses
Like any device, string beacons for plaster, while having strengths, have disadvantages. Therefore, in some cases, a different design has advantages over them. In other cases, despite the disadvantages, string guidelines are chosen for plastering.
Pros:
- reusability;
- low cost;
- the ability to produce on your own;
- easy removal, small amount of subsequent surface editing (does not form a groove);
- gain in time;
- simplification of the formation of an auxiliary plane: you only need to level (or plumb) two (in more complex cases - three) strings;
- the ability to replace wire that has become unusable;
- reducing the minimum possible thickness of the leveling layer;
- You can install only two string beacons for plaster on long walls.
Flaws:
- the system is sensitive to random bends of the wire (any bending of the string affects the quality of the resulting surface), which is often difficult to correct;
- the presence of vulnerable spots - the thread may become clogged with a solution (the solution is to protect the fixing elements before using the solution, for example, with polyethylene);
- the possibility of corrosion of elements as a result of working with raw solutions (for fixing elements it is more rational to use stainless parts);
- unusual leveling technology, in which the rule is carried out in a horizontal direction (the cut solution tends to fly to the floor);
- complex and unusual installation process.
Consolidation process
Installation technology for string plaster beacons:
- Measure 20-25 cm from the corners on each side and put a mark.
- Drill holes at the marks.
- Insert a round tenon into the hole.
- Screw in the screw on one side and the other.
- The wire is immediately wound counterclockwise onto one bolt. The excess is trimmed off.
- Unwinding the spool of cable, pull it towards the opposite screw.
- Using pliers, tightening it as much as possible, a string is wound onto it.
- Wooden blocks can be placed under the cable in the area of the bolts. This is necessary to expose the layer of plaster.
- Using a wrench, begin tightening the bolts to ensure good tension.
- Screws and two string beacons are installed on the lower surface.
- You need to attach a plumb line to the upper beacons to set them parallel below.
- The blocks are also adjusted.
- Apply a solution under the strings to promote their squatting. This should be done several times.
Why should you carry out the actions described in paragraph 13? The string tension when installing them is optimal. But if you do not carry out this step and apply the plaster solution directly to them, this device will begin to bend under its weight. Apply one coat and wait for it to dry. Then also a few more layers.
The wire is wound counterclockwise onto one bolt.
Which wire to choose
For string beacons, any elastic wire, made of stainless material or with a durable insulating coating, is suitable. More often, stainless steel wire made in accordance with GOST 9389-75 is used. Copper-plated (ER70S-6) wire with a diameter of 1.2 mm is suitable for semi-automatic welding. Corrugated wire left over from work on pulling electrical cables is suitable. Galvanized knitting wire is also used.
A thin cable can also be used as a string. The only drawback is that when pulling the rule, it wears out the working edge of the tool.
Beacon installation technology step by step
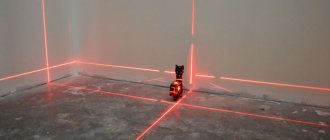
Let's immediately outline the nuances. String beacons on the walls are installed horizontally. If the height of the walls is up to 2 m, it is enough to install two beacons. They are placed at a distance of 100-120 cm from each other (this distance depends on the size of the rule used). For high ceiling heights, three strings can be installed on the wall.
- First of all, we mark the wall using a tape measure and a level (we draw horizontal marking stripes and mark the location of the anchors).
- We install the clamp and tensioner on the base. If the base material is concrete or brick, fastening is done with dowel nails. If we are plastering a wooden surface, we use self-tapping screws.
- We fix one end of the string to the clamp. We attach the second end to the movable (adjusting) bolt of the tensioner.
- We tighten the wire by tightening the adjusting bolt with a suitable tool (screwdriver, screwdriver or wrench).
- We check the location of the string (distance from the wall) using a level or plumb line. We correct the position of the string using special anchor bolts or placing wedges under the wire. This stage is especially important.
- Mix the solution to create a support roller. Apply and level the plaster mixture with a spatula, forming a roller. Finally, we clean the top of the string from the solution.
- Let the plaster composition harden and begin plastering the walls.
installing the retainer
fasten the wire
string tension and adjustment
formation of a structural roller
The string can be dismantled after the solution has set. This is done in reverse order. The lighthouse elements are cleaned of any remaining plaster mixture, dried or reused. The string is rolled up for storage without kinks.
When tensioning the string, be careful not to over-tighten it (otherwise the wire may break). The tension should be tight enough without sagging.
Prices and reviews
Due to the fact that only self-tapping screws and dowels are used during the installation of the guides, the cost of fasteners for the string beacon is minimal. Buying wire or strings will also be inexpensive. A five-kilogram skein, which is usually enough for the entire apartment, costs 200–250 rubles.
The use of wire and string guides is a fairly popular method when performing plastering work, which can be found out by reading reviews from performers. From the point of view of users, the distance between the string beacons on the wall should be as small as possible, so that it is more convenient to use the rule during the plastering process. And, according to others, this technique is not suitable for everyone - when plastering walls along a string, an inexperienced performer will receive a slightly larger consumption of material than expected, which does not remain on the rule, but falls on the floor.
A selection of videos on the topic of string lighthouses
Video:
Video:
Video:
How to make string beacons for plaster with your own hands
In order to make a string beacon with your own hands, you will need two angles, two bolts with 10mm nuts, two dowel-nails or self-tapping screws (for example, a 75 screw and a 6x40 dowel), a wrench and pliers. In addition, wedges are needed (you can take the wedges used when installing windows). It is better to take dowels with ears so that they are securely fixed in the wall material.
wedge adjustment
A hole is drilled in the corners (in one shelf - for a bolt, in the other for a self-tapping screw). When installing a beacon, one shelf of the corner is pressed against the wall with a self-tapping screw, the other is positioned perpendicular to the base. With these shelves, the two corners holding the string should face each other.
homemade retainer
The end of the wire is wrapped (2-3 turns) around the bolt (under the head) and the tip is wrapped around the wire to secure it. The extra piece of the end is bitten off. The bolt is inserted into the hole in the angle, and a nut is screwed onto it on the other side. The other end of the string, not reaching the flange of the corner by about 5 cm, is bent, wrapped around the rod of the second bolt and secured to the head, like the first. The bolt is inserted into the hole in the angle and the nut is screwed on.
Manufacturing is also possible from a regular clamp. This is not the best option and we do not recommend using it.
When tensioning the wire, hold the bolt head with pliers so that it does not turn, and screw the nut with a wrench.
Do not forget that the wire can burst not only from high tension, but also as a result of manufacturing defects. Use protective equipment.
String guide device
One of the simplest ways to make a string beacon is to screw ordinary self-tapping screws into the enclosing structures and wrap wire around them. In this case, the fasteners are held on dowels, and their caps are in the same plane, but at a short distance from the wall surface. Usually 2–3 mm is enough to secure the wire.
After tensioning the guide, there remains a small free space under it. To increase the reliability of the structure, it must be filled with a solution. As a rule, the same one that will be used for plastering.
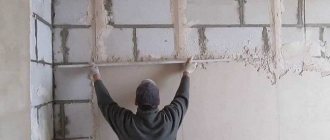
Plastering technology
Working with a vertical rule is somewhat different. Craftsmen advise not to apply the solution immediately from string to string, but to first apply a short strip with a width of about half the distance between them. The solution is made viscous so that it does not creep according to the vertical rule. After applying a little solution, it must be leveled immediately. Having filled and leveled the strip over an area about a meter long, fill the remaining strip above the lower string using a similar technique.
Having finished plastering the central part of the wall, the string is dismantled. The remaining part of the wall (above and below the strings) is plastered after the mortar laid in the center has dried, resting the rule on it.
We invite you to watch the videos and find out what string beacons are and how to install them.
String beacons for plaster are easier to install and dismantle. Their use reduces the amount of necessary materials and eliminates many operations for marking and installing conventional beacons.
Design and method of application
Today, among the finishing tools and devices offered in construction supermarkets, you can find factory-made string beacons. It is a small metal case into which an adjusting screw is screwed. One end of the string is attached to this screw, and the other end is attached to a similar beacon, only installed in the opposite part of the wall.
The main area of application for string beacons is finishing flat surfaces with a large area.
Advantage of string construction
Strings are quickly installed and inexpensive.
The main advantage that string structures provide is time savings. Their installation does not take much time and is very simple, unlike other methods, and also brings significant financial savings.
It’s easy enough to imagine how many disposable beacons made of perforated T-shaped profile would be needed to plaster walls with a total length of 40 m, provided they are installed in 1 m increments.
Plastering a 10 x 10 m room would be no less time consuming if reusable vertical beacons were used.
Installing and reinstalling metal or wooden beacons would significantly increase the total time spent on the job. After all, each such guide would have to be set every 0.8 - 1 m, using a level for this.
To plaster on string beacons, it is enough to just level them once, securing them at opposite ends of the wall.
Installation method
String plaster is a fairly simple technology to use. It is quite easy to string a beacon from strings with your own hands. Unlike traditional lighthouses, string lighthouses are installed not in a vertical, but in a horizontal plane.
To attach the bodies and tension the strings we will need the following tools:
- perforator;
- roulette;
- building level or plumb line;
- hammer;
- dowel-nails or self-tapping screws;
- wrench or screwdriver.
All work on their installation occurs in several stages:
- Using a tape measure, we mark the wall in such a way that the installed beacons with their strings divide it into horizontal stripes. The width of each strip should not be greater than the width of your rule (about 1 m).
- The next step is to secure the housings to the wall surface. For a wooden wall we use self-tapping screws. For concrete or brick - dowel-nails. We place the housing against the wall in a pre-designated location and mark the drilling points through the mounting holes. Using a concrete drill, we make holes in the wall into which we hammer plastic dowels. We apply the body to the drilled holes and secure it by screwing the screws into the dowels.
- On the opposite side of the wall, at the same height from the floor, we attach a second paired housing.
- After fastening the housings, we fix the wire string on the caps of the adjusting bolts installed in them.
- Then we proceed to tension the string by tightening the adjusting bolt with a wrench or screwdriver. When tensioning, care must be taken so that the string does not break from overtension, but at the same time is sufficiently tight.
- The final stage of work is fixing the strings using mortar patches in the central part of the wall. This is to prevent the string from “playing” during operation. After this, you can begin to apply and level the plaster solution along the strings.
For a standard apartment wall with a height of 2.7 - 3 m, it will be enough to stretch two horizontal lines. If the height of the walls is greater than this value, then you will either have to apply a broader rule, 1.5 - 2 m, which will complicate the leveling of the plaster mortar. Or stretch a third line of strings for greater ease of use.
To make leveling the plaster mortar easier, special attention should be paid to its plasticity. The table shows the ratios of various components to obtain one or another type of plaster mixture.