Features and purpose of putty
Putty is a universal building material used in the construction of objects and repairs. The composition contains hardening and setting regulators, plasticizers. Thanks to these components, the required consistency of the building mixture is created, and the material itself is endowed with the necessary properties.
Putty is a widely used building material that helps level the surfaces of rooms. The putty composition can level surfaces even with significant unevenness. Their use is often associated with the use of popular finishing materials:
- paint and varnish coatings;
- wallpaper;
- decorative plaster.
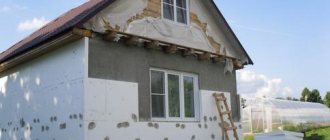
The putty is suitable not only for interior decoration, but also in preparing the facades of buildings for further processing. The holes are filled with the mixture and the joints of the walls are sealed.
Preparing walls for finishing putty
First you need to clear the room of furniture. What you can bear, bear it. Dust from this process cannot be avoided. The floor must be covered with polyethylene or newspapers. The more surface you cover, the better.
Why prime the walls?
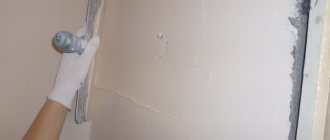
If the room was too dusty, clean the walls with a wet broom. In order for the putty to stick well to the walls, they must first be primed. Primer is a special liquid. After it dries, a microfilm of the adhesive composition forms on the walls. The walls are completely degreased, cleaned and dust-free, so the putty will not fall off in the future. Pour the primer into a plastic container and dilute it with water. The concentration level is indicated on the bottle. Next, use a roller with a long handle to prime the walls. This process is similar to ordinary painting, the main thing is to ensure that the walls are completely primed. It’s easy to guess from the wet stains on the wall.
Some moments
Putting walls under wallpaper with your own hands is easier than painting. Wallpaper will hide small defects and imperfections. But you need to make sure that there is no previous wallpaper left on the wall (if there was any). Because under the influence of the primer they will get wet and stick to the putty.
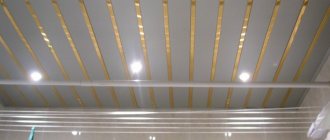
The easiest way is to putty and prime gypsum boards (plasterboard sheets). There are no special recommendations for this, just move the roller from top to bottom. Whatever the surface, it is better to prime separately with a narrow brush near the ceiling, floor and sides, since the roller in these places does not reach all the way.
Puttying walls after plastering is a more labor-intensive process. Therefore, it is necessary to prime very well. To do this, it is better to use a brush to fill all the microcracks and depressions.
GKL putty
Which primer to choose
The primer is used to create an adhesive layer on the surface, which promotes favorable adhesion of the composition to the wall. When choosing a primer, you need to pay attention to the room. If it is damp, it is better to choose a primer with an antibacterial effect that prevents the formation of mold.
- Alkyd primer has powerful properties, but does not penetrate into the material. It should not be used for plaster, putty and plasterboard. It is suitable for wood and iron because it has an anti-corrosion effect. In addition, such a primer creates a film on the treated surface, which is why the material does not breathe.
- Latex primer is suitable for almost any surface. This is an ideal option in the case of plaster and crumbling surfaces. It is very moisture resistant, waterproof and elastic. But it has such properties due to the addition of synthetic substances to it, so it is not suitable for connoisseurs of environmentally friendly products.
- Acrylic primer is best for home use. It does not have a strong odor, dries quickly and is easy to use. The thick composition is diluted with water to the desired consistency and applied to the wall. This primer can be used on any surface. And its price will pleasantly surprise you.
- A deep penetration primer is used in cases where the surface is loose, loose and not solid enough. It could be old plaster, wood, or just gypsum board with fallen corners. This primer penetrates deep into the material, giving it strength and water resistance, which is especially important in wet rooms.
Additional preparation of gypsum boards for primer
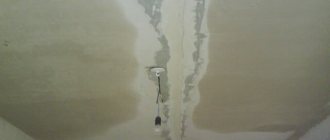
The joints between plasterboard sheets contain cracks and recesses. To eliminate unevenness in these places, it is better to use plaster. Thanks to its coarser composition, it will level the surface faster. But it’s not enough to just use a spatula. After the plaster dries, a crack forms at the joint site, since there is nothing for the composition to stick to in the area of the crack. To prevent this from happening, we use a serpyanka. Serpyanka is a mesh tape in a roll, similar to gauze. It comes in different widths and has a sticky surface on one side, making it easy to stick to joints. After gluing the serpyanka, apply a layer of plaster from bottom to top. We make sure that it does not move and, if necessary, correct it. Drying time 2-3 hours. After this, we remove small rocky particles with sandpaper. The surface is now ready for priming.
Advantages and disadvantages
Construction and finishing materials, regardless of type, have a common feature in common - they all have both pros and cons. Among the obvious advantages it is worth noting:
- high level of adhesion;
- ease of work;
- the mixture takes a long time to dry;
- possibility of leveling even in case of large defects;
- resistance to temperature and other external influences;
- acceptable price.
Among the advantages of plaster are ease of application and high adhesive properties.
Disadvantages include a granular structure, as well as a long setting period.
For painting
For walls that are going to be painted, more careful alignment is necessary. After all, paint will not hide even small defects. Leveling and finishing putties are used here.
Leveling layers are applied; for large defects, two or three layers can be applied. Then the surface is treated with a finishing composition. It eliminates the smallest defects. When the putty dries, it can be sanded to make it smoother.
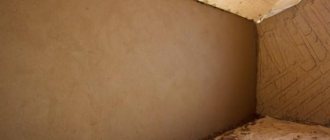
Internal and external corners should be given special attention.
To level the corners, it is better to use a trowel. You can place mesh tape in the inner corner. It is simply pressed onto a layer of putty and covered with another layer on top. For external corners, you can purchase special corners. They are also placed on the putty and covered with the same composition. The perforated corners are placed on the wet putty and covered with another layer.
The putty solution should be of medium consistency. How correctly the putty layer is laid depends on the quality of its preparation.
Proper preparation of the walls will prevent the material from peeling off.
What should be the mixture for putty work?
The plasterboard wall is puttied in two layers under the wallpaper. If you plan to finish, for example, with Venetian plaster, then it is wiser to apply
glass sheet. For the first three days, the putty surface is protected from moisture and hypothermia. The next layer should be applied to the walls only after the previous one has dried. On average, a layer of finishing putty dries for about a day.
Self-preparing the walls for final finishing is quite possible. You just need to do everything according to technique, then the result will be appropriate.
Applying finishing putty: how to do it correctly.
Differences between putty and plaster
Beginners confuse putty with plaster, believing that they are the same composition with minor differences. However, there is a difference:
- Sanding – processing of plaster is prohibited.
- Methods of application - plaster is characterized by spattering when laying the very first layer. Next comes the primer and cover, but sometimes the first two are enough. The putty is simply carefully distributed over the entire surface.
- Grain size – putty has small granules, while plaster consists of larger grains (decorative options are an exception).
Plaster differs from putty in the level of granularity
These are completely different materials, despite the fact that they have one common functional responsibility - leveling surfaces.
Putty or plaster, when leveling the curvature of the walls
The materials needed for this type of leveling differ in composition. The main difference is the use of gypsum compounds to level the surface, which allow you to apply putty (for example, Fugenfüller) according to the technology, following the manufacturer’s instructions on the thickness of the application layer.
Basically, large differences are plastered with Rodband or similar compounds, but if the application layer disappears or less than 5 mm. then you must definitely use materials such as gypsum putties, they are excellent and will not disrupt the technology of plastering the walls.
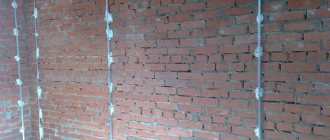
The installation of beacons makes it very easy to level the walls. Beacons are installed strictly vertically and secured with gypsum mixture. Horizontal alignment occurs similarly. Here you also need a rule. By performing this procedure, you can achieve perfect leveling of the surface; the quality of the work is checked by a level. Read more about plastering for lighthouses. Most often, it is carried out in rooms where the initial leveling of the surface of walls that have a lot of shortcomings is carried out.
Types of putties
The classification of putty mixtures is diverse and includes many options. For example, the specific type is determined by the raw materials. In other cases, the criteria vary depending on the purpose, composition, and readiness for use of the product.
By purpose
Depending on the specific purpose, putty is usually divided into three main classes:
- starting;
- finishing;
- universal.
According to their intended purpose, ready-made putties are divided into starting, finishing and universal.
These types differ among themselves in the degree of granularity of the materials used.
Starting
The main purpose of starting wall putties is to level surfaces. The magnitude of the differences can be from 10 to 15 mm. Starter mixtures have the largest granules among other varieties. Minor cracks are filled using starting putty. The thickness of the layer varies widely - from 3 to 20 mm.
It is recommended to apply the starting putty in two layers.
The task of the starting putty is to cover large surface imperfections and level it
Finish
Unlike the starting mixture, finishing putty creates a smoother surface due to its fine grain. Therefore, it is not suitable for repairing cracks. Experts advise applying the composition in two layers. For painting, it is better to choose a material with particle sizes of 100 microns.
Finishing putty is used to bring the pre-leveled wall to perfection.
Universal
Using a universal putty, you not only level the surfaces, but also create a smooth coating. The mixture can be applied in two layers, as is the case with plaster:
- starting (basic);
- finishing.
If there are very large irregularities on the walls, it is advisable to buy two separate mixtures.
Universal putty is suitable for any stage of work on wall or ceiling surfaces
Specialized
Specialized compounds are created to solve specific problems:
- processing joints between panels or sheets of drywall;
- as a replacement for reinforcing tape;
- sealing breathing cracks.
This is the most durable and reliable type of putty, since manufacturers use only high-quality and safe raw materials.
By degree of readiness
Construction materials are sold at retail outlets in the form of ready-to-use or dry mixtures. Putties can be distinguished from each other by various criteria - cost, composition characteristics, etc.
Dry mixes
Dry putty is a powder that is pre-diluted with water and stirred until the desired consistency is obtained. The material is packaged in cardboard bags weighing 5-25 kg, convenient for storage and transportation. The cost of dry wall putties is much lower compared to ready-made products.
Dry putty mixtures are inexpensive and have a long shelf life
Ready-made formulations
This is a liquid mixture of a certain consistency, which is made on a latex, dispersion, polyurethane base. The composition is packaged in different containers:
- banks;
- buckets;
- tanks.
Ready-made formulations are sold in buckets or large tanks
This type of material is stored much longer than prepared dry powder. The finished mixture has high rates of plasticity and adhesion.
If the solution remains, it is enough to seal the container hermetically, and later the putty is still suitable for use.
By composition
Depending on the composition of the wall putty, the material comes in several types. Some mixtures are widely used, while others are used extremely rarely.
Plaster
Gypsum putty is a good solution for finishing walls with plasterboard. The composition is suitable for sealing joints between gypsum plaster boards or sheets and filling cracks and crevices. Based on their purpose, gypsum putties for interior work are, in turn, divided into separate types:
- starting;
- finishing;
- universal.
Gypsum putties are divided into starting, finishing and universal
The capabilities of gypsum-based building materials are limited by their ability to absorb moisture. Therefore, the composition is only suitable for indoor use - facade finishing is prohibited.
Cement
In the manufacture of cement putties for walls, the strongest cement grades M400 or M500 are used. The filler is river sand with a minimum content of impurities. In addition to the starting and finishing compositions, other mixture options are produced:
- façade;
- basement;
- thermal insulation;
- decorative.
Types of cement-based putties
Depending on the specific purposes, other components are added to cement - gypsum, lime, polymers. Cement putties are suitable for external and internal work.
Polymer
Polymer-based compositions include different types, depending on the main component:
- Acrylic is a universal putty for interior and exterior use. The finished coating is smooth and has a mirror shine.
- Latex is the best choice as a finishing coating. The permissible layer thickness is up to 3 mm, otherwise the surface will begin to crack.
There is another type of acrylic-based putty - putty. The material is used when laying ceramic tiles in dry rooms. Using putty, surfaces are leveled after plastering.
Polymer putties include mixtures made on latex and acrylic bases
Water-dispersed
This is a type of gypsum cement mixture, only the mixing is done differently. Water-dispersive putty is packaged in buckets. Due to its high viscosity, the mixture is easily applied to walls.
Adhesive
The building material is made from a combination of three main components:
- glue (10% of the total volume);
- chalk;
- drying oils
Components of adhesive-based putty
The composition is suitable as a finishing coating to prepare the surface for painting. Adhesive putty has high elasticity. After the putty has dried, the surface can be easily sanded.
Oily
The composition of the oil material includes drying oil, driers, and chalk. The putty is suitable for preparing window and door openings. If you plan to finish with oil paints, it is better to choose a putty based on the same name.
Oil putties are successfully used both for interior work and for leveling facade surfaces.
There is an oil-adhesive option, which includes water, acrylates, drying oil, plasticizers and other additives. The putty is suitable for processing wood and concrete. But due to the specific smell and poor quality, the oil-adhesive composition is no longer used.
Based on PVA
The putty contains antiseptic additives, so the coatings are not afraid of either mold or fungi. The composition is used to level asbestos-cement and concrete surfaces. PVA-based putty is compatible with plastered surfaces, including sheets of plasterboard.
PVA-based adhesive putties are intended for interior finishing work.
What does a person without experience need to putty walls with their own hands?
To putty the walls, it is necessary to select materials and tools, without which it will be difficult to complete the work. Don’t be afraid to buy them for future use: if you don’t use them at the current stage of renovation, then you will definitely need them later.
Materials
You don't need a lot of materials to putty walls. But it’s better to buy them right away, so you don’t have to waste precious time going to the building materials store. Main positions:
- There are two types of putty – starting (rough) and finishing (finishing).
- Primer. Experts recommend buying a primer composition containing antiseptic additives. Its use helps prevent the emergence and growth of colonies of microorganisms under the wallpaper.
- To treat a plasterboard wall, you need to purchase a sickle mesh. It is needed to reinforce joints between sheets.
- Wallpaper. There are no special recommendations here - this is your personal choice.
If there are large irregularities, differences, chips, sinkholes or other defects on the wall, it will be necessary to prepare a repair compound. The variant of such a mixture is selected depending on the situation, but most often a cement-sand mortar or a special polymer putty is used.
Tools
To putty walls you need a large arsenal of all kinds of tools.
List of main items:
- Spatulas. One or two spatulas will definitely not be enough to carry out this type of work. Therefore, take care to buy several of these tools, and they should have different sizes. They are very inexpensive, so there is no need to skimp on them. However, thanks to them you can make high-quality putty on the wall surface. For the main wall, you can use a regular putty knife, but for hard-to-reach areas you may need other varieties of this tool.
- Tools for stirring the mixture. A special drill-mixer is perfect for these purposes. It can be used to mix concrete or paint, so it is also suitable for plaster. If you cannot buy such a device, you can use a simple drill with a small attachment. But this process will take longer.
- Container for mixing putty. It can be a simple metal bucket but has good capacity. It is not always advisable to use plastic containers, since the bottom may burst while stirring the mixture. But in the absence of another option, you can use such a bucket.
- Tools for applying and distributing primer. The best option is a set consisting of 2 rollers and a set of paint brushes.
- Level. It is necessary for maximum wall alignment, measuring the distance between walls and calculating the size of the room. To reduce hassle, it is recommended to buy a laser level.
- Sandpaper. It will be needed at the final stage, when you need to “clean” the surface to create a perfectly flat surface. You will need several sheets of sandpaper with different grit levels. To make sanding walls more convenient, you can purchase a special holder.
For repair work, it is important to provide good lighting. It is also necessary to acquire protective equipment - a mask and special construction glasses. They can also be purchased at a specialty store.
Popular manufacturers
The modern building materials market contains a rich assortment of putties. These manufacturers offer popular solutions:
- Knauf.
- Ceresit.
- Tikkurila.
- Vetonit.
- Kreisel.
- "Prospectors".
- "Volma".
- Danogips.
- "Basic."
- Gerkules.
- Bergauf.
- V.G.T.
- "Optimist-Perm".
Popular brands of putties
Saving is not the smartest decision. Buying cheap products leads to unnecessary expenses.
How to putty walls with finishing putty
The most difficult task when performing repair work with your own hands is finishing putty on the walls. Often home craftsmen encounter considerable difficulties precisely when preparing a smooth surface for painting or pasting with thin wallpaper. How masters apply finishing putty, and how to avoid failures...
Preparing the surface of the wall and ceiling for finishing putty
The wall must be leveled with starting plaster (putty) to an acceptable curvature. Starting coarse mixtures allow the presence of local irregularities, roughness, depressions and tubercles of 2 mm, with a total difference of up to 4 mm.
But in general, the plane must be leveled according to the given levels, and the leveling technology is based on height beacons, which are pre-fixed to the wall, after which the solution is leveled using the rule based on the beacons. How to level a wall for finishing putty
- After fixing the primary layer, it is grouted, sagging, protruding particles and debris are removed from the surface, and loose inclusions are removed. Usually craftsmen do this with a wide spatula - moving forward they knock down the upper weak layer of particles protruding above the general surface. This significantly reduces the consumption of finishing material and simplifies the work.
- The next stage of preparation is priming the primary layer, i.e. reducing its absorption. True, not all masters prime, for reasons that will be given below.
Applying finishing putty in two layers
The typical technology for applying finishing putty and leveling the walls is in two layers. The fact is that almost any material gives some shrinkage, which with a thickness of 3 mm will be noticeable, and low-quality cheap finishing plasters, which are used in most cases of home repairs, give considerable shrinkage even with a thickness of 2 mm.
- The first layer is preparatory; it fills roughness and chipped voids up to 4 mm deep.
- After fixing it, the last leveling layer with a thickness of 0.5 - 2 mm is applied.
The final finishing and gloss of the surface is ensured first by rough sanding and then by the finest sandpaper.
The first layer of finishing putty is thick, quick-setting
The peculiarity of the first layer of finishing putty is that, when applied, it should be quickly fixed to the wall and not float, curl, or rake after the tool when repeated application with the addition of material. With a thickness of more than 3 mm, this is not always easy to achieve.
Craftsmen usually try to make the solution for the first layer thicker, so that it practically does not pull off the spatula under its own weight. Then the material will shrink less, it will be more difficult to move it from the recesses in the wall, and it will set faster. Repeated leveling strokes after a few tens of seconds will allow the layer to be leveled, rather than removing the already applied composition.
Putty rating
A few decades ago, buyers were faced with a limited range of options. But today the question no longer arises of which putty is best to putty on walls. According to customer preferences, some putties occupy leading positions in the TOP of the best starting, finishing and universal putties.
7 best starter putties
Among the distinctive features of starting mixtures is the presence of large granules in the composition. Putties have a high level of adhesion and strength. The popularity rating includes the 7 best brands.
Danogips Dano Jet 5
Using polymer putty, surfaces are prepared for wallpapering. The mixture after kneading is suitable for use for 3 days. To ensure that the properties of the material are not lost, the temperature should not fall below +13 °C.
Volma Standard
To increase adhesion and provide resistance to cracks, special components are included in the composition of the gypsum putty. The material is packaged in paper bags (20 kg).
The diluted solution must be used within 2 hours. Then the mixture hardens and loses its properties.
Putties: “Danogips Dano Jet 5” and “Volma Standard”
Bolars Facade
Bolars putty is valued by finishers for its resistance to precipitation and freezing temperatures. Suitable for finishing wet rooms. Among the advantages are high rates of adhesion, vapor permeability, and strength.
Founds Ekonsilk
Among the main advantages of putty:
- short drying time – 5 hours;
- low consumption - 0.9 kg/m2 with a thickness of 1 mm;
- good adhesion;
- high plasticity;
- affordable price;
- wide scope of application.
After the putty dries, a durable coating is created that does not shrink. But there is a risk of cracks appearing.
Plasters: “Bolars Facade” and “Osnovit Ekonsilk”
Rusean TT
Plastic putty is suitable for creating a base coat. After treatment, the surface becomes moisture resistant and vapor permeable. The mixture has high adhesive properties. This is the best option for entrances, basements, and bathrooms.
Bergauf Glatte Zement
Bergauf material has high ductility and resistance to cracking. The mixture is suitable for treating internal and external surfaces, including facades. After application, the putty retains its properties under the influence of temperatures within a wide range – from -50 °C to +70 °C.
GLIMS Styro Prime
The putty mixture is created for preparing surfaces for applying decorative plaster. The elastic mixture forms a durable cover, protected from cracks, does not collapse and is resistant to moisture.
Putties: “Rusean TT”, “Bergauf Glatte Zement”, “GLIMS Styro Prime”
9 best finishing putties
To prepare surfaces for painting or finishing with decorative materials, you need to choose a finishing putty for the walls. The most even and smooth surface is created. For comparison, below are compositions that can be trusted among many other types of materials.
Danogips Sheetrock SuperFinish
The material is applied in a thin layer up to 2 mm. The composition is suitable for treating concrete surfaces, plasterboard structures and after using lime plaster.
TEX finishing Pro
The latex finishing material has a soft texture and optimal consistency. With the help of TEKS putty it is easy to carry out not only complex finishing of surfaces, but also local treatment of problem areas (cracks, seams, joints).
Putties: “Danogips Sheetrock SuperFinish” and “TEKS finishing Profi”
Hercules GT-33
Putty "Hercules GT-33" is a good solution for leveling the joints between gypsum plasterboard and gypsum board. The manufacturer produces the material as a dry mixture. When working, it is better to prepare small portions, otherwise the solution quickly loses its elasticity. The small size of the granules (0.3 mm) eliminates the formation of lumps when stirring.
Sheetrock SuperFinish
The putty has very small grain sizes - 0.03 mm. Due to the fine grinding, the smoothest possible coating is created for painting or wallpapering.
Suitable for substrates such as tongue-and-groove slabs, concrete, plasterboard.
Putty: “Hercules GT-33” and “Sheetrock SuperFinish”
Weber Vetonit LR+
The dry polymer mixture Weber Vetonit has no equal in terms of maximum layer thickness among other analogues - 5 mm. In other respects, the putty is inferior to the leaders. First, you need to prepare the solution correctly. Secondly, the powder fraction size does not exceed 0.3 mm. Thirdly, the drying time is long – a day.
KNAUF-Rotband Paste
Rotband vinyl putty contains polymers, limestone, and water. The mixture dries quickly - 5 hours, but the material consumption is a little disappointing - 1.7 kg m2 with a thickness of 1 mm. The putty has high adhesion, does not shrink, and the finished coating does not crack.
Ceresit CT 225
The cement base of the putty allows the material to be used for treating external and internal surfaces. Among the advantages are high rates of plasticity and adhesion, moisture and frost resistance. Due to the inclusion of reinforcing microfibers, shrinkage and cracking of the finished coating is prevented.
Putties: “Weber Vetonit LR+”, “KNAUF-Rotband Paste”, “Ceresit CT 225”
Prospectors "Finish"
The product from a domestic manufacturer belongs to an acceptable price segment. At a low price, gypsum-based putty is of high quality due to the inclusion of modifying components.
The composition adheres firmly to concrete, brick surfaces and plastered surfaces.
KNAUF Multi-Finish
The gypsum composition includes polymer additives and reinforcing fibers. This manufacturer's solution provides an increase in performance characteristics. The maximum permissible thickness of the cover is up to 5 mm when sealing cracks and joints. For continuous leveling – 3 mm.
Putties: Prospectors “Finish” and “KNAUF Multi-Finish”
8 best universal putties
The versatility of the material lies in the fact that it combines the qualities of starting and finishing putty. This allows the composition to be used with relative curvature of the walls. There are also high-quality mixtures in this category.
Prospectors "Fasadnaya"
Putty is suitable not only for finishing the facades of buildings, but also for treating internal surfaces. The finished coating is endowed with frost resistance, resistance to temperature fluctuations, and humidity.
KNAUF – Fugen
The Knauf Fugen gypsum-based mixture performs well in dry and heated rooms. Layer thickness – 1-5 mm. This is a fine powder (0.2 mm), so no lumps are formed when stirring. In order to increase elasticity, polymer additives are included in the putty.
Putties: “Prospectors “Fasadnaya” and “KNAUF – Fugen”
VGT acrylic universal
The putty is sold ready-made. Suitable for both dry and wet areas (bathrooms, showers, etc.), including external surfaces. The maximum permissible thickness is 7 mm, consumption is 1.4 kg/m2, drying time is 24 hours.
Weber-Vetonit JS
After applying the mixture, the surface is ready for painting or wallpapering. Thanks to the polymer base, the durability of the coating is ensured. Due to the lack of water resistance, the Weber-Vetonit JS mixture is used only for finishing rooms where it is dry and warm.
Unis "Blik"
Gypsum putty is suitable for filling large depressions in concrete walls. The thickness of the laid layer varies from 0.5 mm to 8 mm. Due to the gypsum base, this option is not suitable for finishing walls in rooms with high humidity.
It is also not recommended to cover facades with Unis “Blik” putty.
Putties: “VGT acrylic universal”, “Weber-Vetonit JS”, “Unis Blik”
Bergauf Easy Finish
The putty is suitable for exterior and interior use. In addition to walls, the uniqueness of the composition allows it to be used for treating ceilings. Thanks to its high plasticity, the coating is even and smooth.
White House
A composition based on pure acrylate is used to level surfaces inside and outside buildings. White House products are resistant to precipitation and freezing temperatures. Due to its moisture resistance, the mixture is suitable for use in damp rooms - basements, baths, kitchens, bathrooms.
Litokol Litofinish Facade
The putty is made on a cement base, which imposes restrictions on the thickness of the layer - no more than 2 mm in one pass. The material is able to adhere to concrete and brick bases for a long time. It is not recommended by the manufacturer to treat gas silicate blocks and foam concrete with the composition.
Putties: “Bergauf Easy Finish”, “White House”, “Litokol Litofinish Fasad”
Putty techniques
Builders distinguish between three types of work, each with its own strengths and weaknesses.
Mechanized putty
It is applied with special airless application devices (putty stations). A very fast method, due to the strong impact of the mixture on the wall surface, maximum adhesion is ensured. The disadvantage is that you need to have complex equipment. It is not economically profitable for non-professional builders to buy it to repair only their own home.
Mechanized putty
Semi-mechanized
The putty is applied using an ordinary compressor and a texture gun. The speed is inferior to mechanized, but much faster than traditional manual.
Using a compressor
Using the Texture Gun
Classical
Various spatulas and trowels are used, and the master applies the putty on the wall in sections with his hands.
Using hand tools to putty walls
Puttying walls by hand
The third technique is the most common and accessible to beginners; we will dwell on it in detail.
Which putty to choose
The decision which putty to choose for walls must be made based on the type of base and operating conditions. For walls of rooms with a humidity level from 40 to 60%: any mixture is suitable:
- living rooms;
- hallways;
- home offices;
- bedrooms;
- children's rooms.
It is advisable to finish the bathroom with a cement or acrylic composition.
For the bathroom it is better to choose cement or acrylic plaster
For the ceiling, it is better to choose an acrylic-based mixture, but gypsum putty will do. It is better to buy a gypsum or polymer mixture for painting. For wallpaper, any of the cheap cement analogues is suitable.
How to properly apply putty on a wall
Before you start puttingty, prepare your tools. The list looks like this:
- construction mixer or drill with a kneading attachment;
- a large spatula about 30 centimeters long;
- small spatula 5-10 centimeters;
- angular spatula;
- rollers and brushes;
- sandpaper;
- stepladder or other device for working on the upper sections of the wall.
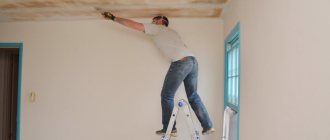
Even if we covered the wall with starting putty, it must first be primed for better adhesion. Next, you can use two methods of manually applying Knauf Rotband finishing putty.
The first method is to apply a small amount of mortar onto a large one with a small spatula, which is then applied to the wall from the bottom up. A wide spatula is pressed tightly against the wall and several repetitions of movements are carried out on each area of work. Remember that your goal is to create a smooth surface without scratches or changes.
Next, the remaining finishing putty is dumped back into the bucket. This is how each subsequent layer of Knauf Rodband finish is applied to the previous one. And at the same time, they carefully smooth out irregularities and sagging.
What affects putty consumption?
Each mixture has its own consumption rates per 1 m2 with a layer thickness of 10 mm. But this is only an approximate value - in real conditions the figures may be higher. First of all, the presence of irregularities affects. During operation, part of the solution remains on the walls of the container or falls onto the floor. More material is removed when grouting and sanding the walls.
The employee's skill level also plays a role. Experienced craftsmen will not allow too thick a layer to be laid - the consumption per m2 will be within normal limits. Beginners run the risk of overusing the mixture.
The consumption of plaster depends on the quality of the surface on which the solution will be applied and the technical characteristics of the mixture
List of tools for work
We will give a list of the most necessary tools for applying putty to various surfaces.
Tools for work
Important. Beginners are strongly advised to purchase only high-quality tools.
The fact is that the higher the quality, the easier it is not only to work, but also to study. Crooked and rough spatulas make it very difficult to apply putty even for experienced professionals, let alone beginners. The material is permanently glued not to the wall, but to the surface of the spatula, does not flow, the tool leaves behind noticeable marks, etc.
Currently, most craftsmen are switching to polymer putty; it is more expensive than usual, but significantly increases labor productivity. Due to this, the increase in cost has almost no negative impact on the construction estimate. What needs to be prepared for puttying?
- Spatulas. There must be at least two: a wide one with a length of 30 cm or more and a narrow one with a length of 5–10 cm. The length of a wide spatula can reach 50 cm, it all depends on the skill of the performer and the characteristics of the wall. Using a short spatula, the material is applied to a long one, and the latter stretches it along the wall. It is not recommended to buy spatulas with a narrow blade; little material can be placed on them, you have to add it often, and this requires time and extra effort. Spatulas can have straight and shaped handles, parallel or semicircular side edges.
Large and small spatulas - Ironers. The tools are much more convenient for work; the sizes and shapes of the handles are different. But learning to work with such tools is difficult; you can switch to them if you have practical experience. You will feel more or less confident after puttingtying 150–200 m2 of surface. Instead of a trowel, you can use a spatula for mechanical application, but this is a rather expensive tool.
Plastic smoother
Additional tools for wall putty
Technical characteristics and certificate of conformity
Based on the type of base being processed and the location of the work, putties differ from each other in a number of indicators. Among the main technical characteristics:
- release form;
- elasticity;
- strength;
- permissible duration of use of the finished putty;
- consumption;
- layer thickness;
- drying time;
- maximum temperature limit for use;
- best before date.
A certificate of product quality conformity is issued for the finished solution, as well as for the dry mixture. This is done voluntarily at the initiative of the seller or manufacturer. Putty is not a product that is subject to mandatory certification.
All plaster mixtures must have product quality certificates of conformity
Starting putty
Performed with a rough starting material, such putty is necessary to eliminate all defects on the wall, the layer thickness can reach 1.5 cm. Several layers need to be applied. The Vetonit series of mixtures is perfect.
The main thing is that each layer must dry thoroughly before applying the next one; this is the basic rule in repairs!
To get the best possible result, you can use a painting net over which you will distribute the putty. Thus, the surface will be more durable and smooth.
Features of mixture preparation and application
Not every putty needs to be prepared - only dry materials need to be diluted. First, the container is filled a quarter full with water at room temperature, then the powder is carefully poured in. Wait about 30 seconds for it to soak and settle to the bottom. Then the mixture is stirred with a construction mixer or an electric drill with a special attachment. Wait 2 minutes and mix again - the solution is ready for use.
Technology for preparing plaster composition
There are no difficulties in application technology. First, a layer of starting putty is laid to cover all existing defects. Next, a finishing material is applied to final level the surface.
Plaster - types, scope, purpose
The main purpose of plaster is to level the geometry of wall and ceiling bases in order to eliminate unevenness or defects. It is used for rough finishing. The application technology allows the mixture to be applied in a thick layer in case of large deviations. By plastering the walls in the apartment, you can get the most even foundations.
According to its composition, plaster can be of the following types:
- plaster;
- cement.
- limestone;
- lime-cement;
- lime-gypsum;
- gypsum cement.
The most important difference between them is the drying time of the solution. Gypsum mortar requires up to a week to dry completely, cement mortar will take about a month. Therefore, compositions with cement should be used in cases where it is necessary to achieve maximum durability.
This coating will last for several decades. Modern manufacturers introduce polymer additives into the mortar mixture, which speed up drying by up to two days. The cement mixture is used to level surfaces in basements or to lay tiles.
The process of leveling walls with plaster with your own hands is quite labor-intensive, so gypsum solutions are often used. With gypsum compositions, it is important to maintain humidity conditions. Gypsum plaster can be applied in one layer, which significantly saves the budget. Finishing is carried out both on a brick base and on wooden surfaces. To achieve perfect smoothness, the coating should be puttied after the plaster has dried.
It is important! In conditions of high humidity or temperature changes, you should abandon gypsum plaster in favor of cement.
For beginning craftsmen, cement plaster with polymer additives is better suited for walls. Video tutorials will help you understand and painstakingly complete the entire process in compliance with the technological sequence.
Dry mixes
Plaster, putty - similarities and differences
A person who is far from understanding construction terms will at first glance decide that these are synonyms for one type of construction work. In fact, these concepts have both similarities and significant differences. Both materials are intended for leveling surfaces, but this is where the similarity ends.
Related article:
Plaster and putty - what is the difference and common features, in what cases should they be used, recommendations from specialists - read about this and much more in our review.
putty
Manufacturers offer a dry composition or a ready-made plastic solution. Cement, gypsum and polymers are added as binders. Using putty, you can smooth out small surface defects and make the base smooth after plastering. For cracks up to 10 millimeters in size, a starting composition is used. Finishing putty is used for final leveling of surfaces.
You cannot mix starting and finishing putty. Compositions of different homogeneity can form additional defects on the substrates.
Surface putty
Plaster
Using plaster, you can level surfaces with deviations of up to 15 centimeters. In addition, it acts as thermal insulation of surfaces, in some cases additional moisture protection.
Plaster can be ordinary or decorative. The composition contains large grains. It is used as a rough leveling or finishing structural coating.
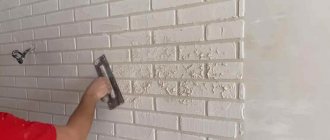
When applying putty and plaster, different technologies are used. For plaster this happens as follows:
- The first layer is applied using the spray method, which hides large surface defects. In addition, it serves as additional adhesion to subsequent layers;
- the implementation of the middle layer ensures the leveling of surfaces;
- finishing putty or coating – finally smoothes the base.
Decorative mixtures are applied using individual technology. The plaster composition needs several days to dry completely, the putty is ready the next day.
Plastering bases
Useful recommendations for choosing
It is better to choose putty of the same brand as the other finishing materials. This allows you to achieve compatibility and the desired adhesion. When choosing putties, consider the purpose of the composition. The mixture for leveling the walls is not used for finishing.
Experts recommend purchasing finishing materials from the same brand.
Do not discount the operational conditions of using materials. For rooms with high humidity levels, it is worth selecting a composition that is appropriately labeled. Temperature indicators are also important, since not every putty can withstand frost.
Putty is in many cases a mandatory procedure in repair work. If the walls are initially flat or covered with sheets of plasterboard, you still cannot do without putty.
Preparing the composition for putty
For puttying small surfaces and minor repairs, you can buy a ready-made prepackaged mixture. But if we are talking about a complete renovation of an apartment or house, then its use is not economically profitable.
The dry mixture is cheaper, and it’s not difficult to prepare the solution yourself. It is only important to take into account some nuances.
- the finished putty is consumed within half an hour after preparation;
- it must be kneaded strictly according to the instructions, adding the powder to the water gradually;
- for stirring it is convenient to use a construction mixer or a drill attachment;
- Now that everything is ready, let the solution sit for a few minutes before starting to work.
To prepare the solution, it is most convenient to take a plastic container.
Level the walls in two steps. First, a layer of starting material is applied. This putty mixture has a deep structure, due to which it removes particularly large differences.
When the material has dried, finishing putty is applied to it. It is this that, when dry, makes the surface smooth and suitable for further work.
Material selection
What finishing putty is better to putty on walls? Based on its composition, putty can be divided into: gypsum, acrylic, cement. Let's pay attention to considering the positive and negative aspects.
- Gypsum composition. It has an affordable price, good recommendations during the work process, and no shrinkage.
- The cement included in the composition shows excellent resistance to moisture, but significant shrinkage occurs over time.
- Polymer products. They have a lot of advantages: they are resistant to moisture and do not shrink. The treated walls are of high quality. An excellent option to consider for those who are wondering how to level walls with finishing putty and are looking for quality materials. The only disadvantage is the cost of putty.
There is also a division by purpose.
- Starting mixtures. They are distinguished by their strength, excellent adhesion characteristics, and coarse grain size. Suitable for correcting uneven walls.
- Decorative. Application is recommended to obtain a perfectly flat surface with correction of minor unevenness. The strength is also quite high, the work process does not cause problems.
- Universal. The product combines leveling and decorative properties. Their cost is slightly higher, although they are inferior to the coatings described above. Use is recommended for eliminating minor wall imperfections.
On the modern market you can purchase both dry mixtures and those already completely ready for use. The dry product is more attractive due to its cost and the possibility of longer storage.
Ready-made material is, of course, more convenient to use. You won't have to knead it, making the process faster and cleaner. However, such putty can cause significant shrinkage.
Important Rules
When working to level walls, you must adhere to the following rules:
- Puttying is carried out on strong, solid bases.
- The base must be absolutely clean.
- The putty is applied after priming the surface to create an adhesive effect.
- Apply layers using a wide spatula.
- For large uneven areas, apply another 2-3 layers.
- Each layer should be given time to dry thoroughly.
- You will have to putty the walls for wallpaper three times, and up to 5 times for painting.
- The finishing putty is applied with a thin primer layer.
- After the last layer has completely dried, be sure to sand the wall with fine-grained sandpaper.
“In everything big there is gradualness, not suddenness and instantaneity!” - the great poet and philosopher Goethe once remarked. This principle must be adhered to when puttingtying walls, this is a prerequisite: apply a layer - wait until it dries completely! Otherwise you won't get a masterpiece. The wallpaper will bubble and become covered with dark spots, moving away from the wall and hanging from the ceiling. The paint will lie in uneven stripes, swell and crack in the very first weeks after painting.
Puttying walls with your own hands is not a difficult task, as it might seem at first glance. The small but very useful video tutorials from professional craftsmen below will help you use the tools correctly and apply layers.