A strong and durable material, such as PVC panels, does not fade or wear out during operation; it is used for finishing interior and exterior work.
The most common question when installing PVC panels is: is lathing necessary and how to do it?
Possible shapes and textures of PVC panels
The sheathing is the supporting structure on which the panels are installed. Installation of panels and installation of sheathing are two integral processes. The reliability and aesthetic appeal of the finish depends on the quality of its installation. Its installation is very simple and does not require additional forces, and will help the facing materials resist in a humid room and in an environment with sudden temperature changes. It will prevent deformation of the panels and preserve them for re-installation.
Types of sheathing
- The sheathing is made of metal, wood or plastic. The material is carefully selected. If it is a tree, then it must be dry, without knots, cracks, fungi or other damage. However, such sheathing is not strong and durable. This material is subject to deformation and is never installed on the ceiling.
- Plastic slats are a more reliable material. Plastic does not deform or rot; it is usually sold together with clips and PVC panels for laying cables.
- Metal profiles are recommended for use in rooms with high humidity.
Self-installation of the ceiling
Having weighed all the pros and cons, we come to the conclusion that you can only make bathroom ceilings with your own hands using plastic panels. The photo shows that its design is quite elementary, and consists only of a frame and the panels themselves.
Suspended and suspended ceilings require not only specific equipment and materials, but also special skills. Therefore, let us first consider the issue of a ceiling made of plastic profile panels.
Read more about installation of this type in the instruction article: Do-it-yourself slatted ceiling.
In principle, its installation is elementary:
We fix guide rails (plastic or special metal) on the walls
It is important to align them at the same level. Often, home craftsmen attach slats along the perimeter of the walls directly below the ceiling
This technique allows you to quickly adjust the levels, but it is worth remembering the need to fit lighting elements under the ceiling.
After securing the slats around the perimeter, you also need to attach intermediate guides (stringers) to these slats, on which the panels will be attached. The distance between these guides is usually made from 70 to 100 centimeters.
When the stringer sheathing is ready, take care of the electrical wires for lighting in advance.
Start of construction of our ceiling in the bathroom - we begin to attach the panels to the sheathing. This is done quite simply: either by simply screwing the edges (at the attachment point) onto self-tapping screws, or using special metal brackets specifically designed for this purpose
It is important that the panel that falls on the stringer mount is attached last, because in this case we will have the opportunity to “level” the ceiling in height
When installing panels with your own hands, do not forget about lighting and wires. It is better to make holes for recessed lamps as you install the panels and route the wires into them. Holes in PVC panels can be made either with a sharp knife or with a special drill attachment
To cut the panels, you can use a regular hacksaw.
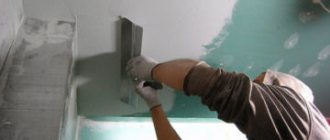
How to install plastic panels
When all the panels are installed, it is advisable to glue and seal the plastic corners at the corners. This will hide the gaps between the walls and ceiling in the bathroom, and also prevent moisture from entering.
Following this step-by-step sequence will allow you to sheathe the surface with the highest quality possible.
For more details, see photo and video materials on our website, which will help you not only choose the material that is suitable for you, but also install it yourself.
https://youtube.com/watch?v=Pw0ghJE6QdM
finishing bathroom walls with tiles and plastic panels
Design Features
Lathing for PVC plastic can be made from one material or in a combined way. Also, frames can be fixed only to the ceiling or to walls and surfaces. The choice of installation method depends on the characteristics of the room:
- Wooden and plastic frames are used when attached directly to the floor slab, when it is flat and there is no need to take up space.
- The design of metal profiles is used in cases where a large area is sheathed with PVC plastic and a significant mass of the material attached to it will affect the sheathing.
- A combined structure is installed when there is a need to lower the ceiling level in order to hide certain elements or defects in the floor slab.
Modern bathroom design
Types of snow guards and do-it-yourself installation
A plastic ceiling in the bathroom will probably be the most practical way of finishing. And today it is also the most popular type. What are plastic panels? This is a material that is not at all afraid of moisture. And even if water falls directly on it, nothing will happen to it. They are used both on the ceiling and on the walls.
The ceiling panels are attached to the assembled box, so the ceiling is suspended. And this is currently fashionable. Get to know this species better. Moreover, there is a huge variety of design solutions. Such panels can be chosen to suit absolutely any style and interior, since plastic truly knows no boundaries.
Pros and cons of plastic panels
Each material has its own advantages and disadvantages. Same with this material. What are they? Positive aspects of finishing with plastic panels:
- if you have a crooked ceiling, then this material will hide it;
- thanks to the frame, it will be possible to hide wires, communications and more;
- you can easily install lamps and lighting;
- The installation process, unlike other materials, is quite simple;
- installation is done using ordinary tools;
- as already mentioned, good moisture resistance;
- if something breaks somewhere, the panels can be installed again;
- inexpensive cost of this material.
There are also some downsides. Here they are:
- plastic panels are plain, and therefore if you want to see something with a colorful pattern on the ceiling, then they will not suit you;
- it is impossible to build with several levels;
- if the bathroom is small, then with them it will become even smaller, since they cut off the height of this room;
- After installation, you can see the seams between the panels.
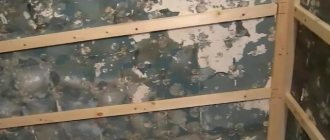
Preparing for work
Well, if you still decide to install a plastic ceiling in the bathroom, then use this article. The first thing you need to get started is to carry out the preparatory work:
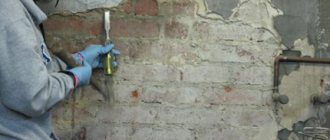
- if you still have old coating on the ceiling in the room, then it needs to be removed;
- An uneven ceiling should not be leveled;
- Be sure to treat the ceiling slab with an antifungal agent:
- draw a line for finding the future ceiling on the walls using a building level.
Creating a box for panels
Along the drawn line, you need to attach a UD profile (2.5 * 2.5) to the walls. For these purposes, take a dowel. Advice. Before you start making holes, check your bathroom walls and ceiling to make sure there are no hidden wires. It often happens that wires are hidden in the walls, so to avoid electric shock, be sure to check this.
Next, insert the ceiling profile into the guide and tighten it with self-tapping screws. The profiles should be attached to the ceiling with hangers so that the frame does not sag. Be careful that the horizontal of the ceiling must be level.
When the box assembly is completed, begin installing hidden wiring (as mentioned earlier, it can be hidden in the walls). It is better to deal with built-in lamps along with the installation of panels. The slots for them are made in the panels themselves using a drill with a crown.
The final stage of installation
A plastic plinth should be screwed onto the main profile. The panels will be attached to it. The very first one should be inserted with a shelf into the groove of the baseboard and secured with a self-tapping screw with press washers. The following panels are made using the same method, only their shelves are inserted into the slot of the previous panel. To prevent seams from being visible between them, you should press them tightly together. If the last panel does not fit, then it should be cut to width.
Advice. The final panel can also be inserted in this way: the panel footage should be two millimeters less from the wall interval to the beginning of the opposite profile. Insert one side into the corner of the wall, and the other will need to be moved a little. To connect the final panel, place tape on it and move the groove into the middle.
If there are small gaps, seal them with sealant. You can make a plastic ceiling in the bathroom yourself. To do this, you will only need your initiative and attentiveness. If you doubt yourself, trust the experts.
Material used for installation of sheathing
Since the lathing performs two main tasks - the basis for fastening the panels and creating a flat surface for them, the material for it must be strong, stable and durable. Today, the construction industry offers fasteners in order to mount the ceiling sheathing under plastic panels made of:
- Tree.
- Become.
- Plastics.
Each of them has its own pros and cons. More about this. Wood is the most popular material for making ceiling lathing under PVC panels. This material has proven itself over many years of use. The tree is characterized by:
- strength;
- durability;
- pliability and ease of processing.
With appropriate processing - resistance to rotting, burning and mold. The negative qualities of wood include its ability to change shape when drying. Considering that the PVC panels are attached rigidly to a wooden frame, if the rail moves, this will cause the surface of the plastic to bend. Steel profiles are a great success among builders due to the positive properties of this material, such as:
- high strength;
- durability;
- possibility of manufacturing structures of any complexity.
The disadvantage of steel products is their lack of resistance to corrosion, which in damp rooms can lead to the appearance of dirty streaks on the plastic. Cost is also not the least important. The ceiling lathing for plastic panels, made of plastic, is characterized by:
- precision of forms;
- possibility of use for laying electrical wires;
- immunity to corrosion, rot and mold.
Plastic profiles have a fairly high cost and a narrow range of applications. In addition, they will not be able to withstand heavy weight.
Bathroom ceiling installation
Facade panels. Types of facade panels
In order to make your own ceiling in the bathroom we will need:
- Drill or hammer drill
- Hacksaw for metal
- Sharp knife
- Dowels, self-tapping screws with press washer
- Metal profile for suspended flows 2.5 cm by 2.5 cm (UD profile) and 2.5 cm by 6 cm (CD profile)
- Plastic panels
- Starter strip or ceiling plinth
- Level
- Suspensions
Installing a ceiling made of plastic panels is a fairly simple process and does not require any special practical construction skills. Here we will tell you step by step about the installation technology, and you will see that doing it yourself is not only possible, but also quite easy (see Plastic lining for the ceiling: installation features)
Frame installation
- Finishing the ceiling in the bathroom with plastic panels, like any work, begins with preparing the room and marking the future ceiling. It is advisable to remove everything unnecessary from the room - it can interfere with work. To mark the frame, you need to measure the level around the perimeter and draw lines on the wall where the new ceiling will begin (see Frame for a plasterboard ceiling: design features)
- Cut the UD profile to the length of the walls, having previously measured the required length with a tape measure, drill holes in it in increments of 50 cm for the dowels.
- Having placed the profile against the wall according to the marks made, drill holes in the wall at the fastening points. Securely fix the profile to the wall with dowels.
Fastening the guide profile
- We cut the CD profile to the required length or width of the room. It is necessary to take into account that plastic panels for the bathroom are attached perpendicular to the direction of the profile. Then insert it into the guide profile, the distance between the supporting profiles should be at least 40cm.
Support profile
- If the profile is more than 1.5 meters long, to add rigidity to the structure, fix it to the ceiling using metal hangers. Also, the profiles at the insertion points should be screwed together with self-tapping screws
Suspension mount
- When the frame is ready, you can proceed directly to installing the plastic panels.
Panel installation
- Before installing the panels themselves, it is necessary to install a starting strip around the perimeter with screws to the guide profile.
Installation of the starting rail
Instead of a starting rail, you can attach a ceiling plinth
Ceiling plinth and self-tapping screw with press washer
Ceiling plinth and self-tapping screw with press washer
- Plastic panels (see DIY plastic ceiling in the kitchen) for the bathroom ceiling should be cut to the required size, insert one end into the starting rail and, bending it slightly, install the other end. Lightly press it against the wall and fasten it with screws and a press washer.
Installing the first panel
- Subsequent panels are mounted in the same way, pressing against the previous one. It is necessary to ensure that the panel fits equally along its entire length. Do not overdo it with the pressing force, because the material is quite fragile and can easily be broken.
Panels are mounted end-to-end
- The last panel is cut to length with a knife and fixed by inserting into the starting strip. It is not necessary to screw it.
Last panel
- All that remains is to remove traces of our work process, and the room is ready for use.
Installation of lamps
- Before installing plastic panels on the bathroom ceiling, take care of the future brightening of the room (see Ceiling lights for the bathroom: types and installation). After installing the frame, run the wiring to all proposed fixtures. It’s better not to spare the wire and leave the “tails” longer; the excess can always be cut off. The wiring should preferably be double insulated and additionally protected with a plastic corrugated hose. Immediately check its functionality.
- Having reached the place where the lamps should be, mark and make a hole of the required size
Can be cut with a regular knife
- You can immediately install the lamp and screw the plastic panel into place
Lamp installed in a hole
- Pull all the wires through the holes and finish installing the ceiling
Finished ceiling
- Connect power to the lamps using terminal blocks and install the light bulbs
Installation of hangers and UD profiles
To hold the sheathing under the plastic panels on the ceiling, hangers and UD profiles installed along all walls are used. In some cases, elements of this type are already equipped with holes every 30 cm: if they are not there, drilling is carried out independently.
Description of installation work:
- Apply linear markings using 300 mm increments along the perimeter.
- Make holes for dowels in the wall. It is better to drill directly through the profile.
- On concrete or brick walls, 60 mm dowels and 50-70 mm long self-tapping screws are suitable for fastening. On surfaces where the plaster layer is not very strong, it is advisable to use longer screws and dowels (90 mm).
- On bases made of limestone or foam blocks, you can get by with 50 mm self-tapping screws without dowels.
Installation of PVC panels on the bathroom ceiling
Installation of plastic panels in the bathroom from A to Z
PVC ceiling panels for the bathroom have a tongue on one side and a groove on the other. This is done to ensure reliable pairing of adjacent plates with each other. There are two types of ceiling panels for the bathroom:
- Suture
- Seamless
They differ in the structure of the panels. The first ones repeat the relief of a wooden lining or a house block. Seams or profile bends are preserved between the panels at the joints. In the second option, the joints are practically invisible, thanks to the precise fit of the tenons into the grooves of adjacent panels.
Direct hanger for plasterboard ceiling
Bathroom ceiling panels are mounted on a frame installed on the existing ceiling. At the same time, if the use of built-in spotlights is intended, then the height of the frame is lowered by at least 10-12 cm from the ceiling.
PVC panels for bathroom ceiling
After priming, the lighting wiring is installed and the places for attaching spotlights or a closed lampshade are marked.
Rules for installing PVC panels on the ceiling in the bathroom
The installation technology involves performing strictly defined actions:
- Marking the level of the future ceiling and frame elements
- Installation of frame on walls and existing ceiling
- Installation of the guide angle.
- Installation of PVC ceiling panels
Installing ceiling panels in a bathroom will require the bare minimum of tools. Probably everyone has an electric impact drill or a hammer drill with a 6 mm drill bit for concrete. Hammer, screwdriver or Phillips screwdriver, sharp knife and hacksaw, meter ruler and pencil with tape measure.
Attaching the guide angle to the profile
To more accurately mark the horizontal plane under the ceiling panels in the bathroom, it is recommended to use a laser level and painting thread (cord with blue in a box). Having such tools (you can rent a level) you will mark without errors.
A bathroom is a room with a high moisture content, so it is not recommended to use wooden beams for a frame under the ceiling in a paneled bathroom. A galvanized metal profile and U-shaped hangers for plasterboard ceilings are ideal for these purposes.
A PVC ceiling panel is placed in this place
The frame elements are fastened to the walls and ceiling using dowels and self-tapping screws (recommended size 6 x 40 mm). The frame profiles and hangers are connected to each other using galvanized 12 mm self-tapping screws.
To mark with a laser level, the device must be secured to the wall using a dowel, leaving the required distance from the ceiling. The horizon is established using a bubble level built into the device.
Once turned on, the laser beam will draw a horizontal line along the perimeter of the room on the bathroom walls. They mark it with a pencil and connect them with painting thread. On the ceiling, using a tape measure and a 1 m ruler (a short aluminum level is recommended), lines parallel to two long walls are drawn at intervals of 600 mm.
The wall profile UD-27 is fastened along the line on the walls. Along the lines on the ceiling with a pitch of 600 mm, U-shaped suspensions are attached to the ceiling. The ceiling profile TsD-60 is mounted to them with self-tapping screws to the required height.
A PVC guide corner is attached to the wall profile along the perimeter with self-tapping screws. It has a groove into which the ceiling panels are inserted. In turn, PVC panels have a tongue and groove for tight joining with each other.
Attaching the plinth to the guide angle
For a paneled ceiling in a bathroom, the panel is cut to size using a hacksaw. The plinth is inserted into the groove of the guide plastic corner with the tenon facing the wall. Through the tenon and the wall of the groove, the panel is secured to the metal frame with a self-tapping screw and a press washer.
The second panel is inserted into the groove of the first and pressed tightly until the gap between them is eliminated. The operation is repeated until the last panel is installed. Usually it has to be cut to width. When the ceiling panels are installed in the bathroom, the ceiling plinth is attached. To do this, there is a tenon on the PVC wall corner and a groove on the baseboard. It must be pressed tightly until the gap between the ceiling plate and the baseboard is eliminated.
Other options
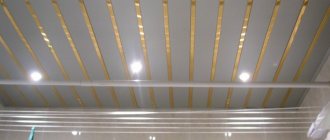
Cellular lathing made of galvanized metal profiles
Also, to cover the ceiling with plasterboard, a cellular sheathing can be used, as in the top photo - the cell size here is 60x60 cm (in the center of the profile). But this option is not popular among professional finishers:
- firstly, the cell size does not fit the parameters of the ceiling gypsum board (1200×2500 mm);
- and, secondly, more material will be needed here, therefore, the total price of the arrangement will be an order of magnitude higher.
Profiles can be expanded
Sometimes the room area is large, and the length of the CD, which can be either 3m or 4m, will not be enough. In such cases, the profiles are extended using special connecting inserts, as shown in the top photo.
But in such situations, a suspension is installed on both sides of the joint and the fixing “fleas” pass through the profile and the insert simultaneously.
Wooden slats instead of metal profile
In addition, the lathing under the PVC panels on the ceiling may not be metal, but wooden, as shown in the top photo. Here, in fact, a rail of any section can be used, but, as a rule, a thickness of 20-25 mm with a width of 40-50 mm is used.
Lathing on stands
Also, the wooden sheathing can be leveled with stands, photo above. However, this requires a flat ceiling. In addition, this installation method takes more time.
How to install a ceiling from panels
Let's look at how to make a plastic ceiling in the bathroom with your own hands, without the help of professional installers.
Preparatory activities
Before you begin installing a plastic ceiling in the bathroom, you need to carry out preparatory work:
- If there is an old coating on the ceiling in the bathroom, it must be removed.
- There is no need to level the crushed slab, but if there are layers of crumbling plaster on it, they should be removed.
- It is recommended to treat the cleaned ceiling slab with deep penetration primer, which has an antifungal effect. The primer is applied with a roller in two layers.
Marking
It is necessary to outline a line on which the new plastic ceiling will be located. The amount of indentation from the ceiling slab depends on how the under-ceiling space will be used. If you don’t plan to install anything there, then you can step back by 4-5 cm. When installing lamps and laying communications under PVC panels on the ceiling in the bathroom, you should make an indent of such a size that you can arrange everything you need without any problems.
Frame construction
- A UD profile measuring 2.5 by 2.5 cm is attached to the walls along the intended line. Dowels are used for fastening.
- Now you need to take the ceiling profile, insert it into the guide and secure it with self-tapping screws and press washers.
- Ceiling profiles should be attached to the ceiling using hangers. While performing this work, you must constantly ensure that the horizontal level of the ceiling is ideal.
- After assembling the frame, you can begin constructing hidden wiring and laying pipes. It is more convenient to install built-in lamps in parallel with the installation of panels. The lamps are installed in accordance with a pre-developed diagram, holes for them are cut in the panels using a special attachment for a drill - a crown.
Installation of panels
Once the frame is assembled, finishing the ceiling in the bathroom can begin. Let's figure out how to make a bathroom ceiling using plastic panels:
A plastic plinth is screwed onto the guide profile to install the panels. Fastening is carried out with self-tapping screws, which are screwed into the mounting strip. When joining in corners, the plinth is sawn at an angle of 45 degrees.
The first panel is inserted with a shelf into the groove of the plinth and secured to the ceiling profile using self-tapping screws with press washers.
- Subsequent panels are mounted according to the same principle, only their shelves are inserted not into the baseboard, but into the groove of the previous panel.
- To form a seamless ceiling, the panels need to be pressed against each other as tightly as possible.
- It happens quite often that the last panel does not fit into the remaining space. It should be cut to width, making it 5-6 mm narrower than the installation site. First, the finishing panel is inserted all the way into the groove of the plinth, and then moved towards the penultimate panel so that it is pressed tightly against it.
So, it is quite possible to decorate the ceiling in the bathroom with PVC panels yourself. This is not a difficult job, but requires care and precision.
It is especially important to correctly mark and assemble the frame, since this determines how even the assembled ceiling will be
Material properties
The usual plaster, which cracked, peeled and became dirty, is gradually becoming a thing of the past. Its place is confidently and permanently occupied by PVC panels. Plastic coating made from this material is distinguished not only by its beauty, but also by its high practical qualities, such as:
- durability;
- water resistance;
- elasticity;
- immunity to high and low temperatures;
- environmental Safety;
- possibility of quick assembly and disassembly;
- the ability to hide all defects of the top plate;
- the ability to quickly and inexpensively differentiate the attic and work areas in warehouses where the ceiling surface has not been installed.
The possibility of quick installation and dismantling for the purpose of replacing or repairing individual fragments is achieved due to the fact that removable elements from which the frame is mounted are used to attach such finishing. The plastic ceiling frame is a supporting structure to which PVC ceiling panels are attached. The main element of the frame is the sheathing - rigidly, in a certain order, guides made of various materials fixed on it, to which plastic panels are attached using fasteners.
Features of choosing panels
A correctly assembled structure ideally covers the uneven surface of the base, main ceiling. It will have the advantage of being able to reflect light, so a bathroom decorated in this way will seem much more spacious and, accordingly, cozier and more comfortable for bathing procedures.
The main material for the manufacture of this type of panels is polyvinyl chloride, which is abbreviated as “PVC”. This building material is an absolutely safe polymer, which differs from other similar ones in its characteristics in terms of operation and cost.
The ceiling in the bathroom is finished using a complete panel, which is mounted using strips 2.6 - 3.0 meters long.
Building materials are divided into:
- wall finishing material;
- material for finishing the ceiling surface.
The difference between the above species is only in weight. Heavier panels are made for wall decoration, and lighter panels for the ceiling surface. Thus, it is much easier to install a ceiling structure than a wall structure.
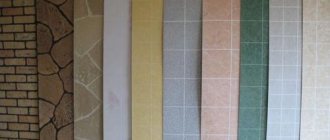
Depending on the design, panels are divided into:
- Wide seamless panels with no lock.
- Long 10cm stripes with a narrow lock. The name of such panels is “polka”.
- Panels similar in length, but with a wide lock. This type is the most popular. These panels are called “eurolining”.
The width of the first type of stripes varies from 24.0 to 37.5 centimeters. The thickness of the above types of products is 0.5-1.0 centimeters. The variety of color palettes on the building materials market allows the consumer to choose the color scheme that will best fit into the intended interior. For example, a consumer can purchase a product that is plain in color or decorated with textured designs.
Note that many people prefer to buy seamless strips, with which they can create an even, monotonous coating.
How to choose the right plastic panels for bathroom ceiling renovation:
- firstly, you need to choose a product whose thickness is more than 0.8 centimeters, because material that is not coarse enough can transmit the rays of light from a spotlight. Thus, the design will be transparent, and the base surface can be seen with the naked eye;
- It is always worth buying products produced in the same batch. Such products have the same batch number on the labels. Building materials produced in different batches may differ in shade;
- purchase material in a neutral color, such as white panels. The main advantage of this type is the ability to visually increase the space in the room, especially if it is a bathroom in a low-rise apartment in a multi-storey building.
A number of advantages of this building material also include:
- the ability to hide the wires that run to the lamps;
- environmental friendliness of this building material;
- the material is incredibly easy to care for; just wipe them with a cloth from time to time;
- Mold or mildew never forms on the surface, which often forms in rooms with high air humidity.
Finishing the ceiling in the bathroom with plastic panels is possible for absolutely everyone, even the owner of a house or apartment who is inexperienced in such types of work.
How to make lathing on the ceiling under PVC panels?
Before you begin manufacturing the ceiling lathing for plastic panels, it is necessary to carry out certain preparatory work. These include:
- Removing from the floor slab or the inside of the roof all parts of the trim and objects that could fall onto the PVC panels.
- Coating of wooden blanks for lathing on the ceiling under PVC with an antifungal composition and fire-retardant impregnation.
- Anti-corrosion treatment of steel profiles.
- Preparing equipment for working at the upper level - stepladders or sawhorses.
- Purchase of necessary building materials and tools.
Types of ceiling panels
Ceiling panels are made from different materials, because... polystyrene, mdf, plastic, foam and so on.
To visually enlarge the bathroom, choose ceiling panels in light and warm colors
To create space in the bathroom, lighting plays an important role. The ceiling in the bathroom, made of plastic panels, makes it possible to install any lighting, it all depends on your imagination. And also ceiling panels can be made not only across, but along the length of the bathroom, and also diagonally. They make it possible to create all kinds of designs (see Ceiling lights for the bathroom: types and installation).
All this can be well used to adjust the space in your bathroom.
You can also choose glossy panels, thanks to which the light reflection effect will make your bathroom much more spacious.
It is also important that if your ceiling has flaws, hanging panels for the ceiling in the bathroom will hide the unevenness
Now let’s look at what types of ceiling panels there are, because choosing among the many options is not so easy.
PVC ceiling panels
A common material for making ceiling panels is polyvinyl chloride, also known as PVC. PVC panel ceilings are one of the most durable finishing materials, because they can withstand the loads in the bathroom and do not deform. The service life of the panels is about 20-40 years.
The plastic from which the products are made is environmentally friendly and does not harm human health. The material can withstand temperatures from -15 to 60°C without damage (see Plastic ceiling in the bathroom: advantages and installation).
MDF ceiling panels
Another type of MDF ceiling panels is Medium Density Fiberboard (MDF). MDF ceiling panels can be installed yourself; they do not require preparation of the surface to be finished.
Laminated panels have a number of advantages: with their help you can make your bathroom interior original.
You can choose MDF ceiling panels of various shapes, sizes, and shades to create unique designs or patterns on the ceiling surface.
Pay attention also to the color - high-quality ceiling panels should be evenly colored
Perforated ceiling panels
Perforated panels provide good ventilation of the room. And different types of perforation patterns will give an unusual look to the bathroom. A suspended ceiling made from perforated MDF panels can create a unique look for your bathroom.
Slatted ceiling panels
Slatted ceilings are an excellent option for decorating various types of rooms, especially bathrooms. Unusual finishes that imitate wood, fabric, stone or leather allow you to create an original surface.
Different colors and textures make it possible to choose ceilings in any style.
Foam ceiling panels
There are also foam ceiling panels. These panels are very lightweight and can be a great option for DIY installation. The main advantage of polystyrene foam is its water resistance, even if you water it from the shower onto the ceiling every day, you will not see any changes. They also have high waterproofing and soundproofing properties.
Foam panels can also be resistant to sudden temperature changes.
Frame assembly
After applying all the marking points and lines, you can begin installing the base. Wooden sheathing will be installed in the same way for all types of coverings - under PVC panels, under siding, or under other types of finishing, therefore, let's consider the general principles of its assembly.
The first to be screwed are the wooden blocks around the perimeter of the room. They will later serve as a guide for the installation of the remaining parts of the base, therefore, it is important to ensure that they are all in the same horizontal plane.
The next step will be the installation of either hangers or slats directly on the concrete base. It all depends on whether their thickness is sufficient to install the coating at the required level.
For small discrepancies, you can place small pads made of fiberboard or plywood under the slats. If the dimensions of the slats are large, they can be slightly adjusted with a plane, removing the top layer of wood until the part reaches the desired thickness.
If the difference between the distance from the base ceiling and the thickness of the parts is large, it is necessary to mount hangers to which the bars themselves will be attached with self-tapping screws.
All slats must be secured in such a way that the plastic parts of the coating are located across their direction. This will make it convenient to attach them later.
When these parts are fixed, all that remains is to check their location in the same plane, and you can begin installing the coating parts.
Selection of PVC panels
When purchasing such materials, it is necessary to pay special attention to their quality, since a PVC ceiling assembled from defective components will look untidy and may also emit substances hazardous to health. In order not to purchase a counterfeit made in a homemade environment, you need to ask the seller for a certificate for the product
You should also inspect the panels for unevenness, foreign inclusions and snags.
In order not to purchase a counterfeit made at home, you need to ask the seller for a certificate for the product. You should also inspect the panels for unevenness, foreign inclusions and snags.
Panel selection
The thickness of high-quality material should be 8-10 mm, the length usually reaches 3 meters, but if necessary, longer copies can be ordered.
In any case, it is almost impossible to distinguish high-quality material from low-quality material by eye, so it is best to purchase PVC panels in trusted specialized stores.
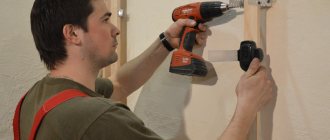
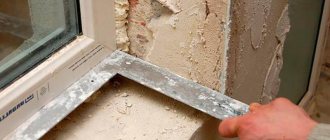
How to properly install plastic panels on bathroom walls
In order to fix the panels on the walls, you can use two different methods, each of which is widely used today.
The first method is to install plastic ones along the sheathing, and the second is to use “liquid nails” glue directly on the wall. As you understand, panels can be attached to liquid nails only if the walls are fairly smooth, which is extremely rare. Therefore, the installation method with a sheathing device made of a plastic profile is more often used, to which PVC panels are attached. In addition, when installing the finishing using sheathing, under the sheathing you can hide electrical wiring, as well as pipelines supplying water to plumbing fixtures - toilet, shower, washbasin, bidet. Installing the sheathing does not require any special skills, and you can do everything yourself. The main thing is to check with a level and a rail whether it is mounted evenly enough. Let's look at how the installation is done step by step.