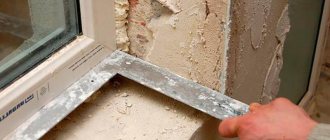
Correctly executed lathing for PVC panels is a very important factor for finishing finishing work. Today, builders use several options for quickly installing a reliable frame under plastic slabs. Any of these options can be done with your own hands. For the production of lathing, you can use wood, plastic or metal. The actual fastening of PVC finishing products using all three methods is not much different from each other.
Installation of plastic panels
For information. The frame is usually made of wood slats, because such a structure is simpler, more accessible and more affordable. Lathing for PVC panels is selected based on the conditions of use and financial capabilities.
How to make a sheathing
From slats
The sheathing is a frame used for installing slabs. Using it, you can avoid such preparatory issues as leveling the surface to be finished. But it all begins with the procurement of material for the structure.
Lathing materials
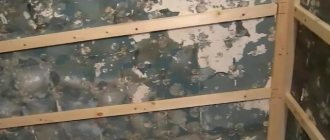
Traditionally, the frame is made of slats with a minimum shape of 20x20 mm. The slats are chosen with smooth surfaces, without any flaws. It will be almost impossible to remove broken components from the assembled structure and replace them. Having prepared the slats, you can begin the step-by-step installation of the frame:
- First, the slats are conscientiously impregnated with antiseptic material;
- Then they are placed around the perimeter of the surface to be finished. A quadrangle of slats forms the basis for the frame;
- The plates are fixed perpendicular to the guides, placed at a distance of at least 50 cm from each other. Self-tapping screws are usually used for installation. The fastening pitch is no more than 400 mm.
Important! Using a special level, the frame slats are aligned parallel to the boundaries of the walls. So that the rail can be fixed at a certain distance from the wall, you can use a butterfly mount.
Making the sheathing
Made from plastic components
A frame made of plastic boards is slightly more expensive than wooden sheathing for PVC panels. Its advantages include absolute immunity to fungi, quick assembly and impeccable design. Ready-made standard strips are equipped with a double-sided groove-to-groove lock. This makes assembly easy and gives a graceful beauty when finished.
Starting bar
Plastic is not subject to antiseptic treatment, so installation begins immediately with surface cladding. At the first stage, a plastic profile is installed, which is called “latten molding”, also known as “PVC mounting strip”. To increase the strength of the structure, in addition to plastic guides, side racks are mounted around the perimeter of the room. The strips must be perpendicular to the installed panels.
According to the technology, the clip-latches do not work at the slightest deviation of the panel - in this case, the entire structure must be redone. Such a frame is mainly installed in small wet rooms such as a bathhouse, steam room, where, due to high humidity, wood is not used for the frame.
Important! The quality of the plastic covering of the panels depends on several factors, including the installation of the sheathing. A rash decision or an unsuccessfully mounted frame should not be finished with plastic panels - such installation is subject to rework.
PVC profile
Made of metal
Metal lathing under PVC panels can be mounted on any surface, including those with roughness and defective slopes. Metal profile battens for fastening plastic panels in wet rooms are considered very popular. Metal lathing under PVC panels is made in the same way as from wood:
- Install a starting profile along the walls or ceilings;
- Perforated metal guides are inserted into it;
- Plastic fittings are installed.
After installing the frame, proceed to the main installation as follows:
- the frame is attached to hangers, the optimal number of which for each profile is approximately 3-4 pieces;
- maintain a distance between profiles of at least 600 mm;
- level the frame with a building level;
- panels are attached.
At the corners of the walls, one profile is attached, installing them strictly according to the level. Then a strong twine is pulled between them and the remaining profiles are installed, focusing on the beacon threads and checking with a level.
The first panel is a little more difficult to insert than the next ones, because it is necessary for the panel to fit into all corners and baseboards at the same time. Correct and level the panel with a regular spatula. When the panel goes all the way, a characteristic click is usually heard.
Frame installation
Which bars to choose
The most important requirement for the wooden components of the frame will be their natural humidity, which should not exceed 20% of the value. Ideally, this parameter will be in the range of 12 – 14%.
Wooden blocks with higher humidity are not suitable. When they dry out, they can become deformed, causing damage to the outer coating, in our case – divergence of the mounted panels.
Parts made from this material can both dry out and swell from moisture. It is this property that does not allow the use of wooden parts for the installation of a frame base in wet rooms. Here you need to use only metal or plastic parts for the bases.
The surface of the selected slats should be smooth, and they should all be the same size. The most popular sizes are 25 by 40, 40 by 40, 40 by 80 and 30 by 30 millimeters. Which ones are suitable must be chosen separately in each specific case.
Comparison of which lathing is better
How to attach MDF panels to the wall
In our country, few people use wood lathing in practice. The advantages of metal lathing are that it is independent from the wall. Galvanized profiles are much more reliable in all respects compared to wood. The advantage of plastic material for sheathing is its ease of processing.
There are also features of the use of lathing depending on the size of the plastic panels. The larger the size, the greater the weight of the structure. The metal frame can withstand any weight. Plastic - can only be used with a lightweight cladding structure.
Lathing - functionality and characteristics
Like any subsystem, the lathing is an integral part of the ventilated facade system and performs a number of tasks:
- base for fastening the finishing material;
- fixing the insulation (when installed by surprise);
- leveling the base;
- Ventilation gap device for unhindered circulation of air masses.
Even with perfectly smooth walls, fastening siding and panels directly, without a subsystem, is not recommended and is fraught with big problems with the facade in the near future. And we are talking not only about possible deformations of the cladding following the base, but also about waterlogging of the walls due to lack of ventilation.
The sheathing is a spatial frame made of guides, mounted on the walls using hardware or hangers, with a certain interval.
In most cases, the guides are mounted vertically; horizontal orientation is less common (with vertical installation of the casing). Thermal insulation materials are laid either between the guides, if the facing layer allows the appropriate distance, or the lathing is assembled on top. The pitch between the guides depends both on the presence of insulation and on the characteristics of the cladding - the heavier the screen, the stronger the frame should be, therefore, the smaller the pitch. For lathing under vinyl siding, the recommended distance is 400 mm, if the side is windy - 300 mm.
Sometimes this distance is increased, but such a retreat is possible only under certain conditions.
Pakha72FORUMHOUSE Member
I made a step of 500 mm. What does this mean for me?
DIYManForumHouse Member
Nothing special, provided proper installation and high-quality siding. In the worst case, the cladding will float in vertical waves with dips right between the laths. But this is the worst. And so it should stand normally...
Whether it is worth the risk, everyone decides for themselves.
How to install the sheathing
In the room
For lathing the walls, slats with a cross section of 20x40 mm are used; they are fastened with a screwdriver perpendicular to the direction of installation of the panels. The sheathing parts are installed in increments of about half a meter. Use a level to check whether the slats are mounted evenly. In case of unevenness, place pieces of plywood under the slats. At the bottom, the slats are placed at a distance of 3-5 cm from the floor for further installation of the floor plinth. The sheathing must be installed in the corners around door and window openings.
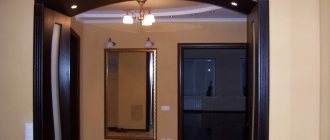
Mirror panels on the wall
Next, install the first panel and check it with a level. Then the panel is secured to the sheathing with self-tapping screws. The next panel is snapped into the groove to the previous one and along its entire length. The remaining panels are attached in the same way.
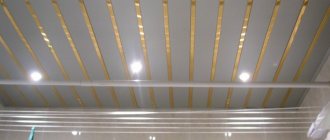
On ceilings
In order to install plastic panels, you must first construct a reliable frame for the ceiling. Installation requires special equipment and materials, which can be easily purchased on an online trading resource, with home delivery anywhere in the country.
The metal profile used for mounting frames is a long piece made by cold rolling.
Ceiling profiles have standard dimensions:
- nominal metal thickness – 4 mm;
- length – 3000 mm * back width – 60 mm * shelf height – 27 mm.
Installation of the frame begins with marking the surface. They extend down 100 mm from the ceiling to accommodate lighting equipment, mounting boxes, electrical cables and much more. The profiles are mounted along the perimeter of the surface using dowels and screws. All frame parts should be fastened carefully, securely and correctly, since the quality of installation of the panels will depend on this.
Reliable installation of profiles for PVC panels on the ceiling is the basis for attaching the cladding material. The sheathing for PVC panels is most often made of light and durable aluminum, like the rest of the elements of the main frame.
For information. Plastic ceiling tiles are very easy to install and do not require any special skills.
On the loggia
In order to carry out the installation correctly and make a beautiful ceiling on a PVC loggia, you should follow the lathing technology. For small-sized loggias, wooden sheathing is mainly made. The small finishing area and the reliability of the material provide the ceiling structure with the required stability.
For reference. For a balcony ceiling, when there is warm glazing, it is better to use a metal frame. Thus, it will be possible to insulate the concrete floor, equip the necessary lighting equipment and give the ceiling structure maximum stability.
The ceiling on the balcony made of PVC panels is easy to maintain, lightweight and durable. Therefore, this method is often chosen when repairing a balcony. You can install a ceiling on a balcony from plastic panels on your own, thereby saving money on finishing work. The main thing is to find a way to fasten PVC so that you can do without professional help.
On a note. The finished ceiling on the balcony, made of PVC panels, is easy to dismantle.
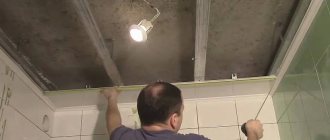
Metal lathing for a loggia
A little about the material
Just ten years ago, PVC panels could be found in literally every house or apartment. Yes, lately interest in them has decreased a little, but they are still in great demand. What explains this? And the fact that they have many advantages.
PVC panels
Advantages of plastic panels:
- Affordable price. This is undoubtedly a big plus in their favor. Finishing the premises will not require significant financial costs.
- Easy to install. There is no need to hire craftsmen; all work is done independently. You also do not need to use special tools.
- Variety of textures. Everyone will be able to choose for themselves the best option that suits the interior of the room.
- Environmentally friendly. Modern technologies make it possible to produce PVC panels that meet all safety and fire resistance standards.
- Light weight and several size options. This makes it possible to quickly work with this material and cover large spaces with it.
- Resistant to fungi and moisture. Allows you to use them in bathrooms and shower rooms.
On a note! If you really wish, you can order products on which the selected drawing or photograph will be applied.
How to make a beautiful corner from a PVC panel
Repair of a bathroom with PVC panels
PVC corners turn out beautiful and practical if you bend them. They do it as follows. Measure the distance from the previous panel, which is already installed, to the corner. Place a mark and draw a line along it with a pencil. Next, use a sharp knife to cut 1.5-2 cm from the line to the right and left. In this case, the knife is placed at an angle of 45 0 and is not recessed too much, so as not to completely cut through the panel. As a result, when the panel is bent, a rounded corner of 900 is obtained. In this case, there will be no gaps or fallen off corners. This method is used when installing boxes and turns.
Important! The inner corners are slightly foamed so that the casing holds more firmly without dips and dents.
Marking
In order for the panels to be installed evenly, it is necessary to carefully mark several points on the walls and ceiling where the PVC planks are supposed to be installed.
First you need to determine which corner of the room is the lowest. This is necessary in order to start marking with it. In the future, even if the walls are not the same height, all other marks will fit exactly into the geometry of the room.
Having found the right place, you need to retreat about five centimeters from the ceiling. You can make a larger indentation, but, usually, five centimeters is enough to place all communications and the upper part of recessed lamps in the ceiling space. It is not recommended to lower the ceiling; if you sit in a room with a standard wall height, the ceiling will be too low.
Having made the first mark, it needs to be transferred to the remaining corners of the room. You also need to make markings on the walls. To do this, you need to connect the marks at opposite ends of the wall with a straight line.
A marking cord is perfect for this, making it much easier to draw a straight line. Make sure that all lines are strictly horizontal. This will determine how even the ceiling will be.
You can move to the surface of the floor slab. Here, it is necessary to mark the points at which the hangers will be fixed, or the lines along which the slats are to be fixed.
It is important that all lines on the floor slab are directed perpendicular to the location of the PVC planks.
To make it easier to navigate later, you can stretch a strong thread from corner to corner of the room. Using it, you can set the level of the frame parts that will be fixed to the ceiling slab.
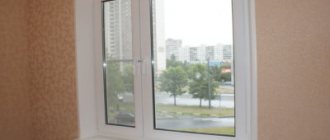
How to make openings for windows and doors
To attach the plastic panel from the window to the corner, it is better to mount a horizontal profile. If the gap between the window sill and the wall is too small, then ordinary planks are used instead of a profile. They are glued to the wall using liquid nails. As the glue cools, additionally:
- foam the joints;
- When the material has set, the boards are attached to the wall using dowels.
The rail is installed vertically to the window in the same way.
To better fit the window, the panel is placed as follows. The part where the fasteners are screwed is cut off. This creates a beautiful factory edge. This edge is used to attach the panel to the window. That is, then there will be no need to design the joint, it will look complete. The other sides of the panels adjacent to the window can be trimmed:
- with cross-cutting with broach;
- on a regular tile cutter.
Door slopes are made in the same way.
Required materials and tools
To avoid downtime during the installation process due to searching for missing parts, you should prepare all the necessary tools and materials in advance. For work you will definitely need:
stepladder or stable bench; level or laser level; screwdriver or screwdriver; hammer drill or impact drill; It is important to make sure in advance that you have the necessary plumbing tools; pencil for marking; tape measure or meter; grinder or hacksaw.
The following materials are used for installation of the sheathing:
- wooden blocks;
- galvanized profile;
- plastic guides.
Each of these samples is quite easy to install and has proven itself during operation. There is no single recommendation on how to choose the right material for installation; preference should be given based on your financial capabilities or available remnants from previous repairs.
Possible options without lathing
You shouldn’t turn the repair into a three-month protracted one. In small rooms (bathrooms) you can do without lathing. It is enough to secure the bars horizontally. The panels are screwed at the ends into the timber. A plastic plinth is glued to the liquid nails, which covers the fastening points.
Frame installation is an important stage of facing work in construction. To the extent that the ceiling and wall sheathing is installed correctly, the appearance of the panels will be as aesthetically attractive as possible after finishing work is completed. Practical advice on choosing and installing material for making a frame is given in the article to help you get a good result. Do-it-yourself lathing for PVC panels should be reliable and even.
The process of attaching plastic panels
The following describes step by step how to properly attach plastic panels in order to avoid any shortcomings that could negatively affect the service life of the material.
Wall marking
When installing the frame, it is necessary to use a building level, which will make it possible to eliminate the possibility of distortions. In order not to measure each slats, you need to make markings on the walls. The lower part of the frame should be 1-2 cm above the floor covering. At this height, you should draw a point on the wall surface with a pencil, after which, using a level, you need to draw a horizontal strip along the entire perimeter of the room. A similar line must be drawn along the border of the finishing material or under the ceiling if the sheathing is not at full height. Next, you need to measure upward 0.4-0.5 m from the strip marked below, install the beacon and continue this procedure to the top line. Through the beacons you need to draw strictly parallel lines along the length of all the walls, which are the final stages of marking.
The panels must be fixed to the frame perpendicularly, which is why the horizontal sheathing is finished vertically and in the opposite direction. In the case of drawing a vertical structure, the first strip must be drawn in the corner from the ceiling to the floor using a plumb line. Next, the second corner is marked, after which other lines are drawn with an interval of 0.5 m.
Fastening the frame
When constructing lathing from wood materials, all its components must first be opened with an antiseptic. Using a hammer drill, holes for dowels are drilled along the drawn strips at a distance of 0.5 m. Next, you need to attach the slats, align them horizontally and fix them on the wall surface. In areas of unevenness, wood wedges should be placed under the frame. The wires running along the wall must be hidden under the finishing, which requires taking measurements, drilling holes in the surface and securing them with clamps so that there is no peeking out from behind the plane of the frame.
Fixing plastic panels
Installation of the first lamella should be carried out from the corner of the room farthest from the entrance, which is considered the most noticeable. Next, measurements are taken, and if necessary, the lining is cut to length using a hacksaw. One side of the lamella is installed in the molding on the side, which leans against the corner and is secured to the frame from the back side.
The second panel must be inserted into the fastening groove of the previous one, pressing the joints tightly and fixing them to the wooden elements of the sheathing. To increase the tightness of the joints, the edges should be lightly coated with silicone before installation. All further panels are attached in the same way.
For switches for lighting elements and sockets for electrical appliances, appropriate holes should also be cut in the lamellas as work progresses.
Upon completion of installation, these areas must be covered with plastic boxes. The edge panel mainly needs to be cut in width, so the first step is to apply it to the wall surface, mark strips corresponding to the dimensions of the opening using a pencil, along which the lamella is then cut with a hacksaw.
Fastening moldings
Upon completion of the installation of all panels, the walls should have a monolithic and even appearance, with no gaps on the surface of the seams and in other areas. To hide them, all existing joints and corners are closed using plastic moldings. The design of these products makes it possible to neatly fit onto the edges of the slats on both edges, giving them an attractive appearance.
Lastly, along the length of the ceiling, decorative moldings are installed, and floor skirting boards are fastened to the floor.
Stages of installation of the structure
To ensure successful installation of PVC lathing, follow the recommendations of professionals
The first thing people pay attention to is the distance between the slats. This is true for both ceilings and walls
The optimal distance is a step of 30 cm. The PVC slats themselves are placed in a perpendicular position to the panels. In other words, if the panels are mounted in a vertical position, the slats are fastened horizontally and in the reverse order.
An important point is the marking. It is carried out at the initial stage. Without this, it will not be possible to create a high-quality frame for the ceiling or walls. If you find it difficult to mark yourself, watch the video. It will introduce you to the details of the marking process for the ceiling and walls.
The frame is fastened along the perimeter of the room; to do this, measure the length of the walls, finding the lowest angle, draw a horizontal line from it, along which they begin to mount the frame. Panels made of PVC material are joined together using a hacksaw and a miter box. These tools will allow you to get a good cut on the panels with minimal dimensions. The material is fastened every 25-30 cm.
The frame is fastened along the perimeter of the room; to do this, measure the length of the walls, finding the lowest angle, draw a horizontal line from it, along which they begin to mount the frame. Panels made of PVC material are joined together using a hacksaw and a miter box. These tools will allow you to get a good cut on the panels with minimal dimensions. The material is fastened every 25-30 cm.
If you have been able to appreciate the advantages of PVC lathing and cladding the ceiling and walls with plastic panels, carefully prepare for the installation process. To perform the steps correctly, watch the video. It will allow you to understand the intricacies of the ceiling creation process and avoid common mistakes. Video is the best assistant that guarantees that the cladding is done correctly.
Necessary tools and preliminary preparation
The tools necessary for attaching plastic panels can be found in almost every home:
- electric drill;
- wood hacksaw;
- scissors and hacksaw for metal;
- screwdriver or screwdriver;
- tape measure, building level, pencil or marker;
- hammer, stapler;
- ladder.
First, use a tape measure to measure the working surface, this will allow you to correctly calculate the required amount of materials.
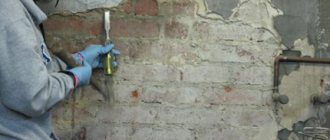
The surface must be cleared of wallpaper. If the panels stick, be sure to clean the walls or tiles of paint and dust.
Before installation, it is recommended to keep the plastic panels for at least half an hour at room temperature. Do not rush to remove the protective film before completing installation work; it will help preserve the presentation of the panels.
Covering a loggia with panels without sheathing - is it possible?
Good afternoon everyone! It is necessary to sheathe the inside of the loggia with plastic panels. Because It is small in size, I would not like to make a crate. (Walls - concrete, KOPE series house). Is it possible to attach panels without sheathing? If so, how exactly? Thanks to everyone who has any advice.
Best answer
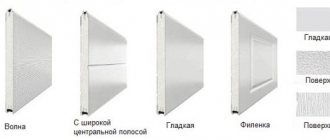
It is logical to assume that you will glue the wide ones faster, due to fewer operations. But the wider are more critical of this type of marriage:
If one pack is straight and the other pack is crooked, then you won’t be able to fit them together without visible gaps.
When examining an unpacked pack, it is impossible to see this kind of deviation, and if you then have to glue them, you will suffer. Therefore, you need to take two plates out of the pack and apply them not tenon to groove (1-2), but tenon to tenon or groove to groove (2-3), then it will be completely obvious that the pack is crooked.
It is unlikely that this kind of defect occurs during production. More likely during storage. If the pack lay on the ends of the plates for several months on a crooked base, and was pressed down by something else on top, then this is possible. I had such a negative experience...
I'll add. 1. It is not only possible to attach the panels to the sheathing. but it is also necessary, because there are no pieces of wood that will necessarily warp and that no one will ever bring to zero. 2. The panels must be glued onto a perfectly flat base, and therefore plastering the walls is mandatory. 3. The slopes of the window block also need to be plastered (leveled). 4. Before pasting the walls with panels, the plaster must be completely dry, the walls must be primed with a moisture-proofing strengthening primer, such as “Aquastop” 5. Liquid nail glue should be used with solvents, it is better to take glue for heavy structures. On average, a tube for a gun is enough for 3 panels. 6. It is optimal to use panels 25 cm wide. Laminated ones are better, they are harder and stink less in the sun. In general, there are panels that are flimsy and paper-thin, and there are dense ones that hold the geometry well. Very good American panels, but lately they have become rare. 7. I don’t recommend using standard white platform wall profiles for wall panels - it’s difficult to work with, it looks cheesy. It is better to place tiled crosses along the entire perimeter of the floor, similarly in all corners, allowing for a small gap of 2-3 mm, into which you later need to insert a plastic corner (preferably an arched one) with one edge inward. It turns out a very nice plastic edging.
A few photos for clarity
Yes, they are usually attached to the sheathing. But, I repeat once again, in this case the quality of the plane will be lower (simply crooked, “village”). In addition, the wall will be flimsy, you won’t be able to attach anything to it (for example, a clothes dryer), you can punch it with your fist.
As for the cost of work, everything is very relative. Depends on the region, on the starting conditions, on the final picture, on the master’s (company’s) assessment of his labor costs. Some people work for 2 thousand a day, others for 10 thousand a day. Someone forces customers to buy everything themselves, someone forbids customers to buy anything without him and goes shopping himself. Some customers count every penny and are not demanding of quality, others are willing to pay for quality and (sometimes) for deadlines.
There are no straight walls; anyway, something will have to be corrected somewhere. It will not be possible to glue panels to the ceiling using liquid nails; the ceiling will just have to be lathed. Moreover, pull it out level (possibly two layers of slats) with foaming of the cracks to eliminate possible deformation.
In terms of time, something like this (provided that the windows and window sills are standing): Days: 1. bomb everything That is, tear off everything that peels off and falls off, everything that gets in the way and everything that stands out (sagging). + remove dust. 2. plastering the walls. 3. final leveling of the floor. 4. priming the walls, floors and tiles on the floor 5. grouting the floor 6. panels on the walls 7. ceiling sheathing, panels on the ceiling, corners in the cracks.
Under certain conditions, some days may be combined or extended. On those days when the working day is not long (for example, pogrom, leveling the floor...) you can spend it on purchasing materials (panels, slats...). But in general it’s something like this. If you raise the floor, install electricity, insulate, install window sills - then of course this is additional labor costs.
What to look for when choosing
It is clear that the choice begins with color and pattern. But to avoid any difficulties during the installation process, you need to keep track of some points when purchasing:
Inspect the cut of the selected plastic panel. The thicker the lintels and the front and back layers of polymer, the stronger the finish. You can also focus on weight - the greater it is, the thicker the panels will be. The thickness of the plastic is the same everywhere, without thickening or thinner places
This is a sign of normal quality. Pay attention to the geometry. The cells should not be wrinkled, the edges should be absolutely straight
Even if everything is packed, it doesn’t hurt to unpack and inspect it so that there are no problems later. Inspect the front surface. The pattern should be applied evenly, clearly, without blurry spots. If you choose panels from different packs, but of the same color, carefully look at the colors - they may differ.
It is also worth checking the quality of the polymer used. You need to take one plank so that it bends by about 30% and straighten it. After that, examine it. If there is no damage to the plastic or pattern, everything is fine.
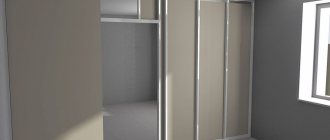
Installation process
In order to install a frame from any selected material, you will first need to apply markings to the wall or ceiling. To do this, a diagram is often drawn on paper, and then, in accordance with the drawing, markings are made on the surfaces where the base elements will be attached.
For example, a diagram for finishing a balcony will look like this, with minor variations.
The principles of drawing up a diagram and subsequent assembly of the entire frame remain the same, regardless of the room and location of attachment.
Having a drawing will allow you to calculate the materials in advance and the amount of necessary fastening fittings.
It is easier to fasten the structure along the marked marking lines so that each part is in its place. This will not only make the base more beautiful, as many people think, but also helps to accurately fit into the pre-calculated amount of material.
After marking, you can begin to assemble all the structural elements together and mount them on the surface. All parts are attached using dowels and screws.
When working with plastic sheathing, you must take one point into account.
To fix the decorative strips, special clips - locks - are used here. In order for them all to snap tightly and securely, you need to position the frame elements strictly perpendicular to the future location of the covering strips. Otherwise, the clips will not be able to securely fix the panels.
Having secured the last part of the frame, you can begin to install the plastic panels.
For ceilings, the lathing for plastic panels is assembled from parts that will be fixed to the walls around the perimeter of the room, and transverse components.
The parts of the structure located around the perimeter are fixed first. They must be positioned strictly horizontally, as this ensures the horizontality of the future ceiling.
Next, the transverse parts of the frame are inserted into them and secured with self-tapping screws or another method. The distance between them should be within 40 - 60 centimeters.
The principles of working with wooden blocks are no different from the methods of assembling a base from any other material. They are fixed to the surface in exactly the same way, according to the scheme, using dowels and screws.
Plastic panels are attached to the resulting base. Wooden battens provide several benefits when used for sheathing.
Firstly, you can attach all other elements to them using a construction stapler. This will greatly speed up the further installation process.
Well, their second advantage will be the price. The slats are inexpensive, you just need to choose ones whose humidity does not go beyond 18%. Then they will not deform when drying.
Rules for constructing a suspended ceiling
Lathing for plasterboard on a ceiling made from a profile. Plasterboard is most often used in the production of suspended ceilings.
To obtain a high-quality ceiling covering that prevents its damage during operation, the ceilings are equipped with lathing. The material for the sheathing is wood or metal. Lathing for plasterboard on a profile ceiling is resistant to temperature changes in the room and low humidity. A metal structure, unlike a wooden one, does not undergo distortions, which are the source of ruptures in plasterboard sheets and the appearance of cracks in the facing surface.
To install sheathing under plasterboard made of metal profiles, fastening elements are required: dowels, self-tapping screws, brackets. A mandatory construction tool is a construction level. The most convenient is a modern laser level with a variety of functions.
The process of arranging lathing for plasterboard on the ceiling is simple and is carried out in the following sequence:
- a mandatory distance of 15 cm is marked from the main ceiling and drywall fastening. This gap provides cable placement for additional comfort devices;
- installation of ceiling suspensions in 6 cm increments;
- installation and fastening of profiles along the edges of the ceiling and ceiling suspensions;
- installation of transverse profiles.
Next, the guides are installed in increments of 6 and racks, the distance between which should be 10 cm. A standard sheet of drywall is fastened with three guides at a distance of 6.25 cm.
Cladding ceilings with frame systems involves the correct installation of the ceiling sheathing, the basis of the suspended structure. Plasterboard, PVC panels, MDF, and wood lining can be used as facing materials.
Ceiling sheathing under panels
The principle of arranging suspended ceilings under PVC panels is the same for cladding with any other materials. The initial mandatory device is the ceiling lathing for panels made of these materials. Installation of the sheathing can be divided into several stages:
- on the walls, along the perimeter of the room, mark the depth of the ceiling cavity, taking into account the dimensions of the built-in equipment;
- Place marks in the corners and use a paint cord to mark a reference line;
- mark the location of the lamps. For a chandelier, you need to set the center of its location. This is ensured by drawing diagonals drawn from the corners of the ceiling. If you intend to install a hanging chandelier, you should immediately drill a hole and install a dowel for the hook. For a chandelier on the console, there should be a guideline in this place to strengthen the frame;
- UD profiles are also installed around the perimeter. If the manufacturer does not provide holes in the profile, they are drilled independently at intervals of 30 cm;
- at the next stage you need to fix the profile with screws and dowels (depending on the design of the original ceiling and walls);
- After fixing the profiles, hangers are installed. As a rule, perforated strip hangers are used to mount the frame under the panels. This type of suspension is screwed onto the rough ceiling, maintaining an interval of no more than 70 cm. The central part of the hole on the tape should lie exactly on the control line;
- Next comes cutting and inserting, perforated suspension strips and inserting them into UD profiles. The length of each tape should be measured before cutting, this will allow for wall surface errors to be taken into account.
Walls
For walls, it is extremely important to assemble the frame with the correct 90 degree angles. There’s no way you can do this without a laser level or a construction angle
Example of wall lathing
First of all, bars or profiles are filled in the corners of the room. If necessary, additional gaskets are placed under them
It is important at this stage to position the slats so that the angle formed between the mating surfaces is straight. Check the resulting connections using a construction angle. The profiles are fastened along the ceiling and floor coverings. Pull the cord between the upper and lower profiles, and, focusing on it, install the horizontal strips of the sheathing. Profile slats must be placed along the perimeter of window and door openings.
When installing a frame under a plastic structure on a balcony or loggia, they use the same calculations and methods. However, it makes sense to insulate the room by placing a layer of thermal insulation in strips between the profiles.
Application benefits
The main advantages include:
- Wide range of use. In addition to the classic use for finishing walls, PVC is involved in the production of door and window slopes, kitchen aprons. The material is lightweight, versatile and cheap.
- Design. In addition to the traditional white sheet color, manufacturers also produce other options. There are plastic panels that externally imitate tiles, paintings, mosaics and frescoes. If desired, you can order a print on plastic sheets;
- Durability and stability. The material has high tensile strength. If the production technology is correct, then the fracture strength is also high. Durable, ceiling plastic is almost impact-resistant.
- Simple and fast installation process. Due to the low weight and production technology, in which the panels are connected to each other using the tongue-and-groove method, installation on the wall is very simple even for beginners. For smooth surfaces, you can install the sheathing with glue. If there are bends, you will have to level the wall or install a frame.
- Easy care. The finished structure is smooth and easy to clean. All you need is a cloth with soapy water. However, there may be problems with cleaning the joints.
Possible decor options