Slopes for plastic windows
Window openings are a vulnerable place for drafts and dampness. Therefore, the material for their design must not allow moisture and cold to pass through.
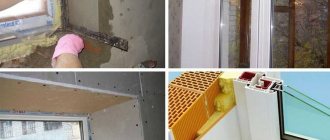
A few decades ago, the spaces between the frame and the wall were usually plastered or covered with plasterboard. PVC products have made it possible to create finishing on a completely new level.
Craftsmen and homeowners immediately appreciated the advantages of plastic slopes:
- They are not afraid of moisture. This eliminates swelling, condensation, fungus and mold.
- Resistant to atmospheric factors. External PVC slopes are not destroyed by temperature changes and do not turn yellow in the sun.
- Good soundproofing characteristics. Significantly reduce the penetration of street noise.
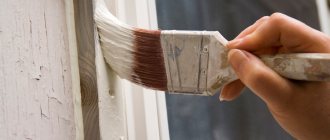
- They do not require additional staining and are easy to care for.
Let's add here quick installation with a minimum of waste - and it becomes clear why plastic slopes remain number one in popularity in Russia.
Features of window sash installation
The main window frames are in most cases installed on spacers. This method causes the presence of installation gaps between the profiles and the opening. They are subsequently filled with foam, which provides additional stability to the structure, resists the penetration of air currents, moisture and noise from the street, and heat loss from the room.
The presence of voids forces us to consider solutions for finishing the window slopes inside, associated with partial or continuous extension of the walls. Based on this, 3 options are suitable: plaster, cladding or glue installation. In both cases, the installation seams will be protected from changing conditions and mechanical stress.
Before choosing a method for decorating an opening, you should familiarize yourself in advance not only with the features of the materials, but also consider ready-made solutions in photos on the Internet.
Style and comfort
What is the secret of the reliability of PVC finishing? The product is made of the same material as the windows. This provides advantages over other options:
- The “homogeneity” of structures contributes to their strong connection. Unlike plaster or drywall, PVC does not peel off from the plastic frame. There are no deformations or cracks.
- PVC slopes are hard, so they can easily withstand sash impacts and other mechanical impacts.
- Panels for finishing openings are not inferior to double-glazed windows in terms of service life - on average 15-20 years. You don't have to change them separately every 2-3 years.
An important point: plastic products are in harmony with the windows - you get a complete ensemble.
Wet finishing
Using plaster to form slopes from the inside allows you to solve several issues at once. The leveling mixture creates a monolithic, durable coating that is highly durable, breathable, and resistant to mechanical stress.
It is also easy to create an opening for a non-standard window: round, oval, polygonal, arched structures. The resulting base can be subsequently used for almost any finishing materials: decorative tiles or plaster, artificial stone, wallpaper, paint.
Selection of materials for finishing slopes of plastic windows
To level window openings, you need to use mixtures that are resistant to changes in humidity and temperature. The best material is cement or polymer based. The gypsum binder is destroyed by moisture. It is often worth considering also plaster, which is suitable for application in a layer of more than 3-5 cm.
To obtain an even result, you will additionally need beacons. These can be modern T-shaped profiles or timber pre-treated with antiseptics. You can also make supports from mortar. A trowel and spatula are used to distribute the solution.
In addition, the technology will require moisture-resistant soil. Depending on the base, deep penetration capabilities for porous or strengthening for weak walls are considered. Additionally, when applying large layers of plaster, a fiberglass reinforcing mesh is fixed.
Application technology
To design the slope correctly, you need to start by preparing the work site. Excess polyurethane foam is trimmed, and a vapor barrier is glued on top of it. The walls are freed from weak areas, degreased, if necessary, lesions are removed and the reappearance of fungus, mold or rust is prevented.
The cracks need to be opened, dusted and filled with mortar. The final step at this stage is to treat the surface with a primer.
The next step-by-step instructions are as follows:
- beacons are installed;
- large irregularities are filled;
- the slope is leveled;
- excesses are eliminated/beacons are removed (not always);
- minor defects are smoothed out.
At each step, you are expected to wait for the applied material to completely dry or harden. The thicker the layer, the thicker the solution should be. For the last step, mix the plaster with the maximum addition of water in the recommended proportions from the manufacturer. The joint is grouted with a trowel and in a circular motion.
Subtleties of finishing
If you plan to carry out facing work, then it is not necessary to rub in the leveling solution. It will be enough to treat the surface with an adhesive primer. The same applies to finishing with decorative plaster.
Before wallpapering (regardless of the thickness of the canvas) and painting, you will need to additionally level the opening on the sides with putty. One-layer application is acceptable in the first case and at least two layers in the second. In both cases, dust-removing soil is used.
Sandwich panels: comfort and durability
But not all PVC panels are the same. They differ in structure and technical characteristics.
Our company installs structures made of three-layer sandwich panels - the most modern material. Its device resembles a closed sandwich:
- The outer layers up to 2 cm thick are made of polyvinyl chloride. They are responsible for rigidity and increased strength.
- Inside there is polystyrene foam - foamed or extruded. The filler gives the sheets low thermal conductivity.
Hence the general properties of sandwich panels: durability, ability to maintain an optimal microclimate. With their help, you will provide warmth in your home for many years.
Finishing slopes using the “dry” method
This implies the absence of water-soluble compounds. In this case, the slopes are finished with sheathing materials: moisture-resistant plasterboard, plastic panels, siding. They are mounted on a supporting structure made of metal profiles or treated wooden beams. Preparation of the working base is carried out by analogy with the use of plaster.
The main advantage of finishing internal slopes using the sheathing method is the possibility of laying insulation, carrying out hidden wiring, and installing built-in electrical appliances. There is no need to additionally create an installation gap between the decor and the base.
Installation technology
To sheathe the opening, support bases are attached to the prepared base using dowel nails and a level. They are fixed along the window frame and the edges of the walls. As the first, special profiles are often used, into which the sheets are simply inserted.
At the same time, the outer edge of the slats remains open. To strengthen the structure, additional jumpers can be installed. This will reduce the risk of breaking or bending of the sheathing fabric.
Drywall is screwed in with self-tapping screws, joints and fastening points are puttied, corners are reinforced. Next, they make the cladding, glue the wallpaper or putty and paint it. The soil used here is dedusting.
Installation of decorative sheet material is carried out in accordance with the recommendations from the manufacturer. It is important here to hide the fasteners and create an airtight coating. Additionally, it may be necessary to install additional elements: on assembly seams in corners, to cover end edges, to finish joints.
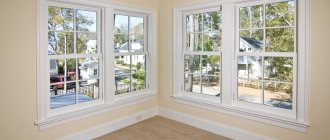
Wealth of forms
Until recently, windows were rectangular, but today almost any shape is available to you. Especially if you live in a cottage. Arched openings are very popular now. Is it possible to make high-quality slopes for them? Of course, if there is a problem, specialists are hired. In addition to standard ones, our company’s craftsmen create structures of non-standard shape:
- arched
- round
- triangular
- polygonal
All projects are carried out with the utmost care. Thanks to accurate measurements and compliance with GOST, each seam turns out flawless.
Plastic materials
Plastic slopes have huge advantages compared to plaster:
- Long service life.
- Aesthetic appearance.
- Covers all joint defects.
- Does not require additional finishing or painting.
- Excellent thermal insulation.
- Average cost of installation work.
- Installation can be completed in 2-3 hours.
- Easy to use - the surface is easy to clean.
- High moisture resistance.
- Wide choice of color palette.
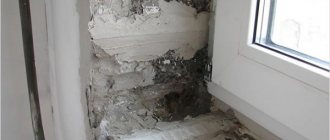
When replacing old windows, the window opening can be severely damaged, so it is important to fill the resulting voids. In some cases, the cracks are not visible , but it still comes through the window. This indicates that the seams were depressurized after installation work.
Thermal insulation methods
If you install slopes according to all the rules, then they need to be properly insulated. Thermal insulation is achieved simply: you need to install insulation under a layer of plastic.
Insulation can be done in 2 ways:
- Insulate the space with polystyrene foam or mineral wool on the inside of the window.
- Fill the cracks at the junction of the window opening and the PVC frame with foam.
It is advisable to insulate a gap within 50 mm on a smooth surface with Isover, sheet foam or expanded polystyrene. If the wall is uneven, it is better to use mineral wool. From the outside, the gaps can be filled with foam.
Well-insulated multilayer walls themselves perfectly protect the window opening from external factors, so it is not necessary to insulate the slopes; it is enough to apply polyurethane foam along all the gaps from the outside.
Installation of plastic slopes
Now let's look at how to make slopes on windows out of plastic. Required tools:
- Sheet plastic 8 mm, enough for 6 meters.
- The starting strip is U-shaped and F-shaped.
- Hammer or drill.
- Building level.
- Metal scissors.
- Square.
- Pencil.
- Sealant and screws.
As in the case of drywall, you need to install plastic slopes with your own hands from blocks and foam plastic. Then we attach the starting profile to the window frame using glue; you can fix the profile to the block with construction staples for greater reliability.
The next step is to attach the F-profile to the block that runs along the wall.
Now comes the most difficult stage - installing the panels. Since the profiles that were previously fixed are made of plastic, they bend easily, this will help to bring them into the F-profile. But before that, you need to insert one edge of the slope into the starting element and push it until it stops.
Then you need to carefully press the inner edges of the F- profile and bring the panel inward. If the work is done correctly, the profile should return to its original position and securely fix the panel.
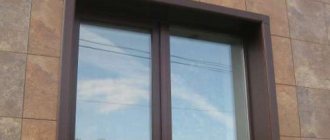
The whole rainbow of colors
White windows are a classic. But not everyone likes traditional options. If you want variety, take a closer look at the laminated finishing of the openings, which will make the interior of the house more expressive.
We have a wide selection of shades imitating natural wood, from golden oak to black cherry, which will allow you to harmoniously decorate the interior in rustic, chalet or eco styles. And lovers of modern design will like rich monochromatic options - noble gray, elegant chocolate.
Original PVC panels are made by applying RENOLIT laminating film to finished parts. The certified coating meets European environmental safety requirements.
Finishing slopes using the gluing method
Preparation is carried out by analogy with the process of plastering the slopes of an apartment. Before finishing the opening with materials that are attached with glue, a moisture-resistant primer is used to treat the surface, aimed at increasing adhesion.
To make it easier to do the work yourself, profiles for inserting sheets are often installed along the window frame. This allows you to minimize the curvature of the canvas. This method of finishing slopes is especially relevant in the case of thin walls.
In order to decorate slopes with decorative sheets without sheathing or frame, you can use three adhesive options:
- If the base is level, as in a modern new building, then liquid nails can be used for fixation. For acrylic-based drywall or neutral: for plastic products - universal or for PVC panels.
- When the walls have slight differences (for example, in a brick house), then a good solution would be polyurethane foam or adhesive foam with low expansion. If you take a composition that greatly increases in volume, then there is a high risk of the finishing sheets bursting.
- A universal solution for working with your own hands on any surface is an adhesive solution. These can be mixtures for facing work, for gluing slab materials. There are also ready-made polymer-based masses. Here, when choosing, it is important to take into account the permissible layer, shrinkage, and resistance to the expected load, so that peeling or deformation of the canvases does not occur.
In any case, before further work, it is important to wait until the adhesive inside the structure has completely dried. Additionally, the edges at the corners should be secured with masking tape. The thicker the layer of glue, the more pieces of tape you need to use. If decorative profiles are not attached to the frame, then temporary supports can be installed.
Finally, the corners are finished, since the cut edges and the gap between them and the base remain open. For reliability, it is recommended to fill the void with foam or plaster. For framing, you can stick beautiful decorative corners on liquid nails or double-sided thin tape.
Installation of slopes
Regardless of what material is chosen, a standard set of tools and consumables is used for the work. You may need:
- Start profile.
- Wooden beam.
- Internal and external plastic corners, trims.
- Insulation.
- Waterproofing tape and sealant, polyurethane foam.
- Spatula and dry putty.
- Capacity.
- Electric jigsaw.
- Screwdriver and level.
- Construction glue gun and “liquid nails”, self-tapping screws.
Standard set of tools for installing slopes
The exact list of additional elements depends on how the plastic slopes will be installed on the windows.
Option #1
This option is used when the assembly seam is a small gap. That is, the distance from the frame to the adjacent wall is minimal. This creates some difficulty, because it is necessary to take into account the location of the hinges and opening doors. Therefore, work is carried out according to certain instructions:
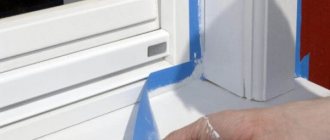
- Before installing plastic slopes, excess foam should be trimmed. This is done using a construction or stationery knife. It is necessary to avoid the common mistake of removing too much foam, because the cut should be flush with the surface of the frame. Otherwise, the existing balance will be disrupted, which will require additional efforts.
Trimming excess polyurethane foam - Areas of plaster that are susceptible to falling off are removed. There is no need to remove the entire layer, just the damaged fragments. The surface is cleaned of residual dust and dirt.
Removing damaged areas of plaster - Do-it-yourself installation of plastic slopes assumes that all areas will be treated with a special primer. It is better to choose penetrating compounds that contain antiseptic components.
Treatment of window slopes with penetrating primerOn a note! To prevent the formation of mold and mildew, special substances are used. This procedure should not be neglected, because such problems are the scourge of plastic windows.
- Next, a wooden strip is fixed. It must be mounted along the outer perimeter of the opening. Dowels and screws are used for fastening. It is better to make a structure that will be installed on the vertical and horizontal (upper) sections, so that the racks do not come into contact with the top bar.
Installation of wooden slats on window slopes - Now a very important procedure is carried out: it is necessary to trim the mounting foam to form a groove in which the panel will be installed. It must be taken into account that each fragment must submerge by 0.8 - 10 mm. Trimming is done directly next to the frame to create a stronger fit. After all, finishing slopes with plastic with your own hands requires that all gaps be minimal, or better yet, absent.
The foam is trimmed as close to the window frame as possible.
This completes the first preparatory stage. It is necessary to perform high-quality cutting of parts. This is a very important point; if it is done incorrectly, then you will no longer be able to install PVC with your own hands efficiently.
Detailing can be done in two ways: take measurements and transfer the data to the material, or make a stencil. BUT! Each of the methods must take into account that 10 mm will be needed for insertion into the groove, and the thickness of the elements themselves must also be calculated, because they will form a common perimeter.
Cutting the plastic panel must be done very carefully
Next, perform the following steps:
- Using a hacksaw for metal or an electric jigsaw, plastic for slopes is cut. Numerous burrs may remain along the edges; they are removed with sandpaper.
- Pre-installation is in progress. It will help determine whether there are defects. If the plastic is double-sided, then the reverse part is marked and should be sanded a little. This will allow you to achieve better adhesion, because the installation of plastic slopes with your own hands is carried out using polyurethane foam, the adhesion of which to the smooth surface of the material will be much worse.
- Now the parts are installed one by one in the required place. They are first inserted into the groove made. Careful alignment is carried out using a level.
- The outer edge of the element is moved back and foam is poured into spots. Extreme care must be taken, because excess substance will lead to warping of the fragments.
- The parts are fixed together using masking tape. It is glued to the joints, as well as along the perimeter of the walls.
When pouring polyurethane foam, it is important not to overdo it with the amount of
foam. It takes a day to completely dry. Then a series of additional finishing activities begins. They consist in the fact that window slopes are treated with sealants, and decorative corners are adjusted. They are seated on glue.
External bevels also need to be trimmed. It often happens that platbands are used, they need to be installed around the entire perimeter. If you exclude the use of such products, then the sealing is done using putty, which will be hidden by the wallpaper.
Option No. 2
Do-it-yourself plastic slopes can also be installed using a technology that is significantly different from the previous one. It lies in the fact that fastening is carried out much faster, using a starting profile. Any PVC materials are used for work.
The starting profile allows you to carry out work on installing slopes several times faster
On a note! Sometimes you can find the abbreviation PVC. This designation is considered equivalent to PVC, but it was used in Soviet GOST standards for plastic coatings.
The initial stage begins with preparation. It consists of cleaning the surface and removing all defects. It is necessary to carefully apply the primer to all areas. The general technology for further work is as follows:
- Wooden slats are installed. They must be installed directly next to the frame. The fastener is carried out so that the block literally fits onto it.
- There is a peculiarity of this installation - the rail is pre-processed at an angle. This bevel must be equal to the angle of repose. A plane is used for processing. Of course, you can cut it off, but you won’t be able to achieve the required indicators.
- Each detail is customized individually. They are fixed with dowels. The use of simple self-tapping screws should be avoided; they cannot guarantee reliability. Each finished area is checked.
Installation of the starting profile is carried out on previously installed wooden slatsOn a note! Such do-it-yourself plastic slopes require more careful preparation of the installation slats. If you accurately calculate and cut the angle of inclination, the coating will be perfect.
- Now comes the turn of the starting profile. It is attached with self-tapping screws (brackets) to the installed beam. For the work, the most rigid material is selected, then the slopes for the windows are more reliable. The fact is that a cheap profile (soft) bends a lot and forms a curvature.
- The necessary measurements are taken. It should be remembered that measurements should be taken from the frame itself, and not from the edge of the profile. All parameters are transferred to a separate sheet. Details are being drawn up. The parameters are transferred to the panels. Trimming in progress.
Sometimes a significant question arises: how to trim window slopes with plastic if they are large. For this option, there are special wide panels that eliminate the need for grooves.
Installation in progress:
- To achieve the best effect, start installing the fragments on the windows yourself from the sides.
- Each part is inserted into the starting profile. If there are protruding excesses, they are cut off with a stationery knife.
Installing the panel in the start profile
- The material is fixed using polyurethane foam. It is poured in small quantities. It should be taken into account that next to the window frame the void will be larger than at the edge. Therefore, the foam is distributed in such a way that swelling is not observed.
- The panels are fixed with masking tape, which is glued to the walls. Finishing window slopes with plastic is considered complete, but finishing measures must be completed.
- When the coating is dry, you can begin installing decorative corners. Particular attention is paid to external modules; they are joined and cut at 45-degree angles. Installation is carried out using glue.
- All joints are additionally treated with sealant. Options are selected that will match the color of the installed material.
The final stage of slope cladding is the installation of decorative corners
On a note! The use of silicone should be avoided. This substance is not suitable for work on visible surfaces. The fact is that such a composition very quickly turns yellow and becomes covered with dirt.
VIDEO: do-it-yourself installation of plastic window slopes