Natural wood
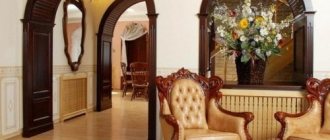
Decorating the front door opening with natural wood is a good option if the design is classic. Wood has a number of advantages that elevate it above other materials:
- Looping. Varnish or oil will become unusable over time, but this does not mean that it is time to change the door frame. You can update it by scraping and opening it again. In fact, this can be done ad infinitum.
- Strength. Compared to plastic or drywall.
Of the minuses: the price, especially for “rich” species, such as beech or walnut. In addition, wood is an unstabilized material and can expand due to temperature and humidity.
Stone and brick
This finish on door jambs is rare, and not just because stone design has become outdated. The process of forming masonry itself is complex, and finding a decent mason-designer is difficult.
But there are significant advantages:
- Durability. Most likely, the masonry will be demolished along with the house.
- Strength. It is impossible to crush or break the stone.
On the contrary, if you need to replace the finishing of the doorway of the front door, it will be difficult to tear off the masonry.
Frame finishing
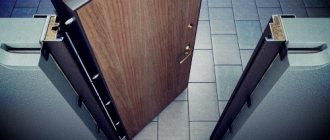
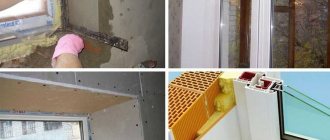
Iron doors can be large. In this case, it is necessary to use a special method of installing slopes. Frame finishing will reduce the load on structural elements. If this recommendation is neglected and a plastering method is chosen for a heavy door, a re-repair process may be required. The surface will begin to crack due to excessive load.
Attention! Using the frame method, you can prevent deformation of finishing decorative materials.
This method is used when installing heavy finishing materials. Frame preparation is also required for MDF with a thickness of 4 mm.
You can save on cement mortar by installing insulation inside. The frame method is also used for walls exposed to frequent moisture.
Frame installation
First, the surface is prepared; in some cases, the base must first be plastered. Then you need an antiseptic primer.
Wooden slats or aluminum profiles are suitable as a frame. If wooden slats are chosen, they must be impregnated with an antiseptic composition. The beam or profile is leveled using a building level and fixed with dowel nails.
All structural elements should be firmly fixed to the base. Longitudinal jumpers will strengthen the structure. Thermal insulation is used in the cells. Then you need to measure and prepare the strips. They are installed using glue. Then the reinforcement is reinforced with self-tapping screws. Finishing can be done using the selected material.
Door frame
Plaster
A gradually disappearing method of finishing the slopes of the front door from the inside. There are several reasons for this:
- The work is very dirty.
- Cracks often appear if you do not use fiberglass or reinforcing mesh.
- The plaster of the entrance door slopes may become damp.
Besides, the savings are imaginary. You will need to buy: building mixture, fiberglass or mesh (sold only in rolls), concrete contact, putty to cover the rough layer. The solution is decorative plaster. It is a little more expensive, but it does not crack and you can decorate it with a structural roller.
Decorative finishing
Different types of decor are used in the process of finishing slopes. Depending on the taste preferences of the home owners and the chosen method, different materials can be used. It can be plastic, lining, tiles, decorative stone, laminate or other materials.
Finishing the slope with clapboard or laminate is a fairly common option. These are durable and strong materials. They can be mounted even on a surface that is not level enough.
For smooth and shallow slopes, it is possible to use finishing made of plastic panels. This decor is quite soft and can be slightly deformed. Therefore, it will be more effective to use MDF panels for finishing. The material is quite tough.
For decorative finishing, depending on the type of material, a cement-sand mixture or adhesive solution is used for fastening.
Finishing door slopes with decorative stone
Drywall
How to decorate a front door doorway cheaply and without expense? In this case, plasterboard sheets are used.
It works well for eliminating defects, such as crooked walls. In addition, you can form a new doorway - narrower than the previous one. Subsequently, it is covered with a layer of finishing putty, painted or wallpapered.
Pros: simple and cheap. But there are a few more disadvantages:
- The strength of drywall is very low. The decoration of doorways will definitely not last long if there is a child or dog in the apartment.
- It absorbs moisture well through the slightest cracks.
- Drywall has been going out of fashion for a long time. Still, it belongs to the category of cheap materials.
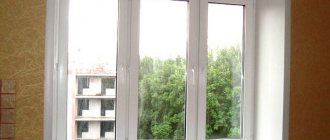
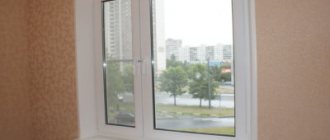
External slopes of the entrance door
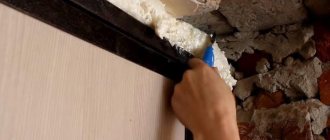
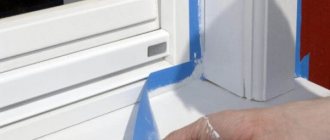
After installing the doors, you will need to carefully seal all the joints and gaps between the door frame and the walls. Polyurethane foam is ideal for this. When it dries, the remains must be cut off and checked for leaks; to do this, close the doors and hold a lit match or lighter around the perimeter. If the flame moves, it means you need to use the mounting material again.
Next, a platband is placed on both sides and at the top. Platbands should be selected according to the color and design of the door. If the door is installed with a recess, the slope must be sealed. On the outside, as a rule, cement mortar is used, but before covering the wall with it, it is cleaned of dirt and dust.
In principle, you can trim the slope and finish it with different materials, for example, use “Rodband” and other mixtures. The finish may also vary. For example, the slope can be painted, clapboard can be used, and if the door was installed not in a private house, but in an apartment where the entrance is heated, then it is recommended to use laminate or plastic.
MDF panels
Although MDF is a cheap substitute for wood, it is much more convenient in several ways:
- MDF is much more stabilized than natural wood; it is less susceptible to humidity and temperature.
- It costs much less. Such finishing options are appropriate for budget renovations, since the price is 2-4 times lower.
- It imitates a wooden surface well. You can find panels in walnut, oak, ash, stained boards.
In principle, MDF door slopes for the front door could be called ideal, if not for the short life cycle. They will have to be changed after 3-5 years. They gradually wear out and cannot be scraped.
You can learn more about MDF slopes from the video.
Materials for decoration
For upholstery and door panels, very different materials are used:
- plastic;
- natural wood;
- plywood;
- chipboard;
- OSB;
- MDF;
- PVC;
- Fiberboard;
- laminate;
- wood paneling;
- leatherette;
- Genuine Leather;
- tapestry;
- fake diamond.
To decorate entrance doors, a prefabricated array of valuable wood species is used: oak, ash, walnut, cherry, etc., MDF panels, laminated chipboards, PVC, upholstery lining strips.
Natural wood
Wood finishing is the most popular and expensive method. Usually an array of different types of wood is used - stained and bleached oak, cherry, maple, walnut, ash, wenge and others. Narrow lining strips are also very popular. Finished slabs are also made from wood, where the places where the planks are glued together are almost invisible, the wood is selected according to the pattern. Such parts can be installed immediately, but they are not cheap.
Natural wood makes it possible to fit the door into any style of apartment design by whitening, aging, and brushing the surface.
Wooden finishing is strong, durable (on average 50 years), it is warm to the touch, has a natural wood grain, and is available in a variety of colors - the material suits any interior. Wood protects well from noise and allows you to retain heat without additional insulation. It is environmentally friendly and repairable.
MDF
The design of the surfaces of the canvas itself, slopes using MDF, is inferior in cost to wooden decor, but in appearance it is practically no different from it.
MDF is covered with veneer or laminated with a special protective film.
Chipboard, plywood
Sheets of laminated chipboard, OSB, and plywood have a thickness of no more than six to eight mm. The decor of such panels is imitation wood, the installation method is gluing directly onto the canvas.
If you have financial difficulties, you can use chipboard, OSB or moisture-resistant plywood to finish the door leaf.
Plastic covers
Plastic panels have different widths. To decorate the door leaf you will need at least three parts.
They have proven themselves to be an excellent waterproof material with a long service life: they do not rot, do not crack, and withstand seasonal temperature fluctuations well.
PVC and fiberboard panels
Fiberboard and PVC that imitate wood are much cheaper than natural wood. They are less durable and strong.
Craftsmen can use panels made of polyvinyl chloride and fiberboard to decorate doors.
Laminate
Decorating with laminate is a good option when you want to do the renovation quickly and beautifully. Laminate coating usually imitates wood, less often stone and other materials.
Craftsmen with golden hands and a sense of beauty make original and very beautiful doors.
Wooden lining
The lining consists of narrow wooden planks. It is permissible to trim the door with it using small nails.
An interesting design can be created with clapboard (Euro or regular) from edged boards - wooden planks 6-20 mm thick.
Leatherette
Dermantine upholstery is a “classic” option for finishing doors. The material is stretched over the door leaf, nailed down with nails, and a layer of foam rubber is placed under it to create volume.
The material does not rot or mold, which is typical of natural leather.
Leather
Doors in expensive, luxurious interiors are upholstered with genuine leather. The design looks beautiful for many years and has a unique texture.
The technological process does not involve significant physical activity - upholstery can be done on an installed door.
Tapestry
For antique-style interiors, tapestry fabric is used as upholstery material. The decor comes out soft, and to keep the coating in place, special nails with large heads are used. Along the edge, the perimeter of the door, the material is tucked under.
One of the most luxurious, sophisticated and expensive fabrics is tapestry. It has a long history and abiding love among designers and users.
Fake diamond
Decoration with fake stone, sold in the form of thin tile or flexible material, looks original and very luxurious. This product adds additional volume and weight, which should be taken into account during installation. Gluing is carried out on the entire canvas, its individual parts, and the corners of the slopes. For this, special glue is purchased. A door completely decorated with pseudo-stone looks as if it is made entirely of it.
It is truly an interior decoration, although it is not always appropriate and is expensive.
Plastic
Finishing with plastic panels has only one drawback - fragility. Surely someone will press with their hand or trip, causing a hole to form in the slope. However, this minus is offset by a big plus – the price. It is cheap, which means it will be easy to replace.
In addition, installation is a matter of 5 minutes. Simply apply liquid nails and stick it to the pre-plastered wall. That's all.
Plastering
The leveled areas of the wall must be thoroughly cleaned of dust and coated with a special deep penetration primer. It will ensure high adhesion of layers and strengthen the base surface. The concrete lintel above the door needs to be given special attention. It needs to be treated with Betonokontakt. This is a special primer used for surfaces that do not absorb moisture well.
When the primer dries (about 5 - 8 hours), the beacon profiles are installed as accurately as possible. They are needed to level slopes.
The following steps are performed:
- Using a regular or laser level on the side wall 3 cm from the door, the position of the line is marked strictly vertically.
- Holes with a diameter of 6 mm and a pitch of 30 cm are drilled along the line.
- Dowels 6x30 mm are inserted into the holes. The level of the caps is leveled using twine.
- The beacon is installed on clips, and the verticality of the installation is checked again with a level.
Corner profiles are placed on the sides and top of the doorway in the same way. They should be flush with the area above the door and with the end walls.
After installing the beacons, a cement-sand mixture is prepared. The cheapest and easiest way is to use river or quarry sand and cement grades M-200 or M-150 as base ingredients. To obtain the correct consistency, you need to follow the following sequence:
- Building materials are sifted through a sieve with cells of 5x5 mm or 3x3 mm.
- It is worth preparing a container in advance in which 1 part of cement is mixed with 3 parts of sand.
- You need to add clean, settled water little by little to the dry mixture. At the same time, the solution is mixed with a special electric drill attachment or trowel.
The finished mortar must be thrown onto the wall with a spatula or trowel and then leveled.
Laminate
A close “relative” of MDF panels, but finishing the front door with laminate has one advantage - abrasion resistance. Laminate is designed to be walked on, so friction and moisture are less of a concern.
It is easy to install and saw with a regular hacksaw or electric jigsaw. The wall underneath does not have to be perfectly level, it will fit well as is.
Photo
Note! Scandinavian style in the interior: description and tips for decorating each room (70+ photos)
Let's discuss this article together:
Click to cancel reply.
Polyurethane
Their polyurethane door frame is an inexpensive replacement for plaster. Polymer slopes are a little cheaper to produce, lighter and more modern. They are mainly used in classical styles, where they are a good substitute for natural plaster. The only drawback of polyurethane is its low strength. He is unlikely to survive the blows. Therefore, it is not recommended to buy it for an apartment with small children and especially animals.
But installation of slopes is simple. In addition, polyurethane masks wall imperfections.
How to make slopes from plasterboard
When installing plasterboard slopes, it is important to correctly and accurately measure the required elements. To do this, measure the distance from the door jamb to the corner in several places, and measure the height of the required parts. Measurements are taken for each side separately: rarely do walls have ideal geometry.
All dimensions are applied to a sheet of drywall and connected by lines. Once again everything is measured and, if everything is correct, cut out.
This is what the “pattern” for a plasterboard slope looks like:
Cutting drywall
Cutting drywall is easy: all you need is a good paper knife, a long ruler (a meter or so) and a block of wood. A ruler is applied to the drawn line, a paper knife is drawn along it, cutting a sheet of cardboard and trying to cut the plaster at least a little. Place a block under the place where the cut was made and lightly tap the sheet along the cut. In this case, the plaster breaks, almost perfectly exactly along the cut line. All that remains is to cut the bottom sheet of cardboard.
This video shows how to cut drywall without a saw.
https://youtu.be/Pxt3QGuz1f8
This method is convenient for cutting drywall in a straight line. Where curved lines are needed, use a hacksaw for metal - it has a fine tooth and almost does not tear the cardboard. They also use a jigsaw, but there is a lot of dust. You can also cut in a straight line with a hacksaw or jigsaw if you don’t like the previous method.
Extras
The decoration of the doorway after installing the iron door can also be done with complete decor. An additional board is an intermediate part between the door leaf and the casing.
Extensions are made from MDF or wood, and therefore have the advantages of these materials. But the installation of door slopes is very simple, because their size is standardized. You don’t have to cut, adjust or level anything.
Installation of door slopes
The corner slope can be installed using a frame or installing the trim with mortar or glue. It is more difficult to work with the frame, so this process will be described step by step below. For the frame, wooden slats or a metal profile are suitable. You can install the frame on dowels; the slats are fastened along the entire perimeter of the opening, two slats on both sides, as shown in the photo:
Frame installation
To strengthen the slope, several slats are mounted in parallel; they can be installed at the lower, upper and middle points. If drywall is used, then it is simply attached to the profile with self-tapping screws around the perimeter, recessing the cap, and the space between the wall and the gypsum board can be filled with insulation. A perforated corner is installed on the edges of the material, and the joints must be sealed with sickle tape. Next, everything is puttied and smoothed with sandpaper. At the very end, the dust is removed and finishing is carried out.
If MDF is used, then installation on the frame should be carried out with small nails or self-tapping screws. Corners and fastening elements are covered with platbands. Laminate flooring is very easy to install, the first lamella is carefully fastened with nails directly into the groove, and the rest are installed in the lock. The last plank must also be attached.
Tile
Decorating with tiles is only justified if it is in harmony with the surrounding design. Basically, it is used to finish the slopes at the metal entrance, and to match it. Ceramics “metal” or “stone” are suitable for this.
It is almost impossible to break, scratch or break tiles. Glass glaze is much harder than steel or aluminum, which is used to make rivets and clothing fittings.
Of the minuses: before you make the slopes of the front door with your own hands, you will need to perfectly level the wall.
Technological aspects of working with certain materials
Each of the materials has its own characteristics and technological aspects, which should be considered in more detail.
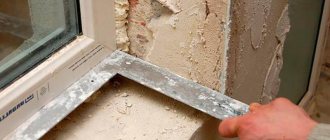
Working with plaster: simple and decorative (textured)
Slopes on the front door using ordinary plaster are made as follows:
- The required amount of mixture is prepared, which should be enough for 35-40 minutes of work. If there is a surplus, they will quickly lose their properties.
- The solution should be applied in layers equal to 1-1.5 centimeters. It is taken into account that more than two layers require reinforcement with reinforcing mesh.
- To obtain a flat surface, beacons are installed. They are fixed to a small amount of plaster.
- The existing experience should be realistically assessed. If it is not enough, then a wooden strip is laid along the outer edge along the entire perimeter. It should protrude to the width of the applied layer. That is, it will serve as a guideline in order to prevent curvature.
- After drying, the beacons are removed, which leave behind small defects. They are eliminated with a newly prepared solution. Care must be taken when removing slats. Corners can be reinforced with perforated corners.
Plastering door slopes requires certain skills.
After the surface has completely dried, the slopes for entrance doors are finished with decorative materials. This could be paint, wallpaper. But decorative plaster (textured putty) will look much more interesting. It is applied after priming:
- The decorative mixture is placed on the surface.
- With the help of various devices, the relief is formed (watch the video). If a decorative solution is used, the coating is obtained by proper smearing.
- Subsequently, depending on the material used, paint, varnish or waxing is carried out.
Thus, plaster can still be an excellent solution for finishing slopes, especially if simple repairs or interior renovations are being carried out.
Drywall: installation with putty
How to make front door slopes using gypsum plasterboards? The work is carried out according to the following principle:
- Putty will be used as a fixing material. She's perfect for the job.
- The process begins with careful measurement of the opening. It is necessary to remove all existing parameters. Based on them, a diagram of each part is built. Please note that the entrance doors have sloping openings. This is an important point.
- Drywall is cut into fragments. For this, a construction knife is used to cut the sheets. Of course, the edges turn out to be very uneven and will have to be sealed with putty.
Cutting drywall sheets - All elements are tried on in their place.
On a note! It is important to remember that the horizontal element overlaps two vertical pieces. Its thickness is subtracted from the dimensions of the racks.
- Putty is applied to the reverse side of the material. It is distributed in “slaps”.
- Each part is installed in its place. If necessary, clamps are installed, the role of which is performed by a wooden beam. Installation of drywall with putty
How to seal the joints and cracks that appear? Indeed, when you install plasterboard fragments on the front door yourself, finishing measures are necessary. They consist in the fact that the corners are formed using perforated pads, and the surface is covered with a layer of putty.
Installation of gypsum plaster boards differs from plastering in that the base is formed much faster. The work does not require any special skills.
MDF panels: fastening to the lathing
Finishing of slopes using MDF panels is carried out on the sheathing. This method is preferable for situations where the installation seam is more than 4 cm.
The product should be installed using the following technology:
- A wooden beam is installed around the entire perimeter of the opening. The parts are laid horizontally. Fixation is carried out using dowels.
- It is advisable to treat the planks with an antiseptic before installation.
- The resulting cells are filled with insulation.
- All areas are measured. Panels are cut out. They are tried on in their places.
- Fastening occurs with self-tapping screws that are screwed into the very edges. They will be covered with decorative corners.
- Thus, all elements are fixed to the frame.
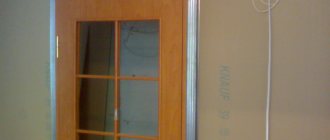
See photos before and after finishing with MDF panels:
Sheathing MDF slopes: doorway before and after finishing
Next comes the final finishing. The joints between the wall and MDF are covered with putty. The sealed area is sanded. All seams are hidden under patch corners.
Laminated chipboard: installation on vertical racks
Making door slopes with your own hands using laminated chipboard is not the best solution. But if installed correctly, the coating will be durable.
- The whole process almost completely repeats the work with MDF panels. The difference is that the wooden beam is installed vertically. That is, you need to get two racks that are fixed on each edge.
- For work, LDPS is used, which is most suitable in thickness. After taking the dimensions, the parts are cut.
- To avoid repairs to the material due to water ingress, all open ends are coated with sealant.
- The elements are fixed through pre-drilled holes, which at the initial depth should be slightly larger than the diameter of the cap. This will allow you to recess the screws so as not to damage the front side. All holes are covered with special wax or sealed with overlays.
- All corners and joints are covered with decorative corners.
This method is convenient if you are covering the slopes of interior doors, which are less susceptible to moisture.
Additionally, we recommend watching the video:
PVC panels: fastening with glue
This material is less often used for such work. Also, many people mistakenly believe that they can give preference to the cheapest options. In fact, such a choice leads to the fact that the coating begins to deteriorate immediately after installation: defects appear, color changes.
Most often, plastic panels are fixed with glue:
- Preparatory work is carried out carefully. Differences should not be more than 2 mm per 1 m.
- The panels are cut according to the dimensions taken from the areas to be covered.
- Please note that the fastening is done with glue. Therefore, before installing slopes on the door with your own hands, all surfaces must be pre-treated. A primer is used for the walls, and the plastic is slightly sanded on the inside with sandpaper. Such procedures will increase adhesion.
- The glue is applied with a snake. It is important to consider that excess mixture is removed immediately, otherwise the surface may be damaged, which will lead to repair or replacement of parts.
- The elements are pressed against the base, but are not held in place, but immediately come off. After waiting a few minutes, they are finally installed.
- Now all that remains is to secure the decorative fragments.
The easiest and fastest way to install PVC panels on slopes is to mount them with glue.
Modern PVC versions have sufficient strength and beauty. As an alternative, sandwich panels are used.
Decorative stone and brick (tiles): the main thing is to draw up a diagram
How to make slopes on doors made of artificial stone or similar materials? The procedure is:
- It all starts with drawing up a diagram. It should reflect the actual position of the elements. If laying bricks can be outlined on paper, then more work will have to be done with stone.
- Initially, the surface is marked. It is immediately taken into account whether the parts will lie only inside the opening or frame the outer part.
- Detailing is done on the floor. It should be quite detailed.
- Now they start facing. The stone is fixed with glue or a special mixture. It is important to consider whether suture or seamless technology will be used.
- After installation, if the surface is not protected, it is varnished.
We encourage you to additionally watch this video:
Thus, door slopes can be made of various materials. Each option is selected individually.
Gypsum
Nowadays it is rare due to the complex installation and high fragility of gypsum. In addition, it is simply traumatic. The density of gypsum is 2200 kilograms per square meter, which, coupled with the looseness of the material, can lead to falling off.
But the biggest drawback is that finishing the front door opening from the inside with plaster is very expensive.
At the same time, it is an indispensable decor for classicism and baroque. And if it is made in an ornate manner, characteristic of that era, it will decorate the entire interior.
Wallpaper
The oldest method of finishing the front door from the inside with your own hands. In some cases, they even paste over the canvas.
Apart from the price, this method basically has no advantages, only disadvantages:
- They will quickly become damp and fall off.
- Constant friction will cause noticeable light areas.
- They don't look modern.
laminated chipboard
A good idea is to make slopes for the front door with your own hands from laminated chipboard.
The same material is used for furniture. It doesn’t even lie on a flat wall, and is not afraid of impacts or friction.
If there is constant humidity in the entrance, you can buy moisture-resistant laminated chipboard. It is not afraid of even direct contact with water, so even external slopes are treated with it.