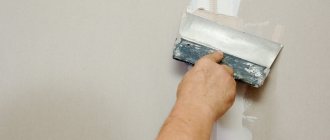
Surface preparation
The surface must first be cleaned of dirt, dust, old wallpaper, oil stains and other deposits that can affect the adhesion (adhesion) between the plaster and the treated area.
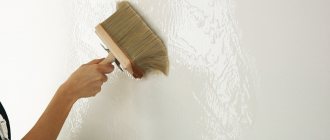
- The wallpaper is generously moistened with a wide paint brush and peeled off with a spatula.
- Old paint is removed with a scraper or burned off using a blowtorch. A steel brush and abrasive paper can also be used to clean the base.
- Heavily soiled areas are washed using an alkaline detergent. Then the surface is washed with cold water.
- Grease stains are treated with a solvent or removed mechanically.
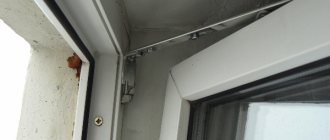
- Metal parts are cleaned of rust and treated with special compounds to protect against corrosion.
- The beads are cut down using a chisel or a double-pointed hammer.
- At the final stage, the surface is either dusted with compressed air or treated with sandpaper and then wiped with a rag.
Before you start plastering, make sure that the surface is sufficiently smooth, stable (does not crumble if scraped with a sharp object) and does not wobble anywhere. Examine the base, make sure there are no chips or cracks on it, tap the surface with a mallet. Seal the seams so that they do not stand out, then clean the sealed areas, smooth them with finishing putty and treat them with an alkaline solution.
Reinforcing mesh and shingles
The plaster mesh ensures retention of the coating on the wall, increases its mechanical strength, and prevents the formation of cracks. Its use is especially important when plastering ceilings, block and brick walls, as well as when the plaster layer is thick.
When the thickness of the plaster layer is less than 3 cm, a mesh of synthetic or glass fibers is used, which is aimed at the base using a construction stapler. If the thickness of the plaster layer exceeds 3 cm, it is recommended to install a metal mesh with an anti-corrosion coating, fixed to the wall with self-tapping screws.
Shingles are used for plastering wooden walls. It consists of narrow thin strips made of coniferous wood, which are stuffed crosswise onto the base at an angle of 45 degrees so that they form cells of the same size (40*40 cm for the ceiling and 45*45 cm for the walls). To increase the strength of the plaster layer, insulate and improve sound insulation, fibreboards, matting, felt and other materials are placed under the shingles.
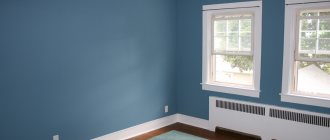
Alignment by beacons
Beacon plaster allows you to create a smooth and even surface that looks like a solid slab. Strips of hardened plaster applied to the wall, aluminum structures, thin wooden blocks and even drywall scraps can be used as beacons. The simplest and most convenient option is to use metal (aluminum) beacons.
Beacon installation technology
Drill a hole in the corner of the wall, 10 cm away from the other wall and from the ceiling. Insert a self-tapping screw into the hole. Using a plumb line, draw a vertical line from this point. Repeat the operation, stepping back from the first line (the distance between the lines should be 20-30 cm less than the length of the rule). Mark the entire wall this way.
Throw plaster along the outermost marking line. Attach the beacon to the plaster, level its position using a level, make sure that it is level vertically and horizontally. Repeat the operation, installing the outermost beacon on the other side.
At the top and bottom of the wall, stretch the cords between the beacons, placing them horizontally parallel to each other.
Throw plaster at the locations of the intermediate beacons. Install the beacons and align their position with the cords.
Upon completion of the plastering work (after the mortar has completely dried), the beacons can be removed and the remaining holes can be sealed with plaster mortar. Some craftsmen prefer to leave beacons in the wall.
Preparation of mortar for plaster
The first thing you need to do if you decide to plaster the walls yourself is to prepare the solution and the surface on which it will be applied.
To prepare walls for plastering work you need:
- hammer-pick;
- a hammer with a notch (an ax can replace it);
- shoe knife;
- putty knife.
To prepare the solution directly you will need:
- box;
- container for water;
- sieve for sifting sand and dry mixtures;
- a sieve for straining the solution;
- scoop;
- shovel.
It is important to choose the right solution. It always includes three main components:
- binder material;
- aggregate;
- water.
When mixing all the components, it is important to maintain the correct proportion so that the work is not in vain. The fact is that in the absence of fillers, cementitious materials begin to crack and crumble after drying.
As for the liquid, to prepare the working solution it is necessary to use only clean drinking water (in no case mineral water) and in such a quantity that the resulting mass is similar in consistency to dough.
The choice of aggregates and binding materials depends not only on the type of surface that is going to be plastered, but also on the operating conditions and durability of the structure.
Applying plaster. Tools and general recommendations
To work you will need a falcon, a spatula or trowel, a grater, a grater and a rule.
Choose a composition taking into account the characteristics of the surface. For curved walls with broken geometry, coarse-grained plaster is suitable, allowing you to smooth out unevenness and large defects.
A reinforcing mesh is pre-glued onto the block or brick base to prevent cracking of the plaster. The thickness of the plaster must be at least 5 mm, otherwise the masonry seams will be visible through it.
A smooth concrete wall can be plastered in one layer using fine-grained (finishing) plaster. Layer thickness is about 5 mm. For better adhesion, the surface is pre-primed with concrete contact.
In order for the coating to be of high quality and durable, several rules must be followed:
- Plastering must be performed at temperatures from +5 to +30 ºС. During the cold season, this temperature regime in the room should be set in advance (so that the base has time to warm up) and maintained for 3 days after plastering work. Relative air humidity should be no more than 60%. Study the information on the mixture pack in advance - some formulations may require special conditions.
- Perform work from top to bottom. Start with the ceiling and then move to the walls.
- Clean and rinse tools thoroughly after each stage of work.
- Apply the next layer of plaster only after the previous one has completely dried.
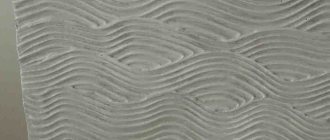
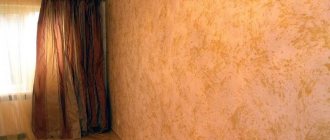
Working with decorative plaster
Decorative plaster will replace wallpaper and is a very aesthetic and durable solution
Plastering walls with your own hands can be done not only with the aim of removing any defects in the walls, improving their heat and sound insulation properties, and avoiding dampness and moisture entering the room.
Decorative plaster used for design purposes is sold in the form of dry mixtures in containers.
- All you need to do with it is dilute it with water according to the instructions and mix thoroughly.
- It is recommended to prime the walls the day before.
- Afterwards the plaster can be applied to the surface.
- How to do this, in which direction and with what movements depends solely on the desired result, on what kind of relief and what kind of pattern you would like to see in the future.
- It may be necessary to make markings before applying the solution (this is required in order to obtain a certain relief, a pattern that is repeated at approximately equal distances).
- If desired, you can add a little color (paint) to the plaster, or you can paint it after drying in the desired color.
When applying decorative plaster, an ideal flat surface is usually not required. It hides minor defects, but you still need to get rid of large irregularities!
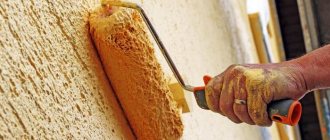
Splash
This layer of plaster ensures adhesion of the coating to the wall. To create it, a solution that is not too thick is used, with a consistency similar to sour cream. The thickness of the layer is about 0.5 cm.
Scoop out the solution and place it on the center of the falcon. Do not take too much material so that it does not fall off the surface of the tool. Bring the falcon to the base, tilting it slightly towards the wall. Take a small amount of mortar with a trowel and throw it onto the surface, making a sharp movement away from you.
Cover the base with the solution gradually, in strips, moving from bottom to top. Try to throw the material from the same distance all the time. When finished, remove protruding areas if necessary. There is no need to level the coating.
Wait until the plaster layer hardens. After making sure that the material does not crumble or press through when pressed, proceed to the next step.
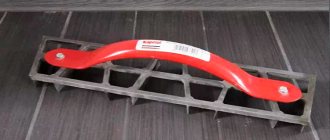
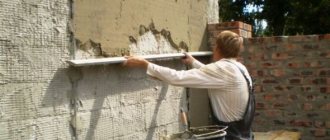
Plaster leveling
The wider the trowel, the smoother your wall will be.
As a rule, there is no need to level the spray. The exception is those cases when protruding clots of solution form on the surface and must be removed.
But the soil needs to be leveled. This is done either as a rule (in the case of throwing the solution with a trowel) or with the help of a falcon. The latter occurs when applying the solution with the same falcon. The leveling process in this case is similar to the process of spreading primer, only the primer is no longer placed on it, and the pressure on the tool is applied depending on the plane in which it is necessary to level the solution.
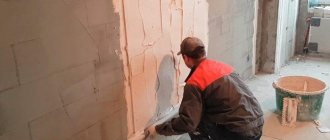
Priming
This layer makes it possible to align walls with broken geometry, ensures the strength of the coating and gives it heat-protective properties. To create it, use a thicker solution. The thickness of the layer should not exceed 1.5-2 cm, otherwise the material will begin to slide. If it is necessary to create a thick soil, the solution should be applied in several layers.
Apply the solution to the base between the two beacons. Set the rule on the protruding parts of the beacons, and then move it from top to bottom with a sharp movement. Repeat the operation until a smooth surface is formed, located flush with the edges of the beacons. Do not try to eliminate small holes and minor roughness - their leveling will be done in the next step.
Level each layer of soil. Particular care should be taken when leveling the top layer. Allow the soil to harden.
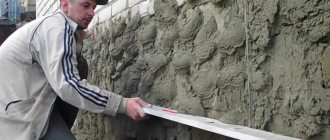
Covering
The covering is the top layer of plaster, which will subsequently be rubbed down to create a flat and smooth surface. To create it, a liquid solution with a creamy consistency is used. The layer thickness should not exceed 2 mm.
Before preparing the solution, sift the components of the mixture through a sieve with cells no larger than 1.5 mm.
Wet the primer with water using a paint brush. Apply the solution with a trowel, and then smooth the surface with a trowel, making circular or wave-like movements.
Grouting (grouting)
This operation is performed immediately after the end of the previous stage, when the solution is still processable, but no longer sticks to the grater. Mashing can be done in a circular or accelerating manner.
When grouting in a circular manner, use a float to make circular movements counterclockwise, pressing the tool tightly against the surface.
Competitive grouting allows you to create a more even and smooth coating. It is usually performed after grouting in a circular manner, pressing the float to the surface and making straight, sharp strokes.
If some areas of the coating have already hardened and are difficult to machine, they should be moistened with water using a paint brush.
To make the surface even smoother, it can finally be treated with a grater covered with soft fabric (felt or felt).
To main§ 11. COATING, GROUTING AND SMOOTHING OF PLASTER
Preparation of the solution and application of the coating. The final process of finishing plaster is coating and grouting. Instead of grouting, the plaster is often smoothed down. The cleanliness of the finished surface largely depends on the quality of the prepared coating solution. A well-prepared mortar on fine sand of normal fat content is easily, quickly and cleanly rubbed or smoothed, thereby increasing the productivity of plasterers. To prepare the covering solution, fine-grained sand should be used. Coarse sand is of little use, as it gives a rough, rough texture. The covering is carried out with a solution of the same composition as the plaster primer. It is not recommended to add gypsum to the lime mortar for covering, because when grouting it quickly softens and the strength of the covering layer decreases. Fatty solutions give a rougher surface, with a large number of grinds and unrubbed stripes. These solutions are more suitable for smoothing. Thin solutions are not strong enough and do not rub well. In 12-20 minutes
Before applying the covering, the soil should be moistened with water.
The covering adheres more firmly to the moistened soil, resulting in the formation of a monolithic plaster crust. The solution is applied to the surface of walls and ceilings in thin layers and carefully leveled with trowels. The cleaner and more thoroughly the solution is leveled, the easier it will be to grout. The covering can also be applied from the falcon by spreading. With the appropriate skill, it turns out quite clean and even. Grouting plaster with floats.
Grouting is done in a circular and continuous manner. Spreading grout is cleaner and is most often performed with high-quality plaster. To grout the plaster manually, use a wooden trowel (Fig. 51, a). The grater handle, made of wood of any species, must exactly match the hand of the worker. Attach the handle to the canvas with wooden dowels or nails. The grater cloth is made from pine or spruce. There should be no knots or tar on it.
During operation, the float blade wears out and the dowels or nails begin to scratch the plaster, so they should be gradually deepened into the blade. When replacing the grater blade, the handle often breaks. In addition, periodic wetting and drying of the grater leads to warping of its blade. As a result, only one half of the grater blade begins to work, which reduces labor productivity and impairs the cleanliness of the surface being processed. Felt or felt pads stuffed onto such a fabric also wear out quickly. The grater, the blade of which is made of galvanized steel or duralumin with a thickness of 1 - 1.5 mm
.
Holes with a diameter of 1.5-2 mm
at a distance of 10-15
mm
from one another and three or more holes on the other two sides.
The end sides have bent sides 10 mm
, on which all the holes are located.
The handle is nailed to the bottom of the canvas with nails with wide heads, the ends of the nails are bent on the handle. The handle can be nailed so that the sides face either up or down. Felt, felt or wooden cloth is attached to the grater, whose sides are curved upward (Fig. 51, b). The metal sheet does not warp, so the felt or felt rubs the surface with its entire plane.
A wooden sheet consisting of several slats can be nailed to a grater,
whose sides are 5 mm Nails for fastening the slats are driven into holes drilled in the sides. This type of canvas rubs like a regular wooden one, but does not warp at all, since it consists of narrow slats (25-30 mm
).
You can also nail a felt or felt backing to such a canvas, bending its edges towards the canvas. When attaching the slats, the nails should be driven in incompletely and bent to make it easier to pull them out when replacing the slats. Circular grouting
(Fig. 52, a) is performed as follows. With one hand, take a grater, press the blade to the surface of the plaster and make circular movements counterclockwise. “Lumps and irregularities are cut off with the edges of a grater. The solution, moved along the surface, fills individual depressions and rubs the covering. The grater should be pressed with different force: where the surface is convex, it is stronger, and where it is concave, it is weaker.
During the grouting process, cut mortar is collected onto the edges of the float blade. Periodically it must be cleaned off and used to lubricate grouts and sinks. Over time, the covering dries out and is difficult to rub off. To make it softer, the surface of the plaster to be rubbed should be periodically moistened with water using a fine brush. The brush can be made of hair, bristles, grass or matting. When the plaster is grouted in a circular manner, slightly noticeable circular marks remain on its surface without cavities or mortar grout. Therefore, for high-quality finishes, the round grout is supplemented with a running grout. Competitive grouting
(Fig. 52, b) do this.
The grater, well cleaned of the solution, is pressed tightly to the surface and begins to make straight-line movements with it - swings. This removes all traces of grout all around. It is best to carry out the grouting in a round manner after the grouting in a circle. Having rubbed a small surface (0.5 - 1 m2
) in a circular manner, it should immediately be rubbed smoothly.
If the surface of the plaster, rubbed in a circle, has dried, then it is moistened with water and then rubbed smoothly. After smooth grouting, the surface of the plaster should be free of scratches, cavities, abrasions, grooves, bumps and other defects. When grouting walls up to 4 m
, there should be only one joint on them, for which grouting is carried out in two strokes: one from the top from the ceiling to the scaffolding, the other from the scaffolding to the floor.
The cleaner the surface of the plaster is rubbed, the less it requires corrections during painting work. The greatest cleanliness of rubbed plaster is achieved when the work is done first with a wooden float, and then with a float, the canvas of which is upholstered with felt or felt. Currently, various troweling machines are widely used for grouting (see § 20). Smoothing plaster with trowels.
Smooth the plaster using wooden or metal smoothers (Fig. 53, a).
Soft rubber
2
to the wooden sheet 1 of the smoothing board, so that it extends beyond the edges of the sheet by at least 20
mm
.
The process of smoothing the cover with trowels differs little from working with a regular trowel. Smooth out in two ways. In the first case, the applied coating is first leveled with a regular trowel and then smoothed with a trowel in two directions. On walls, it is recommended to first smooth the covering in the vertical direction (Fig. 53, b), and then in the horizontal direction (Fig. 53, c). On ceilings, the covering is smoothed first across the rays of light coming from the windows, and then in their direction. In the second case, the covering solution is simultaneously spread and leveled, and then smoothed. The cleanliness of the surface depends on the skill of the worker. When smoothed with a rubber-lined trowel, the surfaces acquire the appearance of fine sandy textures; Such surfaces are suitable for finishing with adhesive paints. When smoothed with metal trowels, the surfaces become as if iron-plated. They are suitable for painting with oil paints. Sandless cover.
To avoid puttying and paint directly over the plaster, use a sandless coating.
It is prepared from lime paste and gypsum. Lime dough is taken with a thickness of a standard cone of 12 cm
.
Gypsum and lime paste are passed through a sieve with holes no larger than 1X1 mm
. When preparing a new portion of the covering, the lime dough should be mixed well so that it is of uniform thickness. The following ratios of gypsum and lime paste (by volume) are recommended: for wet plaster...1:3; for slightly damp……1:2; for dry……….1:1. The solution is prepared in small portions without gypsum set retarders. Slightly set or thawed solution should not be used. The soil for applying the covering must be well leveled. If it is dry, then it is thoroughly moistened with water. To apply a sand-free coating, trowels (Fig. 54, a, b), cut-offs (Fig. 54, c), and spatulas (Fig. 54, d) are used.
The prepared solution is applied to the ground with a layer of 2-3 mm
and immediately level it well and smooth it with metal trowels. When joining the covering (Fig. 55), the edge of the previously applied section of mortar is cut off at an angle of 30° and only a new portion of mortar is applied to the cut part.
Grouting surfaces for painting without puttying. To prepare the solution, it is necessary to use thick, well-seasoned lime dough (preferably fatty) and fine sand with grains of 0.3-0.6 mm
.
Lime dough and sand for preparing the solution should be filtered through a sieve with 1X1 mm
.
To grout dry surfaces, prepare a solution of 1:1 composition (lime paste: sand), mix it well and additionally filter through a sieve for uniformity. Apply the solution in a layer 2-3 mm
.
As soon as the solution hardens, it is rubbed in a circle or evenly with graters lined with felt or felt. If the solution dries out, moisten it with water. A smooth, well-made covering can be easily rubbed off. Since the sandless covering is applied in a thin layer, there should be no sinkholes, potholes or other defects on the soil surface. A well-trodden covering has a fine-grained, smooth texture that does not require puttying for simple painting. This increases the productivity of painters and reduces the cost of finishing work. Previous page
| table of contents | Next page |