How to check the evenness of walls and the quality of plastering work in residential premises
Before starting work on plastering walls, you need to understand that there is simple plaster and high-quality plaster. To enable high-quality further finishing of the walls, high-quality wall plaster is used. Therefore, when ordering work, please pay attention to this. How to check the evenness of walls after plastering work. To do this, you will need a rule-level, preferably a new one 2.5 meters high, a new building level.
1.Check deviations vertically and horizontally. Differences in the plane of the walls from the vertical by 1 meter of their length by 1 millimeter are allowed. The entire height of the room is no more than 5 millimeters. The planes of the walls are 1 millimeter from the horizontal, per 1 meter of their length. Check this using a two-meter building level. Advice! Be sure to check every two meters of the wall surface.
2. Check the evenness of the walls. The surface can have no more than two irregularities of smooth outlines per 4 square meters with a depth or height of no more than 2 millimeters. The evenness of the walls is checked using the new rule - a level with a height of 2 or better 2.5 meters. It is applied to the plane first vertically, then horizontally, and the distance between it and the plastered surface is determined; it should not exceed 2 mm. Check the evenness of the surface under the radiators, on the walls where there are windows, in the area of sockets and switches, behind heating risers, in places where it is difficult to reach. Attention! Non-genuine builders believe that the ideal level should be at eye level, and will show you exactly these places, so be vigilant in this matter and check everywhere.
3. Check the strength of the plastered surface. Inspect the surface. There shouldn't be any cracks. Hit the surface with an open palm in several places at your discretion; if you hear a booming sound from the impact and feel peeling, then the work must be redone. Attention: Make sure that all metal beacons are removed from the walls.
4. Checking the corners If you have agreed with the performers to align the corners at 90 degrees, this is especially true in places where furniture and equipment are installed, then you can check the work as follows. The corners are checked not for evenness, since evenness will be ensured by the metal corners that are installed before the putty, but for deviations in degrees horizontally. For example, an angle of 89.9 degrees gives a wall 5 meters long, a deviation of about 1 cm. A 90 degree angle between the walls in a rectangular room is easier to check with a tape measure. You need to measure two diagonals of the room and compare them. If they are equal, then the walls form a rectangle, with right angles and parallel walls. You can also check the right angles of the walls using a long construction square at least 50 cm long; check the entire angle from floor to ceiling.
5. Check the parallelism of the walls. If you have agreed in advance on the walls, which should be strictly parallel to each other, then use a tape measure to measure the distance between them, at the beginning and at the end, it should be the same.
6. Checking areas of special attention. We do this in the same way using a building level rule. Important! Door trims, ceiling and floor plinths are smooth, so the junction areas of the plinths and platbands must be perfectly smooth so as not to get a gap in this place. Deviations of door and window slopes, arches, pillars, pilasters from the horizontal and vertical should not be more than 1 millimeter. The radii of curved elements, for example arches, should not deviate from the design value by more than 5 millimeters. This can be checked using the template pattern. The width of the slopes should not deviate by more than 2 millimeters from the design value. Check the entire perimeter of the slopes.
Attention! Check that the walls are plastered to the very edge of the doorway, as the trim may not hide the remaining surface.
Attention! Check that the plaster on the window slopes does not interfere with the free movement of the window sashes. To do this, you need to open the window all the way and see if the window opens completely.
Attention! Make sure that all metal corners, especially those above doorways, are pre-primed so that later, when painting, stains from metal corrosion do not appear.
Surface quality
A good wall should not have moisture stains or dark marks, otherwise mold will form in this place after some time. The absence of stains is checked visually.
The plaster should not come too close to the hinges on the windows, as this will interfere with free opening. Checked by opening the window sashes.
Quality requirements for various types of plastering work
These requirements are contained in GOST No. 28013/98 “Building Mortars” and in Appendix No. 8 of SNiP No. 3.04.01/87. According to these documents, the plaster mixture must meet the following criteria:
- the mixture used for spraying or priming is sifted through a sieve with cells no larger than 3 mm;
- mixture for covering or single-layer plaster - through a sieve with cells no larger than 1.5 mm;
- solution mobility - from 5 to 12 cm;
- delamination level – up to 15%;
- the water retention rate of the mixture is at least 90%;
- the strength of the coating is determined by the values included in the design.
Attention If the plaster mixture is purchased at the factory, then documents confirming its quality must be attached to it.
These papers contain the following information:
- date, exact time of preparation of the solution;
- brand of plaster mixture;
- type of binder used;
- overall volume;
- mobility indicator;
- name of GOST to which the mixture corresponds;
- price per cubic meter of purchased batch.
Carrying out work in accordance with the regulatory document
Scope of work for different types of plastering.
Requirements for the implementation of high-quality plastering work are stated in paragraphs No. 3.1/3.17 of SNiP No. 3.04.01/87.
Surface preparation
Before plastering begins, the following operations must be carried out.
- The premises to be finished must be protected from weather influences and precipitation.
- There is hydro-, heat- and sound-insulation of surfaces, as well as leveling floor screed.
- The joints and seams between the panels and blocks are sealed.
- The junction areas of door and window units, as well as balcony blocks, have been sealed and carefully insulated.
- Windows installed.
- Embedded elements have been installed.
- Test runs of the heating and water supply systems were carried out.
Main works
External work should be carried out at positive temperatures and dry weather.
- Plastering should be carried out at a temperature of air and the surface being treated not lower than +10°. Air humidity should be no more than 60%. This temperature must be maintained in the premises at all times, no less than two days before the start and twelve days after completion of the work.
- Plastering should be carried out on the basis of the PPR - the work plan for the construction of a building or structure.
Note! Applying plaster finishes to surfaces that have areas with efflorescence, rust, bitumen and grease stains is strictly prohibited. It is necessary to remove dust from the base before laying each layer of plaster.
- The strength of the treated surfaces should not be less than the same finishing value.
- Architectural elements protruding beyond the plane of the base, areas where wooden surfaces meet stone, brick and concrete structures, must be plastered using the reinforcing mesh fixed on them. Entirely wooden bases must be finished over shingled panels.
- Brick, concrete and stone walls constructed using the freezing method must be plastered only after they have been thawed from the inside, no less than half their thickness.
- When working on brick walls, if the air temperature is +24° or more, their surface should be moistened before plastering.
- When covering the surface with single-layer plaster, it must be smoothed immediately after application. When using troweling units - after the mixture has set.
- When laying a multi-layer coating, apply each layer only after preliminary hardening of the previous one. The soil must be leveled before it begins to set.
Checking the quality of plastering work in apartment renovation
Checking the quality of plastering work is done on the basis of an open source: Requirements SNiP 3.04.01-87 “Insulating and finishing coatings”. To achieve high-quality plastering work, during the plastering process it is necessary to comply with the following requirements and standards for plastering work.
Protruding architectural details, as well as joints between plastered structures made of different materials, must be plastered over a metal mesh or woven wire attached to the surface of the base.
Wooden surfaces are plastered over shingled panels. Note: This check of the quality of plastering work applies to plastering work performed with classic cement-sand mortars, as well as modern gypsum plaster mixtures with polymer additives.
OverStroy
December 18, 2021 2:15 pm
PLASTER COATINGS: BASIC CONCEPTS
Plaster is a type of finishing layer on the surfaces of various bases of premises (walls, partitions, ceilings, columns), which levels the planes of these bases, gives them the necessary outline and shape, protects structures from moisture, weathering, fire, increases resistance to heat transfer, improves air permeability and sound conductivity of enclosing structures.
According to their purpose and properties, monolithic plasters are divided into: ordinary - intended for use in normal temperature and humidity conditions; special - performing protective functions in relation to the base; decorative - for finishing facades and some premises of public buildings (lobbies, halls, staircases).
Conventional plasters are divided into three categories depending on quality: simple, improved and high-quality:
Drawing - Types of plaster: a - simple; b - improved; c - high quality; 1 - base; 2 - spray; 3 - soil; 4 - cover
Simple plaster is made from two layers of mortar: spray and soil with a total thickness of up to 12 mm. Improved plaster is made from three layers of mortar: spray, primer and covering layer with a total thickness of up to 15 mm. High-quality plaster consists of a spray, two layers of primer and a covering layer with a total thickness of 20 mm.
PREPARATORY STAGE OF PLASTERING WORK
Before carrying out plastering work, it is necessary to: - complete installation and general construction work, incl. roof installation; — make entrances to the building and arrange canopies over the entrances; — complete the laying of all communications and seal communication channels; - seal joints and gaps between walls, partitions, ceilings, as well as joints between window, balcony and door blocks with elements of external and internal enclosing structures; — install window sills; — test the internal plumbing, heating and sewerage systems; - insulate the room and ensure its temperature is not lower than +10 ° C and air humidity is not more than 60%, as well as drying damp places; — check the strength and stability of the scaffolding; - thoroughly clean the surfaces of walls and partitions from dust, dirt, grease and bitumen stains, and the room from remnants of building materials and debris; — illuminate workplaces; — deliver tools, equipment, fixtures and materials to the workplace.
Preparing the surface for plastering involves cleaning the surface from plasters that have lost their adhesion and astringent properties, products of brick destruction, old peeling paint layers, dust and dirt. Cleaning methods and means depend on the chemical composition of the material being cleaned, the nature of the contaminants and deposits. Requirements for the quality of cleaning are determined by the type of finish being designed. Dust-free surfaces before applying each layer of primers or plaster compositions. If there are smooth surfaces of the base, it is necessary to apply notches to improve the adhesion of the plaster composition. The adhesion of the plaster coating to the base depends on the quality of surface preparation for plastering. For interior decoration of ceilings, walls and partitions, this indicator must be at least 0.1 MPa.
Grease, bitumen and oil stains (traces of grease), efflorescence, protruding reinforcement, and rust are not allowed on the surfaces to be plastered. The surfaces of the walls are cleaned of mortar deposits by cutting them off with scrapers and plaster hammers, after which the surface is cleaned of dust with a rag. When plastering brick walls and partitions laid with seams filled with mortar, first scratch the seams to a depth of 10 - 15 mm or evenly incise the surface, and then remove the dust. Protruding architectural details and joints between structures made of different materials must be plastered using materials that ensure the joint functioning of the structures and prevent the formation of shrinkage cracks. When applying the solution at an ambient temperature of 23 ° C and above, the bases must be moistened.
✔FREE - SITE VIEW, COST CALCULATION, CONSULTATIONS
✔ CONTRACT, ESTIMATE, COST OF MATERIALS
✔ WE PROMPTLY START WORK AND PLASTER
✔ PAYMENT ON FACT, CASH/NON-CASH
8 (029) 67 67 830
PRODUCTION OF PLASTERING WORKS
Sequence of execution, requirements for application layers
Plastering the surface is carried out by applying plaster compositions in the following sequence: - for simple plastering: a) applying a spray of ordinary solutions; b) applying a layer of soil from ordinary solutions, followed by leveling and grouting.
- with improved plaster: a) applying a spray of conventional solutions; b) applying a layer of soil from conventional solutions, followed by its leveling and alignment; c) cutting corners, husks, appendages; d) cutting ceiling rustics; e) applying a covering layer followed by grouting.
- for high-quality plaster: a) applying a spray of conventional solutions; b) applying a layer of soil from ordinary solutions (in two layers), followed by its leveling and alignment; c) cutting corners, husks, appendages; d) cutting ceiling rustics; e) applying a covering layer followed by grouting.
The spray layer should completely cover the surface to be plastered, have strong adhesion to it, and fill all the unevenness. The thickness of the spray is 5 mm. The spray acts as a connecting link between the surface to be plastered and the remaining layers (primer and covering layer) of the plaster coating, therefore the surface of the spray should be rough and should not be smoothed or leveled. After spraying, apply a layer of primer (depending on the quality of the surface, one or more). The thickness of each layer of soil should not exceed 7 mm. Each subsequent layer of plaster coating is applied only after the previous one has been leveled and set. The last layer of soil is leveled so that the covering layer has the same thickness over the entire plane. The average thickness of the plaster marking should not exceed 12 mm for simple plaster, 15 mm for improved plaster and 20 mm for high-quality plaster.
The sequence of technological operations in the production of plastering work on the surfaces of walls and partitions, ceilings and slopes: - surface preparation: cleaning the surface, priming the surface, installing beacons for vertical surfaces, protective corners on external corners, window and door slopes; - preparation of mortar mixture; — plastering the surface: applying the mortar mixture, leveling the applied mixture, cutting off irregularities; — preparation for final finishing: surface structuring (if necessary), surface troweling, surface smoothing, second surface smoothing (for high-quality painting).
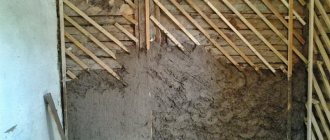
Installation of beacons and profiles
The installation of beacons on walls also begins with hanging the surface; for this purpose, from the top of the wall at a distance of 30-40 cm from each corner, install dowels so that the caps protrude above the surface of the wall to the expected thickness of the plaster layer. A plumb line is lowered from the caps and two more dowels are installed along it at a distance of 30-40 cm from the floor. The cord is pulled diagonally and horizontally and the minimum thickness of the plaster layer is determined from it. Then the dowel heads are leveled so that they are in a certain plane of the plaster. If the walls are 2.5-3 m high, then you can get by with two dowels; if the height is greater, install a third dowel. Dowels must be made of non-corroding material.
The placement of beacons (or pitch) is determined depending on the length of the applied rule.
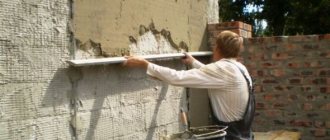
After marking the installation sites of the beacons along the entire length, every 300 mm, a mortar mixture is applied with slaps, into which the metal beacons are pressed and aligned as a rule horizontally and vertically. The correct installation of beacons is also checked using plumb lines or a building level.
The installation of corner mesh profiles on external corners is carried out as follows: a mortar mixture is applied to the inner side of the corner every 300 mm and pressed against the corner, as if pressing into the applied mixture, and aligned so that the corner is not rotated relative to the corner and is aligned with the previously set beacons one plane. The length of the corner is 20-30 mm less than the height of the corner; an angle of 45° is cut at both ends so that they are pointed.
Plastering bases
Plastering on beacons occurs after beacons have been installed on all surfaces to be finished.
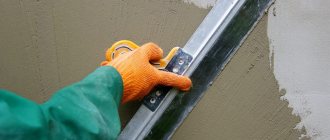
Plastering is carried out in the following sequence: first the ceiling is plastered, then the walls and then the slopes. Apply the mortar mixture to the surface using a wide wooden or plastic trowel or a large metal spatula. The mortar mixture is applied to the walls from bottom to top, and to the ceiling - towards itself. The solution is applied in the usual way: first one layer of spray, then several layers of primer. Each layer of soil is leveled. The applied mortar mixture is leveled along the beacons using the h-rule using zigzag movements. The mixture remaining on the working surface of the rule is removed with a trowel (trowel) and applied to unfilled areas, then leveled again. After applying and leveling the soil, the metal beacons are removed, the areas under them are covered with a solution, leveled and ground in, the surface of the applied solution is checked using a rule, applying it in different directions, and all inaccuracies are corrected by cutting off or spreading the solution.
Figure - Leveling the mortar with a trowel
Drawing - Grouting plaster: a - in a circle, b - spreading.
Then a covering solution is prepared, the ceiling and top of the walls are covered, the surface is smoothed and rubbed.
The slopes are plastered with a certain bevel from the frame to the wall surface, resulting in the so-called “dawn angle”. First, the upper slope is plastered, then the side slopes. Leveling the plaster mixture on slopes is done with a wide spatula, and the angle of dawn is checked with a square.
QUALITY CONTROL AND STANDARDS
The plaster coating must be protected from damage, getting wet, freezing and drying out. Heating the drying plaster coating above 23 °C and intensive through ventilation are not allowed. The surface of the plaster coating must be flat and smooth, without traces of the troweling tool or mortar drips. Cracks, bumps, and shells are not allowed.
Evaluation of the surface after plastering
Deviations that are permissible for high-quality plastering work are contained in Appendix No. 9 and 10 of SNiP No. 3.04.01/87:
- surface deviation horizontally and vertically – 1 mm per 1 meter, along the entire wall in the room – no more than 5 mm;
- for 4 sq. meter there should be no more than two irregularities with smooth outlines, the depth of which is up to 2 mm;
- deviation from the plane of slopes, arches and pillars must be within 1 mm vertically and horizontally;
- permissible error of curved elements from a given design – no more than 5 mm;
- the width of plastered slopes may differ from the design by no more than 2 mm;
- the error in the deviation of the rods from the straight axis between the angles of their intersection and bracing does not exceed 2 mm.
Advice
It is more convenient to carry out all types of checks regarding the quality of plastering work using a pattern and a laser level.
Flatness
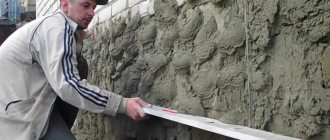
The evenness of the wall after plastering is checked using a rule and a laser level. How to measure:
- Applying the rule horizontally to the wall, check that there is no gap between it and the surface. To measure the size of the existing gap, it is convenient to use a laser level.
- To determine vertical evenness, you must turn on the vertical axis construction mode on the level. First, a vertical line is drawn on the surface. Then the device is applied at an angle of 45 degrees to the surface. If the laser line is straight, then the surface itself is smooth. When the laser deviates from the drawn one towards the level, there is an influx of plaster on the wall; when it deviates to the side from the device, there is a concavity. The size of the irregularity corresponds to the distance between the drawn line and the laser line.
The quality of the solution and the correct application of layers
Quality control of the plaster solution is carried out at three stages:
- preparatory;
- at the time of application;
- during acceptance of completed work.
At the preparatory stage, attention is paid to:
- the quality of the prepared solution;
- wall humidity, room temperature;
- cleanliness of the surfaces on which the plaster will be applied;
- priming walls, selecting a solution for priming.
Any type of plaster mortar (cement or lime-cement) can be applied in one or several layers. The permissible quantity is specified by the manufacturer in the instructions for the solution.
Attention
It is necessary to observe the rule of completely drying the previous layer before applying the next one.
Each subsequent layer when using multi-layer solutions should be less durable than the previous one.
The need and choice of plaster mesh is regulated by the project and SP 71.13330.2017. When working with gypsum mixtures, it is allowed to work without a plaster mesh.
We offer you to watch a video on the topic “Minimum and maximum layers of plaster”:
Adhesion
Requirements for plaster adhesion are contained in GOST 31356-2007. You can measure the adhesion strength of the layer to the base using a special device - an adhesive meter. It can calculate the clamping forces in the range from 0 to 10 kN. This indicator means the force that must be applied to tear off or separate the layer in a direction perpendicular to the base.
Finish classes
Russian SNiP No. 3.04.01/87 “Finishing and insulating coatings” defines three types of plaster finishing according to its quality:
- simple;
- improved;
- high quality
Note! The standards and requirements for the quality of plastering work outlined in the document are applicable for both manual and mechanized work. Each class of plaster requires compliance with certain rules.
They regulate the maximum permissible deviations from the design values or conditions that are accepted between the parties in the relationship, by default.
Plaster layers
Simple plaster.
Before we move on to describing the types of plaster by quality, let's talk a little about finishing layers. This is important for understanding the essence of the topic.
First, the base is sprayed.
- Its purpose is to ensure reliable adhesion to the surface of the walls of the following layers . For spraying, a solution with a liquid consistency is used. This makes it possible to fill in unevenness in the base, ensure strong adhesion, and hold all layers of plaster. Layer thickness 0.3/0.5 cm.
- At the second stage of work, primer is applied . It is necessary for the basic alignment of the plane of the walls. When priming, a solution having a dough-like consistency is used. Its thickness can be 1/2 centimeter.
- The third layer is the covering . It is needed to level out small defects and smooth out the coating. A solution with a creamy consistency is used for it. The layer thickness should be 0.2/0.5 centimeters.
Note! When plastering any type, if the totality of all its layers exceeds 2 centimeters, the base surface must be pre-reinforced. This can be done using a metal or polymer mesh.
Types of plaster by quality
Improved finish.
- A simple type of finishing is used in basements, utility rooms, warehouses, and attics. In other words, in all non-residential rooms where an absolutely flat wall surface is not required.
- Improved plaster is needed in rooms that are directly used by people. These can be residential buildings and apartments, medical, public, educational institutions, etc.
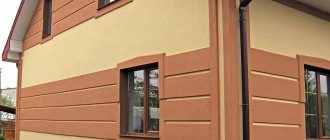
The photo shows a high quality coating.
- High-quality plaster is used for work in public, residential, medical, educational, office buildings, with increased coating requirements. In other words, when the design documentation directly indicates such a nature of the rough cladding.
SNiP defines the following features of plaster coating classes.
- A simple type of finishing should consist of two mortar layers - spray and primer. Their total thickness should be 2 centimeters.
- The improved coating is applied in three layers and consists of spray, primer and cover. The total thickness of the finish should be about 5 centimeters.
- A high-quality grade of plaster consists of four layers - spray, two primer layers and a topcoat. The total thickness of such finishing should approach 2 centimeters.
Plastering on beacons.
Note! The instructions say that the application of improved and high-quality plaster must necessarily be carried out along the guide beacons. They are installed on the walls before the main work and can be made from mortar or in the form of ready-made metal profiles.
A high-quality class of plaster is intended for leveling and smoothing bases for their further finishing:
- various paints and varnishes;
- wallpapering;
- facing with ceramic, porcelain stoneware, clinker, plastic tiles.
Quality control of this type of plastering work, carried out according to the minimum permissible SNiP deviations, makes it possible to carry out finishing finishing work at the highest level.
It should be remembered that the optimal order of performing the described operations is as follows.
- First of all, the ceiling is plastered. Next, the walls are processed in the top/down direction. Floors should be leveled last.
- Plaster mortar can be applied to the surface of the base in two ways: spreading it or throwing it on.
- Improved plaster
No primer
Applying a primer to the base is an important procedure before plastering. The composition is selected depending on the type of plaster and base. Porous surfaces are treated with deep penetration soils. Concrete contact is used to adhere gypsum plaster to concrete walls. Concrete contact cannot be used for cement-sand mixtures.
Read more about primers in the article “When to use a primer?”
Soils with a dry residue partially saturate the base and partially remain on the surface, leaving a protective film that prevents moisture from leaving the solution.
Deviations of plastered surfaces
Deviations of plastered surfaces from the vertical (by 1 meter):
- for simple plaster – no more than 3 mm (no more than 15 mm for the entire height of the room)
- with high-quality plaster - no more than 1 mm (no more than 5 mm for the entire height of the room)
- Horizontal deviations of plastered surfaces (by 1 meter):
- for simple plaster – no more than 3 mm
- with improved plaster – no more than 2 mm
- with high-quality plaster - no more than 1 mm.
with improved plaster - no more than 2 mm (no more than 10 mm for the entire height of the room)
Related article: How to seal the joint between the bathtub and the wall
Openings and slopes
Slopes and openings must also be located strictly in horizontal and vertical planes, otherwise doors and windows will have to be installed crookedly, and this will look ugly.
The correctness of the plaster is checked using a building level. Deviations from the vertical and horizontal should not be more than 1 mm per 1 m. The width of the slope cannot deviate from design calculations by more than 2 mm.
Methods for checking work performed indoors
The work performed is checked according to the following points and methods of their control:
- Deviation from the vertical is no more than 1 mm per 1 m. It is measured using a rule of at least 2 meters in length by applying it to the wall every 2 meters.
- The angle between the walls in a rectangular room should be 90 degrees. Measured using a tape measure. The length of the two diagonals of the room must be the same - this means that the corners of the room are equal to 90 degrees, and the walls are parallel. Another measurement option is with a construction square with a shoulder of at least 50 cm. It is applied to the corner over the entire distance from floor to ceiling.
- Parallelism of walls. Measured with a tape measure. The distance between the walls along their entire length should be the same.
- Deviation of slopes, pilasters, pillars vertically and horizontally - no more than 1 mm per 1 m. Measured using a building level.
- Surface evenness. Measured using a two-meter rule applied to the wall vertically and horizontally.
Attention
If the wall unevenness exceeds 1 mm, this may cause the seams of thin wallpaper to diverge.
We offer you to watch a video on the topic “How well is the surface of the walls plastered”:
In separate publications, our experts give recommendations to beginners on how to properly plaster, including walls made of aerated concrete, aerated concrete and foam block.
Rules for accepting results
When accepting completed plastering work, you should adhere to the following rules and requirements:
Acceptance of plastering work is an important stage in repairs. The final result, pleasant appearance, and service life of the repairs depend on the quality of their execution.
Plaster for interior work
For interior decoration, the main guideline for choosing cement plaster is the base material. However, first of all you should evaluate the geometry of the room. In business-class houses, the walls and ceilings are smooth; it is enough to putty them before finishing. In ordinary houses, horizontal and vertical deviations can reach 50–60 mm. They can be eliminated using cement plaster, but experts recommend applying such mixtures at a time in a layer of no more than 20 mm, so that subsequent shrinkage does not cause defects. A layer of 40–50 mm will require much more time and material. Perhaps in these cases (if the size of the room allows) it is more effective to use dry construction systems - a metal frame and cladding made of gypsum fiber board or gypsum board. Each situation should be considered separately. For example, for a basement room that is being equipped for a home theater, the evenness of the walls is not so important. Here the plaster can be applied in thick layers using reinforcement technology. The main thing is that the craftsmen have a full hand, since leveling an impressive layer of cement mortar is more difficult than plaster mortar.
Photo: Unis
Dry leveling high-strength plaster mixtures for finishing plinths: “Silin plinth” (Unis), compressive strength - 10 MPa (1 pack 25 kg - 284 rub.)
Photo: Volma
“Socle” (“Volma”) compressive strength - 10 MPa (1 pack 25 kg - 248 rub.)
Photo: GLIMS-Production
Tweed (Glims), compressive strength - 7 MPa (1 pack 20 kg - 290 rub.)
The base material determines the choice of soil and the technology for carrying out the work. Thus, monolithic concrete is a dense, durable, non-absorbent base. It is usually primed with contact concrete and additionally installed with reinforcing mesh. The latter is also laid in places where different materials meet. Soil for brickwork is no less important. It neutralizes the different absorbent properties of brick and masonry mortar. In order for the plaster to last for decades, it is necessary to find professional craftsmen. Plastering 1 m² of walls will cost from 300–600 rubles, ceilings - from 400–750 rubles. And the thicker the layer applied, the more expensive the work costs.
- Walls
How to properly plaster a brick wall: step-by-step instructions
Before plastering, the base is cleaned of dirt, dust and exfoliation, which may prevent the solution from adhering.
What is a beacon for plastering work?
Plastering on beacons allows you to create a smoother surface. Beacons are narrow vertical metal projections that are attached to the wall using dowels or plaster mortar. Their installation is a very important undertaking and requires scrupulousness and attention. The time spent on installing beacons pays off when performing plastering work. The purpose of installing beacons is to create an ideal surface plane. Before starting finishing work, it is recommended to check the deviations of the walls from a flat plane. After finishing the walls, the beacons are removed.
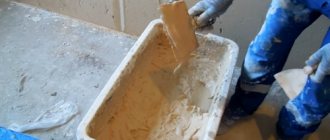
Making a mixture for plaster
To perform plastering work, a solution is made based on cement or gypsum, lime mortar and aggregate. Typically sand is used as a filler. A high-quality solution should be homogeneous and well-balanced, with a consistency reminiscent of a thick, viscous dough. To work with gypsum-based mortar, plastering skills are required, as it sets very quickly. Nowadays, ready-made dry mixtures with polymer additives are increasingly used, increasing the strength of the plaster.
Lack of reinforcement in new buildings
Reinforcement is a necessary procedure in new houses. This is due to the fact that after construction the building undergoes shrinkage, a process that usually takes 1-2 years. Shrinkage leads to the formation of microcracks on plaster without reinforcement, which extend to the finishing layer.
Such defects are especially critical if painting is chosen as the final finish. Small cracks will not be noticeable under the wallpaper, but on a painted wall they will ruin the appearance of the room.
What is a rule and how to choose it?
The rule is a long, straight ruler to help identify flaws when inspecting a plastered surface. Previously, the rule was made of wood. The modern rule is aluminum profile. It is lightweight and durable, almost not subject to deformation. The length of the rule is usually from 1 to 2 meters or more. The most convenient is the 2-meter rule.
Some modern models are equipped with a built-in hydraulic level in the form of ampoules with liquid. When choosing this rule, you need to pay attention to the tightness of the housing.
What tools are needed for plastering walls?
The quality of work depends on the availability of tools and materials. To plaster the walls you will need:
- Master OK;
- rule with level;
- grater and grater;
- lighthouses;
- net;
- plaster corners;
- steel smoother;
- construction mixer;
- solution;
- bucket for solution.
putty knife;
You will also need several pairs of rubberized gloves, since the plaster solution is very caustic. All these materials and tools will help create a completely flat surface.
( 2 ratings, average 5 out of 5 )
Surface quality after starting and finishing putty
When the walls have been plastered, leveled, corners are brought together and work with openings and slopes, you can begin finishing decorative work. But I would additionally check the quality of the surfaces, because the removal of beacons, the banal inattention of the master, shrinkage of the solution, mechanical damage during the transfer of materials and tools could play a cruel joke.
Check: Spend just a couple of minutes picking up a 2000 mm long trapezoidal rule. It must be applied to the surface of the wall vertically, horizontally, and carefully drawn in a circle, trying to detect gaps between it and the wall.
Permissible irregularities along the smooth outline of an area of 2000x2000 mm are within 2 mm. The number of such errors is no more than two. It only takes 30-40 minutes to identify problem areas, mix a small amount of putty and fix them to avoid problems with decorative finishing in the future!