Plastering is a widespread method of finishing external and internal walls, ceilings, and slopes.
The popularity of this processing method is explained by its availability, low cost and versatility.
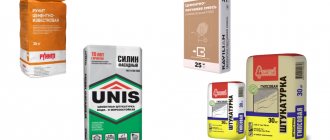
The essence of plastering is to apply a layer of special plaster mortar to the walls, which can be:
- cement-sand;
- limestone;
- plaster;
- clay
or mixed type.
The mortar is applied in a layer of a certain thickness according to the design and taking into account the properties of the selected type of plaster mortar.
Plaster application, in turn, can be done manually or mechanized.
There are special plastering stations that allow you to plaster quickly and efficiently, but they are not available to everyone.
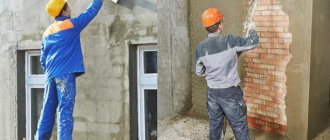
In private construction and renovation, plaster is usually applied by hand, spreading it with a trowel.
The manual method has a number of serious disadvantages:
- labor intensity of the process;
- low productivity;
- high influence of the human factor.
At the same time, purchasing a plastering station is not affordable for everyone, and for one-time work it is not advisable.
The optimal solution is to purchase a special hopper bucket for plaster, which is also called a plaster hopper, ladle, pneumatic bucket or plaster shovel.
Benefits of using a hopper
The use of this useful device provides many advantages:
- Prices for hoppers are lower than for plastering stations; Hopper buckets are available in private construction and renovation.
- Hoppers are small in size.
- The productivity of plastering work increases significantly compared to the manual method. The bucket is emptied in a few seconds, the speed of work increases approximately 3 times.
- The hopper requires less physical effort and the plasterer is less fatigued because he does not have to make the flapping motions of his hands as with manual application.
- Any type of plaster can be applied.
- The consumption of plastering materials is reduced. This occurs due to less loss of plaster mortar. The cut mortar can be loaded back into the ladle and sprayed onto the wall.
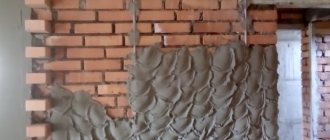
- Due to the fact that the solution is applied in drops under pressure, the plaster is distributed more evenly than when applied with a trowel, adheres better to the surface of the base, and fills all voids well, which improves the quality of finishing work. Application under pressure increases the density of the plaster layer, and hence its strength.
- Sometimes plaster applied with a hopper is used as a decorative coating, because it forms an interesting “pimply” structure. If a smooth surface is needed, it can be leveled and trimmed.
- Hopper plasters both vertical and horizontal surfaces (ceilings).
Video: Plasterer's assistant - hopper bucket
Types of devices
There are two main types of this simple tool:
- for the ceiling - has an elongated handle and nozzle slope, optimized for finishing the ceiling;
- for a wall - the most common option with a nozzle directly directed at the surface to be plastered, located vertically.
There is also a third version of the construction bucket, which works on nozzles of various diameters and directions. The device is universal and helps solve various problems.
The ladle for applying plaster can be factory-made or home-made. The first group is distinguished by certain advantages: it has an optimized nozzle slope, an ergonomic handle, and precise fitting of fittings and compressor hoses.
Requirements for the plaster mixture when using a hopper
Using a hopper, you can apply any type of plaster.
According to the requirements of SNiP 7.1.7, the strength of the base on which the plaster is applied must be higher than the strength of the plaster. Therefore, for example, lightweight plasters are applied to aerated concrete bases - gypsum or cement-sand with the addition of polystyrene granules.
The choice of plaster also depends on the type of premises:
- For wet rooms, as well as for external walls that are exposed to temperature changes and the formation of condensation, cement-based plaster solutions are used.
- For dry rooms, if it is important for the walls to “breathe,” lime and gypsum plasters are used.
- Cement-sand plasters are applied as a base under the tiles.
To impart additional properties to the plaster mortar, various additives are added to its composition:
- Fiber fiber is added to cement compositions to increase strength, which eliminates the need for the labor-intensive use of mesh. Fiber fiber minimizes shrinkage deformations and prevents cracks.
- To increase the plasticity of cement-sand mortars, PVA, lime, detergents or ready-made plasticizers are added. Plasticizing additives allow you to prevent delamination of the solution, extend its life and be able to work with it longer. Mixtures with plasticizing additives, such as CemStone and CemAqua, allow you to save cement, increase the strength of the coating and its water resistance, reduce shrinkage, and help avoid the appearance of cracks. The CemStone additive completely replaces lime in the mortar, as it has plasticizing properties and extends the life of the plaster mortar to 5 hours. It is very easy to introduce CemStone into the plaster mortar, unlike lime, which must first be extinguished, spending time and effort, observing certain safety precautions. And the additive from Cemmix just needs to be added to the solution and mixed. In addition to increasing plasticity, the additive prevents mortar delamination and accelerates strength gain.
- To obtain waterproof plaster, water-repellent additives for cement mortars are used.
- To increase strength, PVA is introduced into lime plaster or lime is combined with cement.
- To increase the strength and hiding power of gypsum plaster compositions, plasticizers are used, for example, CemStone, which make it possible to more fully involve gypsum in hydration reactions and obtain self-compacting plaster.
We advise you to study: Additives for cement mortars
Important!
You should not replace the plasticizer with liquid soap, given that there are special additives - plasticizers and superplasticizers. Their action has been tested in laboratories, the exact working dosages and effects are known, unlike detergents, which may have different compositions, different concentrations of surfactants, and may also contain sodium chloride, which promotes corrosion. The cost of plasticizers is more than compensated by the subsequent savings in cement, and “saving” on plasticizers and replacing them with detergent can lead to losses and wasted time and effort when the plaster turns out to be fragile or becomes covered with cracks after drying.
An important difference between any plaster solutions for application with a hopper is consistency. The hopper requires more “hard” solutions, that is, thicker than for a trowel.
Thanks to the thick consistency of the solution and application under pressure, the plaster adheres well to the wall and does not slip; You can apply it in a fairly thick layer without fear that it will come off. Thick plaster with a reduced water content has less shrinkage when drying.
How to use a hopper correctly and what to consider when working with it
The hopper is powered by a compressor, so it is important to choose a device with suitable characteristics.
It is recommended to use a compressor with a cylinder volume of at least 100 liters, the output volume is optimally from 350-400 liters.
Pressure should be limited to 4-6 atmospheres.
The hopper should be kept at a distance of 10-15 cm from the surface; if a thin preliminary layer is applied, you need to move the plaster shovel further, and if a thick layer is needed, on the contrary, move it almost close to the wall (a gap of up to 6 cm).
Technology of applying finishing materials using a hopper
In general, the technology differs little from the manual method.
Step 1: Clean the base
It is necessary to thoroughly remove dust and clean the surface to be plastered.
Step 2: Primer
Surface primer in order to reduce water absorption from the mixture and increase the adhesion of the plaster to the base. Primers suitable for the selected surface are used, for example, PVA or concrete contact.
Step 3. Installation of beacons
Beacons are set according to levels and secured with gypsum plaster mixture or special fasteners.
Step 4. Mesh reinforcement
Labor-intensive mesh reinforcement can be avoided by adding polypropylene fiber to the solution.
Step 5. Mixing the solution.
A construction mixer or concrete mixer is used to mix the solution.
Step 6. Applying the solution
The solution is applied starting from the bottom of the walls. The hopper, unlike a trowel, applies the plaster straight away and evenly.
Step 7. Trimming
Until the solution has set, it is trimmed using the rule.
Types of pneumatic buckets, what are there
The classification of pneumatic plastering buckets is based on design features. So, the wall one has a handle and nozzles located at right angles to the tank. For convenience, an additional handle is attached to the latter.
Sprayer for painting walls cement mortar sprayer paint sprayer sprayer hopper bucket gypsum…
Sprayer for painting walls cement mortar sprayer paint sprayer sprayer hopper bucket gypsum…
aliexpress.ru
Buy
New Cement Mortar Spray Gun with Hopper Bucket Wall Sprayer Plaster Plaster Cement Sprayer...
New Cement Mortar Spray Gun with Hopper Bucket Wall Sprayer Plaster Plaster Cement Sprayer...
aliexpress.ru
Buy
Spray gun for painting walls, cement mortar, spray gun, Hopper gun, spray gun, bucket...
Spray gun for painting walls, cement mortar, spray gun, Hopper gun, spray gun, bucket...
aliexpress.ru
Buy
The second type of bucket is intended for finishing the ceiling, the upper part of vertical structures. Here, the key elements are fixed at an angle relative to the container so that the solution does not fall out. The handle is thoughtfully elongated. This makes it easier and more convenient to carry out plastering without tables, scaffolding and stepladders.
The third option of a universal nature is considered separately. Its difference lies in the presence of seats for removable nozzles. Here you can work with different mixtures of relative solid filler fractions. It is also possible to adjust the position of the handle to finish either walls or ceilings.
How to make a hopper with your own hands
Despite the relatively low cost of the hopper, some craftsmen make this useful tool on their own.
For this you need:
- sheet steel, galvanized sheet or aluminum 1 mm thick or a suitable metal canister;
- air gun;
- nozzle;
- metal scissors;
- washers with a diameter of 10-12 mm according to the number of nozzles;
- "Bulgarian";
- drill.
The bucket is manufactured by welding or rivets according to the drawing. The capacity of the container should not exceed 2-3 liters, since it will have to be held by hand when filled.
Holes for the nozzles are drilled in the lower part of the bucket and secured with washers. Opposite them, holes are drilled for supplying the solution. A gun is attached that will act as a handle.
Video: DIY hopper bucket - it's easy
What is this device?
The plastering process implies uniform distribution of the solution over the surface, the ability to minimize working steps, and reduce labor costs.
Using a plaster hopper bucket, the mixture, driven by an air stream, is thrown onto the wall. The operating principle is similar to a spray device for liquid formulations.
A stream of compressed air passes through the mortar mass, capturing the mixture and moving it to the surface to be repaired. The solution, driven by the air flow, hits the wall, sticks to it, forming a layer that can be stretched with a trowel and rubbed.
How not to make a mistake when buying a hopper
A large selection of hoppers from different manufacturers is available for sale. But some models are convenient and durable, others work worse and quickly fail. To avoid making a mistake with your choice, pay attention to the details:
- Evaluate the quality of the material from which the bucket is made. What is the thickness of the walls, how is the surface made - is it smooth or loose, with shells and burrs.
- Check if the nozzles are reinforced. Under the influence of abrasives (sand, cement), unstrengthened nozzles will quickly wear out.
- Check the number of rivets. If there are few of them, the bucket will quickly become holey.
- Check to see if the rivets are rolled to ensure a tight seal.
- Evaluate the symmetry, quality and smoothness of the trigger mechanism.
- Hold the hopper in your hand and evaluate its ergonomics. The handle should be designed so as not to twist your wrist when working.
- Pay attention to the rubber coating of the handle.
The hopper is a convenient tool that allows you to increase productivity when carrying out finishing work, save finishing materials and improve the quality of plastering. And special additives will help improve the quality of plaster solutions.
What will you need to connect?
To ensure the operation of the ladle for applying plaster mortar, you will need a compressor unit and a set of appropriate adapters for connecting it. The industrial version of the tool provides standard, quickly removable “rapid” and “bayonet”, but it is better to use the fire type of connection, as it is more convenient when connecting the bucket and provides maximum air flow due to the increased diameter of the hole.
The kit for connecting the tool includes a ball valve, nipple adapter, Huck fittings and adapters, and clamps.