Most of the entrances to apartment buildings are a pitiful sight: walls peeling or painted with obscene inscriptions, whitewash crumbling by the collar, panels faded with time, stained floors. Meanwhile, the Housing Office has traditionally been citing a lack of funds for many years now.
Maybe it makes sense to solve this problem yourself? Especially when there is mutual understanding of the issue by all residents of the entrance and the opportunity for almost everyone to work - from young to old. Of course, there is not enough enthusiasm for a major overhaul, but enough for painting.
Preparing materials
Bringing walls into an acceptable appearance is possible in two ways - whitewashing them or painting them. Everything will depend on financial costs, which must be agreed upon by all residents. Whitewashing is a much more budget-friendly option, but also less practical: few people would want to annually update the surface of whitewashed walls and periodically clean their clothes from white traces of whitewashing.
Therefore, the initiative group should work among the participants, insisting on painting. Moreover, saving in this case is also quite possible.
You need to start by choosing the right paint. Based on the conditions in which the wall covering will be used, it must meet the following consumer characteristics:
- Be distinguished by high ductility, since under conditions of sharp temperature fluctuations (and they will still occur, even if the entrance is heated), the finished coating will lag behind the wall the next year.
- Be easy to apply with a high-performance painting tool - a roller. Other options should not be considered, since otherwise it will be very inconvenient to work in the entrance.
- Do not have a strong odor that will penetrate into apartments.
- Dry quickly, otherwise it is extremely inconvenient to use the entrance, especially for casual visitors and guests.
- It fits well on any base (chalk, lime, concrete, brick).
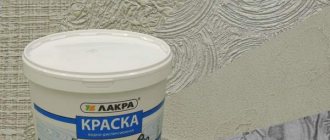
Water-based paints best meet this set of requirements. They are easy to use, adhere well to any base, and are affordable.
The disadvantage of such coloring compositions - a small selection of colors - is easily overcome. To do this, you need to purchase special tinting additives of the desired color. These additives are added to the paint immediately before its use; the intensity of the color will be determined by the amount of additive. This way you can paint the entrance even in a certain color scheme.
In addition to the walls, the floor often requires painting. Here you will need paint that is more mechanically durable. It is most beneficial to use any composition intended for painting roofs: their operating conditions are no simpler than those of the floor in the entrance.
Which paint to choose for the floor? There are also options here that depend on the type of flooring in the entrance. Most often, the floors in the entrance are concrete, much less often - wooden. Acrylic paint works best on a concrete floor surface. Unlike other options (polyurethane paint, epoxy compositions), it is one-component, and therefore easy to prepare for work.
It's also a good idea to use latex-based rubber paint. Although it is more expensive, it is recommended mainly for roofs, but it also fits perfectly on other surfaces: wood, cement or concrete. and entrance staircases will be highly resistant to moisture, dries relatively quickly, and adheres well to the original surface. The only limitation is that latex paints are not recommended for use at ambient temperatures less than 15°C.
Wooden floors can be painted with any paint except water-based paint. By the way, most painting compounds are also suitable for painting wooden windows.
The color and texture of the walls and floors to be painted are discussed with all residents, after which paint and, if necessary, coloring additives for it are purchased.
Repair of walls in the entrance
Usually there is no wallpaper in the entrance and staircase corridors. Most often we see simply painted walls. But the paint is peeling off in places, torn off in places, and in places someone’s art is visible on it:
How to tidy up a wall? If we think logically, two very important conclusions arise:
- There is no point in leveling the wall, since we don’t need to glue wallpaper. Therefore, even if the wall is piled up in one direction or another, it’s okay, which means: plastering the walls along the beacons - the most difficult stage - is no longer necessary!
- The easiest way to paint a wall is to simply paint it again. To do this, you only need to knock off the paint in those places where it comes off easily, which means that: you don’t need to knock off all the old paint from all the walls!
Next, places where there are deep potholes in the wall need to be sealed with repair compound or DSP mortar, and where the paint has simply peeled off, you need to putty:
Important!
Corridors can be damp, so it is better to use cement-based putty rather than gypsum-based putty.
The only thing you need to remember is that before you put repair compound or putty on the wall, you need to first prime it in those places where repairs are expected.
Tools for work
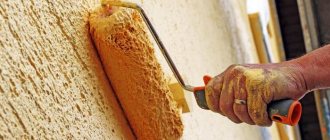
Since these elements of the entrance do not have a complex configuration, it is quite possible to use a paint roller mounted on a long handle. In this case, you won't even need a stepladder. However, to paint individual protruding parts (for example, heating pipes, covers and doors of switchboards), you still cannot do without brushes.
In addition, it will not be superfluous:
- building level;
- putty knife;
- cord for marking the dividing line (if not the entire wall is painted, but a panel is being made);
- colored crayons;
- broom;
- hammer;
- construction tape (useful when painting window frames).
Naturally, we should not forget about the things that provide normal conditions for workers - gloves, a respirator, a gauze bandage. They will be especially necessary when cleaning surfaces from dust.
Tidying up the electrical wiring in the entrance
In order for the appearance of our entrance to take on a finished look, it is also a good idea to tidy up the electrical system. No, you don't need to reconnect anything! You just need to remove the old wooden, half-rotten and dilapidated boxes in which the electrical wires are laid and install a new plastic cable channel and, if possible, replace the lamps:
Sequence of work
Even if the previous wall covering is in satisfactory condition, it must be properly prepared for painting. If you choose water-based paint, then before starting work you need to:
- thoroughly clean all surfaces from dirt;
- eliminate paint drips;
- fill the identified recesses with putty.
Old paint will have to be removed using a spatula.
The worst thing is if the walls of the entrance were once plastered. Then you need to evaluate the quality of the plaster: if it lags behind or is already missing somewhere, then such problem areas should be removed with a hammer, and only then putty.
Separately, you should deal with cobwebs on ceilings and staircases. A long-handled broom will come in handy here; you need to use it to go through all the hard-to-reach areas - this is where the cobwebs are most numerous.
After this, it is advisable to disinfect the entrance walls. Otherwise, very soon dark spots from fungus may appear on the painted surface, which easily forms during sudden fluctuations in temperature and humidity. This treatment can be carried out using either an aqueous solution of copper sulfate (the substance is poisonous!), or a conventional cleaner for cleaning sinks and toilets (“Bref”, “Domestos”, etc.). It is enough to rinse the floors in the entrance well, and then also treat them with disinfectants.
Gypsum putty is most suitable for filling walls and floors in the entrance. It is universal, inexpensive, suitable for any subsequent coating, and can easily cope with even fairly deep unevenness.
Puttying the walls is rational only when they will subsequently be completely painted. If you plan to paint only the panels, then the remaining areas will have to be plastered, and this will significantly complicate the repair work and increase its cost. Therefore, oddly enough, it is much more profitable to paint the entire entrance than to decorate the panels on the walls.
When assigning the order of work, it is worth remembering that the greatest inconvenience to movement is created by the painted floor. Therefore, it should be painted in the evening and only after the painted walls have completely dried.
The work is usually carried out with a paint roller. This will ensure the desired performance and allow the final coating to be more uniform. Lastly, using a brush, areas of the floor and walls that are difficult to reach with a roller are painted. It is better to paint floors and walls in spring or autumn - this period of time is most comfortable for this work.
Instructions
As a rule, our entrances have not been renovated for a long time, so the whitewash on the ceilings and walls has practically disappeared. Take a broom or mop and sweep away the remaining whitewash from the walls. In inconvenient places, sweep away the cobwebs with a round brush attached to a pin with tape. After this, moisten the ceiling and walls with water from a spray gun and let the room dry.
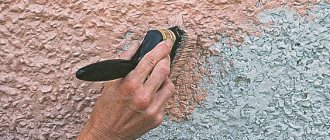
The next stage of work is stripping the panels of old paint. Take a putty knife or any other sharp tool and scrape off the old weak paint from the walls. If the plaster is separated from the surface of the wall, then knock it down with a hammer to the very base in order to subsequently strengthen it with a new layer of plaster.
Prime all areas that you have cleaned on the walls with primer and let the room dry. After this, start plastering the places that you have knocked off. Dilute the dry mixture and apply to a section of the wall. If you need to plaster twice, then let the first layer dry and only then apply the next layer. Do not forget to moisten the wall with water before applying the second layer, otherwise the plaster will not stick and will fall off.
While the plaster is drying, putty the walls. Take putty, putty the walls in one go and let dry. Then putty them again. As a rule, walls are puttied twice, but if necessary, this can be done a third time.
When all the preparatory work has been done at the entrance, start whitewashing the ceiling. Cover all floors on the landings with cardboard, and ask the residents of the entrance to cover their doors. After this, you can safely begin whitewashing the ceiling. Dilute oil putty in water; it is more opaque than whitewash. To check the quality of the whitewash, dip your finger into the solution. If a thick coating of whitewash remains on it, then the solution is suitable for use; if not, then the solution is considered weak and putty should be added to it. Now strain the solution through gauze into a clean bucket and use a spray gun to whitewash the entrance twice. Do the whitewashing with the help of an assistant, because this job is difficult to do alone.
After the whitewash has dried, sand the putty areas on the walls, as well as the whitewash that got on the panels, otherwise the paint will not stick to these places. Now mark the lines on the panels along which the paint border will run. Do it this way: take the lace, roll it in blue and attach it to the marked points on the panels. Pull the lace and quickly release it. There will be a trace of blue on the wall. The height of the panel should be 150, 180 cm - this is the optimal height so that residents do not get dirty with whitewash.
For painting entrances, oil paint is used to make it easier to keep the entrance clean. Take the paint and pour it into one container. You will need a lot of paint, because in addition to painting the panels, you will also have to paint fragments of the flight of stairs. It is advisable that everything be painted the same color, otherwise the entrance will look unsightly.
Take the paint and pour it into a bucket. Dip the flange in paint and draw an even strip 5 cm wide along the marked line, do the same at the floor of the panel. Do this around the entire perimeter of the entrance, or have your partner do it. At this time, take a roller, dip it in paint and roll it on the cuvette. Now place it against the wall near the floor and move the roller up the panel, blending the paint along the wall, then across it. Try to wet the roller in paint more often, paint the panel without gaps. After painting the panels the first time, let the surface dry, then paint the walls a second time. Oil paint spreads easily and covers the surface well, so you can easily handle this job.
The last stage of repairs at the entrance is painting the windows and parts of the railings. Take white oil paint, mix it and paint the window frames in two coats. Also paint over the railing fragments twice.
Before starting repair activities, it is first necessary to distinguish between major and cosmetic repairs.
. The first includes:
- restoring the operation of faulty elevators;
- complete or partial replacement of water, heat, gas, electricity and sewerage systems;
- renovation of basements and attics;
- plastering walls, etc.
Even if these systems are geographically located at the entrance, work on their repair is paid from the Capital Repair Fund, formed in each region of the Russian Federation from contributions from home owners (Article 166 of the Housing Code of the Russian Federation).
Major renovation of the entrance is being carried out
:
- simultaneously with the overhaul of the entire house, which is carried out according to the schedule drawn up by the district Administration;
- at the request of the residents by the Management Company.
In the first case
Additional contributions from the owners will not be required - it is enough to pay receipts for major repairs on time.
In the second case
The procedure for collecting funds for the restoration of entrances is regulated by Federal Law No. 185 of July 21, 2007 “On the Housing and Communal Services Reform Assistance Fund,” according to which owners are required to pay 5% of the cost of all work.
Redecorating
common areas require much more often than capital and implies:
The management company should perform these works once every three to five years.
, while apartment owners do not have to contribute additional funds: all work is paid for by a contribution for the Maintenance and Repair of the residential premises.
Where to contact? To put the entrance in order, residents at a general meeting must draw up a list of necessary work, attach it to the application and submit documents to the Criminal Code.
Repairing the entrance is the responsibility of the management company. The company is obliged to draw up a work schedule for the year, find funds
(if the owners' contributions are not enough) and repair the entrance.
The work will be carried out in strict accordance with the list, so it must be carefully thought out
.
How to whitewash the ceiling (walls) with a vacuum cleaner or sprayer
One of the fastest and most effective ways to whitewash is to use a vacuum cleaner, which is found in almost every home.
For proper whitewashing, you need a vacuum cleaner itself, which must be “able” to blow air, not blow it in (not all models have this function), and among the attachments it must come with a special polyethylene lid with a set of tubes.
How to whitewash a ceiling (walls) with a vacuum cleaner or sprayer. This lid needs to be placed on a liter or one and a half liter jar, and all this must be connected to the blowout hole in the vacuum cleaner.
Air under pressure will flow through the hose, enter the sprayer, drawing the mixture from the can, exiting through the tube and spraying the solution over the surface.
The supply of solution is regulated using another hole, which is closed with a finger.
In order for the whitewash to lay evenly, you need to make smooth circular movements. The spray nozzle should be approximately 80-100 cm from the surface. You can repeat the procedure several more times to achieve optimal results.
Follow basic safety rules when whitewashing the ceiling (walls) with your own hands
When whitewashing a ceiling or walls, you need to wear protective clothing and use safety measures: a bandage on your face, safety glasses on your eyes, and rubber gloves on your hands.
If you want your ceilings to please you with their cleanliness and whiteness for many years, you can safely start whitewashing the walls and ceilings with your own hands, using these instructions!
Who will do it?
Having received an application with a list attached, the management company begins to draw up an annual plan and develop an estimate, which includes the costs of purchasing construction materials and paying workers.
Who should do repairs to the entrance? Work can be carried out
:
- by the staff of the management company;
- by a third party contractor.
By law, both options do not require additional contributions from residents
and, even more so, participation in the work.
In practice, the management company often offers residents the following:
- wash the walls after whitewashing the ceiling;
- cover the floor with newspapers when painting the walls and then remove the paper;
- remove construction waste;
- wash windows and floors after completing work.
However, according to the Decree of the State Construction Committee of the Russian Federation No. 170 dated September 27, 2003 , cleaning after repairs, as well as maintaining cleanliness throughout the year, is required to be carried out by the Criminal Code
.
There are cases when residents, considering the cleaning provided by the Management Company to be insufficient, refuse it and clean the entrance themselves. The Criminal Code may refer to this, calling on owners to clean up themselves after repairs.
But cleaning of common areas by residents has nothing to do with cleaning after painting/whitewashing
: the repair is considered completed after demonstrating the renovated, clean entrance and signing the Acceptance Certificate by the residents.
Management Companies repair only common areas. Staircases on floors, common corridors and vestibules must be maintained in order by residents.
Repair of ceilings in the entrance
The ceiling, most likely, will not please you either. We repair it one on one with the walls: we beat off the crumbling parts of the old putty or chalk and prime the areas to be repaired. Then we repair large chips with repair compound, and the remaining parts with putty.
Conclusion. When preparing the ceiling, there is no need to remove all the old chalk:
Painting
Before using the emulsion, it must be mixed thoroughly. If the solution is too thick, dilute it with plain water. The ratio of the added liquid to the total volume of the container should not exceed 5 - 10 percent. In some cases, you can add a little more water.
A little paint is poured into a ditch or other container that is suitable for dipping a roller or brush into. In cases where the paint is applied by spray, it is poured into a special reservoir that is in the sprayer.
It is better to start painting from the perimeter of the room. This way you can protect the wall covering from accidental painting and it will be easier to work with a roller - it cannot paint areas that are close to the wall.
The roller is dipped into the ditch and the emulsion is rolled out along the horizontal part of the paint bath. This is done to remove excess emulsion. It's better to dip your roller in the tub more often than to apply an unsightly thick layer of paint. When the entire working part of the tool is completely saturated with paint, you can begin to roll it over the ceiling.
This must be done carefully, avoiding the formation of drips and drops. Properly whitening a ceiling with a roller is not as difficult as with a brush, and therefore, if you do not have experience in such matters, it is better to prefer it.
Layers, of which it is better to make two, are applied in different directions: first, the surface is completely painted, using roller movements perpendicular to the light entering the room. This means that the first layer must be applied along the wall on which the window is located. The second layer is applied parallel to the light rays and will run along the other wall.
To understand the essence of the process and understand how to properly whiten a ceiling with water-based paint, below is a video in which all operations are shown in detail.