During renovations, the question always arises of what to do with the walls. Do they need to be completely plastered and what material is best to do this?
If a major renovation has already been done in the apartment or house, then perhaps all the walls are well plastered, and therefore this question disappears by itself.
But in most cases, the walls must be leveled. Otherwise, this will affect the final result of the entire repair.
You can also level the walls with plasterboard. But today our focus is on other wall finishing materials. Finishing with plaster and putty.
A little about why sometimes many people doubt whether to plaster them or not? It's all about costs. I just want to save money.
- Firstly, this work often requires more preparation of the walls themselves before plastering. Preparation often includes completely knocking down the old surface of the wall itself (old paint, old plaster, etc.). The craftsmen, of course, charge money for this work.
- Also, it can take a lot of mortar to perfectly level the walls. The price of payment also depends on the amount of mortar and the thickness of the future plaster.
- Don't forget that this is one of the dirtiest renovation jobs. You also need to pay for the delivery and delivery of the material itself (these are bags of sand, cement and other additives with mortar).
It is not surprising that many people wonder how they could do without plastering the walls. But let's look from the other side.
- The walls for the same putty will also have to be prepared (remove old paint, tear off multi-layered wallpaper soaked for years, and so on). This is also money. But it happens that it is easier and even faster to knock off all the old plaster at once with modern tools than to rip off the same wallpaper or paint.
- Next, applying putty will be much more on such “prepared” walls, and most often you will have to plaster in order to even out the same corners and holes at least a little (at least to a minimum). The material in this case will, as a rule, be gypsum, and it is more expensive than cement and sand.
- And do not forget that this will also be “considered” plaster and, therefore, the price will also be.
As a result, you get a payment for the work that is not much cheaper than if you had thoroughly plastered the walls, but the surfaces were uneven.
How will this turn out for you? Skirting boards, platbands, ceiling plinths, slopes and the surfaces of the walls themselves look with cracks and unevenly. It's unpleasant, isn't it?
We plaster ourselves
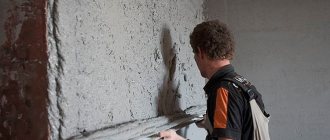
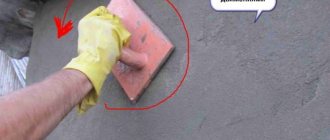
1. Apply the mixture. Now let's proceed directly to plastering the walls. To do this, you need to prepare the mixture according to the instructions. Please note that it should not be too liquid. In your left hand, hold a grater with a small amount of mixture. Using the end of a spatula, take a little bit of the solution and throw it onto the wall. The direction of movement is from bottom to top. Then smooth the layer using a grater in a circular motion. If you are plastering on beacons, level the mortar over the surface using a rule, lightly pressing it against the wall.
2. Set the layer thickness and number of layers. It is advisable to apply gypsum solutions in one layer. Cement - in three layers (preliminary, main and leveling). Thin-layer plastering is done only on smooth brickwork (5 mm and above) or concrete surface (up to 5 mm). It is not recommended to make an overly thin layer of plaster, because... it may crack later. And if it is too thick (more than 30 mm), it may slide off during operation.
3. Let the plaster dry. The setting of the solution depends on the composition, humidity and porosity of the surface, as well as on the thickness of the layers. Gypsum plaster hardens much faster. So, each subsequent layer with lime-gypsum mortar is applied through with cement mortar - through Walls plastered with cement mortar will dry completely only after approximately
4. Putty and sand. When the composition has dried, use a “grater” with sandpaper of different grain sizes to sand the wall.
If necessary, putty with preliminary priming. And we polish again. This completes the alignment of the walls.
How to level an uneven surface with putty yourself
The puttying process requires a certain skill, however, having studied all the intricacies, you can do this work with your own hands.
Before you putty on uneven ceilings and walls, you need to determine the degree of unevenness. To do this, you can use a rule. By applying it to the surface, you can see the gaps that need to be puttied. The rule is applied in different directions and the defects are marked with a pencil.
If the gaps are large, then before leveling the walls in the apartment yourself with putty, you can use beacons. Rigid slats are fixed across the entire area for the length of the rule perpendicular to the floor. Plumb lines are attached to the ceiling and lowered down along the slats, making marks on the floor. The slats are leveled vertically. Then the space between them is filled with putty starting solution and smoothed with the rule.
Description of the process step by step, how to do it yourself
Before leveling the walls with putty, you still need to study the technique of the process.
To do everything right, you need to start work from the corners. The corners themselves are formed last with a regular or corner spatula.
- The building mass is also leveled with a spatula, moving vertically and horizontally.
- Some masters advise smoothing the first layer in one direction, and the next in another.
- For convenience and speed, use two spatulas - long and short. The mixture is applied first, and the excess material is removed from it second. Also, use a short spatula to scoop up the solution and distribute it over the long one.
- Each time the movement of the spatula begins to overlap with the previous layer of solution.
- When an area of about a square meter is processed, they walk over it as a rule to remove excess mass.
- The first layer is ready, you need to wait until it dries completely.
- The finished surface is sanded with sandpaper and checked for evenness.
- Next, it is recommended to perform finishing putty to obtain perfectly smooth walls or ceilings. Now you can start decorating.
Advantages of compositions of different materials
Cement-based plaster is suitable for leveling brick walls - it is inexpensive and can be applied in a dense layer. Gypsum-based mixtures are suitable for concrete surfaces, but they require prior priming. They are also suitable for use on foam concrete surfaces - but even there a primer is required, since the material itself is porous and needs to create additional adhesion. Gypsum mixture is one of the most versatile materials: it is suitable for leveling concrete blocks and for leveling tongue-and-groove slabs.
Leveling the floor
Today there are many materials for leveling horizontal bases. They can be used as a base for such types of materials as tiles, linoleum, parquet floors, etc. They allow you to perfectly level the surface, making subsequent work easier and faster, while minimizing the consumption of adhesive solutions. You can buy self-leveling flooring and many other high-quality materials in the Luch-Stroy online store.
When choosing the appropriate screed, you should pay attention to its technical parameters - you need to select this product depending on the type of cladding. You also need to check what the thickness of the applied layer should be (it is determined by the manufacturer) and not exceed it. How to level the floor with your own hands, watch the video for this article.
How to prepare the base? A very important point is the preparation of the base for self-leveling masses.
Since their thickness usually does not exceed a few millimeters, they must be firmly connected to the existing soil. Therefore, they need to be carefully prepared in advance: they cannot contain dirt or cement laitance, which impair the adhesion of the screed. The base should be primed, this allows you to remove residual dust from the surface and also reduces its absorbency.
Decoration
If your wall in the interior design should be empty, that is, there is no furniture adjacent to it, and there is no urgent need to create a perfectly flat surface, then the problem can be solved with the help of decor. This will save money on building materials and give free rein to your imagination, turning uneven areas into a source of pride.
Decorative plaster
This method of visually leveling walls is the most popular, and textured mixtures will not only hide possible unevenness, but will create a unique style for the entire room. You can choose any color and shade, as well as application methods. If desired, such plaster can be painted at the request of the customer. The only limitation is your imagination.
If the discrepancy in level near the baseboard of the floor and at the ceiling is impressive, but this wall will not be used for furniture, you can make a whole panel from decorative plaster, giving free rein to your imagination and creativity.
Advantages:
- Practically does not get dirty.
- Protects the wall from external destructive factors.
- Easy to paint and clean.
- It will not cause any difficulties in application even for beginners.
- You can create your own unique design.
Flaws:
- Relatively expensive material.
Gypsum products go well with decorative plaster. They are glued to the wall, complementing the design. This option is convenient and practical only on those walls that will be open and not used in the interior.
Living ornamental plants
If the problematic wall is directly in sight, then all its disadvantages can easily be turned into advantages. To do this, it is enough to apply any coating (plaster, liquid wallpaper, textile wallpaper), and drive decorative nails on top in a chaotic (or strictly directed) order, stretching a thread between them. Place flowerpots with climbing flowers at the bottom, placing the vines on stretched threads. As the plants grow, their lashes will spread over the entire wall, thereby hiding all the unevenness and roughness of the repair.
Advantages:
- Cheap way.
- The ability to create a unique interior element that will also fill the room with oxygen.
Flaws:
- You will have to wait a while for the plants to grow.
- This “disguise” requires care.
A kind of living corner where it would be nice to place a table and a few armchairs. Beautiful, bright, not boring and always lifts your spirits. Decorative butterflies or birds of paradise can be placed between the lashes.
Volumetric decor
Various posters, paintings, panels framed in massive frames will help to hide the unevenness of the wall and shift attention. The cheapest option would be to make a gallery of your own photographs on the wall, displaying the most pleasant moments of life. There can be as many of them as your heart desires.
Expert opinion
Sheveleva Oksana Maksimovna
Chartered Interior Designer
As for panels and paintings, it is important to maintain a unified style so that the masking elements do not look ridiculous. If difficulties arise, you can look at examples on the Internet or seek help from designers who will create a unique decor that fits perfectly with your interior.
Advantages:
- Possibility of independent choice.
- Variety of interiors.
- You can make it yourself using various techniques.
Flaws:
- None.
You can also use various pottery, all kinds of plates, mugs, and antiques as three-dimensional decor. They will turn a gloomy and boring (and also crooked) wall into a source of pride.
Photo wallpaper with 3-D effect
Photo wallpaper with a complex multi-stage pattern will help to visually hide all the unevenness. An optical illusion that eliminates the need to spend money on building materials for leveling, it fits well with any interior.
Recently, wallpapers with images of wild stone and imitation brickwork are often used in interiors. The multi-level structure allows you to deceive the eye so that even the most impressive irregularities and discrepancies will be invisible.
Advantages:
- Easy to glue.
- Relatively low price.
- Variety of choice.
- Easy to clean and care for.
Flaws:
- None.
If the stores don’t have what you need, you can order photo wallpaper from the manufacturer by providing your personal sketch with measurements.
Liquid wallpaper
In addition to the fact that you can choose any shade, liquid wallpaper independently levels the walls, filling all the holes and smoothing out unevenness on the surface. This is one of the simplest and most accessible means that have recently begun to be used instead of plaster. They are easy to apply to the wall, lay down softly, dry well and do not cause any difficulties in use.
Advantages:
- Wide selection of decor.
- Quick and easy to apply to the wall.
- Environmentally friendly material.
- There are no seams.
Flaws:
- The relatively high cost of the material and high consumption in the presence of unevenness on the wall.
Liquid wallpaper needs to dry well, so after applying it the room should be warm.
Drywall
A very common and fashionable material today is a sheet of fairly thick cardboard on a gypsum base. Drywall also requires sheathing, metal or wood. But you can fix a sheet of drywall without using lathing - using gypsum mastic, which contains building gypsum and a solution of bone glue.
Drywall is the best option as a base for wallpaper. You can start gluing them without pre-treatment; you just need to cover the nail heads with alcohol varnish (or nitro enamel) to avoid corrosion. You can not glue the wallpaper, but simply whitewash or paint the surface of the drywall with oil or adhesive paint. It is not recommended to use lime paints for this, because... poor adhesion to cardboard.
Plaster mixtures
We will not talk about plaster, which was used before, and is still used by some now, when all the components of the mixture are purchased separately and the solution is made according to their internal ideas. This kind of work is more like fortune telling with coffee grounds, and even in the same room, different bookmarks can manifest themselves differently over time. When choosing whether to plaster or sheathe with plasterboard, we will initially create equal conditions and consider ready-made mixtures. Here are the stages of working with plaster:
- Preparing rough walls. It is necessary to thoroughly clean the surface under the plaster, get rid of all cracks, knock down all weak points and restore them if necessary. Thoroughly clean from dirt and dust, and finally prime the surface.
- Install the so-called beacons, edges along which a special instrument will pass - the “rule” (emphasis on the first syllable). It is a long (up to 3 meters) aluminum strip of various widths.
- If the layer of plaster is more than 2 - 3 centimeters, use a reinforcing mesh, which is designed to hold the composition. It is attached to the wall with hardware every thirty or forty centimeters in a checkerboard pattern.
- It is best to stock up on a concrete mixer or a large construction mixer; you will very quickly get tired of making batches with your hands or a hammer drill attachment. They are done small and often, as the plaster dries quickly.
- Now that the preparations are complete, now you need to take a trowel and start throwing the mixture on the wall, while trying not to stain everything around and get an approximately uniform coating.
- Take the rule in hand and straighten out what happened. Repeat the procedure until the surface is plastered.
We still don’t know what is better: drywall or plaster walls, but we already know what plastering work looks like. It is important to remember that these works are classified as “wet” works, because the mixture is diluted with water. Stock up on plenty of it and get ready for a lot of cleaning. After such work you can’t do without it.
Why is this necessary?
The surface under the wallpaper should be smooth. Especially under thin ones that show the slightest irregularities remaining on the wall after its preparation. Ensuring the absence of flaws is the most important task of the finisher leveling the walls.
Advice. When taking prepared walls, use rights and a crowbar. If the work is done well, its edge will fit tightly to the wall.
Some building materials, such as precast concrete, initially have a smooth surface. Therefore, whether it is necessary to plaster concrete walls under wallpaper is decided individually, based on specific circumstances. In 90% of cases, you can get by with careful putty, saving:
- time;
- materials;
- money.
And 3 more tips from a blogger
1. When do you need to remove beacons?
The time to remove beacons depends on the selected technology. If the master uses the so-called “glossing” (smoothing) of the surface during the plastering process, then the beacons must be removed as soon as the mixture on the wall begins to set. The grooves from the lighthouses are also sealed immediately - to obtain a uniform surface. But this method is used in real practice by a minority of masters. It is much easier and faster to do rough plaster and remove the beacons the next day. Beacons can be removed after a week: the time of removal is not critical.
2. Can gypsum plaster be used on a balcony or in a damp room?
Gypsum plaster should not be used only in areas of constant contact with water. Many manufacturers strongly recommend using cement-based mixtures on balconies and in bathrooms.
3. Is it worth plastering window slopes?
Plastered slopes, despite all the criticism of this decision, have a right to exist. If everything is done correctly, using technology, with reinforcement and using an adjacent profile, then there will be no problems with them. Keep in mind that this is a rather labor-intensive undertaking and the work will cost more than slopes made of sandwich panels or plasterboard.