After you have made your own decorative stone, painted and dried it, you can begin installation. Laying decorative stone from gypsum is quite an exciting activity that anyone can do, because it does not require any special tools or experience. You can do all the work yourself and save a lot of money, because... For one square meter, installers ask from 1000 to 1500 rubles.
From this article you will learn:
- How to prepare tiles for laying;
- How to glue tiles on walls;
- How to cut stone without dust;
- Is it possible to glue it to wallpaper?
- How to grout seams on brick;
- How to cover the stone.
Preparation for installation
The wall on which the stone will be glued must be dry and even. Ideal option: plastered, primed wall or drywall. The tiles need to be laid out on the floor and compared, because... The sizes of individual tiles may vary. It often happens that the length of the stones is different; if for slates this does not play any role, since it is laid closely, then for bricks this is a problem. Even if the length of some tiles is 1-2 mm longer, then “in volume” your seams will shift and it will not be beautiful. There are 2 options to work around this problem:
- File each tile;
- Do the installation “by eye”. Usually, when laying bricks, a bead of equal thickness is used to form a seam and laid at horizontal and vertical joints. If the bricks are different in length, then this bead is not placed on the vertical seams, but is done “by eye”, slightly narrowing or widening the seam. If you do this and move a few meters away from the wall, you won’t even notice anything, it will seem that everything is smooth.
Gypsum tiles - laying rules
Preparing the walls
As in any case, it is very important to prepare the base for decorative gypsum tiles. This mainly involves removing old paint, deep cracks, peeling plaster or any finishing layers that may be peeling off the wall. The cleaned wall must be leveled and primed to ensure maximum adhesion to the tiles.
As with other tiles, gypsum tiles begin by laying from the corners. This is the easiest way to avoid joints in more open areas. And if the last tile extends beyond the edge of the wall and needs to be cut, this is done... with a regular wood saw. It’s worth remembering to buy a good saw blade, because a bad one simply won’t cope with hard plaster.
Processing gypsum tiles
There are sometimes sagging gypsum coatings on the back of each tile. This is not a disadvantage, but tiles cannot be laid this way. They need to be cleaned, for which they use a spatula or a metal brush. Due to the large mass of gypsum tiles, they must be laid from the bottom. This way, the pre-laid layers will take some of the weight of the higher rows and they can all be held together perfectly.
Recommendations!
To avoid the effect of a repeating pattern, in the vast majority of cases, gypsum tiles are laid with an offset of 1/3.
Gypsum tiles are only available in one color: they are all white. Luckily, they can be freely dyed. In many cases, it is recommended to do this only after the glue has completely cured. This takes about two weeks. Theoretically, you can paint earlier, but you should wait.
The finished wall, finished with tiles, will still have to be treated with an impregnating agent. Again, theoretically this is not necessary, but plaster is quite an absorbent substance and skipping this step may result in slight staining of the tile. As for the construction chemicals needed to lay gypsum tiles, you will need three products: primer, adhesive and grout.
1. The primer is always selected according to the base
At least in theory, it will never come into direct contact with the decorative gypsum board, and its dual purposes are to increase the cohesion of the substrate and increase adhesion. Even on walls that are in good condition, it is worth using stronger primers designed for damaged surfaces. This will not cause any damage, and given the significant weight of the gypsum stone, it may prevent the panels from tearing off the wall
2. Gypsum tiles - which adhesive is best?
Again: adhesive strength is the main criterion. It is good to attach heavy slabs using elastic, strong adhesive. Thin-layer gypsum adhesives are also used. They are applied to the back side of the tile in a very thin layer (no more than 3 mm) and distributed evenly, gently pressing the plate to the base
No grout needed
You can buy tiles without grout (sometimes criticized for their aesthetics, but they still have their charm), with cast grout (however there may be a minimal gap between them) or with grout. In the latter case, special spacer crosses for gypsum tiles are purchased. Usually there is no need to use them, but it is worth remembering that the thickness of the grout should be small.
If desired, impregnation for gypsum decor can also be useful - these are special preparations that reduce absorbency and make it easier to keep it clean. In most cases, impregnation will be recommended if the gypsum brick or imitation stone is not going to be painted, although the use of impregnation is still not technically required.
Installation
Let's look at the installation using decorative brick as an example, because... it is more difficult to install than slate. It is better to start gluing the stone from the outer corner and from the second row. It’s up to you to decide what the corner will look like; some installers cut each tile at 45 degrees and join, others overlap. The second option is simpler, because No need to cut the tiles, but it is only suitable for stones with simple relief. Laying from the corner involves gluing solid tiles without cutting their length, if you do the opposite, it may turn out that you have a 2-3 cm scrap that fits the corner and it will honestly say “no ice”.
Read also: How to calculate how much decorative stone is needed for walls?
Before starting work, we make marks on opposite sides of the wall, equal to the height of the tile with the seam. If the height of the brick is 5 cm and the seam is 1 cm, then we make marks 6 cm from the floor. Then we draw a line using painting thread and screw something flat along the entire length of the wall: a block, a lath, a profile for drywall, etc. Next, we make similar markings with a pencil up the wall after 5 and 1 cm. We draw only horizontal lines, they serve as a guide. If you have a laser level, then such markings are not needed and you can use it.
Next, we dilute the glue according to the instructions; you can read about choosing glue here. Take a notched trowel with 6 mm teeth and apply it to the wall.
Let's start installation. For gluing, you need to press on the tile slightly to the sides.
Don't forget to lay the glazing beads before the glue dries.
I only had 1 glazing bead, 1.5 meters long, when I did the installation at the customer’s apartment. I laid the first row, then started the second, and as soon as the tile extended beyond the length of the bead, I carefully removed it and moved it further. And so on with each subsequent row until you reach the ceiling. Most likely the ceiling will need to be trimmed to length.
There is also another installation method: glue is applied to the tile itself with an ordinary spatula, then glued to the wall. This way there will be no glue between the tiles. Many people don’t even fill this space, but leave it as is.
Disadvantages when using gypsum tiles
Gypsum wall tiles are perhaps a better solution than stone in many ways. But when laying it, there are several pitfalls that you should be prepared for in advance.
- This is quite a heavy finish, so applying it to an unprepared or imperfect surface ends in a repair disaster, although sometimes only after a while.
- Gypsum tiles are not sold ready to install. Its preparation does not take much time and does not require specialized tools, but must be carried out carefully.
- Cutting tiles requires a simple but very unusual tool. Many people forget to prepare it before starting work.
How to avoid these pitfalls and what are other unexplained problems? Everything will become clear in a moment.
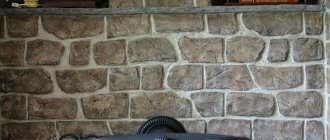
Grouting decorative brick joints
Grouting, or as it is also called “grouting,” involves filling the seam between the tiles and gives the natural appearance of brickwork. You can grout the seams using different methods and mixtures. You can use special grout and a narrow spatula, as in the photo.
Or you can take regular finishing putty (it's usually white), dilute it with water and place it in a milk bag. On the other side of the bag, cut off the corner and squeeze the whole mixture into the seams. You can see how this is done in the video.
How to make gypsum tiles with your own hands from plasterboard
Not every family today can afford modern renovations. And I really want to update my home. Therefore, we offer a budget option for finishing the interior walls of a house with decorative gypsum stone tiles. Watch the video at the end of the article.
To do this we need to purchase:
- the cheapest drywall;
- gypsum plaster;
- impregnation or paint as desired.
The process of making plasterboard tiles
- Mark the bricks 250*65 mm. per sheet.
- Using a hacksaw, knife or jigsaw, loosen the drywall along the lines.
- Apply a 3-5 mm layer of gypsum plaster to each tile.
- Apply texture with a sponge.
- Let the tiles dry.
The tile is ready. Wall finishing is done using glue, as well as gypsum plaster. The seams can be filled either with grout (if these are small seams) or with the same plaster.
Work order
The beauty of the finish will depend on the correct installation work. To make the composition less noticeable, it is usually distinguished by a white color, which looks advantageous against the background of imitation of any material. Installation steps include the following:
- The surface must be completely cleaned, old finishes and all types of contaminants must be removed.
- Large irregularities must be eliminated.
- The wall is divided into horizontal lines; their width should be approximately forty centimeters.
- The necessary marking lines are drawn on the wall so that the slabs are installed evenly and without distortions, and the evenness of the installation is periodically checked using a building level.
- A primer solution is applied, it will increase adhesion and reduce the consumption of the adhesive solution; it is important that the layer dries completely before installing the tile material.
The installation of slabs should begin from the corner areas, so that later it will be easier to make unnoticeable adjustments between the rows. If the solution was prepared strictly according to the manufacturer’s instructions, then the tile rows will not peel off and will be securely fixed to the surface in a short time. The manufacturer also prescribes the setting time of the glue on the packaging.
Gypsum tile adhesive can create a strong bond that will make the finish last longer, while making installation easier. If you choose a high-quality composition, you can carry out the finishing work yourself. When choosing, be sure to take into account the operating conditions, the characteristics of the slabs and the type of base.
How to glue drywall tiles to a wall
Apply a thin layer of gypsum plaster to the prepared wall and rub. Then apply a layer of plaster to the tile using a trowel with 3-5 mm teeth. Press against the wall. Between the rows either crosses are laid (for small seams) or the same drywall (for large seams). Watch detailed video instructions. You need to start gluing the tiles from the corners.
After the tiles have dried, you can use all your imagination in terms of coloring the tiles. Finally, varnish the entire wall (if necessary).
Tips for laying decorative stone
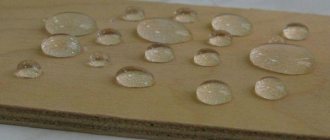
After 12 hours, when the design is completely dry, the final stage begins - applying a water repellent to the surface. This creates a thin protective film that preserves the appearance of the cladding. The water repellent protects the stone from ultraviolet rays and moisture. A brush is suitable for application. Examples of high-quality design can be found even at home. To do this, you must adhere to the standards of preparation, mixing the adhesive solution and the sequence of laying the material.
A water repellent is not needed if the surface is being finished inside the home. In this case, varnishes are suitable, which will slightly change the color of the stone and make it a couple of tones brighter. There are also matte solutions that look impressive in most interior solutions.
Technology for creating gypsum stone
Even though the production of installation materials will be cheaper, you will still have to spend money on materials and tools. You need to understand the principle of creation, which is somewhat reminiscent of baking bread. Then you will understand why. So, here's what you need to get started:
- the main component is gypsum. Replenishment includes other elements, such as coloring pigment, water and other additives;
- There is no way to do without special forms or templates. They are made of silicone or polyurethane. It is these soft products that are preferred. There are plastic molds for gypsum tiles, but they are rigid and difficult to work with. Moreover, you need to choose the size of the forms, their relief and shape. This is chosen individually;
- thickener, which is needed to speed up the thickening process;
- container for preparing the mixture;
- drill with a mixer-type attachment;
- brush;
- composition for processing molds. It will make the finished product easier to remove from the mold. It’s like with baked goods - so that they move away from the pan, they are greased with butter;
- notched spatula.
It is from this set that the gypsum tiles will be created. The process itself has no difficulties. There are only some points. For example, the pigment can be added directly to the plaster mixture. Then the color of the stone will be throughout the structure. Due to this, even if one finishing element is damaged, it will be difficult to notice. Another coloring option is to apply the color with a brush to the form itself. What to choose, everyone decides for themselves. The number of molds can also be different. It is clear that it is more convenient to use several at once. This way you can quickly create the required amount of decorative stone.
To begin with, dry gypsum mixture and water are mixed in a tank. It must be remembered that the amount of the finished mixture must be identical to the number of filled forms that are available. In other words, it is unacceptable for the prepared plaster to remain for a long time without a mold in the tank. Cook as much as will go in at a time. It is important to make the mixture similar to sour cream and maintain a similar proportion so that the batches of gypsum stone are the same.
The following is the process step by step:
- The mold is lubricated with a composition for better removal of the element and painted (if this option is selected).
- The mixture in the tank is mixed again and the molds are filled with plaster.
- In order to remove air and compact the material, the template is moved slightly, creating vibration.
- Excess plaster is removed.
- As soon as the mixture begins to harden, grooves are formed on its surface using a notched trowel. Their task is to improve grip on the surface.
Note!
Laying gypsum decorative stone can be done on a concrete base, on brickwork, on a plastered or wooden wall, and even on plasterboard. That's all, all you have to do is wait for it to dry and make a new batch. When you have collected a sufficient number of decorative elements, you can begin to lay them out. How to do this? Let's find out.
Let's sum it up
With the development of building materials, the use of natural stone in decoration is moving away. Although this is a practical, but unprofitable way to transform a room. After all, there are materials that are much more accessible and practical. Those who have made a choice in favor of gypsum decorative stone do not regret their choice. The ranks of satisfied users are growing, as evidenced by reviews. Therefore, if you do not have enough funds to get a stone finish, do not be upset. Gypsum stone is a worthy alternative. And the installation process can be done with your own hands.
Recommended Posts
Japanese houses made of polystyrene foam
Cement mortar for bricklaying
Gypsum stone for interior decoration + photo
House made of expanded clay concrete blocks + reviews
We build a wooden house with our own hands
How to nail the lining correctly + video
Joining seams
The presence of seams helps prevent dust and dirt from getting into the gaps between elements and ensures sealing. Seaming is carried out using a special bag or syringe gun. A special cement-based solution is used as a grouting material. This allows you to imitate the laying of natural stone.
When jointing, you need to fill the syringe with the solution and slowly squeeze it out in the direction of the seam. After the solution has set somewhat, press it with a spatula.
It is recommended to fill the joints completely 5 mm from the back of the tile.
You can remove excess mortar after 40–45 minutes, when the grout has hardened a little. You can use a wooden or special metal trowel for this.
Recommendations for installation work
When applying glue, the layer thickness should not exceed 1 cm.
Before gluing the plaster to the wall, a primer is applied to the back side.
The preliminary preparation of a “dry” layout significantly speeds up the work. Having placed the elements in the desired order, you can gradually transfer the masonry pattern to the wall in accordance with the plan.
Large and small panels are laid out in regular alternation to create a harmonious composition.
To prevent the glue from hardening for a long time, stirring is done with cold water, bringing the solution to the consistency of thick sour cream with a high degree of viscosity.
Wedges help to lay out the tiles evenly. The applied glue is spread with a notched trowel. To ensure smooth corner joints, the edges are cut at an angle of 45 degrees from the outer edge to the inner.
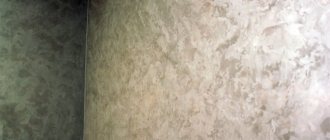
Example of smooth angular coupling
Finishing is carried out at a temperature of 5-35 degrees, and the seams are rubbed at the end.
Seam filling
It is possible to additionally protect decorative slabs from dirt and dust if you coat them with façade varnish. You need to brush on several layers.
At the preparation stage, level the wall surface, buy material with a margin of 5 to 10%.
The products are cut with a metal saw.
There are no standards for the width of the tile joint for gypsum blocks; they are often made individually. It is recommended to leave no more than 1 mm between elements inside the bathroom and kitchen.
Types of glue
Alabaster mixtures
They are dry mixtures of alabaster and plasticizers, which are diluted with a certain amount of water.
The mixture may contain quartz sand (pay attention to the composition on the packaging), which is added by manufacturers to reduce the cost of the material, but impairs adhesion, so use compositions without this component.
Choose an adhesive that has a pot life of about 30 minutes and is characterized by rapid setting, which will prevent the hand from holding elements on the surface for a long time.
To mix high-quality glue, you need at least 300 ml of liquid per kilogram of dry mixture (read the instructions on the package). Otherwise, the solution contains a small amount of alabaster, which affects its adhesive properties.
Liquid Nails
Polymer adhesive with high adhesive properties:
- based on neoprene: has a pungent odor, toxic. Suitable for fixing gypsum cladding to any type of surface. When performing work, it is necessary to protect the skin of the hands and respiratory organs, and subsequently ventilate the room;
- based on acrylic copolymers, polyurethane: the composition is non-toxic, there is no specific odor. Adhesive properties are lower than those of neoprene glue, suitable for installation of porous materials (bases made of wood, plasterboard or brick). They have low moisture resistance and cannot tolerate low temperatures.
Tools consumables
To carry out the work, the master will need:
- tile cutter;
- level;
- notched spatula;
- pencil;
- rags;
- roulette;
- bucket;
- crosses.
Before finishing drywall with stone, it should be prepared. For this you will need a primer. The sheets may also have to be leveled, and for this, in the case of sheet material, putty is used. Artificial stone is usually glued to drywall using special glue. It allows you to make the layer thickness smaller, reducing material consumption.