The essence of the “wet facade” technology
A “wet” facade is an external insulation system under plaster.
The construction of warm walls using “wet” technology is carried out using the following methods:
- Increasing the thickness of the structures themselves.
- By fixing the insulator to the outer part of the walls and then covering its surface with sheet material (ventilated method).
- Fastening the insulator with plastering (non-ventilated technology).
Insulation materials are much cheaper than samples that are used to increase the thickness of walls. However, some modern solutions are subject to destruction even under minor loads. To prevent such consequences, special protection must be applied to the thermal insulation.
The non-ventilated technology is called “wet plaster”. It involves the use of plaster mixtures “mixed” with liquid.
The method was first used 50 years ago in Germany. Installation of sheet materials is carried out both outside and inside the building. The second option is simpler, but it is used exclusively in cases where it is impossible to insulate the wall from the outside.
With external insulation, the following results are achieved:
- The wall loses its cold bridges.
- The dew point ends up outside the living area of the house and moves into the insulation.
- The cooling of the building occurs more slowly, because heat accumulates inside.
Types of finishes
Taking into account the fastening technology, several types of wet plaster are distinguished. The heavy version involves fixing the material without an adhesive mixture, but using dowels with hooks. In this case, the coating does not come into contact with the wall, but remains independent. Because of this feature, the insulator does not deform and does not become waterlogged from the inside.
There are several types of wet plaster.
In a heavy wet facade, a special metal mesh is used, which is hidden by plastering. The costs of implementing work using this technology are much higher than using an alternative method.
Lightweight wet technology is more popular due to its low cost and ease of installation. In addition, it has a smaller list of requirements for the wall surface. The insulator can be mounted on OSB boards and plywood sheets. The main condition is that the base must be level, so before work a series of plastering and painting activities is carried out. To fasten the insulator, plastic dowels or an adhesive mixture are used.
Technology characteristics
The physicochemical properties of a wet facade are determined by the composition of the plaster.
If mineral wool is chosen as insulation, it must meet the following parameters:
- Tensile strength - up to 15 kPa.
- Density - from 130 to 180 kg/cub.m.
- Resistance to alkaline environment - from 12.5 pH.
- The degree of water absorption is up to 1.5%.
If polystyrene foam boards are used, their strength properties cannot be less than 100 kPa.
The optimal density is 15-25 kg/cub.m. in addition, the selected sample must have precise geometric dimensions.
Wall cake layers
The main components for installation are:
- Glue mixture. In the construction industry, the layer is called Portland cement. However, other analogues that are sold ready-made are also suitable for installation.
- Mineral wool or polystyrene foam boards. The former are characterized by a high degree of thermal insulation. Expanded polystyrene is inexpensive and provides reliable protection from the cold.
- Plaster with reinforcing fiberglass mesh. It is necessary to level the surface.
- Decorative material. It allows you to decorate the surface and give it a finished look.
For installation, an adhesive mixture, slabs, and plaster are used.
Comparison with the “dry” insulation method
Understanding what a “wet facade” is, you need to compare it with “dry” technology. If in the first case liquid adhesives, moisture-proofing and plaster mixtures are used, then in the second case ready-made panels or siding are used. With the help of such materials you can quickly refine the outer part of the wall and at the same time protect it from the passage of cold.
The “dry” method is easy to implement, but has some nuances. The service life of the cladding is from 50 years.
If you want to update the appearance of the room, it is enough to remove the sheathing, install a new layer of mineral wool or other insulation and carry out the insulation work again.
Some errors when performing work
When carrying out work on installing a wet facade, a number of mistakes are often made that negatively affect the quality of the coating:
- Failure to comply with the temperature regime leads to peeling, destruction and even rotting of the wet facade.
- Due to poor-quality preliminary work, the service life of the finish is significantly reduced, since destruction is possible inside the thermal insulation layer.
- The appearance of cracks in the area of door and window openings can spoil the overall design of the surface.
- If the reinforcing mesh is installed in violation of the technological process, chips and cracks may appear on the outer layer of plaster.
You can learn about new modern materials by looking at wet facade photos on numerous Internet sites.
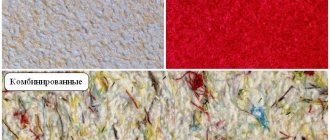
Choice of insulation
A house insulation system using wet technology will be effective if the insulation is chosen correctly. For most conditions, foam sheets 5-10 cm thick or high-density mineral wool are suitable.
When choosing an insulator, the following parameters should be taken into account:
- Price. The cost of products is influenced by the country of origin and the reputation of the manufacturer. For example, products from foreign brands are more expensive than Russian-made samples. Products have an optimal price-quality ratio.
- Vapor permeability. Such characteristics are present in mineral wool. Using it as insulation makes the building “breathable” and improves the microclimate inside.
- Difficulty in installation. Installing polystyrene foam is much easier than mineral wool because it has a rigid structure.
- Compliance with fire regulations. Foam boards ignite quickly, and basalt samples in the façade pie are not subject to combustion at temperatures up to 1000 °C.
Features of using mineral wool
If mineral wool is chosen as an insulator, then it must be cut with a sharp knife. To eliminate negative consequences for the body, personal protective equipment should be provided. To solve the problem, you need to wear gloves and overalls, and if you have to grind the insulator, it is important to find a mask and safety glasses. After completion of work, the uniform must be removed and hands washed.
Mineral wool is a fibrous inorganic insulation material.
Installation of mineral wool is practically no different from installation of other types of insulation.
Determining the required thickness
Depending on regional characteristics, the wall design is subject to heat transfer resistance requirements. Scheme maps are used to determine the current value. There are special calculators that can be used to obtain the optimal insulator size.
Calculation of the amount of insulation
You can calculate the insulation after analyzing the area of the insulation and finishing area, or taking into account the linear parameters of the wall, minus the openings for windows and doors. First you need to estimate the thickness of the insulator. When calculating the amount of materials, you need to use the area of the part of the house to be finished and insulated as an initial parameter.
Required materials and tools
You can make a façade on a frame house using “wet” technology with your own hands. The list of required tools and materials for work:
- Base or starting profile. The width of the product must correspond to the thickness of the insulator.
- Fasteners and mixtures. They guarantee correct joining of profiles in one plane.
- Fasteners for frame elements. The minimum length of dowel nails is 40 mm when it comes to attaching insulation to partitions made of concrete or brick.
- Primer composition. It is necessary to prepare floors for fixing slabs.
- Reinforcing mesh. It is better to choose wear-resistant and reliable products that are not exposed to alkali.
- Finishing. To improve your home, you need to purchase a water-dispersion primer, decorative plaster and paint for cladding.
- Insulating boards. Before purchasing an insulator, you need to calculate its thickness and quantities in advance.
The reinforcing mesh must be wear-resistant and reliable.
Recommendations regarding the choice of “system” and contractor
- Choose only “systems” with a name on the market, the quality of which is documented;
- Trust the work only to specialists. Correcting errors is much more expensive, it is better to pay professionals.
Important! Specialists must have a number of completed projects and certificates from system suppliers
How to check the quality of work performed
Of course, it’s not your task to continuously monitor workers, but it’s still worth taking a closer look at such moments and making sure that:
- Preliminary preparation of the base has been carried out;
- The adhesive composition is applied to the insulation correctly, according to the instructions;
- The insulation is glued evenly;
- The insulation boards are tightly joined to each other;
- The dowels do not protrude above the insulation;
- The reinforcing mesh is not laid on the insulation, but is recessed into the base plaster layer;
- “Breathing” plaster is used; after application it does not crumble;
- The facade is protected from moisture from the window sills and roof;
- The façade is smooth and does not bulge;
- There are no vertical, “spider-web” cracks on the façade, or diagonal cracks in the corners of door and window openings.
According to European standards, the service life of such an insulation system is 25 years.
Repaint it or change the texture of the plaster (re-plaster) if necessary, possibly earlier.
Step-by-step installation technology
The technology for installing “wet” plaster consists of several stages. Initially, a series of measurements are taken and surfaces are prepared for upcoming work. Then the walls are covered with a primer, and the base profile and insulation are installed. After this, a layer of base reinforcement and a facing panel are laid.
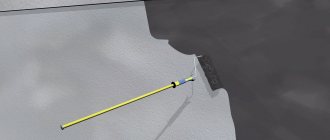
Required measurements
To evaluate the geometric parameters of the plane, it is necessary to hang the facade with laces. This stage is carried out identically to the installation of beacons. In the upper corner it is necessary to secure a piece of reinforcement with a diameter of 12-14 mm. At a distance L (5-10 mm + insulator thickness) from the wall, you need to fix a nylon cord with a plumb line.
In the lower part, along the line of the lace, a second piece of reinforcement is fixed, to which the cord is tied with tension.
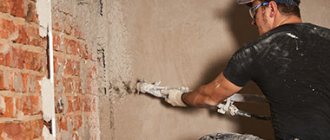
Preparing the surface for work
Using “wet” plaster, you can repair any wall defects, but if you do not eliminate them in advance, the quality of the finishing coating will greatly deteriorate. As a result, this will increase the risk of the plaster peeling off from the base.
Using wet plaster you can repair defects.
Remains of plaster or concrete deposits must be knocked down. In a block wall, you should carefully check the seams. If they contain cracks, they can be removed with foam adhesive or a special adhesive mixture.
Primer coating
To give the plaster-adhesive mixture the required strength, it is necessary to apply a primer to the surface to protect the mixture from dehydration. With this product, the pores of the materials will be sealed. If you do not do this, the walls will quickly absorb moisture, which is necessary for the normal passage of chemical reactions.
Laying the base profile
To protect the lower part of the insulator from wear and shock, it is enough to secure the base metal profile. It is fixed at a height of 40-60 cm from ground level. In addition, the profile will allow you to align and support the insulator sheets of the lower row.
Installation of insulation
For successful fixation of the insulation, it is necessary to prepare the adhesive mixture, following all the instructions. To do this, pour the dry ingredients into a reservoir of water and start stirring them with a mixer. The cycle continues for 5 minutes at low speed.
The adhesive mixture is needed to fix the insulation.
The glue-treated slab is placed as tightly as possible against the wall surface. Excess mass must be removed immediately with a spatula.
The insulator is installed from the corner along the wall. Adjacent slabs are joined and installed close to each other.
Laying the reinforced base layer
The next step is the fastening of the “wet” plaster. The “shell” can be made using an identical adhesive mixture or plaster with a different composition. The installation technology is as follows:
- Using a spatula, spread the mortar 20 cm wide along the corner on both sides.
- It is necessary to secure the corner along the corner line and align the grid.
- Using a spatula, you need to press the mesh into the layer of solution. At this stage, mass should not be allowed to pass through the mesh cells.
Layer of decorative plaster
Before carrying out facing work, you should wait until the facade has dried. Finishing involves priming the surface in 2 passes using a suitable mixture. In most cases, a water-dispersed mixture is used.
Decorative plaster is used for facing work.
Material on the topic: Venetian plaster: properties and composition of Venetian plaster, varieties, selection criteria, application rules
Description of insulation technology
The essence of installation is the gradual creation of several layers that perform a specific function in the structure. The heat insulator is fixed first, which helps reduce heat losses from the building during the cold season. This factor gives the right to claim savings in energy resources spent on heating the premises. The second layer gives the structure strength and solidity. Reinforcement is an important step when using liquid mortars and mixtures. Fiberglass reinforced mesh is considered one of the popular materials. Its technical characteristics are ideal for wet façade technology. The third layer performs a decorative and protective function. The abundance of mixtures makes it possible to transform the facade of any building, giving it an individual style. The range of coatings is distinguished by a variety of colors and textures.
Pros and cons of the “wet” finishing method
Unlike the ventilated (“dry”) method, the “wet” technology has the following advantages:
- No need to install a complex frame.
- Reliable protection against cold bridges due to the lack of a frame structure.
- Light weight.
- Good noise-absorbing properties.
- Durability.
- Resistant to external loads.
“Wet” technology is durable and resistant to external loads.
Disadvantages include a number of requirements for the quality of samples and dependence on the season.
Cost of work
Arranging the facade of private houses is not an expensive pleasure. Approximate cost of installation per 1 sq. m looks something like this:
- Surface preparation (paint cleaning, etc.) - 50-70 rubles.
- Preparation for installation (plaster removal) - 120-150 rubles.
- Laying the insulator - the cost is determined by the type of slab.
- Decorative works - 350-400 rubles.
- Plastering concrete belts - 320-350 rubles.
The average price for installation is 5-6 thousand rubles. excluding the cost of materials.
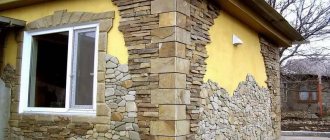
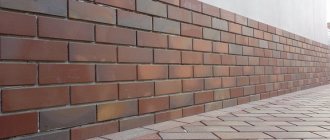
Photo examples of finishing of private houses
To choose the appropriate wet plaster option, you can see photo examples of finishing. To dilute the pastel palette, light side accents and a dark roof structure are suitable.
In a “wet” façade, each subsequent layer is applied without waiting for the previous one to completely dry.
The “wet” façade is a technology that is constantly being improved.
The “wet” facade is an external facade insulation system under plaster.
Options with snow-white or cream paint beautifully complement the wild gray stone inserts. The room can be decorated with rocky garden paths or wrought iron fences near the balcony.
Briefly about the advantages of technology
Due to the fact that this installation technology is designed for external insulation, its use can significantly save internal space indoors. In addition, wet façade plaster can be easily covered with artificial stone, ceramic tiles and other finishing materials. Insulation is quickly and easily installed around windows, without requiring the use of additional devices and materials. Despite the wet method of application, the thermal insulation system is relatively light in weight and does not create a significant load on the base and foundation of the building.
The price of the finished structure is slightly more than the cost of ordinary decorative plaster. The installation technology is accessible even to a person who has no construction experience. To carry out all work in accordance with SNiP, it is enough to read this article and look at the photo of the facade in order to remember the entire technological finishing process. The use of such an external coating improves not only the thermal insulation properties of the walls, but also performs the function of sound insulation
Like the use of plastic windows, this is especially important for buildings located in noisy cities. Thus, the affordable price and excellent performance make this technology a leader in the modern construction market.