Advantages and disadvantages of using drywall
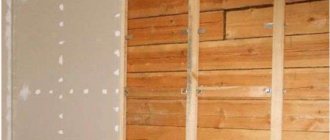
There are two ways to attach sheets: directly to the wall and to guide strips. In the first case, the vertical difference should not exceed 4 mm; in the second, the critical value is 40 mm.
Using the leveling method without installing a frame has the following advantages :
- loss of room volume is not significant;
- the cost of consumables and work is affordable to most categories of citizens;
- short deadlines for completing work;
- The owner of the apartment can do the leveling of walls with plasterboard without a frame with his own hands, without involving specialists.
The disadvantages of the method of leveling surfaces without a frame include the following problems:
- Adhesive mixtures are characterized by significant shrinkage upon drying. Violation of the technology for leveling the surface without using a frame can lead to the formation of voids and poor-quality adhesion;
- impossibility of using plasterboard sheets to form interior parts (niches, ledges, shelves).
Methods for gluing plasterboard to the wall
There are a couple of technologies that you can use. The difference lies in the application of glue (mortar, plaster). In the first option, the entire internal space between the wall and the sheet being glued is filled with the mixture, and the sheet is glued (almost) over its entire area.
Recommend: What is the status of a building with a common roof, separate walls and foundation
In the second option, the solution is applied only to a few areas in small slides and the sheet is glued to these areas. There are usually about 5-8 slides. This minimizes glue consumption, increases ease of installation and speeds up the process of leveling walls with plasterboard. BUT, this method has one rather big disadvantage - the space between the wall and the sheet will not be completely filled and there will be voids there. Thus, the sheet can simply break into this void upon any impact. Glue can also be applied not to the wall, but to the gypsum board itself, but it’s more convenient to apply it to the wall, although it depends.
Drywall is sometimes attached to several sheets, without filling the entire space between the wall and the sheet with glue.
The choice of option for fastening the sheets depends on the need for protection from such impacts; anyway, with any not very strong impact, the gypsum board sheet will be dented, but at least a hole will not form at the point of impact.
If time and money are short, you can also use the option of point-mounting mortar onto piles without filling the entire space under the gypsum board. This technology is used in America.
Provided that you apply glue to the entire base, in any case, “all over” may mean that there will still be voids, but there will be a minimal amount of them.
Materials and tools
To eliminate the curvature of the wall using gypsum board sheets without using a frame, the following materials will be required:
- GKL sheets, thickness from 8–12 mm.
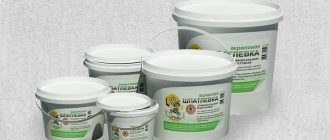
- Adhesive mixture.
- Serpyanka.
- Primer.
- Dry gypsum powder.
To carry out the work you will need the following tools:
- Spatula: wide (200 mm) and narrow (40 mm).
- Rubber mallet.
- Roulette 5 m.
- Pencil.
- Typically, a length of at least 2000 mm.
- Construction knife.
- Level.
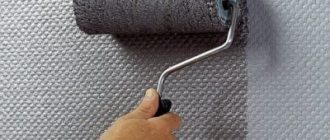
- Brush, roller.
- Twine.
- Container for preparing the adhesive mixture.
Before purchasing materials, it is necessary to make accurate measurements of the area of the walls that will be leveled.
The fastening of plasterboard sheets using the frameless method is carried out in steps, so you should estimate the location of the material in advance, transferring the dimensions to the drawing.
Preparatory work
Before leveling the wall with plasterboard without a profile, prepare the surface for work. The performance properties of the surface that is planned to be straightened depend on compliance with the preparation technology.
The following work will be required:
- To obtain a surface with high adhesion ability, it is necessary to strip the old coatings to the base. If the walls have been painted, to avoid labor-intensive paint removal, use the method of notching the surface;
- the basis is being studied. All detected cracks, chips and crevices must be repaired. To seal problem areas, gypsum-based putty solutions or cement-sand mixtures are used. If gaps in the base more than 20 mm wide are detected, it is permissible to use polyurethane foam;
- after repair work, dust and dirt are removed from the wall surface;
- the cleaned surface is treated with a primer. To work with concrete bases, deep penetration primers are used. On large areas, the primer is applied with a roller, and in corners and places adjacent to the ceiling, a brush is used. Priming ensures reliable adhesion and prevents the spread of mold and mildew. To obtain the required surface quality, the treatment is performed twice. Further work with the base is possible only after the primer has completely dried;
- when the wall is completely ready for leveling, you need to find the extreme points on the surface. To determine vertical deviations, it is convenient to use a metal rule or a flat wooden block. The level is applied to the rule and, achieving a strictly vertical position of the guide, the deviation values are found over the entire surface.
Preparing the mixture
The technology for preparing adhesive compositions is reflected on the packaging of any material. Manual mixing of gypsum-based materials in large volumes is not recommended - it will be difficult to achieve the desired result. A high-quality mixture is prepared using a hand mixer or a regular electric drill with a special attachment.
The finished mixture should not have clots or dry suspensions. The consistency of thick sour cream is considered optimal.
Most materials for gluing gypsum board sheets retain their properties for 60-90 minutes, so it is necessary to calculate the volume of the prepared adhesive mixture and the speed of working with drywall.
The final strength gain of the adhesive mixture occurs within a week.
Fastening sheets
Before leveling the walls with plasterboard without a frame, it is necessary to clarify the operating features of the room. Drywall is hygroscopic, which is why its use for leveling surfaces in non-permanent homes is not recommended. It is also not advisable to use drywall in rooms with high humidity (bath, toilet and kitchen).
Open the gypsum board.
Sheets are fastened to the wall in two ways: along guides (with differences of up to 40 mm) and with an adhesive composition (with differences of up to 4 mm).
When working with guides, adhere to the following algorithm:
- in accordance with preliminary measurements of the curvature, guides made of plasterboard strips 150 mm wide are fixed to the wall. Self-tapping screws or adhesive are used to attach the strips. The distance between adjacent guides should not exceed 400 mm;
- sheets of drywall are cut to size;
- An adhesive or polyurethane foam is applied to the guide strips, after which gypsum board is applied. When choosing polyurethane foam, it is necessary to choose a material with the lowest expansion coefficient, which will ensure reliable adhesion;
- Pressing the sheets with your hands to achieve alignment. If necessary, use a rubber mallet;
- after the solution or polyurethane foam has dried, additional fixation of the gypsum boards to the guides is carried out using self-tapping screws.
Working with a mallet on drywall is only possible until the adhesive or polyurethane foam has completely dried, otherwise the resistance exerted by the hardened mixture will lead to cracks or chips on the plasterboard.
As guides, you can use not only strips of plasterboard, but also a metal profile or plywood.
When using drywall installation with adhesive directly to the base, perform the following steps:
- Having measured the deviations of the vertical wall, a line is drawn on the floor along which it is necessary to orient the sheets of drywall during installation. If necessary, string is pulled diagonally, which also serves as a limiter and guide for installing the gypsum board;
- the adhesive composition is prepared;
- along the width of the sheet fastening area (the sheet is vertical), apply the adhesive in small piles, 25-30 mm thick, every 150-200 mm. To securely fix the plasterboard, you will need to prepare three strips along the width of the sheet;
- at the junction of the wall and the floor, install a 15 mm thick lining;
- a sheet of plasterboard with its lower edge rests on the lining and is pressed against the wall. Alignment of the sheet along the limiters is done by pressing it by hand. If necessary, use a rubber mallet.
When installing drywall without guides, it is recommended to use Perlfix glue as an adhesive.
If differences of up to 30 mm are found on the wall and the method of installing drywall without guides is used, the thickness of the piles of mortar applied to the wall for attaching gypsum boards should be at least 40 mm.
When working with aerated concrete bases, you should remember that polyurethane foam cannot ensure reliable adhesion of this material to drywall, so adhesives are used to attach gypsum boards.
Horizontal sheet fastening.
We glue gypsum board sheets
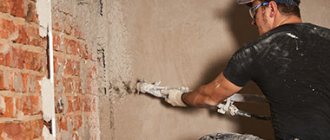
After applying the solution, carefully take the sheet and press it against the wall. We press a little into the solution, first with our hands, as much as possible over the entire area, then we take the rule and press the sheet with the rule at the same time placing it vertically. It is more convenient to use the rule with a bubble level, but if there is none, study the wall in advance, determining where the vertical will be.
The drywall sheet must be leveled (from the edge of the sheet), this way you will avoid many problems with the subsequent installation of the sheets. If, after gluing the sheet, gaps have formed between the perpendicular wall and the sheet, then they should be sealed with the same solution; if the gap is more than 2-3 cm, then such a gap should be sealed with carefully cut pieces of gypsum board. In general, if you are leveling more than one wall, then there should not be such gaps, since you will also level the perpendicular wall.
I recommend: Which putty to choose for sealing seams and preparing the surface for painting?
The same applies to the gaps between the ceiling and the sheet, and the floor and the sheet; they should also be carefully sealed, if any. Since one sheet of gypsum board may not be enough in height, another sheet cut to size should be glued higher.
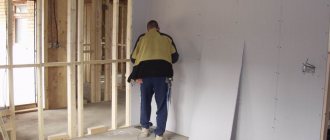
Having glued one sheet or one part, apply glue (solution) to the next part of the wall. If you managed to glue the drywall in more than one sheet in height, the second whole sheet should be placed under the ceiling so that the seams (joints) of the drywall do not coincide, so the structure will be stronger.
Sequence of gluing gypsum board sheets
As can be seen from Fig. above, gluing 1-2 sheets, measure, cut out, and glue the bottom piece of the sheet, the 3rd one.
Final work
After installation of the gypsum boards, they begin to mask the joints of the sheets and the heads of the screws. Masking joints using serpyanka occurs as follows:
- The joint area is cleaned with a stiff brush to remove small fractions of gypsum and dust.
- Serpyanka is attached along the length of the joint.
- Gypsum putty is being prepared.
- Using a spatula with a working surface width of 40 mm, rub the putty through the sickle into the joints of the sheets. Before starting the next work, you need to wait at least 15 minutes for the mixture to rise.
- Using a spatula with a working surface width of 200 mm, apply a layer of putty over the entire joint surface. After leveling the mixture, the serpyanka should not be visible.
Serpyanka.
In addition to serpyanka, fiberglass is used to mask the joint of sheets. In this case, perform the following steps:
- The joints of the sheets are embroidered in such a way as to create a groove 10 mm wide.
- The groove is filled with gypsum putty and leveled flush with the surface of the sheets.
- After the putty has risen, the fiberglass sticker is applied. To do this, prepare an adhesive solution based on PVA (one part glue to one part water). Further work can begin no earlier than half an hour later.
- Masking fiberglass is done in the same way as masking serpyanka (with gypsum putty and a wide spatula).
To mask the heads of the screws, it is necessary to tighten the heads of the fasteners so that they are recessed into the gypsum board by 1-2 mm. Next, apply gypsum putty with a narrow spatula and level it.
If, after leveling the walls, you plan to cover the surface with wallpaper, you need to apply a thin layer of putty over the entire area. The dried putty is rubbed with fine sandpaper until a flat and smooth surface is obtained.
What is the main difference
Despite the gypsum base, the materials have many differences:
- drywall is a three-layer sandwich made of paper and gypsum, GVL is a single piece of hardened gypsum mortar;
- The strength of gypsum fiber is many times higher. You can hang kitchen cabinets on it, which is excluded with gypsum board;
- GVL is less natural - it contains magnesium oxide and magnesium chloride. But these components of the composition are harmless;
- drywall has a much smaller scope of application;
- When cut with a knife, gypsum plasterboard crumbles and becomes dusty when working with a grinder; gypsum board is cut without residue;
- breaks differently when cut: drywall down, gypsum fiber upward. A small thing, but important. If you don’t follow the technology, you won’t get smooth edges;
- It is difficult to work alone with GVL due to its heavy weight. Need an assistant;
- The drywall is puttied before wallpapering. For GVL, such an operation is unnecessary. Here only the joints and heads of hardware are sealed;
- gypsum fiber sheets are more difficult to bend. Therefore, they are difficult to use for curved surfaces;
- Heavy gypsum fiber boards must be mounted on a more durable sheathing. Therefore, it is necessary to use a metal profile with a thickness of at least 0.5 mm.
What is better and cheaper, to plaster the walls or cover them with plasterboard?
Which building material is more preferable when leveling walls - plaster or drywall? This is one of the most pressing repair issues that must be resolved in advance so as not to encounter many problems that are inevitable with the wrong approach. Both materials show excellent results when leveling walls and ceilings and look great after finishing work is completed, but both of them have disadvantages, and working with each of them has its own nuances.
To answer the question of which is better - drywall or plaster, it is worth comparing their characteristics and considering the pros and cons.
From the history of drywall
Gypsum or alabaster as a building material has been used since ancient times. Physical and chemical properties make it convenient to work and successfully combine gypsum with other building materials. The use of gypsum in construction and other fields began with the ancient Greeks many centuries BC. Gypsum was used primarily for finishing walls and creating stucco moldings to decorate walls and ceilings. Further, the use of gypsum spread throughout Europe and the World.
In European territory, gypsum was mined in France, where the use of this material contributed to the development of such architectural styles as Baroque, Rococo, and Empire.
the use of plaster in repairs contributed to the development of styles
In 1880, American manufacturer and inventor Augustine Sackett combined sheet gypsum and thick multi-layer paper into one material. And thus he created a gypsum paper construction board. Sackett launched mass production of the new finishing material in his factory and patented his invention.
inventor of drywall
Drywall acquired its final form in 1910, after engineer Clarence Utsman modified the structure of drywall by covering the edges of the sheet with paper and began using single-layer thick paper. The first linear plasterboard factory was built in Great Britain in 1917 and from there the production technology spread throughout Europe.
High-quality drywall is now created by European manufacturers around the world and is indispensable for creating unique designs and interiors.
Types of drywall
The modern construction market offers many types of drywall from Western and Russian manufacturers, designed for different purposes, differing in size, sheet thickness and performance characteristics:
- Standard gray plasterboard with blue markings for finishing walls and ceilings in rooms with low and normal levels of air humidity.
- Waterproof plasterboard GKLV with silicone granules, which includes antifungal components, intended for rooms with high levels of humidity and unstable air temperatures. GKLV color is green, markings are blue.
- Fire-resistant plasterboard GKLO pink or gray with red markings is used to protect the premises from fires. In an apartment, such material is sometimes chosen for a nursery.
- Waterproof and fire-resistant GKLVO material in green color with red markings for industrial premises with high levels of humidity and increased fire safety requirements.
Based on thickness, plasterboard is divided into wall (from 12.5 mm), ceiling (8–9.5 mm) and arched (6 mm).
Drywall: types and applications
Drywall is a universal building material, often used instead of plaster. It consists of plaster covered on both sides with sheets of cardboard. It also contains starch and surfactants. Standard dimensions of gypsum board sheets are width 1200 mm, length 2000/2500/3000 mm, thickness 9.5 or 12.5 mm.
Depending on its operational properties, plasterboard is divided into the following types:
GKLO . Contains mineral fibers and special. additives. Resistant to fire, used in facilities with increased fire safety requirements.
GKLV . Impregnated with water-repellent components, this allows it to be used in rooms with high humidity - baths and toilets. It is worth considering that with prolonged contact with water, the material may still suffer.
Regular gypsum board . Widely used in residential premises for leveling walls and ceilings, and creating decorative elements.
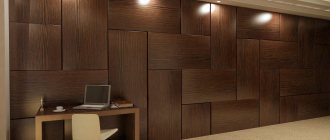
Decoration of walls and ceilings from gypsum plasterboard
You can find out how to plaster drywall in our article.
Positive qualities of gypsum board
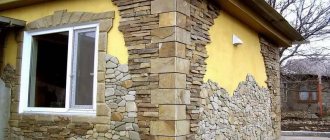
- Excellent for leveling walls with large deviations from the plane , serious chips and defects. The sheet of drywall itself is an ideal plane.
- Less dirt during renovation compared to wet finishing. GKL sheets are easily cut with a construction knife and attached to the sheathing with self-tapping screws. If the walls are smooth, then the drywall can be glued directly to them using an adhesive solution.
- Simple and quick installation - covering walls with plasterboard occurs in a matter of hours. It allows you to level surfaces with your own hands, without resorting to the help of hired craftsmen.
- When using a frame under gypsum plasterboard, it is possible to lay electrical wiring, install insulation or soundproofing material between the wall and the sheets.
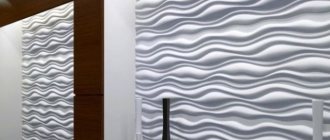
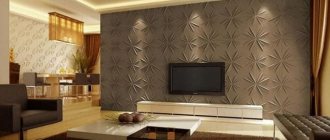
- And the main advantage of gypsum boards is the ability to create multi-level ceilings and various decorative elements. The easiest way to make interior partitions is also from plasterboard.
Cons of drywall
- Reducing the area of the room . If you install drywall not with glue, but sheathe the frame, then the room will be reduced by the width of the metal profile and the thickness of the gypsum board sheet. For example, the PN-2 STANDARD guide profile has a width of 40 mm. Let's add 12.5 mm - the thickness of the sheet. It turns out that the room is reduced by 52.5 mm on each side where finishing occurs.
- Low moisture resistance . Even gypsum boards with water-repellent impregnations will not withstand frequent contact with water. But with proper protection, for example, with tiles, you don’t have to be afraid of this.
- Low strength . A sheet of drywall can crack from an impact, leaving dents or holes. Difficulties also arise when it is necessary to hang heavy objects on the wall - cabinets, appliances or shelving. For these purposes, the sheathing is additionally reinforced or wooden beams are attached to the wall. Light shelves and objects can be hung directly on gypsum board sheets using special dowels.
Drywall dowels
Advantages of drywall over plaster
Drywall has the following advantages:
- High noise-absorbing properties. Plaster also has soundproofing characteristics, but not to the same extent.
- Convenient arrangement of heat and sound insulation. Materials are laid between the frame and the wall or ceiling.
- Sheathing a surface with plasterboard is easier and faster than leveling it with plaster, especially in the case of a ceiling that is particularly difficult to plaster.
- Drywall is indispensable when creating complex structures - arches, figures, interior and zone partitions, multi-level ceilings.
- Suitable for walls of any curvature.
- Plasterboarding is a relatively clean way to level surfaces, leaving only dry debris behind.
Disadvantages of drywall
Among the disadvantages of gypsum boards:
- fragility of the erected structure;
- reduction of room area;
- the need to completely replace drywall in cases of flooding from the upper floors;
- difficulties with placing heavy objects on the walls, special fasteners are required, and in order to hang heavy cabinets on drywall in the kitchen, you will have to think about ways to strengthen it.
Leveling walls with plasterboard requires a whole range of work. To create an ideal surface, you will need to seal the seams and the locations of the screws with putty, apply a layer of primer and then putty to the entire surface of the drywall, and after drying, sand it. When everything is dry, you can begin wallpapering, painting or finishing with decorative plaster.
Types of plaster
Plastered walls and ceilings are an ideal base for painting or wallpapering. Types of plaster for leveling surfaces:
- The most economical option is a cement mixture, which provides a durable coating with high heat and sound insulation and fire protection characteristics. The composition can withstand high levels of humidity, but is heavy, which makes it difficult to apply to walls and especially ceilings. It requires puttying and sanding before painting or laying tiles, but if properly leveled it can last a very long time.
- Cement-lime plaster has antibacterial properties, protecting the room from the appearance of mold and microorganisms.
- Gypsum is a dry mixture consisting of gypsum powder with plasticizers. Gypsum plaster is plastic, vapor-permeable, environmentally friendly, lightweight compared to cement, compatible with concrete and brick surfaces, and does not require putty before painting or wallpapering.
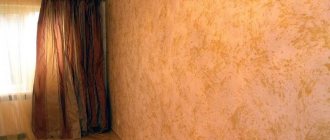
- Decorative plaster - can be silicone, mineral, silicate, used for finishing, allows you to create unusual and unique surfaces. It makes no sense to compare such exclusive types of this material as travertino, Venetian, Moroccan plaster with plasterboard, since their cost significantly exceeds the most expensive types of gypsum plasterboard along with finishing.
Advantages of plaster over drywall
Plaster is one of the most ancient building materials, the composition and properties of which have changed over the centuries. Modern mixtures with various additives are successfully used for both interior and facade work, maintaining the excellent appearance of the cladding for decades. Among its main advantages:
- High strength and reliability.
- Long-term operation.
- Space saving.
- Low material cost
- No problems with placing wall cabinets and any other items.
Which material to choose
Before you begin a renovation, there are several important factors to consider to decide which of these materials is right for your particular application.
- If the speed of work is important and the repair must be completed quickly, you should give preference to drywall.
- It is better to level walls in rooms with high levels of humidity with cement or cement-lime plaster, which is an excellent base for all types of tiles and heavy wall structures - shelves, mirrors, water heaters. Plastered surfaces in the kitchen, bathroom and toilet will last for several decades.
- It is much more profitable to level surfaces with large differences with plasterboard rather than plaster. When using gypsum plasterboard, the curvature of the walls does not matter; when using a plaster mixture, you will have to use up a lot of material.
What is cheaper – plaster or drywall? The cost of the plaster mixture is lower than the cost of plasterboard, plastering work will also require lower costs, but if a really good experienced craftsman does the plastering, his work will be paid higher. In this case, the price of work with these materials will be approximately the same.
- If the ceiling or walls need to be insulated, it is better to choose plasterboard.
- When choosing paint as a finishing material, you should prefer gypsum board, since microcracks will not appear on it.
- It is advisable to finish the walls in new buildings with gypsum or cement plaster to minimize cracking of surfaces during shrinkage of the building.
- In a small room, it is better to plaster the walls and ceiling so as not to waste space due to the plasterboard frame.
- In the kitchen or other rooms where heavy cabinets or other items will hang, it is more advisable to choose plastering.
When is the best time to use plaster?
Plaster is used in premises:
- with an unstable temperature regime, moving from heat to negative temperature values;
- where it is necessary to preserve the volume as much as possible;
- with height differences at the wall surface of no more than 2 cm;
- on the walls of which it is planned to mount heavy objects;
- with high humidity, for example, bathroom and kitchen;
- with finishing of the walls with heavy marble slabs.
With the exception of a few specific situations when the use of gypsum board or plaster for leveling walls is dictated by necessity, the choice of one or another technology remains with the owners of the room.
Pros and cons of plasterboard walls
Its first advantage is lightness. The material is produced in sheet form with standard dimensions of 1.2x2.5 m, thickness 6, 9, 12 mm. Dimensions may vary depending on production technology and the manufacturer. Today from the well-known company Knauf you can find sheets with smaller sizes for ease of installation in small spaces.
More about drywall. Another advantage of drywall is that it is available in large sizes. This allows for quick installation of voluminous, perfectly level structures. The same cannot be said about standard plaster and finishing walls with self-leveling mixtures. About how to make a wall correctly from plasterboard.
Drywall, primarily as a finishing material, has a number of advantages, which have led to its widespread use everywhere. Plasterboard walls also have their pros and cons when installed in wet areas. It is important to choose the right material here. There are at least 3 types of plasterboard available on the market, depending on the possible operating conditions: Plasterboard walls also have pros and cons in terms of versatility and practicality.
By creating a structure from this material using frame technology, it is possible to perfectly hide communication elements without much difficulty. Pipes, wiring, ventilation ducts. But again, if there is a threat of flooding, it is better to use gypsum board sheets.
They have a distinctive feature - green cardboard.
What is drywall (gypsum plasterboard)
Drywall (the word is derived from the term plasterboard sheet) is a building material of varying sizes and thicknesses made from a hardened layer of gypsum dough (core), covered on both sides with cardboard (construction paper). The second name is dry gypsum plaster (in English-speaking countries - drywall).
The material was first obtained in the USA in the second half of the 19th century. It acquired its modern appearance in the 20th century. And again the author of the invention was the American Utsman.
Compound
GKL contains only natural ingredients:
- gypsum (core) - 93%;
- paper (cardboard lining) - 6%;
- water, starch (in gypsum) and sheet coating - 1%.
Attention: the amount of water indicated is in a dry state. During operation, the indicator can change significantly due to the hygroscopicity of gypsum plasterboard.
Kinds
According to established habit, gypsum board is divided into 3 types:
- classic (standard). Denoted by the abbreviation GKL. Cardboard color is gray. The marking is blue. Used for finishing work in rooms with normal operating conditions;
- moisture resistant (GKLV). Resistance to moisture is acquired after impregnation of the gypsum mixture (before molding) with a special waterproofing compound, as a result of which the gypsum absorbs water 10 times less, while quickly releasing it. Recently, antifungal additives have been added to the impregnation. The leaves are green with blue markings. Used in damp areas;
- fireproof (GKLO). The addition of fire retardants, and from leading manufacturers of crystallized water, gives the material high heat resistance - such sheets can resist open fire for up to an hour. The color is pink, the inscription is bright red.
There is another type that is not talked about much: moisture-resistant drywall with increased fire resistance (GKLVO) . It is a combination of moisture-resistant and fire-resistant material. It turns green. The marking is red.
For information: since 2015, the name of plasterboard in construction documentation has been changed to “gypsum building boards” (GSP).
Shapes and sizes
On sale you can find sheets of the following sizes:
- thickness - 8.0; 9.5; 12.5; 14.0; 16.0 mm. The most popular are 9.5 and 12.5 mm;
- width - 120 and 60 cm (rarely 90 cm);
- length - 2.0; 2.5; 3.0; 3.5 and 4.0 m. Sheets with a length of 2.5 and 3 m are in greatest demand, which is mainly due to the height of the ceilings in the house (apartment).
The shape is rectangular sheets. Differences on the side edge. She may be:
- straight - indicated in the marking by a combination of letters PC;
- thinned (UK);
- semicircular (PLC);
- semicircular thinned (PLUK);
- rounded (ZK).
Types of edges.
Purpose
Drywall is used to level walls and ceilings and construct various partitions. You can stick wallpaper and tiles on it, apply decorative plaster, liquid wallpaper. In addition, the surface can be painted with almost all types of paint.
Manufacturers
The best quality gypsum board of the following brands:
- "KNAUF";
- “Saint-Gobain” is a trademark of the Gyproc concern;
- "Lafarge";
- "Volma";
- "BelGips".
Leveling walls with plasterboard without a frame is an easy way to solve the problem
Installation is much simpler, because there is no need to construct a structure from aluminum profiles. The work takes less effort, time, money and material.
- Construction spatulas of different sizes;
- Rubber hammer;
- Marker or construction pencil;
- Measuring tape;
- Metal brush;
- Rule (2 meters);
- Construction level (hydraulic or laser);
- Painting knife with a set of blades;
- Regular fishing line;
- Roller (necessary if the wall has a porous surface);
- Electric jigsaw;
- Plasterboard sheets (regular or moisture resistant);
- Dry gypsum mixture;
- Special glue;
- Container for preparing the solution.
It is not used as widely as installation using a frame. The sheets are fastened using specially prepared glue. Measurements are made using a tape measure. It is important to know exactly the dimensions of the room so as not to make mistakes when purchasing building materials.
First, take measurements, apply marks with a marker or pencil on a sheet of drywall where they are needed. Make a small cut with a paint knife on one side, and then continue along the entire length along the marked line.
Preparing the base
The preparation of the base must be done carefully so that the drywall does not subsequently fall off the wall. It is better to remove old wallpaper, as already mentioned, especially if there are not 5-7 layers of it. Next, you need to remove peeling areas of plaster, etc. You can read about surface preparation → by following the link. In general, you need to remove what doesn’t stick well and is easily removed and crumbles.
I recommend: Question: What adhesive should I use for tiling walls?
Next, we prime the surface with deep penetration primer, for more details → about priming surfaces, read the link. We wait until the soil dries, usually 2 hours.
Prime the wall
After checking the verticality and plane of the wall, we determine whether beacons are needed and where to install them. 5 beacons are enough per sheet of drywall so that it is pressed against them along the edges and in the center, and, accordingly, is thus set to the required level.
Based on the vertical and plane of the wall, how littered and uneven it is, we choose one of the fastening methods:
- Directly onto the base, onto the glue, leveling the gypsum board as you go along with the rule. You can also attach gypsum boards with mounting foam, but this method is convenient only when the base is level or beacons are installed.
- With the preliminary installation of beacons, if the base has large differences of 2-3 cm, everything that is smaller can be leveled right in the process, working with a solution, adding more in one place, less in another and adjusting the sheet with the rule, achieving a flat surface.
If the surface requires additional fastening with self-tapping screws, they can be installed after the glue has dried for more reliable fixation of the sheets.
Drywall: pros and cons
Before choosing a finishing material for your home, you should know the positive and negative sides of drywall. Knowing these subtleties, it will be possible to avoid alterations or unpleasant surprises directly during repairs and during further operation. Another important advantage is the good fire resistance of the material.
In the event of a fire, only the top cardboard layer will be exposed to fire, and even then only on the side of the fire. In addition, you can use not standard, but special fire-resistant plasterboard sheets, which are not afraid of fire at all. Nowadays, it is very difficult to imagine a good renovation, for example, with a multi-level ceiling, without the use of plasterboard.
Today, plasterboard is the most popular and widespread material for finishing walls and installing partitions. It is multifunctional and can be used to decorate walls, ceilings, and floors. It can be used to create decorations in the house, or it can be used to build a partition between rooms.
Special moisture-resistant plasterboard sheets do not absorb moisture. Thus, they can be safely used in the kitchen and bathroom without fear of deformation and destruction of the finish. For this reason, it is not recommended to use drywall where heavy loads on the walls are expected.
If you plan to install shelves, a TV stand and other heavy structures on the wall, you should use a double layer of plasterboard for finishing. This is the only way to ensure secure fastening. If the sheet length reaches 4 m, then its thickness is 12.5 mm, 14 mm, 16 mm. These parameters do not affect the performance of facing work. Moisture-resistant drywall is considered an excellent heat and sound insulator.
You can clean its surface with a damp cloth, but without using abrasives or detergents.
Disadvantages of plasterboard walls
Seemingly massive and durable plasterboard structures are actually not so if they are directly impacted. They can easily be destroyed with an ordinary carpenter's hammer, making a through hole in the sheet with one blow. This drawback will be significant when planning the installation of heavy hanging furniture on a wall or partition. Ideally, this should be thought through at the stages of creating the frame, investing wooden blocks or additional profiles into the guide and rack profiles. If this is not foreseen in advance, then you should abandon the idea of hanging a large plasma TV on the wall. Otherwise, you may end up with new repair problems and get rid of the equipment.
Breach of drywall with bracket
An ordinary brick wall or a foam block wall with a thickness of at least 15 cm can easily cope with the loads placed on it. All kinds of brackets, hinges and even simply screwed screws are held perfectly in the foam block, securely fixing the TV shelf. But due to the lack of perfection of the geometry of the blocks and the shortcomings of the master, and even the large weight of the masonry material, a partition made of blocks may become impossible or undesirable. Useful information on choosing what is best to make interior partitions in an apartment from.
When choosing a material for constructing thin walls and partitions, you should take into account a lot of parameters and weigh them carefully. But still, in most cases, drywall is the best solution, because only from it can truly unique and inimitable design creations be made.
Leveling walls with plasterboard: pros and cons
Using two plumb lines in the corners and a system of cords stretched between them, a vertical plane is formed - parallel to the wall and at a minimum distance from it. Even when laying in dry rooms, the ends of any type of plasterboard, unprotected by cardboard, must be coated with a hydrophobic compound, for example, nitro varnish. If the height premises longer than a standard sheet (2.5 m), then the covering fragments should be arranged in the same way as with the frameless method - “staggered”.
In this case, in addition to the vertical posts of the frame, it will be necessary to install horizontal ones - under the joints of the added elements. The least expensive solution to the problem is to level problem areas of the walls by plastering or puttying. This will not correct the geometry of the room, but will improve the quality of the surface and allow for a new finish.
On walls made of wood or gas silicate blocks that do not have significant deviations from the vertical, frameless drywall fastening is performed without an adhesive mixture, using only self-tapping screws.
We level the walls with plasterboard without a frame
Be sure to follow the algorithm, try not to miss anything. The reliability and durability of the coating will depend on the quality of work. Use small pieces of drywall, as well as a special gypsum-based solution. Mark any irregularities with chalk. Mark a high point. Pull the thread downwards so that you end up with a perfectly flat, even surface.
- polyurethane foam;
- special adhesive for drywall;
- gypsum-based putty;
- soil composition;
- serpyanka;
- plastic dowels;
- long self-tapping screws;
- plasterboard sheets.
- Mark the material sheets. There should be approximately 9-10 dots on one sheet to indicate areas of fastener fixation. Make holes for self-tapping screws at the specified points.
- Apply the sheets to the wall to make marks on the base surfaces.
- Make special holes for the dowels. You need holes with a depth of 6 cm.
Pieces of material are glued at the extreme points. You should focus on them in order to bring the rest of the surface to a level surface.
- well processed to create complex shapes: arches, convexities, concavities.
- It is convenient to lay communications inside the frame, which is sheathed with gypsum board.
- Easy installation.
- The wall turns out smooth and does not require additional leveling.
- If you mount the frame on top of the floor screed, the plasterboard wall can be dismantled and rebuilt as needed.
- Very light material, gives very little load on the floors.
- Sound insulation is better than gypsum plasterboard, but not much. It can be improved by installing the material in two layers.
- For items heavier than 20 kg, you will still have to make additional reinforcement of the wall at the hanging location.
Using a rule and a plumb line, they determine how large the difference in heights is. It is necessary to identify how crooked the wall is and where its protrusions are located. After this, it will be clear what will be aligned and where.
It is along the maximum protrusion that the entire surface will be leveled. Perhaps there are small protrusions that would need to be cut off with a chisel or an ax. The smaller the height difference, the cheaper all the work will be.
If the height difference is no more than 4 cm, then it is still possible to level the walls with plasterboard without a frame with your own hands. If the surface falls more than 4 cm, then you should think about a frame. Leveling the walls with plasterboard is necessarily accompanied by cutting out the sheets and overuse of finishing material cannot be avoided, so it is necessary to purchase gypsum boards with a reserve of approximately 10-15%. Serves for attaching a rack profile or PP 60/27 (depending on the one selected) to the main wall to ensure sufficient rigidity of the frame.
Price for finishing walls with plasterboard without frame and profile
Finally, let's see how much it costs to finish walls with plasterboard:
- The average cost of installation of drywall from masters in Moscow is from 250 rubles. per sq. m, in St. Petersburg - from 220 rubles, in other regions of Russia it may cost a little cheaper.
- If you install drywall yourself, you will only have to spend money on materials. Thus, the average price of a sheet of plasterboard 2500x1200 mm, depending on the thickness and moisture resistance, as well as the manufacturing company, is 250-400 rubles, a package of 25 mm self-tapping screws is about 400 rubles, adhesive for plasterboard is about 300 rubles. per bag 25 kg.
The cost depends on the region.
Now you know how to use drywall for interior wall decoration, and you can do this work yourself without involving craftsmen.
We advise you to read interesting articles about home and interior:
- Purple color - combination with other colors in the interior
- How to make a phytowall and phytomodules in an apartment with your own hands
- Modern decor in the living room interior
- Decor for the kitchen in the interior
- How to choose the right interior for an apartment or house