Causes of coating deformation
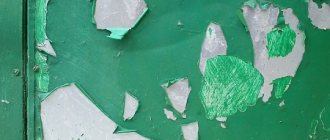
The inside of a microwave oven has to be washed regularly because it becomes dirty with grease and food debris. If you use a hard brush or abrasive detergents for cleaning, micro-scratches appear on the surface - the paint chips, cracks, and peels off. The integrity of the material is damaged - the road to its deterioration is open. Scratches cause rust to appear inside. This is not the only problem; in addition to rust stains, there may be other defects - their nature depends on the coating material.
Inner covering material
If the enamel peels off in the microwave, do not rush to write it off as scrap - restoration is possible. By painting the inside of your camera, you will extend its service life by another 2-3 years. The nature and causes of deformation depend on the type of coating.
Ceramics
- It is hard, but has a drawback: it is too fragile.
- Due to mechanical stress, cracks and chips appear on the ceramics.
- The smoothness of ceramics is a plus; fat does not stick to the smooth surface so much. Any dirt can be easily wiped off with a regular foam sponge soaked in soapy water.
Stainless steel
- Durable and reliable, resistant to temperature changes. The downside is that it’s difficult to clean off grease stains.
- Do not clean with abrasive or aggressive agents as this may cause scratches or stains.
- Clean with steam, special products for microwave ovens or kitchen cleaning liquids.
Enamel
- Food enamel is the most short-lived option. It is used in inexpensive models. Thanks to their low cost, they are leaders in the buyer ratings.
- Pros: smoothness and lack of pores. Cleans well, especially with regular care.
- Aging and deformation due to natural working conditions. Over time, high temperatures, hot steam, fat, and detergents disrupt the structure of the material - it becomes loose.
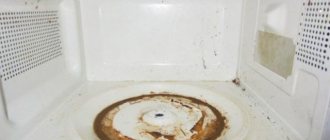
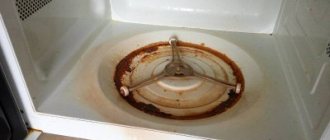
- The next stage is total destruction. Bubbles appear, the material separates from the metal in pieces, and after a short time the owners discover that their microwave has rusted inside.
- If you look inside an old microwave oven, you can see that the enamel on the ceiling and bottom is the most peeling. The ceiling is more exposed than others to the hot steam that rises during cooking. The bottom deteriorates due to liquid spilling from the dishes in which food is cooked or heated.
If you do not respond to damage, the microwave will crack and spark. It won't work for long in this mode - it will break down.
The owners are interested in whether it is possible to paint the interior walls of the chamber. It is possible, but only in one case - if they are covered with enamel.
Is it possible to use a microwave with damaged enamel?
Operating a microwave oven with damaged enamel. You can use a microwave oven, but do not forget about further destruction of the surface layer.
A partially cracked microwave enamel surface does not mean a complete failure to use it. The enamel coating itself is designed to protect consumers from exposure to harmful electromagnetic microwaves, which can cause harm to human health, and obviously require high energy consumption.
Through small cracks and chips, microwave waves will still not be able to leave the space of the inner chamber. But it is definitely worth solving the problem in the near future by restoring the integrity of the coating to further prevent an increase in damaged areas. Otherwise, the operation of the microwave oven will be stopped and the household appliance can only be disposed of.
Next, we will look at ways to “reanimate” a microwave oven, at the first signs of damage to the enamel coating; which one to choose is up to you.
What colors are suitable?
Most owners of a microwave oven, having discovered that it is rusty, prefer to throw it away and buy a new one. If wastefulness is not your thing, you will have a question: what to do, how to extend the life of the microwave? Paint the damaged surface. The main thing is to find the right paint; not every paint is suitable for this task.
Let's look at the dyes that can be used if the microwave is rusty.
Food-grade organic is the best solution
Recommended brands: KO-5102 and BEP-5297. The downside is the high price of organic dyes.
Pros:
- withstands high temperatures, alcohol steam, acid, and high humidity;
- non-toxic - made for the food industry;
- prevent corrosion;
- waterproof.
The dye adheres especially well to aluminum and other metal surfaces. The paints are approved by the Ministry of Health and are allowed to be used in the food industry. Apply with a brush or roller, whichever is convenient.
Electrically conductive
They use Zinga (Belgium) or KO-8111 enamel.
They contain zinc, aluminum, silver or shungite. Once dry, the dye turns into a durable layer that is resistant to any negative influences. It can easily withstand temperatures of 150-200 degrees. Adheses well to the surface. Used infrequently due to high cost.
Shungite. Shungite is a rock with high electrical conductivity, strength and density. It is used to make heat-resistant and antistatic bases.
Acrylic car
Are you wondering how to paint your microwave to avoid big expenses? Then acrylic is for you. Compared to previous options, this is the simplest and most inexpensive dye. It is sold in cans, so it is very easy to use. With one can you can paint the entire camera in one layer.
How to extend the life of a microwave oven.
First, you need to understand that when working with the device, you cannot use metal or tightly closed containers . The metal can spark and completely damage the stove. And under a hermetically sealed lid, a lot of pressure is formed (as in products with a hard shell or peel, for example, eggs), which can cause an explosion.
Important! When heating food, do not close the lid of the dish tightly.
The inner surface must be wiped after each use. Preferably with a dry cloth. If there are any stuck crumbs, you can use a damp cloth, but still try to avoid excess moisture.
Important! Make sure that water and cleaning fluids do not get into the ventilation openings!
To clean your microwave oven, use only cleaning products that do not contain abrasive particles. The presence of these thins the enamel and leads to scratches and chips.
Summarize. Damage to the enamel is a signal that the microwave needs repair, but does not affect the quality of the food cooked in it. If the paint chips are too large or rust is already appearing on the exposed metal, it is better to replace the device with a new one.
Painting stages
We found out how to restore the original beauty and integrity of the surface. All that remains is to find out how to apply paint correctly. The process can be divided into 4 successive stages:
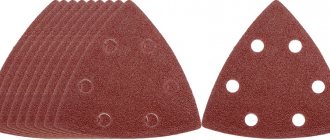
- Sandpaper is used to clean surfaces from rust, bubbling, and peeling paint.
- Degrease with an alcohol solution.
- All holes inside the chamber are sealed with tape.
- Dye is applied. Wait for it to dry completely. If necessary, cover with a second layer.
As it turns out, the main reason for premature microwave wear is careless maintenance. If you properly clean the microwave oven chamber from grease deposits, there will be no problems. Do not rush to throw away the oven due to defects in the coating. Choose one of the dyes discussed above and paint it quickly - don’t wait for it to break.
How to paint the inside of a microwave at home, instructions
Now you know how to paint the inside of a microwave. The type of material used is also extremely important. To do everything correctly, follow the simple step-by-step instructions:
- Unplug the equipment. Place the device on a flat surface with the door facing up so that access to the equipment is not restricted.
- Seal the air duct, wave duct, and other compartments that you don't want paint getting into with tape or tape.
- Clean the surface of old paint that has peeled off. If the coating on a certain wall is not damaged, then it can be left untouched.
- If you do everything in a timely manner, then rust should not have appeared. It is necessary to clean damaged areas and uneven areas with sandpaper.
- If the rust has spread sufficiently, you need to treat these areas with a special acid converter.
- Immediately after completing the process of cleaning the peeling areas of enamel, remove dust and dirt from the surface with an ordinary rag.
- Be sure to degrease the surface with special products or regular alcohol.
- Follow basic safety rules. You need to work exclusively with gloves. Be sure to provide proper ventilation in the room. It is advisable to apply layers of paint outdoors.
- To prevent dirt from accumulating in the workplace, you need to lay a special oilcloth or film on it; newspapers are a good alternative.
- If you plan to spray paint your microwave, then place it on edge. Start painting with recessed surfaces.
- To prevent drips, do not put too much paint on the roller, which should be applied in a thin layer. The corners must be painted with a brush.
- When the first layer of paint is completely dry, apply the second layer using the same principle.
- Paint from spray cans is applied in a zigzag pattern; there should be no delays. This will allow the layer to be applied evenly.
- After final drying, evaluate the work done and, if necessary, apply another layer.
- When everything is dry, you can remove the tape. Wait for the paint to fully adhere to the surface.
- After restoration work is completed, the stove should not be turned on for several days.
To maximize the effect of painting your microwave oven, regularly remove grease and food debris from the surface of the heating chamber. This can be done with a sponge soaked in soapy water or special cleaning products. If you find a peeling area, paint over it immediately to prevent the damage from getting worse.
Coloring stages
Now you know that even if the enamel peels off in the microwave, you can still restore the integrity of the surface. However, it is extremely important to apply the paint material correctly. Conventionally, the coloring process can be divided into 4 stages:
- Bubbling, rusty and flaking areas should be carefully cleaned using sandpaper.
- The surface on which paint will be subsequently applied is degreased with an alcohol solution.
- It is extremely important that no paint splashes get into the important hardware compartments of the oven, so they are sealed with tape.
- The dyeing process itself. The second layer is applied at the discretion of the user. The decision is made only after complete drying.
After reading this step-by-step instructions, you will know what you can use to paint a microwave if the enamel has peeled off, as well as how to do it correctly.
Preparation. Primer. Coating
If, when examining the internal chamber of the microwave oven, burst areas are found that expose metal or there is swelling of the enamel, it is necessary to sand these areas without leaving any rough spots.
The next stage of preparation will be degreasing the edge of the coating and the metal, using special means, such as a solvent. It is very important to take care of the safety of the work being carried out by covering the lamp that generates electromagnetic waves with a field (magnetron) with adhesive tape.
If you can remove the microwave's protective outer hood, this will greatly speed up the drying process by creating more air circulation. Don’t forget about the microwave door, covering it with protective material.
The next step in restoring the enamel is applying a primer.
- The room where all work will take place must be well ventilated;
- For safety reasons, wear protective clothing and a mask to avoid damaging the respiratory tract with paint;
- Next, you need to turn the household appliance to 45°C, spray the first layer of primer from the can evenly at the distance specified in the instructions;
- There will be several layers (2, 3 usually), each layer must go through the entire drying process, to speed up which you can use a heat gun or hair dryer;
- At the end of applying the base layer (primer), it is recommended to leave the microwave for 24 hours to dry completely.
The final phase of microwave “restoration” is the coating. Everyone chooses a paint coating on their own, based on existing experience, recommendations from friends, or choosing a manufacturer based on its composition. Preference is given to paints low in harmful substances, which are included in the Ministry of Health list for use in the household, food and production industries. They are in the expensive price segment and are quite rare.
You can always find an alternative to use this paint, which we described above. They are safe to use and do not harm human health.
After the coating has dried, the microwave oven should be washed using laundry soap or other proven disinfectants. Checking the absence of odor after “repairing” the microwave is very simple - just put a glass of liquid (water, for example) in boiling water.
Checking the microwave after painting. Many manufacturers indicate this method in the instructions; boiling ordinary water will help check whether the microwave oven has been cleaned well enough.
Care instructions
- The stove cannot be used for three days after painting.
- To ensure that the restored enamel lasts longer, it is better to wash off any remaining fat immediately after heating or preparing food.
- It is better to cook under a special hood.
- It is dangerous to wash the microwave with cold water, since a sudden change in temperature will cause the destruction of the internal enamel coating.
- To clean equipment, you should not use rough or hard brushes, and it is better to minimize the use of aggressive chemicals.