How to plaster bathroom walls under tiles
- Types of plasters Sanitizing
When carrying out renovations on their own, homeowners often wonder whether they need to plaster the walls before laying the tiles. Each master will answer that this procedure is extremely necessary, because... with its help you can carefully prepare the walls for further finishing. If this is not done, then laying the tiles will be impossible due to uneven surfaces and poor adhesion.
Why plaster walls before laying tiles?
“Wait, wait, why plaster the walls before laying the tiles if they are already smooth”?
This is how my first dialogue usually begins with any client who wants to renovate their bathroom.
In this article I will try to dispel the myth that walls hastily plastered by the developer and visually looking “smooth” are suitable for laying tiles, and to convince you, my dear and respected reader, that if you want to make a major and high-quality renovation bathroom, then it is still (unfortunately) necessary to plaster the walls before laying ceramic tiles. Why "Unfortunately"? Because this inevitably leads to an increase in the cost of the final estimate.
So, perhaps the very first thing I want to say.
If you want to make a truly durable, reliable and high-quality renovation in your bathroom, in this case, it is advisable that the bathroom walls be plastered with cement-based plaster. It is highly discouraged (although not prohibited) to use gypsum mixtures such as “VOLMA” or “ROTBAND” for these purposes, which is practiced in most budget-level urban new buildings.
The thing is that gypsum does not tolerate moisture well, and from its excess it begins to crumble over time, loses strength and collapses, which cannot be said about cement-sand plaster.
Developers, for various reasons unknown to me (maybe in order to save time and finances, or maybe for some other reason), for the most part, plaster all the walls of the apartment (including the bathroom with a toilet) with gypsum plaster, applying it by machine and leveling it with a rule (without installing beacons), and therefore its quality, sufficient for gluing wallpaper, is absolutely not suitable for laying ceramic tiles.
There are several good reasons for this.
Reason #1
The walls of almost any new building are heavily “filled up” vertically, have unevenness, depressions and bulges horizontally. Typically, deviations from the vertical level to a height of 2.7 m exceed 1.5-2 cm, which is a lot for tiles. Why? Because starting with a 3 mm layer of glue. at the bottom (or at the top), you will end up with a layer of 2-3 cm at the top (and vice versa).
Further, if you take a closer look at the room, measure all the dimensions of the room, check the walls with a level, check the corners and horizontal plane of the walls, then the actual dimensions of the bathroom almost always (with very rare exceptions) have an uneven shape.
The differences in size can be quite significant. For example, one wall has a length of 166 cm, and the one opposite it (which in theory should be the same size) has a size of 162 cm. That is. for a length of up to 2 meters, the discrepancy is already 4 cm, and such dimensions are visible to the human eye. Accordingly, when tiling, in one part of the bathroom the tiles will be longer than in the other. Also, ultimately, this will affect the evenness or unevenness of the corners and joints of the entire tile.
Reason #2
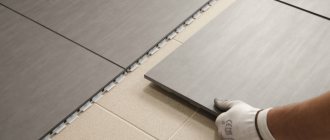
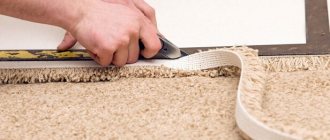
A very good reason! The working surface of the tile, i.e. that part of it where tile adhesive is applied has an almost ideal plane, so if the walls have unevenness, depressions and bulges, then the layer of tile adhesive is distributed unevenly over the surface of the tile (example in the photo below), which ultimately leads to a less durable adhesion of tiles to the wall surface and uneven distribution of tile adhesive, which ultimately leads to reason No. 3
.
tile comb
Reason #3
Swimming in tile adhesive.
The third reason follows as a consequence of the second.
The unevenness of the walls, in this case, has to be compensated and leveled with a layer of tile adhesive, which in turn is very elastic (unlike a simple cement-sand mortar for masonry), which leads to the “floating” of the tiles, i.e. its strong instability, in connection with this it is almost impossible to level the plane and evenly align the crosshairs of the tiles.
A large layer of tile adhesive leads to:
- slow down the work process
- reduction in styling quality
- a strong increase in tile adhesive consumption
- increase in the cost of work
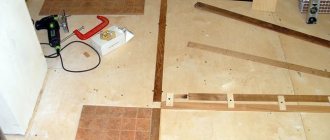
An example of inaccurate laying “on a layer” directly on brickwork
In order to avoid all these mistakes, unevenness and errors in brick (or any other) masonry, you just need plaster, which is designed to level the plane, maintain the level of the walls, and maintain the correct geometric shapes of the room, which ceramic tiles will subsequently repeat.
Yes, of course, this leads to an increase in the overall cost of the work and a certain amount of time, but with this approach, the tiles will be laid with high quality, reliably, neatly and will serve you for many years.
Well, that's all for today, bye everyone!
Ask questions, leave comments, subscribe to news.
Choosing plaster for the bathroom
When the time comes for finishing work, novice plasterers have a number of questions. Which plaster is better for tiles: cement, lime-cement or gypsum? Is it worth choosing gypsum solutions for the bathroom?
To understand the best way to plaster walls, it is worth familiarizing yourself with the advantages and disadvantages of specific types of plaster.
Plaster mixture in bags
Cement plaster
Cement mixtures are the best plaster for bathroom tiles. The structure of cement plaster prevents the penetration of moisture into the material, making the plaster more resistant to external influences. The surface of cement plaster is rough, which is an additional advantage, because... the adhesion of tile adhesive to future plaster increases.
It is best to plaster uneven walls with cement-based mixtures, because... This is the cheapest plaster for interior decoration. It binds and hardens faster than cement-lime plaster. However, such a solution has low plasticity, which makes it difficult to apply plaster to the walls and lengthens the work.
Among the advantages of cement plasters are:
- high moisture resistance;
- high strength;
- high adhesion with tile adhesive;
- low price.
The disadvantages of cement plasters are as follows:
- long time to gain strength;
- high shrinkage after drying;
- high probability of cracking (especially if the layer is thin);
- high mixture consumption (12-20 kg/m2 with a layer thickness of 10 mm);
- high weight and, as a result, load on the wall;
- low plasticity of the mixture, which complicates application.
Cement-lime plaster
Cement-lime mixtures are widely used. Thanks to the presence of lime, the mortar becomes more plastic, the weight of the plaster decreases, and the strength decreases. Cement-lime mortars are highly resistant to the formation of fungi and mold. Cracks rarely appear on walls made of cement-lime plaster.
The setting time for cement-lime plasters is longer than for cement plasters, which makes the application process more convenient. Also, cement-lime plasters are more environmentally friendly.
Advantages of cement-lime plasters:
- increased ductility compared to cement plaster;
- resistance to cracking;
- increased adhesion to the base;
- additional antibacterial effect;
- average consumption (13-18 kg/m2 with a layer thickness of 10 mm);
- the weight is lighter than that of cement plasters, thus the load on the wall is less.
- less durable than cement;
- moisture resistance is lower than that of cement plasters;
- more expensive than cement plaster.
Gypsum plaster
Gypsum solutions are used mainly in dry rooms; they are used quite rarely in bathrooms. They are highly hygroscopic, i.e. ability to absorb moisture and water vapor from the air.
Universal gypsum plaster Rotband
There is an opinion that if you lay tiles on gypsum plaster in the bathroom and seal the seams with grout until completely sealed, then water will not penetrate into the plaster, and you don’t have to worry about the reliability of the structure. In practice, everything is different. At the slightest flaw or crack in the grout/tile, moisture begins to seep in, moistening the gypsum plaster, thereby destroying it. Over time, the defect will spread wider and deeper until one day the tile falls off along with a piece of plaster.
Also, in the event of a sudden leak from above from neighbors, deformation of the gypsum plaster, loss of strength properties, and partial peeling of the plaster from the base are possible.
Defects in gypsum plaster after moistening
We do not recommend using gypsum plaster without additional protection in small rooms with constant humidity above 70%. In such rooms protection should be provided in the form of liquid water-repellent primers, and the wall surface should be tiled with hermetically sealed seams. However, such additional measures significantly increase the cost of work.
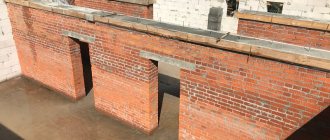
It is allowed to use gypsum plaster away from direct exposure to water and water vapor, while good ventilation must be provided in the room.
Large rooms where gypsum plaster can be used
Advantages of gypsum plaster:
- short setting time;
- low consumption (8.5-10 kg/m2 with a layer thickness of 10 mm);
- no shrinkage and high ductility;
- high environmental friendliness;
- relatively low weight.
- low water resistance; if there is a sudden leak from neighbors, you can lose the plaster;
- reduced strength, not resistant to mechanical stress;
- smooth surface of gypsum plaster, impairing adhesion to tile adhesive;
- relatively high price.
Important! When choosing plaster for the bathroom, remember that it must first of all be resistant to high humidity
Comparison of bathroom plaster
To finally decide which plaster to plaster the bathroom under the tiles, a summary table is provided with the characteristics of the various types of mixture.
| Characteristic | Cement | Cement-lime | Plaster |
| Moisture resistance | Very high | Average | Low |
| Strength | Very high | High | Low |
| Price | Low | Average | High |
| Start time of setting | From 2 hours | From 3 hours | From 1 hour |
| Time to reach full strength | 30 days | 7 days | 7 days |
| Shrinkage after drying | High | Average | Absent |
| Possibility of cracking | High | Average | Low |
| Mixture consumption at a thickness of 10 mm | 12-20 kg/m2 | 13-18 kg/m2 | 8.5-10 kg/m2 |
| Plaster weight | High | Average | Short |
| Plasticity of the mixture | Low | Average | High |
| Adhesion with tile adhesive | High | Average | Low |
| Minimum layer thickness | 8 mm | 8 mm | 5 mm |
| Maximum layer thickness | 30 mm | 30 mm | 50 mm |
| Antibacterial effect | Average | High | Short |
| Environmental friendliness | Low | Average | High |
Plastering a bathroom under tiles: types of finishing materials
Cement plaster
Cement-sand plaster is used in the form of an aqueous solution , where the main components are cement, sand or crushed limestone.
Those who want to get a better quality coating in construction stores can opt for plaster with mixed sand, with different sizes of sand grains. To make working with the cement mixture easier, some builders add PVA glue or wallpaper glue, washing powder, and liquid soap to it. A small amount of the listed substances improves the elasticity of the facing mixture. Cement plaster for bathroom tiles has excellent performance parameters, and it will last a very long time.
When working with this facing mixture, you need to keep in mind that at temperatures around twenty degrees, it will dry for more than a week . It is undesirable to speed up the drying process by using a hair dryer, heater, or heat gun, because uneven drying can lead to cracks. It is strongly recommended to begin tiling with ceramic tiles no earlier than a few weeks after the surface has been plastered with a cement-sand mixture.
Those who want to have a coating with good heat and sound insulation properties should instead of sand add slag or a little crushed pumice to the cement base in a ratio of 1:4. The resulting mixture is applied on top of the plaster in a layer of about 20 mm. The dried surface is not rubbed down.
Sanitizing plaster
It often happens that when it is necessary to lay tiles in the bathroom, a problem arises such as poor waterproofing or its absence at all.
For this reason, moisture containing salts begins to come out of the soil. The surface of the walls is covered with salt deposits, which cause the slow destruction of ceramic tiles, the development of mold and constant dampness. You can get rid of these negative phenomena by using dry sanitizing plaster mixtures for repairs. In addition to good hydrophobic properties, they are more durable than sand-cement samples. Hydrophobic plaster is easy to apply to the surface of walls. Another advantage is the fact that it does not take much time to dry. Just a few days later you can begin finishing the walls.
Sanitation plaster has two layers:
- Basic (with a porous structure);
- Sanifying.
Moisture that comes from the walls is retained in the base layer. This is where the process of blocking salt occurs, which remains in the pores. The liquid evaporates through the second layer. As a result of this mechanism, it is possible to prevent damage to the facing tiles.
Laying tiles on gypsum plaster
Recently, gypsum has gained popularity in the construction industry. It is widely used for making plaster. This finish can be used both when renovating a bathroom and a living room.
The huge advantage of gypsum material is that it is very convenient to work with, since it is quite plastic and homogeneous, and does not have rough impurities. Gypsum plaster has a delicate white color, so you can safely glue even light paper or non-woven wallpaper on top of it. Is it possible to lay tiles on gypsum plaster? Ceramic tiles fit perfectly on this plaster. Gypsum finishing material allows you to perfectly level concrete and brick walls , it dries quickly and perfectly maintains the microclimate in any living space. But gypsum plaster also has its disadvantages, which may scare off a potential buyer:
- Porous structure. When they start plastering with gypsum, it does not lay down as tightly as certain conditions require. It forms a porous surface that affects some of the characteristics of the cladding.
- Increased moisture absorption. Due to its porous structure, gypsum plaster overreacts to changes in humidity levels in the bathroom. Gypsum plaster in the bathroom will absorb liquid well and just as easily get rid of it. Constant moisture softens the base layer of plaster and creates movement under the tiles. Excess moisture often leads to mold growth.
- Fragile material. At first glance, it may seem that the gypsum mixture is quite durable, but when a pinpoint impact or significant mechanical impact is applied, dents or cracks may appear on its surface.
- Adverse effect on metal products. When using metal objects that are in contact with the gypsum layer (nails, screws, meshes), they begin to deteriorate over time due to corrosion.
How to level walls for tiles
Several methods can be used to level the surface. The first is to putty. To do this, the wall is completely cleaned of dust, degreased and primed. After this, you need to install beacons and calculate the amount of materials that will be needed.
You can do without putty, or putty in one layer, only if, when measuring the differences, it turns out that they are less than 1 centimeter.
It is better to plaster walls using cement-sand mortar. If puttying is done in the bathroom, pay attention to high humidity. That is why they choose putty with a reduced level of water absorption. You can level the putty using a spatula. It is not at all necessary that the surface be perfectly flat.
There are several ways to level the surface, which you can choose at your discretion.
How to straighten a wall with a strong curvature:
- Purchase sheets of drywall that are resistant to moisture.
- Attach the slabs to the wall with metal profiles.
- Foam or plaster the joints with honey slabs.
This leveling method is quite simple, fast and least expensive. In order to lay the slabs on the prepared surface, it must be properly processed. This should be taken seriously, since poor surface preparation will certainly lead to the fact that the tiles will sooner or later fall off or swell.
Drying time
It is very important to proceed to cladding after the plaster has completely dried. Otherwise, the tiles may fall off the wall. The drying speed differs for different types of mixtures.
Don't miss: Adjustable joists
Laying tiles on gypsum plaster is carried out in 7-14 days. It takes 1-2 days for the tile adhesive to harden initially, and up to 7 days for complete hardening.
The drying time is also affected by the thickness of the plaster layer. It is believed that cement-sand mortar dries at a rate of 1 cm per 7 days. At the same time, it is recommended to lay tiles on it after a month. By this time, the plaster should gain strength.
What plaster to use in the bathroom under tiles
There are only two types of plaster materials available, divided according to the type of binder: cement and gypsum. Let's look at both options in detail.
Cement mixtures
The base is white cement or Portland cement. Quartz sand of different grain sizes is used as filler. The higher it is, the larger the irregularities the material can cover even with a single application. True, the surface will be rougher. But for subsequent tiling, this is not a disadvantage. In addition, the composition includes plasticizers.
Materials with the addition of lime are produced. It gives an antibacterial effect and reduces the weight of the finished coating. Let us list the advantages of cement mortars:
- High strength, resistance to mechanical damage.
- Durability. Properly installed coating lasts for decades.
- High adhesion to most substrates. The mass is quite plastic, fills small unevenness, holds well and lays down in an even layer.
- Resistance to temperature changes.
- Low cost. Possibility of self-production.
Cement mortars are perhaps the best choice for wet areas. However, it must be taken into account that they have significant drawbacks. First of all, it is a significant weight. The hardened material puts a serious additional load on the structure, especially if applied in a thick layer. This type of plaster is quite difficult to install. It is not very flexible, so installation requires certain skills.
For the same reason, after drying, the solution shrinks. If its layer is small, cracks may appear. Another disadvantage is the almost complete lack of adhesion to paint and wood. It is impossible to plaster such substrates with cement without prior preparation. The coating takes a long time to dry. Curing time depends on many factors: substrate moisture, layer thickness, etc. In order not to spoil the work, you need to leave the plaster to dry for at least a day.
Gypsum material
Gypsum, used as a binder, is a natural substance with high hygroscopicity. Therefore, there is a lot of controversy around the use of such mixtures for rooms with high humidity. Indeed, if you lay standard gypsum plaster in the bathroom under the tiles, the consequences can be the most unpleasant.
Some craftsmen claim that if you correctly lay tiles on the walls and floor in the bathroom, install a suspended or suspended ceiling, you can plaster the base with plaster. This is explained by the fact that the worn seams are sealed and there are no loopholes for water. Consequently, moisture will not reach the plaster, and the finish will last safely for many years.
In reality, everything is not so good. Even a small crack or any flaw that will inevitably appear during operation will become a “gate” for water. Gypsum absorbs it very actively. Wet areas will only grow, gradually destroying the cladding. Double priming the walls with special solutions will not help either. And if in such conditions a leak occurs from neighbors above, it will become a real disaster.
Therefore, you need to understand that if you want to choose gypsum, then it should only be waterproof plaster for the bathroom under the tiles. It includes special additives that reduce hygroscopicity. Of course, this does not completely guarantee the absence of problems, but it significantly increases the water resistance of the material. The choice of gypsum mixture is due to its advantages:
- High plasticity and complete absence of shrinkage.
- Light weight, therefore does not create a load on the structure.
- Easy to apply. Even an inexperienced plasterer can handle the job. The result is a smoother surface than cement mortar.
- High curing speed. Even the thickest layer will gain the necessary strength in no longer than a week. For this reason, the time required for repair work is noticeably reduced.
Among the disadvantages of the material, low strength should be noted. It is not advisable to subject it to mechanical stress. The mixture sets quickly, so you need to prepare it in small portions just before you start plastering. The cost of gypsum mixtures compared to cement mixtures is much higher, so the finishing will be more expensive.
It is difficult to answer unequivocally which composition to choose for the bathroom. Only its owner can decide this by correlating the characteristics of the product he likes with the actual operating conditions. In some places, a durable cement mixture will be the best choice, while in others, an easy-to-apply gypsum mixture is quite suitable. The latter should be chosen only in a moisture-resistant version, otherwise the consequences will be extremely unpleasant.
Is grout necessary?
Grouting is always used at the final stage of work to give the tiles an attractive, holistic appearance, as well as to protect the seams from excess moisture, which can cause the development of mold and fungi.
To treat tile joints in the bathroom, it is recommended to use epoxy grouts, which are durable and more resistant to moisture and chemical cleaners. Epoxy grouts are more capricious, so you need to be extremely careful when working with them.
When preparing walls for laying tiles in the bathroom, it is important to remember that this is a place with high humidity. This factor is key when choosing finishing materials. Another secret is to thoroughly dry each layer of finish. Otherwise, the operating principles are not very different compared to other rooms and do not cause major difficulties even for inexperienced craftsmen.
Leveling walls with plasterboard for laying tiles
One of the options for leveling walls under tiles is finishing with plasterboard. For wet rooms, use only moisture-resistant gypsum plasterboard. You can attach it in the usual way to a metal frame or directly to the wall using glue. If the unevenness is significant, then only the option with a frame is suitable. In other cases, it is better to glue drywall to the walls, since the frame method “eats” 5 cm of space on each side of the room.
To complete the work you will need:
- metal profile rack and guide, hangers;
- level, grinder or metal scissors, screwdriver or drill;
- GKLV sheets (green), masking tape, self-tapping screws.
Procedure:
- Draw up a diagram of the frame. It consists of two horizontal guide profiles and rack-mount vertical ones. Two sections of the rack profile are mounted in the corners, the rest are installed in increments of 60 cm. If you subsequently plan to hang cabinets on the wall, then the increment is made smaller (up to 40 cm) and additional horizontal transverse sections of the profile are installed in the place where the furniture is supposed to be fastened.
- Apply markings to the walls according to the drawn up diagram.
- Using a grinder or metal scissors, cut the profile into pieces of the required length.
- Using dowels, attach the upper guide profile to the ceiling.
- Using a plumb line, determine the position of the lower guide profile and screw it, also with dowels.
- Use self-tapping screws to attach hangers to the walls to secure the rack profile. During work, check their position with a level.
- Install and secure the vertical profile with screws according to the markings. Check that each element is installed correctly by level.
- Secure the gypsum board sheets to the resulting frame with self-tapping screws. The joints between the sheets must fall on the rack profile. They need to be sealed with sickle tape.
- Also cover the corners with sickle tape.
- Putty the seams and screw heads with a special putty for drywall.
- The water-repellent properties of gypsum board can be enhanced by treating the sheets with a water repellent for drywall.
- To improve adhesion, be sure to apply a gypsum board primer under the tile adhesive.
If you decide to glue drywall without installing a frame, then proceed in the following order:
- Apply primer to the walls.
- Clean the surface from dust and dirt.
- Apply handfuls of drywall adhesive onto the sheets or wall in 30cm increments.
- Attach the sheet to the wall and set it level.
How to properly plaster walls in difficult places
Yes, I think that many have encountered the problem of how to plaster evenly and beautifully near and under pipes. All these places are called problematic and complex. Now I’ll tell you what to do and how to plaster in these places. First make a template, without it you won’t succeed. It can be made from a flat piece of board, metal or tin. In general, whatever will be easier for you.
Under the pipes, if there is a distance of a couple of centimeters, then you can use a small corner. Because it is very difficult to get there.
Plastering and leveling corners
Here I want to say the following: “A smooth and beautiful corner is a decoration for the entire room, and if it is made with your own hands, then it is also self-respect and the pride of the owner in the apartment.”
Basic principles of aligning walls according to beacons
All areas located in the corners should be plastered last. Typically these are unplastered distances of 15 or 20 centimeters. The very execution of this work requires great care. One of the sides of the corner can be processed simultaneously with the main wall, and the other side can be processed after the first has dried.
But if you feel confident in yourself, then you can do it at the same time. The principle of operation is the same as when working with walls: we throw on the mortar, remove the excess plaster with a lath, drawing and pressing it against the beacons. In order to get a nice neat and even corner, cut one of the edges of the slats at an angle. This will help you avoid touching the adjacent wall.
At the end, we place the strip in the very corner and lightly rub it up and down. This will give you a clear line of the angle, and most importantly it will be perfectly straight. And this will be the final action in working with angles. After completing the work, we put the slats against the wall and see that you have no unevenness or deflections, which means that you did everything right and you can start to be proud of yourself.
We prepared this wall for ceramic tiles, so we deliberately did not achieve a smooth surface in the plaster and did not remove the beacons. All small chips or irregularities do not in any way affect the overall plane of the wall and will not in any way affect the quality of the ceramic tile installation. At this stage, the preparation of walls for ceramic tiles is completely completed. All that remains is to apply the primer and start laying the tiles.
Friends, at the end I just want to add that there is nothing complicated in repairs. The main thing is to tell yourself that I can do it - I will do everything. Well, we will constantly advise you and will always try to help you with this. When repairing yourself, repair with us!
If this article didn’t help you in any way, and you simply don’t want to get your hands dirty, then it’s better for you to just call the specialists, and they will be happy to do everything in an ideal way for you. Read our second article about the basic principles of aligning walls using beacons.
Surface preparation
Thanks to such measures, you can make the walls ideal for further work. The tile will hold up well. The walls will be strong and stable, adhesion will improve, and the surface will be smooth and free of defects.
The set of measures to prepare walls for puttying and applying tiles includes:
- Preparation of tools and materials. A set of spatulas, containers for mixing putty and glue, primer, roller and paint brush, etc.
- Preparing the premises. If it is residential, all furniture is removed, accessories, doors, windows and floors are protected from damage and dirt, since the work will be wet.
- Removing the old finishing layer. Wallpaper, painting, whitewashing, old tiles - all this must be removed using available means.
- The condition of the wall is assessed. The peeling plaster must be removed. The cracks expand and are sealed with putty or plaster. When leveling a wall is required, depending on the differences, the ideal method is chosen to obtain the best result.
- The surface should be smooth and clean. Dust and debris from construction are removed from it. And if the surface is too smooth, then notches should be made on it with an axe, grinder or knife.
- The final stage of surface preparation before puttying under tiles is priming. The main task is to apply the primer to the surface using a roller and brush. The entire surface is processed without gaps. Hard-to-reach places are coated with a narrow brush.
Subsequent work can only be carried out after the primer layer has dried. It all depends on the brand used. The packaging indicates how long it will take to dry. This completes the preparation.
How to prepare walls for finishing with ceramic tiles in a toilet with your own hands
Preparation for independent repairs in the toilet includes several stages:
- dismantling the old coating (if any);
- alignment;
- primer.
In apartments, the walls are, as is correct, concrete or brick. Each material has its own preparation characteristics.
Concrete walls
The concrete must be leveled before laying the tiles.
- A visual assessment is first carried out and measurements are taken using a level.
- When irregularities are identified, their nature and parameters are determined.
- Before carrying out work, the walls are cleaned of dust and dirt.
- Plaster is used directly for leveling in case of pronounced differences. If the concrete is smooth, but there are cracks or potholes, putty is used. If the difference is more than 5 cm, drywall is used for leveling.
- Next, the walls are primed to impart or enhance adhesive and waterproofing properties.
- After completing each stage of work, the coating must be given time to dry completely. The operational life of the masonry directly depends on the degree of readiness of each layer.
What is leveling plaster?
The technology for carrying out facing work requires careful preparation of the base. If the walls in the bathroom do not have strong differences in height, leveling plaster is performed as preparatory work. It is made from moisture-resistant mixtures. Special requirements are placed on the strength characteristics of leveling compounds. They are explained by the fact that the bathroom is often tiled with ceramic tiles. Any tile material glued to the wall creates a colossal load on the vertical surface. In addition, tile adhesive, when dry, has the ability to shrink. By contracting, it pulls the tiled module toward the center. The layer of leveling plaster should easily cope with such influences. If a poor-quality mixture is chosen, the tile will simply tear it off and fall to the floor along with a layer of plaster.
Preparation for installation
Before preparing foam blocks for tiles, you should evaluate the evenness of the wall surface. If the foam concrete laying was done correctly, practically no additional finishing is required. If there are significant irregularities, the contractor will have to do serious work preparing the base and plastering the foam block.
Since the foam block strongly absorbs moisture, it is ideal for wet rooms to waterproof the walls and ceiling.
Applying primer under plaster.
The next stage is priming the blocks. For this purpose, specialized materials are used, and a wide range of primers is available. When decorating bathrooms, it is worth additionally waterproofing the walls; in the kitchen such work is not required. Having finished with the preparation, they move directly to the question of whether it is necessary to plaster the foam block under the tiles - as a rule, they choose the option with plaster, which is more expensive, but also provides increased strength to the walls. Tile adhesive is quite suitable for these purposes. Having plastered the surface on which the tiles will be laid, proceed to the main part of the work.
What should be the choice
Do you know whether walls are plastered under tiles, but what materials are used for this work? The choice of putty mixture is associated with the following features:
- constant level of high humidity and frequent contact with water;
- high probability of fungus formation and the development of other harmful organisms;
- choosing a material that is not prone to shrinkage;
- environmental safety of the material;
- presence of temperature changes.
Not every material meets these requirements. Of the entire range of plaster mixtures, only two options suit us: cement and gypsum plaster. It is these that we will consider in detail. So, how to plaster the walls in the bathroom under tiles, let's look for the ideal option for you.
Cement based plaster
This material is not afraid of moisture and even direct contact with water. It is not surprising that this option is chosen for baths and outdoor work. The binding component is Portland cement or white cement. Sand is also used, which differs in grain size. Plasticizers/additives are also added to such mixtures, which significantly increases performance characteristics.
Cement plasters are valued for their plasticity, adhesion and immunity to moisture. Such materials are often created independently, which allows you to save some money. To get high-quality cement plaster, you need to combine one part of cement (M400, M500) and sifted fine sand. Add 3 tablespoons of any detergent to a bucket of solution. Such an additive will make the mixture plastic, but at the same time it will shrink and increase the drying time.
If you nevertheless decide to buy a ready-made composition, then our brief review of popular brands will be very helpful. So, what plaster should be used to plaster the walls under the tiles so that the result does not become a complete disappointment.
- EK TT30 is based on gray cement. The mixture is plastic, durable, not afraid of moisture, does not crack and is not subject to shrinkage. Various types of surfaces can be used as a working base: concrete, brick, aerated concrete, cement. The layer can have a thickness from 8 mm to 3 cm. The solution is mixed for 2 hours, and the time for complete drying is 24 hours.
- IVSIL THINER is created on a cement-lime base with the addition of polymers. Very well suited for leveling any type of surface. Valued for excellent ductility and adhesion. The layer thickness starts at 5 mm, but cannot exceed 2 cm. Requires application for 3 hours, dries in 24 hours.
- Profit Hydrophobe has a cement base with an average grain size. This plaster repels water, adheres well to various surfaces and pleases the user with its plasticity. The finished solution must be used within 3 hours. Only after 20 days will the plaster be as strong as possible, as intended by the manufacturer.
- Ceresit CR 65 is well known in the construction market. The composition contains polymers; the material is not affected by water, alkalis and salts. Working with this solution is easy even for a beginner. There are restrictions for working with gypsum surfaces. After application, you will have to wait three days until the material dries.
- Consolit 540 is created on the basis of non-shrink Portland cement, lime and polymer additives. The coating is not afraid of water, does not crack and exhibits high adhesion. A couple of hours are given to consume the finished solution, and it dries within a week.
Do you know what plaster to use to plaster walls under tiles if cement materials are preferred. But don’t rush to go to the store, because there are still gypsum mixtures that can now be used in rooms with high humidity.
Gypsum based plaster
Previously, such materials were used exclusively in dry rooms. Modern manufacturers have begun to change the composition of gypsum plaster, making it resistant to high humidity. This effect is achieved thanks to additives and modifiers. Gypsum materials are valued for their high plasticity, easy application and excellent adhesion, which remains at a high level regardless of the type of working surface.
For a bathroom, of course, you need to choose waterproof materials, but even in this case, direct exposure to water is extremely undesirable. The use of such mixtures is advisable in the following cases:
- leveling surfaces in bathrooms and kitchen spaces;
- in bathrooms with shower;
- in rooms with high-quality ventilation that works flawlessly.
Gypsum plaster is not as durable as cement plaster. This means that it cannot be used for large, thick tiles. Such a load will cause the tiles to lag along with the plaster. But thin tiles adhere perfectly to such material. The only condition is double priming of the plastered surface before applying the adhesive.
Have you decided to choose this particular material? So you need to know what is the best way to plaster bathroom walls under tiles. Let's choose a brand.
- Knauf Rotband has polymer additives in its composition, which provide an excellent level of adhesion and equally good ductility. This material can be used on any surface in rooms with high humidity. It is necessary to use up the prepared solution in 20 minutes, which for an inexperienced person will be a problem at first. It will take a week to dry.
- UNIS Teplon resists moisture well, does not shrink, is easy to apply, and does not crack. An hour of time is allotted for using the solution, which is a good indicator for gypsum plaster.
- VOLMA-Plast tolerates high humidity conditions well. This option is best suited for leveling brick, concrete and gypsum board surfaces. An hour is given to consume the finished mixture, final drying is achieved after a week.
You know how to plaster bathroom walls under tiles; we have paid enough attention to this issue. This means that you can move on to practical guidance.
What kind of plaster can tiles be laid on?
Option No. 1: gypsum and lime
Gypsum and lime plaster mixtures are generally not recommended for use in kitchens, bathrooms, swimming pools and other wet areas. As a base for laying tiles in any room, plaster or lime plaster is also not the best option. If, nevertheless, this particular material was used to level the walls, then it can be left. But you need to prime the surface well with a deep penetration compound.
The primer helps:
- increase adhesion;
- increase the strength of the coating;
- create a water-repellent film;
- reduce porosity;
- prevent the appearance of fungus and other bacteria.
The primer is applied in two or three layers. The last layer is recommended to be made of a waterproofing primer.
To glue tiles to gypsum and lime plaster, it is recommended to use a special tile adhesive.
It is recommended to additionally reinforce the surface covered with lime-based plaster mixture with a metal mesh. To do this, after applying two layers of primer and drying them, coat the walls with tile adhesive. Place a mesh on the dried glue and prime it again.
Let's highlight the important points: wait for the plaster to dry completely; use a primer; lay the tiles with high-adhesion adhesive.
Option No. 2: cement-sand mortar
In rooms with high humidity and frequent temperature changes, where tiles are most often used for finishing, walls are usually plastered with cement-sand mixtures. It is difficult to prepare plaster of the required quality without experience. Therefore, it is better to purchase a ready-made one, already with the selected composition, and simply mix it with water according to the instructions.
Advantages of sand-cement plaster: strength and moisture resistance.
Disadvantages: it takes a long time to dry and gain strength, cracks are possible.
To prepare the solution yourself you will need :
- cement M400 or M500;
- purified sand of medium fraction;
- plasticizer
Cement and sand are mixed in the following proportion: for 1 part M400 cement, 4 parts sand (for 1 part M500 cement, take 5 parts sand). The less sand in the mixture, the stronger the coating. The plasticizer increases the elasticity of the solution and simplifies application. It is added to the mixture in the amount specified in the manufacturer's instructions. Instead of a professional plasticizer, detergent or washing powder is often used.
By the way, when plastering aerated concrete with cement-sand mortar before laying tiles, you don’t have to worry about reducing the vapor permeability of the blocks. All the same, the tiles will completely protect the aerated concrete from moisture.
Option #3: tile adhesive
Instead of the usual plaster mixture under tiles or porcelain stoneware, you can use any tile adhesive or screed mortar. The main advantage that is obtained in this case is an increase in the strength of the leveling layer with the same or less thickness.
But application is much more difficult due to the fact that the mixture flows and does not stay in one plane. Mortar overflows can be reduced by adding a cement-sand mixture to the tile adhesive. However, even when using beacons, you can detect unevenness in the set layer of plaster. After complete drying, the wall is checked using the rule and the protruding areas are leveled with a float.
Overall this is a good option and is often used.
How long should plaster dry before laying tiles?
How quickly the plaster layer dries depends not only on its composition, but also on the base on which it is applied, as well as the thickness of the plaster. Brick and concrete walls have low vapor permeability, while aerated concrete or wooden walls remove moisture well. In addition, how long the plaster should dry depends on the additives added by the manufacturer, and these indicators may vary. Here are some examples:
- Gypsum plaster
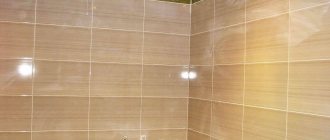
How to plaster the walls in the bathroom?
First of all, the walls need to be treated with a hydrophobic primer. This composition will strengthen the adhesion of the wall to the plaster and will be a barrier to the development of fungi and bacteria, which are precisely what form in a humid environment. One of the common hydrophobic primers is Ceresit CT 17.
The selection of plaster depends on the material of the rough base. For plastering concrete and brick walls, it is advisable to give preference to moisture-resistant cement compositions, such as Knauf Unterputz. If it is laid out from gypsum blocks, then the mixture should be gypsum.
Preparing a wall for laying tiles using putty
Assessment of differences and irregularities on the wall plane
Checking the surface for differences.
Before you begin leveling the surface and purchasing material, you first need to carry out assessment work. This will require either a long level (about 2 m) or beacons.
The process of determining unevenness using plumb lines consists of the following steps:
- First, in one of the corners you need to drive a nail, which will serve as the first beacon, not completely.
- Next, any weight (for example, a nut) is attached to it on a thread so that it rises several cm above the floor.
- After this, when the thread stops oscillating, it needs to be tightened, as a result of which it forms a straight line. Then at the bottom point you need to drive in another nail, the head of which should be located in line with the thread.
- You need to do the same thing on the other side of the wall. The result will be 2 vertical lines.
- After this, in the same way, using stretched threads, diagonal lines are drawn - from the top nail to the bottom one, located on the opposite side. Thus, using this method, all the irregularities on the wall will become visible. The size of the differences can be determined by the distance between the threads and the wall.
The process of installing beacons.
Note! To the question of whether it is necessary to putty the walls under the tiles if large differences are found on the surface (more than 20 mm), one can definitely give a negative answer, since in this case it is more advisable to use drywall. The only thing is that to seal the seams on the plasterboard surface, you can use a suitable putty, when choosing which for the tile you also need to follow the criteria described above.
Leveling large uneven walls with slabs
Separate moisture-resistant plasterboard boards are the cheapest finishing option, but not the only one. Other materials are also suitable. The strength of new floors increases if more profiles are added. Plates with cement and shavings have a number of disadvantages:
- The problem cannot be solved without an assistant due to the large weight of the slabs;
- Difficult material processing. High fragility;
- Expensive.
Plaster mixtures that have a cement base, when hardened, form durable, hard coatings. This material holds ceramic cladding without problems. Cracks are sealed in advance using special compounds. Areas of bricks with a loose or crumbling surface are removed. They are also sealed up. The time it takes for the composition to set is very convenient - 40-50 minutes. Water repellents are added where high humidity persists. Their instructions are provided additionally by the manufacturers.
Plaster mixtures that have a cement base, when hardened, form durable, hard coatings.
What plaster to plaster uneven walls
Ready mixes will be too expensive if the gaps are large enough. A profitable solution is to purchase cement-sand products. You can make it yourself using traditional technologies. You just need to make sure that the sand is sifted and that the ratio between the components is correct.
A common practice with sheet materials. An example is drywall.
A profitable solution is to purchase cement-sand products.
How to level walls using drywall
Screws or direct fastening to walls is a fastening method with maximum spread. The frame is based on wooden beams or galvanized metal profiles. The latter option has its disadvantages:
- Installation in small pieces in places where pipes exit.
- The likelihood of sheets bending where the differences are large.
- If the corners are severely obstructed, their geometry is almost impossible to correct. It will be more difficult to level.
More often they give preference to false panels, in the form of a full-fledged gypsum plasterboard system:
- Serpyanka tape, reinforcing each joint;
- Waterproof plasterboard, with horizontal seams;
- Horizontal jumpers forming stiffening ribs;
- 0.6-meter pitch of rack profiles. A good option to process the product;
- Guide profiles as a complement for floors with ceilings.
Self-tapping screws are needed so that the drywall forms a strong connection on the vertical lintels and horizontal racks. The heads of the hardware are slightly recessed, then everything is covered with plaster. Coating and painting compounds are used for the last stage, when the room is almost ready.
Screws or direct fastening to walls is a fastening method with maximum spread.
Advantages of drywall as a basis for laying tiles
Drywall sheets are great for tiling on top in many ways because of their smooth surfaces. The material is installed in rooms for different purposes. Application will provide the following benefits for owners:
- Decorative.
- Easy processing and installation.
- Multifunctionality.
- Versatility.
The material is easy to use and remains absolutely safe. You just need to choose an increased coefficient of moisture protection. Then the surface remains even, there are no adjustments to the main walls, including when using a solution.
Drywall sheets are great for tiling on top in many ways because of their smooth surfaces.
When do walls need to be plastered?
Master finishers know for sure that the base for the tiles should be level, without significant differences. Whereas to non-specialists any surface without noticeable defects may seem like this. You must understand that even if the walls are plastered or made of outwardly smooth concrete slabs, this does not mean that they are ready for cladding.
Mass construction with machine plastering does not involve leveling the surface. Beacons are not used here, which means that height differences can reach several tens of millimeters. This is a lot and will be very noticeable, for example, in corners where the cladding simply “does not fit” or at the junction of the edge of the bathtub and the wall.
Concrete slabs are rarely aligned strictly vertically. Often they are “filled up” by at least 10-20 mm. According to building regulations, this is a completely acceptable error, but for finishers it is too much. Thus, it turns out that alignment is necessary. To verify this, it is enough to take measurements by attaching a long rule to the base. If the differences are more than 2-3 mm per linear meter, you will have to level the surface before gluing tiles onto it.
Sometimes you can hear that unevenness in the base can be leveled out using tile adhesive. Indeed, by adjusting the thickness of the solution layer, you can level the base. But this should only be done for very minor differences. Firstly, leveling with glue increases its consumption, and this is not cheap. Secondly, the cladding laid on a thick layer of tile mixture will “float” and will not hold firmly enough. There is a high probability that it will fall off quickly.